
1. Introduction
This manual provides detailed instructions for the setup, operation, and maintenance of your Yunseity Solar Trail Camera. Designed for outdoor surveillance, wildlife monitoring, and home security, this camera features 4K video recording, 50MP photos, night vision capabilities, and an integrated solar panel for extended operation. Please read this manual thoroughly before using the camera to ensure proper function and longevity.

Image 1.1: Front view of the Yunseity Solar Trail Camera, showcasing its camouflage design and integrated solar panel.
2. Package Contents
Please check the package contents to ensure all items are present:
- Yunseity Solar Trail Camera (1)
- Mounting Strap (1)
- USB Type-C Cable (1)
- User Manual (1)

Image 2.1: The Yunseity Solar Trail Camera shown with its included mounting strap and USB Type-C cable.
3. Product Overview
3.1 Camera Components (Front View)
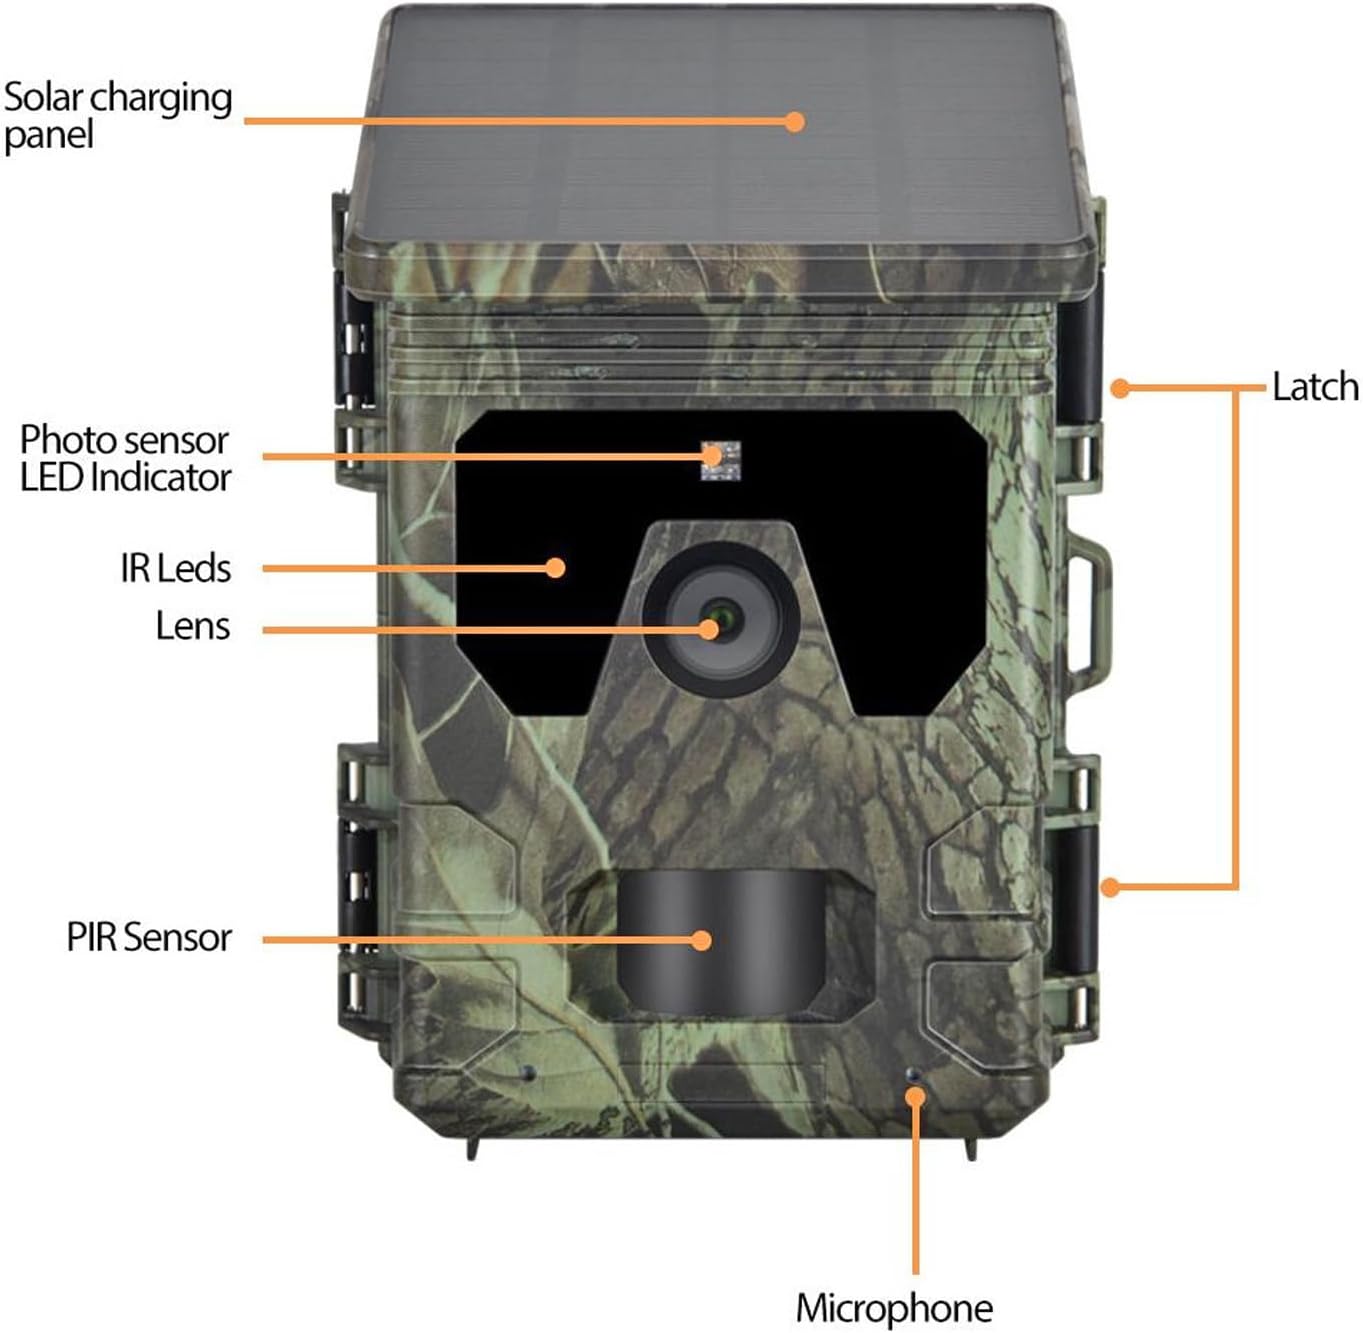
Image 3.1: Detailed front view of the camera, highlighting the solar charging panel, photo sensor LED indicator, IR LEDs, lens, PIR sensor, microphone, and latches.
- Solar Charging Panel: Charges the internal battery.
- Photo Sensor LED Indicator: Indicates camera status.
- IR LEDs: Infrared emitters for night vision.
- Lens: Captures images and videos.
- PIR Sensor: Passive Infrared sensor for motion detection.
- Microphone: Records audio with video.
- Latches: Secure the camera housing.
3.2 Camera Components (Bottom View & Internal)

Image 3.2: Bottom view of the camera, showing the USB Type-C port for data transfer and charging.

Image 3.3: Internal view of the camera, displaying the AA battery compartment, mode switch (OFF/SETUP/ON), LCD screen, and control buttons (Menu, WiFi/Up, Video Mode/Right, Photo Mode/Left, Playback/Down, OK Button).
- AA Battery Compartment: For optional AA batteries (not included).
- Mode Switch: Selects OFF, SETUP, or ON modes.
- LCD Screen: Displays menu, settings, and playback.
- Control Buttons: Navigation and selection within the menu.
- USB Port (Type-C): For connecting to a computer or external power.
4. Setup
4.1 Powering the Camera
The camera is primarily powered by its integrated solar panel and internal rechargeable battery. For initial setup or extended use in low-light conditions, you may install optional AA batteries.
- Internal Battery: The camera has a built-in 4400mAh lithium battery, charged by the solar panel. Ensure the solar panel is exposed to direct sunlight for optimal charging.
- Optional AA Batteries: Open the camera housing using the latches. Locate the AA battery compartment (refer to Image 3.3). Insert 4 or 8 new AA batteries (not included), observing correct polarity.
4.2 Inserting a Memory Card
A Micro SD card (up to 256GB, not included) is required to store photos and videos.
- Open the camera housing.
- Locate the Micro SD card slot.
- Insert the Micro SD card with the contacts facing down until it clicks into place.
- To remove, press the card gently until it springs out.
4.3 Initial Configuration
- Switch to SETUP Mode: Move the mode switch from OFF to SETUP. The LCD screen will turn on.
- Format SD Card: It is recommended to format the Micro SD card before first use. Navigate to the "Format" option in the menu and confirm. This will erase all data on the card.
- Set Date and Time: Navigate to the "Date/Time" setting in the menu to set the correct date and time. This is crucial for accurate timestamps on your recordings.
- Adjust Settings: Configure desired settings such as photo resolution (up to 50MP), video resolution (up to 4K), detection sensitivity, and recording mode (photo, video, or photo+video).
4.4 Mounting the Camera
Use the included mounting strap to secure the camera to a tree or pole.
- Thread the strap through the slots on the back of the camera.
- Wrap the strap around the desired mounting object.
- Secure the strap tightly.
- Adjust the camera angle to cover the desired area. Ensure the solar panel is exposed to direct sunlight if possible.
5. Operating Instructions
5.1 Switching to ON Mode
After configuring settings in SETUP mode, move the mode switch to the ON position. The camera will enter monitoring mode. The indicator light will flash for a few seconds and then turn off, indicating the camera is actively monitoring.
5.2 Motion Detection and Recording
The camera uses a PIR sensor to detect motion. When motion is detected, the camera will automatically capture photos or record videos according to your settings.

Image 5.1: Illustration of the camera's fast 0.3-second trigger speed, capturing a bird in flight.
- Trigger Speed: The camera boasts a rapid 0.3-second trigger speed to capture fast-moving subjects.
- Night Vision: Equipped with 2 850nm infrared LEDs, the camera provides clear black and white images/videos up to 65 feet in complete darkness. Color images are captured during daylight.

Image 5.2: Example images showing a deer in daylight (color) and a deer at night (black and white) captured by the camera's night vision.

Image 5.3: Depiction of the camera's night vision capability, showing a tiger in a dark forest environment with infrared illumination.
5.3 Viewing Photos and Videos
- On Camera: Switch the camera to SETUP mode. Use the Playback/Down button to enter playback mode. Use the navigation buttons to scroll through files. Press OK to view a photo or play a video.
- On Computer: Connect the camera to your computer using the USB Type-C cable, or remove the Micro SD card and insert it into a card reader. The camera/card will appear as a removable disk. Navigate to the DCIM folder to access your media files.
5.4 Loop Recording
The camera supports loop recording. When the Micro SD card is full, the camera will automatically overwrite the oldest files to continue recording new events. This ensures continuous operation without manual intervention, provided the feature is enabled in the settings.
6. Maintenance
6.1 Cleaning
- Lens and Solar Panel: Gently wipe the camera lens and solar panel with a soft, dry cloth to remove dust, dirt, or water spots. Avoid abrasive materials that could scratch the surfaces.
- Camera Body: Clean the camera body with a damp cloth. Do not use harsh chemicals or solvents.
6.2 Battery Management
- Solar Charging: Ensure the solar panel is unobstructed and receives adequate sunlight for optimal charging of the internal battery.
- AA Batteries: If using AA batteries, check their charge level periodically, especially in low-light environments or during prolonged use without sufficient solar charging. Replace all AA batteries at the same time.
6.3 Storage Card Management
- Regularly back up important files from your Micro SD card to a computer.
- Format the Micro SD card periodically (e.g., once a month) to maintain optimal performance and prevent data corruption.
6.4 Waterproofing
The camera has an IP65 waterproof rating, protecting it from rain and dust. Ensure the latches are securely closed and the USB port cover is properly sealed to maintain its waterproof integrity.

Image 6.1: The camera shown outdoors in rainy conditions, illustrating its IP65 waterproof and dustproof design.

Image 6.2: The camera positioned near water, emphasizing its IP65 waterproof capability against rain and sand.
7. Troubleshooting
- Camera Not Turning On:
- Ensure the mode switch is in SETUP or ON position.
- Check if the internal battery has charge. Expose the solar panel to sunlight or connect via USB.
- If using AA batteries, ensure they are inserted correctly and are not depleted.
- Poor Image/Video Quality:
- Clean the camera lens.
- Ensure the camera is stable and not vibrating.
- Check resolution settings in SETUP mode.
- For night vision, ensure there are no obstructions in front of the IR LEDs.
- No Motion Detection:
- Ensure the PIR sensor is clean and unobstructed.
- Adjust PIR sensitivity settings in SETUP mode.
- Verify the camera is in ON mode.
- Test the detection range and angle.
- SD Card Error:
- Ensure the Micro SD card is inserted correctly.
- Format the Micro SD card in the camera's SETUP menu.
- Try a different, known-good Micro SD card.
- Ensure the card is not full (though loop recording should prevent this).
- Short Battery Life:
- Ensure the solar panel receives sufficient direct sunlight.
- Reduce video length or photo burst settings.
- Lower PIR sensitivity if false triggers are frequent.
- Consider using high-quality AA batteries for backup power.
8. Specifications
| Feature | Specification |
|---|---|
| Brand | Yunseity |
| Model Name | Yunseity2a71bvhcte |
| Video Capture Resolution | 4K |
| Effective Still Resolution | 50 MP (interpolated from 5MP sensor) |
| Photo Sensor Technology | CMOS |
| Night Vision | 2 x 850nm IR LEDs, up to 65 feet |
| Trigger Speed | 0.3 seconds |
| International Protection Rating | IP65 (Waterproof & Dustproof) |
| Power Source | Solar Powered (integrated 4400mAh li-battery) / Optional AA Batteries |
| Storage | Micro SD card up to 256GB (not included) |
| Connectivity Protocol | Wi-Fi (for smartphone connection) |
| Video Capture Format | MOV |
| Alert Type | Motion Only |
| Recommended Uses | Game & Trail, Hunting, Wildlife Monitoring, Home Security |
| Item Weight | 1.18 pounds |
| Package Dimensions | 6.69 x 4.72 x 4.72 inches |
9. Warranty and Support
Yunseity products are designed for reliability and performance. For warranty information, technical support, or service inquiries, please refer to the contact information provided on the official Yunseity website or your purchase documentation. Please retain your proof of purchase for warranty claims.