1. Introduction
This manual provides detailed instructions for the installation, operation, and maintenance of your MUSETEX Y6 ATX PC Case. Designed for optimal airflow and aesthetic appeal, the Y6 features a 270° full-view tempered glass panel and comes with six pre-installed PWM ARGB fans. Please read this manual thoroughly before beginning installation to ensure proper setup and safe operation.
2. Safety Information
Always handle the tempered glass panels with care to prevent breakage. Ensure all power is disconnected from your system before installing or removing components. Keep small parts away from children. Do not attempt to modify the case structure, as this may void your warranty and pose a safety risk.
3. Package Contents
- MUSETEX Y6 ATX PC Case (White)
- 6 x Pre-installed PWM ARGB Fans
- Accessory Box (Screws, zip ties, etc.)
- User Manual (This document)
4. Setup and Installation
4.1 Removing Panels
The MUSETEX Y6 features quick-remove snap-on panels for easy access during installation. Gently pull the tempered glass side panel and the rear metal panel to detach them. This tool-less design simplifies component installation.

Figure 4.1: Quick-remove snap-on panels for easy access.
4.2 Motherboard Installation
The Y6 case supports ATX, M-ATX, and ITX motherboards. Align your motherboard with the standoffs inside the case and secure it with the provided screws. Ensure all I/O ports align correctly with the rear panel opening.

Figure 4.2: Motherboard compatibility and installation area.
4.3 Power Supply Unit (PSU) Installation
The case supports PSUs up to 200mm in length. Install your power supply into the dedicated compartment at the bottom rear of the case. Secure it with screws from the rear of the case.

Figure 4.3: PSU installation area.
4.4 Storage Drive Installation
The Y6 case provides support for 3x 2.5" SSDs and 2x 3.5" HDDs. Utilize the designated mounting points and drive cages for secure installation of your storage devices.

Figure 4.4: Storage drive mounting locations.
4.5 Graphics Card (GPU) Installation
The case supports horizontal GPU mounting up to 400mm (15.75 inches) in length. Carefully insert your graphics card into the PCIe slot on your motherboard and secure it with the retention clip and screws.

Figure 4.5: Graphics card installation area.
4.6 Fan and Radiator Installation
The Y6 comes with six pre-installed PWM ARGB fans. The case supports various fan and radiator configurations:
- Top: 3x 120mm or 2x 140mm fans; Radiator support: 360mm/280mm/240mm
- Rear: 1x 120mm or 1x 140mm fan
- Bottom: 3x 120mm or 2x 140mm fans
- Side: 2x 120mm fans; Radiator support: 240mm/120mm
The pre-installed side fans feature a unique reverse-blade intake design for improved aesthetics and airflow. Ensure all fan cables are properly connected to your motherboard's fan headers and ARGB headers (3-pin +5V D-GND connector) for lighting control.

Figure 4.6: High-performance airflow design with pre-installed fans.
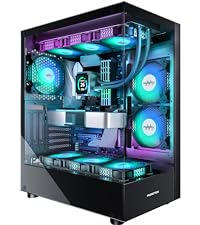
Figure 4.7: ARGB fan connection to motherboard.
4.7 Front I/O Panel Connections
Connect the front panel cables (Power, Reset, HD Audio, USB 2.0, USB 3.0, Type-C/USB 3.2) to the corresponding headers on your motherboard. The Type-C/USB 3.2 port offers speeds up to 10 Gbps.

Figure 4.8: Front I/O panel and connections.
5. Operating Instructions
5.1 Powering On
Once all components are securely installed and connected, close the side panels. Connect your monitor, keyboard, mouse, and power cable. Press the power button on the front I/O panel to start your system.
5.2 ARGB Lighting Control
The pre-installed ARGB fans can be controlled via your motherboard's ARGB software (e.g., ASUS Aura Sync, MSI Mystic Light Sync, GIGABYTE RGB Fusion, ASRock Polychrome RGB). Install the appropriate software for your motherboard to customize lighting effects and colors.

Figure 5.1: ARGB lighting customization via motherboard software.
5.3 Fan Speed Control
The PWM fans allow for dynamic speed control based on system temperature. This can be managed through your motherboard's BIOS settings or dedicated fan control software provided by your motherboard manufacturer.
6. Maintenance
6.1 Cleaning Dust Filters
The MUSETEX Y6 case includes magnetic dust filters on the top and a removable filter at the bottom (for the PSU intake). Regularly clean these filters to maintain optimal airflow and prevent dust buildup inside your PC. Simply remove the filters, clean them with water or a soft brush, and reattach them once dry.

Figure 6.1: Magnetic dust filters for easy cleaning.
6.2 General Cleaning
Use a soft, dry cloth to wipe down the exterior of the case. For tempered glass panels, a glass cleaner can be used, applied to the cloth first, not directly to the glass. Avoid abrasive cleaners or solvents.
7. Troubleshooting
- No Power: Ensure the PSU is switched on and all power cables (24-pin ATX, 8-pin CPU, GPU power) are securely connected. Check front panel power button connection to the motherboard.
- Fans Not Spinning/Lighting Up: Verify that all fan PWM and ARGB cables are correctly connected to the motherboard headers. Check motherboard BIOS settings for fan control. Ensure ARGB software is installed and configured.
- USB Ports Not Working: Check if the USB 2.0, USB 3.0, and Type-C front panel headers are correctly connected to your motherboard.
- Poor Airflow/High Temperatures: Ensure dust filters are clean. Verify fan orientation (intake/exhaust) for optimal airflow. Check CPU cooler and GPU fan operation.
8. Specifications
| Feature | Specification |
|---|---|
| Brand | MUSETEX |
| Model Name | Y6 |
| Case Type | Mid Tower |
| Motherboard Compatibility | ATX, M-ATX, ITX |
| Dimensions (L x W x H) | 42 x 29.5 x 36.8 cm |
| Weight | 6.7 Kilograms |
| Material | Tempered Glass, Metal |
| Pre-installed Fans | 6 x PWM ARGB Fans |
| Max GPU Length | 400mm (15.75") |
| Max CPU Cooler Height | 176mm |
| Max PSU Length | 200mm |
| Radiator Support (Top) | 360mm/280mm/240mm |
| Radiator Support (Side) | 240mm/120mm |
| Front I/O Ports | USB 3.2 Type-C (10Gbps), USB 3.0 x2, USB 2.0 x2, HD Audio, Power, Reset |
9. Official Product Video
Video 9.1: An official product video showcasing the MUSETEX Y6 PC Case, its features, and aesthetic appeal, including the 270° full-view tempered glass design, pre-installed ARGB fans, and internal component layout.
10. Warranty and Support
MUSETEX products come with a standard manufacturer's warranty. For specific warranty terms and conditions, please refer to the warranty card included with your product or visit the official MUSETEX website. For technical support, troubleshooting assistance, or replacement parts, please contact MUSETEX customer service through their official channels.