1. Introduction
This manual provides comprehensive instructions for the installation, operation, and maintenance of your Nunoo Android 12 Car Stereo. Please read this manual thoroughly before installation and use to ensure proper function and safety. This unit is specifically designed for Ford F-150 models manufactured between 2009 and 2012.
Vehicle Compatibility
This car stereo is compatible with Ford F-150 models from 2009 to 2012. It is designed to fit specific center console configurations. Please review the images below to confirm compatibility with your vehicle's dashboard.

Figure 1.1: Examples of compatible Ford F-150 center consoles.

Figure 1.2: Examples of incompatible Ford F-150 center consoles. This unit does not fit if your OEM radio has a NAVI screen or two holes on top.
2. What's in the Box
Verify that all components are present before beginning installation:
- Car Radio (1280*720) with Frame x1
- User Manual x1
- Cleaning Cloth x1
- Power Cord x1
- USB 4Pin Cable x1
- USB 6Pin Cable x1
- GPS Antenna x1
- AHD 1080P Rear View Camera x1

Figure 2.1: Overview of the Nunoo Car Stereo package contents.

Figure 2.2: Detailed view of all cables, the head unit, and the frame.
3. Setup and Installation
Professional installation is recommended. Ensure the vehicle's battery is disconnected before starting installation.
Pre-Installation Checklist:
- Confirm vehicle compatibility (Ford F-150 2009-2012).
- Gather necessary tools (panel removal tools, screwdrivers, wire strippers/crimpers).
- Disconnect the negative terminal of the car battery.
Installation Steps:
- Carefully remove the factory radio and dashboard trim using appropriate panel removal tools.
- Disconnect all wiring harnesses from the original radio.
- Connect the provided power cord and other necessary cables (USB, GPS antenna, rear view camera) to the new Nunoo car stereo. Refer to the wiring diagram below.
- Install the new car stereo unit into the dashboard opening, ensuring all connections are secure.
- Reinstall the dashboard trim and secure all components.
- Reconnect the vehicle's battery.
- Power on the unit and perform initial setup and testing.

Figure 3.1: Wiring diagram for connecting the car stereo and its components.
Video 3.1: Demonstration of touch button settings and calibration. This video shows how to configure the touch keys on the unit's panel.
4. Operating Instructions
4.1 Wireless CarPlay and Android Auto
The unit supports both wireless CarPlay and Android Auto for seamless smartphone integration. Connect your compatible smartphone wirelessly to access navigation, make calls, send messages, and play music directly from your phone's interface on the car stereo screen.

Figure 4.1: Wireless CarPlay and Android Auto interfaces displayed on the unit.

Figure 4.2: Overview of wireless connectivity options including CarPlay, Android Auto, and Mirror Link.
4.2 Radio Functions (AM/FM/RDS)
Access the built-in AM/FM radio tuner. The Radio Data System (RDS) provides additional information such as station name and song title where available. You can save your favorite stations for quick access.
Video 4.1: Demonstration of setting the car logo. This video shows how to customize the boot logo of the car stereo.

Figure 4.3: Interface for radio tuning and sound adjustments.
4.3 Bluetooth Connectivity
Utilize Bluetooth 5.4 technology for hands-free calling and audio streaming. Pair your smartphone to make and receive calls directly through the car stereo and play music from your device.

Figure 4.4: Bluetooth hands-free calling interface.
4.4 Audio Settings (EQ & Subwoofer)
Customize your audio experience with the 32-band equalizer. Adjust sound frequencies to match your preferences. The unit also supports subwoofer output for enhanced bass.
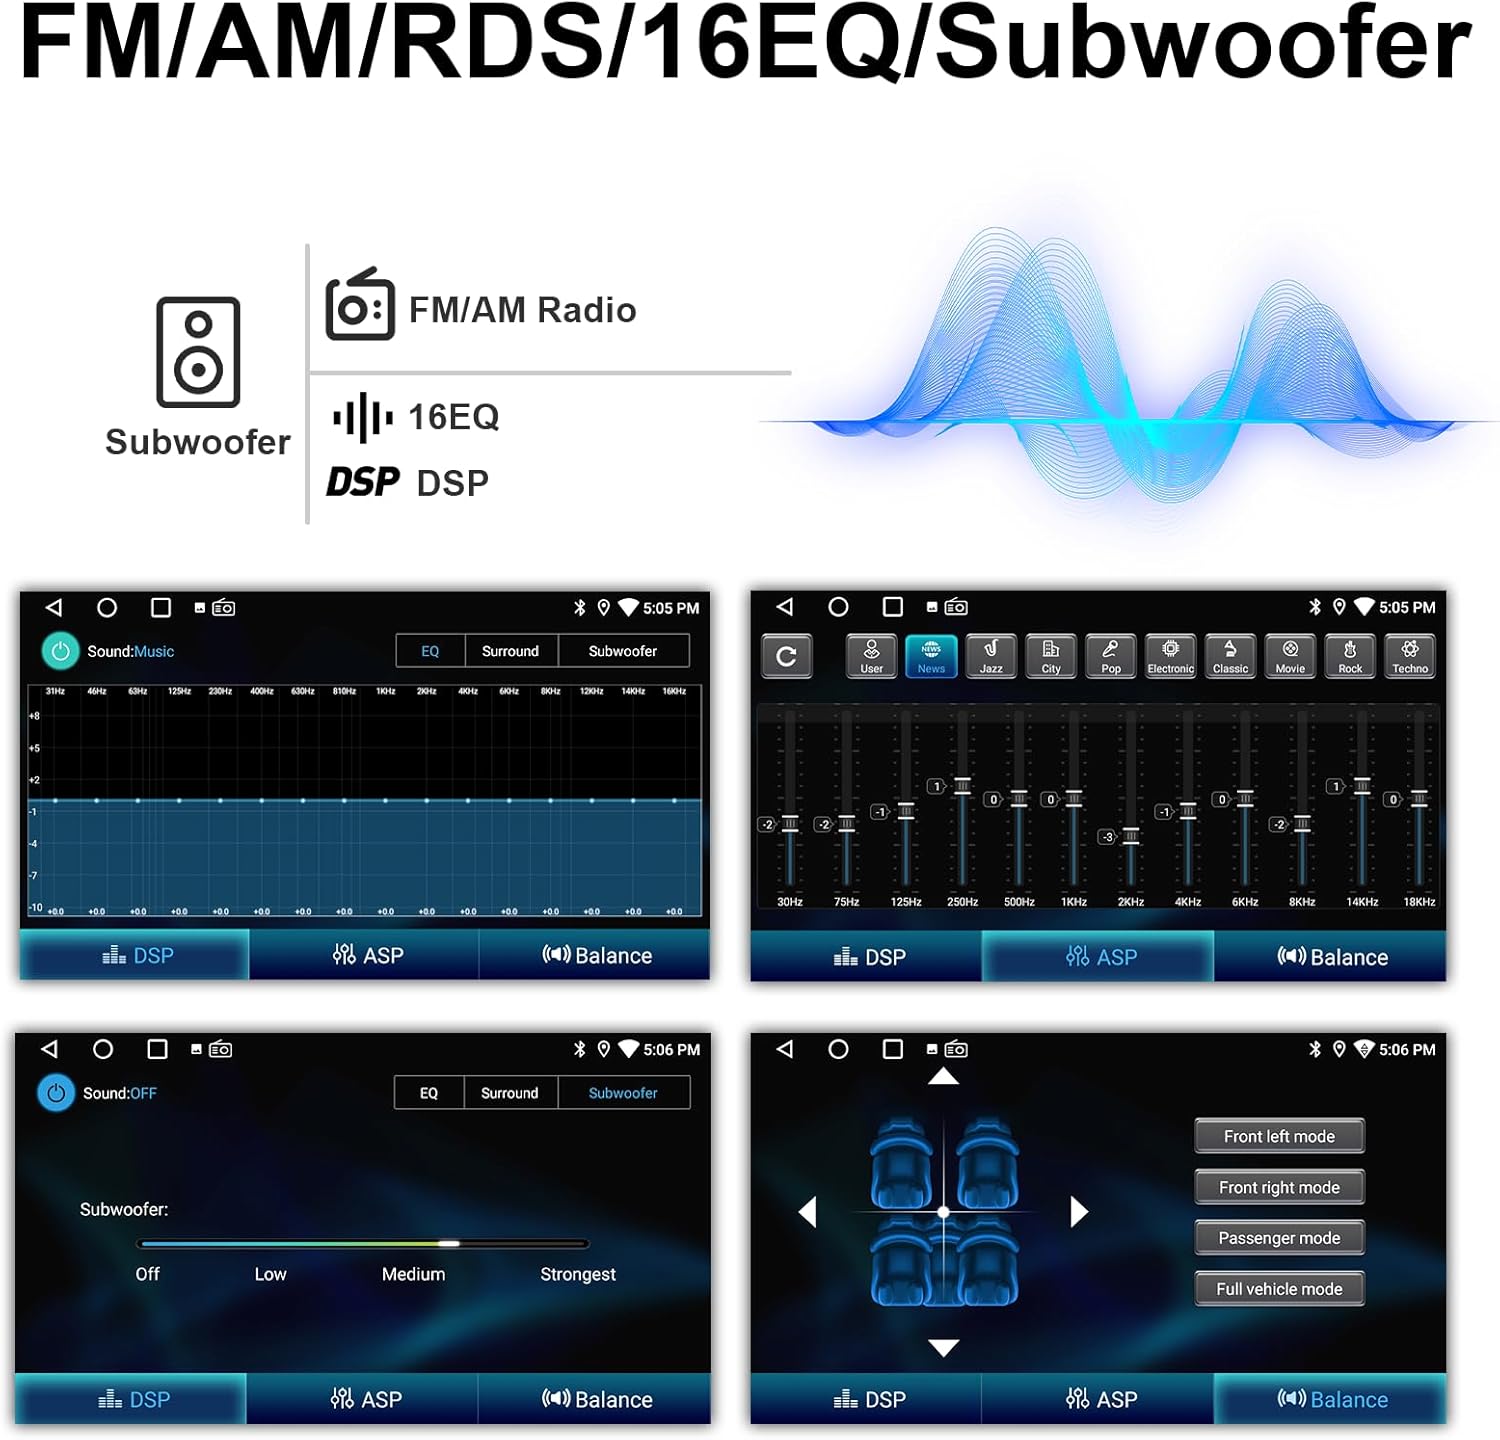
Figure 4.5: Detailed view of the 32-band equalizer and subwoofer controls.
4.5 Navigation & Apps
Connect to Wi-Fi to use online navigation apps or download offline maps. The Android 12 operating system allows you to install various applications from the Google Play Store, including streaming services and productivity tools.

Figure 4.6: Navigation and app display on the car stereo.
4.6 Steering Wheel Controls (SWC)
The unit retains factory steering wheel controls, allowing you to manage audio, calls, and other functions without taking your hands off the wheel.

Figure 4.7: Integration of OEM steering wheel controls with the car stereo.
4.7 Backup Camera
The system supports AHD night vision rear camera input, enhancing parking safety and efficiency. A backup camera is included with the unit.

Figure 4.8: Backup camera display and features.
4.8 Display and UI Themes
The 9-inch 1280x720 HD IPS touchscreen offers clear visuals and responsive touch. You can customize the user interface with various desktop themes to personalize your experience.

Figure 4.9: Comparison of the 1280x720 IPS screen clarity.

Figure 4.10: Examples of customizable UI desktop themes.
Video 4.2: Demonstration of various car functions and settings. This video provides an overview of the stereo's capabilities.
5. Maintenance
To ensure the longevity and optimal performance of your Nunoo Car Stereo, follow these maintenance guidelines:
- Cleaning the Screen: Use the provided cleaning cloth or a soft, lint-free cloth to gently wipe the touchscreen. Avoid abrasive cleaners or harsh chemicals that could damage the display.
- Software Updates: Periodically check for software updates via the unit's settings menu to ensure you have the latest features and performance improvements.
- Environmental Conditions: Avoid exposing the unit to extreme temperatures, direct sunlight for prolonged periods, or excessive moisture.
- Cable Connections: Periodically check all cable connections to ensure they are secure and free from damage.
6. Troubleshooting
This section addresses common issues you might encounter with your car stereo. If you experience a problem not listed here, please contact customer support.
| Problem | Possible Cause | Solution |
|---|---|---|
| Unit does not power on. | Loose power connection, blown fuse, vehicle battery issue. | Check power cable connections. Inspect vehicle fuses. Ensure car battery is charged. |
| No sound or distorted audio. | Incorrect wiring, volume too low, EQ settings misconfigured. | Verify speaker wiring. Adjust volume levels. Reset EQ settings to default. |
| Touchscreen is unresponsive or glitching. | Software issue, calibration needed, temporary system error. | Restart the unit. Perform a touchscreen calibration (refer to operating instructions). If issues persist, a factory reset may be required. |
| Bluetooth connection issues. | Pairing mode not active, device out of range, interference. | Ensure Bluetooth is enabled on both devices and the unit is in pairing mode. Move devices closer. Try re-pairing. |
| GPS signal is weak or inaccurate. | GPS antenna improperly installed or obstructed. | Ensure the GPS antenna is mounted in a clear location with an unobstructed view of the sky. Check antenna connection. |
7. Specifications
| Feature | Detail |
|---|---|
| Operating System | Android 12 |
| CPU | 8-Core Processor |
| RAM | 4GB |
| ROM | 32GB |
| Screen Size | 9 Inches |
| Display Resolution | 1280 x 720 IPS |
| Connectivity | Bluetooth 5.4, Wi-Fi |
| Special Features | Wireless CarPlay, Android Auto, Mirror Link, GPS, AM/FM/RDS, 32-Band EQ, Subwoofer Output, Steering Wheel Control (SWC) |
| Included Camera | AHD 1080P Rear View Camera |
| Item Weight | 4.33 pounds |
| Package Dimensions | 16.54 x 13.43 x 4.8 inches |

Figure 7.1: Performance details of the 8-core processor and Android system.
8. Warranty and Support
Your Nunoo Car Stereo comes with the following:
- 30-Day Refund Policy: For returns within 30 days of purchase.
- 12-Month Replacement Warranty: Covers manufacturing defects for one year from the date of purchase.
- Lifetime Technical Support: Access to professional technical assistance for the lifespan of the product.
For installation assistance, technical support, or any inquiries, please contact Nunoo customer service. You can typically find contact information on the seller's storefront or by using the 'Ask a question' feature on the product page.

Figure 8.1: Guide on how to contact customer support for installation and technical assistance.