1. Introduction
This manual provides essential instructions for the safe and effective use of your IAQIYOPS replacement battery, compatible with Dreame P10 handheld cordless vacuum cleaners. Please read this manual thoroughly before installation and operation to ensure optimal performance and longevity of the product.
2. Safety Instructions
Observe the following safety precautions when handling the lithium-ion battery:
- Do not disassemble, strike, crush, or expose the battery to fire. Such actions can lead to explosion, fire, or leakage of hazardous substances.
- Do not leave the battery in a high-temperature environment. Exposure to excessive heat can damage the battery and pose a safety risk.
- Do not use the product if the battery shows signs of serious swelling. Swelling indicates internal damage and a potential safety hazard.
- Do not use the product if the battery is exposed to water. Water exposure can cause short circuits and damage the battery.
- Keep the battery away from children and pets.
- Dispose of used batteries according to local regulations. Do not dispose of with household waste.
3. Product Overview
The IAQIYOPS replacement battery is designed to provide power to compatible Dreame P10 handheld cordless vacuum cleaners. It features a robust casing and electrical connectors for seamless integration.
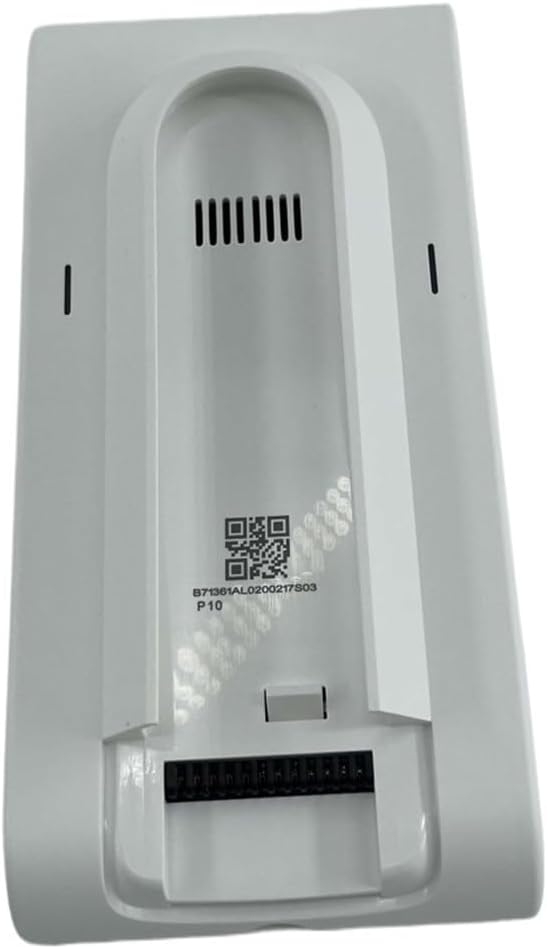
Image 3.1: Top view of the IAQIYOPS replacement battery, featuring ventilation slots and a QR code with 'P10' marking.

Image 3.2: Multiple views of the battery, illustrating its form factor and connection interface.
The battery pack may come with a protective storage bag, as shown below, to ensure its safety during transport or when not in use.

Image 3.3: The replacement battery alongside its optional protective storage bag.
4. Setup and Installation
This replacement battery is designed for easy installation and removal. Always ensure the vacuum cleaner is powered off and unplugged from any charging source before attempting to install or remove the battery.
4.1. Battery Installation
- Locate the battery compartment on your Dreame P10 handheld cordless vacuum cleaner. Refer to your vacuum cleaner's manual for specific instructions if needed.
- Align the battery with the compartment, ensuring the electrical contacts on the battery match the connectors in the vacuum cleaner.
- Gently push the battery into place until it clicks securely. Do not force the battery.
- Verify that the battery is firmly seated and does not wobble.
4.2. Battery Removal
- Ensure the vacuum cleaner is turned off.
- Locate any release buttons or latches for the battery compartment on your vacuum cleaner.
- Press the release mechanism and carefully slide the battery out of the compartment.
- Store the removed battery in a safe, dry place, ideally in a protective bag if available.
5. Operating Instructions
Once installed, the battery powers your vacuum cleaner. Refer to your Dreame P10 vacuum cleaner's manual for specific operating instructions.
5.1. Charging the Battery
The battery is charged when installed in the vacuum cleaner and connected to its original charger. Ensure you use only the charger provided with your Dreame P10 vacuum cleaner or a compatible replacement charger.
- Connect the vacuum cleaner to its charging adapter.
- Allow the battery to charge fully before first use and after each use for optimal performance.
- Do not leave the battery charging unattended for extended periods.
6. Maintenance
Proper maintenance ensures the longevity and efficiency of your battery.
6.1. Cleaning
- Periodically inspect the battery contacts and the vacuum cleaner's contacts for dust or debris.
- Use a dry, clean cloth or cotton swab to gently wipe the contacts if necessary. Do not use liquids or abrasive cleaners.
6.2. Storage
- If storing the battery for an extended period, ensure it is partially charged (around 50%) and stored in a cool, dry place, away from direct sunlight and extreme temperatures.
- Avoid storing fully charged or fully discharged batteries for long durations, as this can reduce battery life.
6.3. Replacement
Regular replacement of parts, including the battery, can help your vacuum cleaner maintain maximum efficiency over time. Replace the battery when you notice a significant decrease in run time or charging capacity.
7. Troubleshooting
If you encounter issues with your replacement battery, consider the following:
- Battery not charging: Ensure the battery is correctly installed, the vacuum cleaner is properly connected to its charger, and the power outlet is functional. Check for any visible damage to the charger or vacuum cleaner's charging port.
- Reduced run time: This is a normal sign of battery aging. If the reduction is significant and sudden, ensure the battery is fully charged. If the issue persists, the battery may need replacement.
- Vacuum cleaner not powering on: Verify the battery is fully charged and correctly installed. If the issue continues, it might indicate a problem with the vacuum cleaner itself or a faulty battery.
- Battery swelling or overheating: Immediately discontinue use and safely remove the battery. Contact the seller or manufacturer for assistance. Do not attempt to use a swollen or overheated battery.
8. Specifications
Please note that specifications may vary slightly depending on the specific battery model or production batch. Refer to the label on your individual battery for precise details.
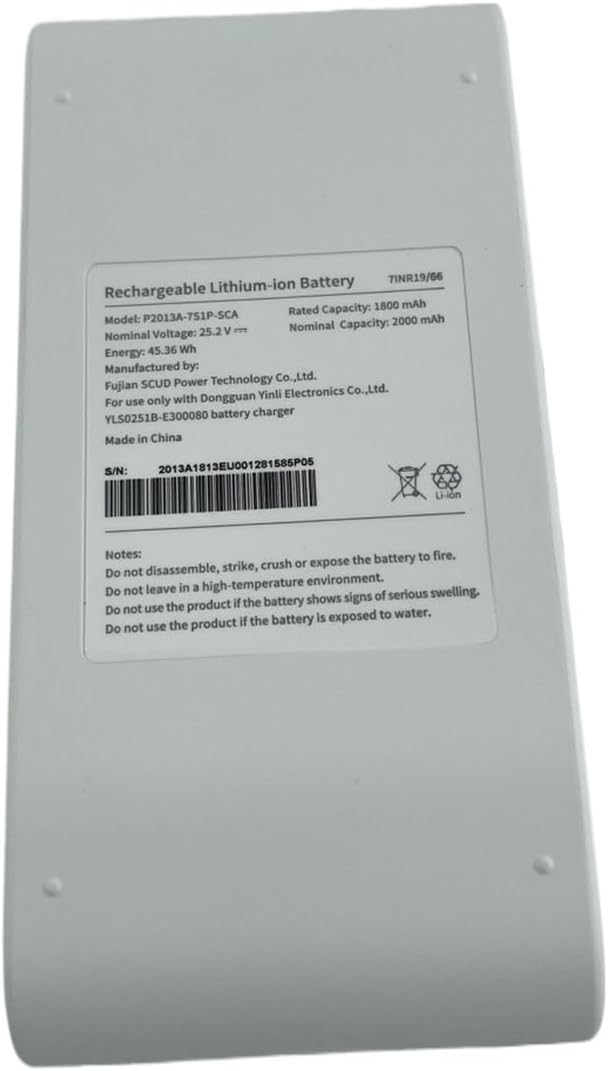
Image 8.1: Example Battery Label (Model P2013A-7S1P-SCA)

Image 8.2: Example Battery Label (Model P2125-7S1P-SCA)
| Feature | Description/Value |
|---|---|
| Product Type | Rechargeable Lithium-ion Battery |
| Compatibility | Dreame P10 Handheld Cordless Vacuum Cleaner |
| Nominal Voltage | 25.2 V |
| Rated Capacity (Example P2013A) | 1800 mAh |
| Nominal Capacity (Example P2013A) | 2000 mAh |
| Energy (Example P2013A) | 45.36 Wh |
| Rated Capacity (Example P2125) | 2400 mAh |
| Nominal Capacity (Example P2125) | 2500 mAh |
| Energy (Example P2125) | 60.48 Wh |
| Manufacturer | Fujian SCUD Power Technology Co., Ltd. / Dongguan Yinli Electronics Co., Ltd. |
| Model Name (Internal) | xuekaishu |
| Item Weight | Approximately 50 Grams (1.76 ounces) |
| Package Dimensions | 1.18 x 0.79 x 0.39 inches (approximate) |
9. Warranty and Support
For warranty information and customer support, please refer to the documentation provided at the time of purchase or contact the seller directly. Keep your purchase receipt as proof of purchase.
If you have any questions or require assistance, please reach out to the seller via the platform where the product was purchased.