1. Introduction
The SURAIELEC TD02A-1 Digital Pool Timer is a heavy-duty, programmable timer switch designed for controlling high-power electrical devices such as pool pumps, hot water heaters, and outdoor lighting. This 7-day digital timer offers versatile programming options, including multiple ON/OFF settings and day combinations, to automate your electrical devices efficiently. Its robust, weatherproof design ensures reliable operation in various outdoor and indoor environments.

Figure 1.1: SURAIELEC TD02A-1 Digital Pool Timer in an outdoor setting, showcasing its weatherproof design and application for pool equipment.
2. Safety Information
WARNING: Risk of Electric Shock. Improper installation can lead to serious injury or death. All wiring should be performed by a qualified electrician in accordance with national and local electrical codes.
- Before wiring and servicing, ensure power to the timer switch and the equipment it controls is turned off at the main panel.
- This device is intended for permanent installation.
- Do not install if the compartment insulator is not present.
- Ensure proper grounding. Grounding type bushings and jumper wire to the control unit must be installed in accordance with the National Electrical Code requirements.
- Use listed wiring connectors for grounding terminals.
- Always close the door after use to maintain weatherproof integrity.

Figure 2.1: Internal view of the timer with printed safety warnings and specifications.
3. Product Features
- Heavy Duty Capacity: 40A Resistive, 1HP to 2HP, suitable for 120-277 VAC applications.
- Versatile Programming: Up to 7 ON/OFF program settings with 15 day combinations, 24-hour settings, Daylight Saving Time (DST), and Random function.
- Battery Backup: Built-in rechargeable battery retains time and settings for approximately 3 months during power outages.
- Weatherproof Enclosure: Raintight and rust-proof construction with durable, flame-retardant material for outdoor use.
- Lockable Cover: Protects the timer from tampering and environmental elements.
- Easy Installation: Designed for straightforward setup and programming.
- Certifications: ETL Listed, conforms to UL STD.60730-1 and CSA STD. E60730-1.
4. Specifications
| Parameter | Value |
|---|---|
| Model Number | TD02A-1 |
| Input Voltage | 120-277 VAC, 60Hz (Auto-detects voltage) |
| Resistive Load | 40A @ 120-277 VAC |
| General Purpose Load | 30A @ 120-277 VAC |
| Motor Load | 1HP @ 120 VAC, 2HP @ 240 VAC |
| Tungsten Load | 15A @ 120 VAC |
| Ballast Load | 15A @ 120 VAC, 10A @ 277 VAC |
| Pilot Duty | 120 VAC, 240 VAC, 277 VAC |
| Terminal Range | #14 - #8 AWG |
| Operating Temperature | -40°F to 149°F (-40°C to 65°C) |
| Product Dimensions | 8.5D x 13W x 21H Centimetres (3.35"D x 5.12"W x 8.27"H) |
| Material | Polycarbonate |
| Battery | 1 Product Specific battery (included) |

Figure 4.1: Product dimensions and typical applications.
5. Installation
5.1 Physical Installation
The timer is designed for outdoor and indoor use. Mount the timer box securely to a flat surface using appropriate hardware through the designated mounting holes. Ensure the location allows for easy access for wiring and programming, and is protected from direct water spray if possible, despite its weatherproof rating.
- The enclosure features 1/2" and 3/4" knockouts for conduit connections.
- The removable module facilitates easier wiring.
- The lockable cover provides security and protection.

Figure 5.1: Weatherproof enclosure details, including knockouts and mounting points.

Figure 5.2: Labeled components of the timer for installation reference.
5.2 Wiring Diagrams
Refer to the following diagrams for typical wiring configurations. Always ensure power is disconnected before performing any wiring.

Figure 5.3: Wiring for a single 120VAC/277VAC load (SPST).

Figure 5.4: Wiring for a single 240VAC load (DPST).

Figure 5.5: Wiring for two 120VAC/277VAC loads simultaneously.

Figure 5.6: Wiring for a hot water heater (DPST).
6. Operation and Programming
The timer features a digital display and several buttons for setting time and programs. The buttons are typically labeled CLOCK, PROG, MANUAL, DAY, HOUR, MINUTE, DST, RND, and RESET.
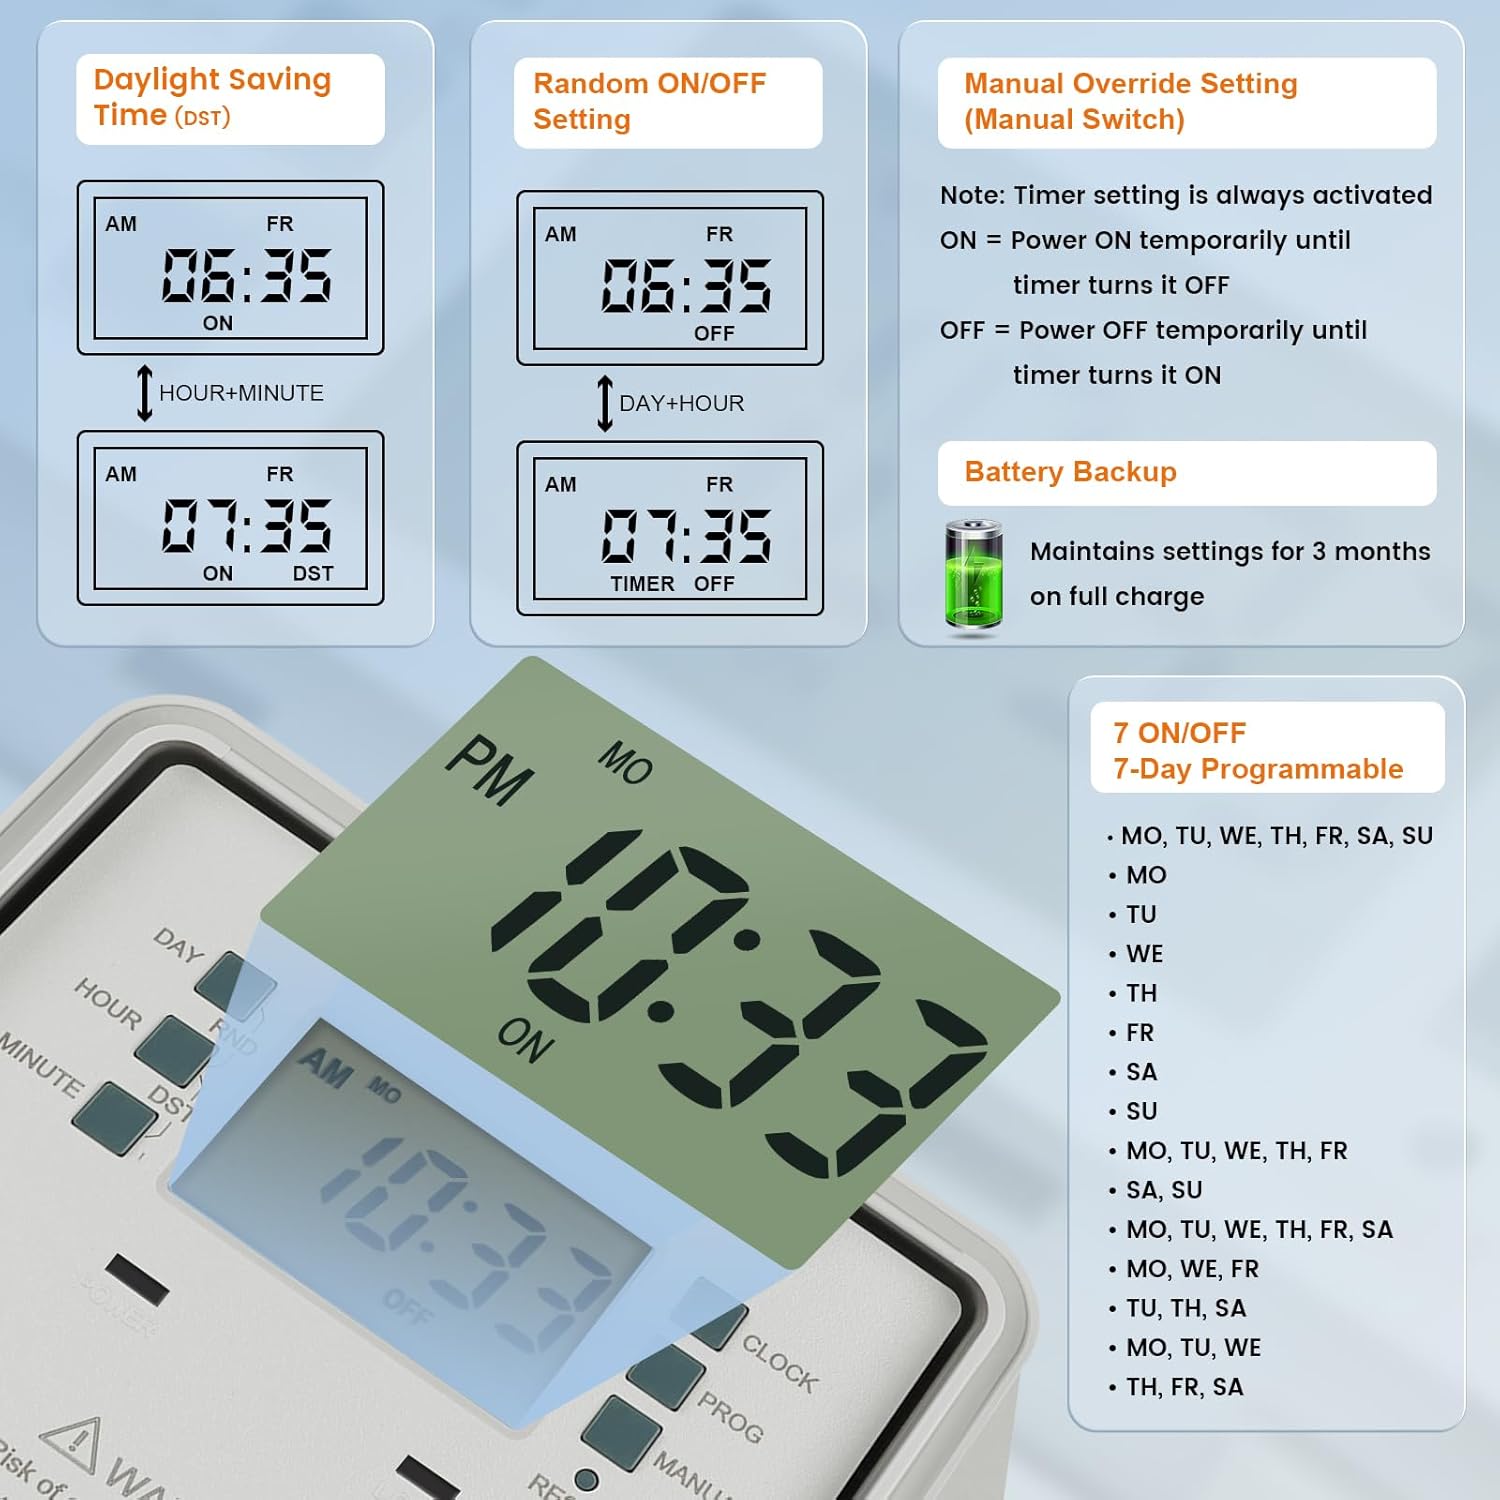
Figure 6.1: Timer display and programming options.
6.1 Setting Current Time and Day
- Press the CLOCK button.
- Use DAY, HOUR, and MINUTE buttons to set the current day and time.
- Press CLOCK again to save.

Figure 6.2: Setting the current time and day.
6.2 Programming ON/OFF Cycles
The timer supports up to 7 ON/OFF programs. Each program can be set for specific days or combinations of days.
- Press the PROG button to enter programming mode. The display will show '1 ON'.
- Use DAY to select the desired day(s) for the program. Options include individual days (MO, TU, WE, TH, FR, SA, SU) or various combinations (e.g., MO-FR, SA-SU, MO-SU).
- Use HOUR and MINUTE to set the ON time.
- Press PROG again. The display will show '1 OFF'.
- Repeat steps 2 and 3 to set the OFF time for the first program.
- Continue pressing PROG to cycle through and set additional ON/OFF programs (2 ON/OFF to 7 ON/OFF).
- After setting all desired programs, press CLOCK to exit programming mode and return to normal operation.

Figure 6.3: Programming an ON/OFF cycle.

Figure 6.4: Available day combinations for programming.
6.3 Daylight Saving Time (DST) Function
To adjust for Daylight Saving Time:
- Press and hold the DST button for a few seconds. The display will show 'ON' or 'OFF' and adjust the time by one hour.

Figure 6.5: Adjusting for Daylight Saving Time.
6.4 Random Function (RND)
The Random function can be used to turn the connected device ON and OFF at random intervals, providing a security feature for lighting when away from home.
- Press the RND button to activate or deactivate the random function.
6.5 Manual Override
The MANUAL button allows you to temporarily override the current program without deleting it.
- Press MANUAL to cycle through ON, OFF, and AUTO modes.
- In ON mode, the device will stay ON until the next programmed OFF time.
- In OFF mode, the device will stay OFF until the next programmed ON time.
- In AUTO mode, the timer follows the programmed schedule.

Figure 6.6: Using the Manual Override function.
6.6 Resetting the Timer
To clear all settings and reset the timer to factory defaults, use a pointed object (like a pen tip) to press the RESET button. This will erase all programmed settings, and the time will need to be reset.
6.7 Battery Backup
The timer includes a built-in rechargeable battery that maintains the time and programmed settings during power outages. Ensure the timer is connected to power for a sufficient period to allow the battery to charge fully. A fully charged battery can retain settings for approximately 3 months.

Figure 6.7: Battery Backup feature.
7. Maintenance
The SURAIELEC TD02A-1 Digital Pool Timer is designed for minimal maintenance due to its durable and weatherproof construction.
- Cleaning: Periodically wipe the exterior of the timer with a soft, damp cloth to remove dust and debris. Do not use harsh chemicals or abrasive cleaners.
- Enclosure Integrity: Ensure the cover is always securely closed to maintain its raintight and rust-proof properties. Regularly inspect the enclosure for any signs of damage.
- Battery: The internal rechargeable battery is designed for long-term use. If the timer frequently loses its settings during power outages, ensure it is connected to power for an extended period to allow the battery to fully charge.
8. Troubleshooting
If you encounter issues with your SURAIELEC TD02A-1 Digital Pool Timer, refer to the following common troubleshooting steps:
- Timer not turning ON/OFF as programmed:
- Verify that the current time and day are set correctly.
- Check that the ON/OFF programs are correctly entered and enabled for the desired days.
- Ensure the timer is not in MANUAL ON or MANUAL OFF mode. Set it to AUTO mode.
- Confirm that the connected device is functioning correctly when directly powered.
- Display is blank or dim:
- Check the power supply to the timer. Ensure it is receiving power.
- The internal battery may be depleted. Connect the timer to power for several hours to allow the battery to charge.
- Timer loses settings after power outage:
- The internal battery may not be fully charged or may be at the end of its lifespan. Ensure the timer is powered for an extended period to charge the battery.
- Buttons are unresponsive:
- Try pressing the RESET button with a pointed object. This will clear all settings, so you will need to reprogram the timer.
If these steps do not resolve the issue, please contact SURAIELEC customer support for further assistance.
9. Warranty and Support
For warranty information and technical support, please contact SURAIELEC directly. Details regarding warranty coverage and duration are typically provided with the product packaging or can be obtained from the manufacturer's official website.
When contacting support, please have your product model number (TD02A-1) and purchase information readily available.