1. Introduction
Thank you for choosing the QUMOX External CD/DVD Drive with 8-in-1 USB 3.0 Hub. This versatile device provides high-speed data transfer for reading and writing CDs and DVDs, along with expanded connectivity through its integrated USB hub and card readers. This manual will guide you through the setup, operation, and maintenance of your new device.
2. Safety Information
- Keep the device away from water, moisture, and extreme temperatures.
- Avoid dropping or subjecting the device to strong impacts.
- Do not attempt to disassemble or repair the device yourself. Contact qualified personnel for service.
- Use only compatible discs and cables.
- Ensure proper ventilation to prevent overheating.
3. Package Contents
Please check the package contents to ensure all items are present:
- QUMOX External CD/DVD Drive with 8-in-1 USB 3.0 Hub
- USB-A to USB-C Data Cable
- USB-A Data Cable
- User Manual (this document)
4. Product Overview
The QUMOX External CD/DVD Drive combines an optical drive with a multi-functional hub, offering enhanced connectivity and media capabilities.
4.1 Device Layout
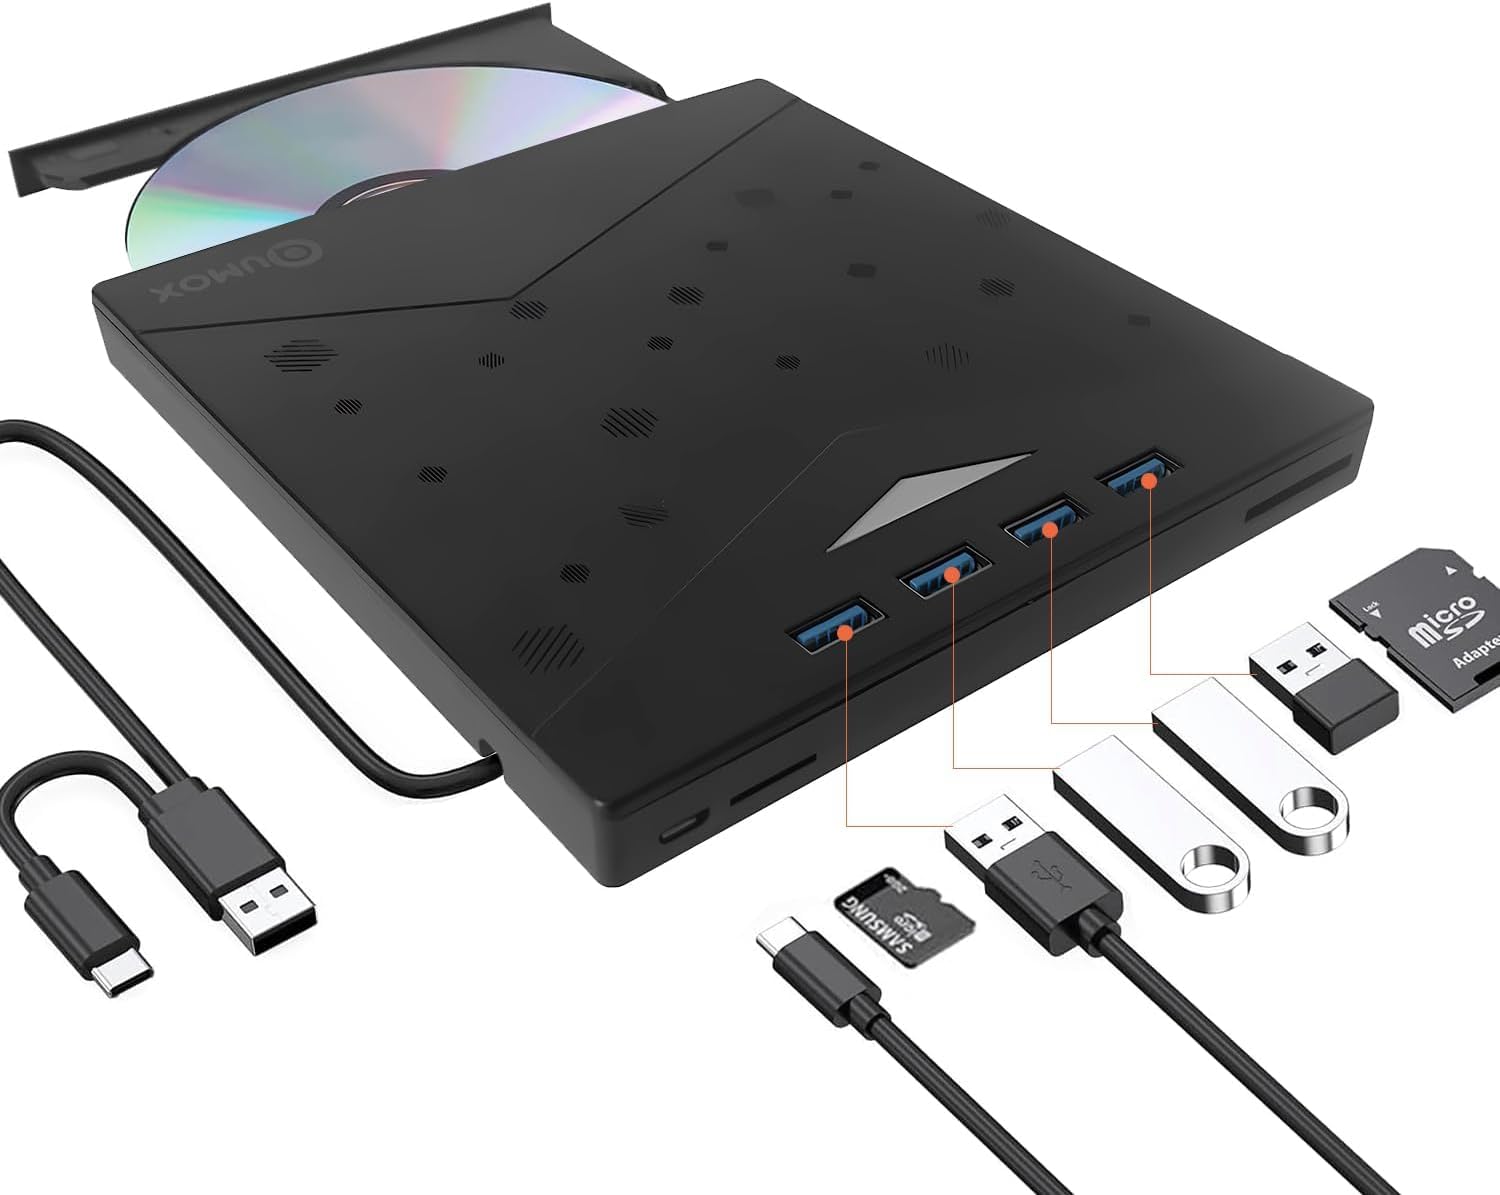
Figure 1: QUMOX External CD/DVD Drive with USB-A and USB-C cables.
The device features a sleek, ultra-slim design with an integrated cable for convenience. It includes multiple ports for various peripherals.
4.2 Ports and Indicators

Figure 2: Labeled ports and connections on the QUMOX External CD/DVD Drive.
- USB A 3.0 Ports (x4): For connecting USB devices such as flash drives, keyboards, mice, or external hard drives.
- TF Slot: For Micro SD (TF) memory cards.
- SD Slot: For standard SD memory cards.
- USB C Port: For connecting the drive to a host device with a USB-C port.
- USB A Data Cable: Integrated cable for connecting to a host device with a USB-A port.
- Pop-up Button: To open the disc tray.
- Forced Ejection Hole: For manual disc ejection in case of power failure or malfunction.
- Indicator Light: Shows device status (e.g., power, activity).

Figure 3: Device dimensions and additional features.
5. Setup and Installation
The QUMOX External CD/DVD Drive is designed for plug-and-play functionality, requiring no additional drivers for most operating systems.
5.1 Connecting the Device
- Connect the integrated USB-A data cable to an available USB 3.0 port on your computer. If your computer only has USB-C ports, use the provided USB-A to USB-C adapter cable.
- Ensure the connection is secure. The indicator light on the drive will illuminate, indicating it is powered on and ready for use.
- Your operating system should automatically detect and install the necessary drivers. This process may take a few moments.

Figure 4: Plug and Play connection to a laptop.
Note: For optimal performance, connect the drive directly to a USB 3.0 port on your computer. Avoid using unpowered USB hubs or extension cables, as this may affect performance or power delivery.
6. Operating Instructions
6.1 Using the CD/DVD Drive
- To Insert a Disc: Press the pop-up button on the front of the drive. The disc tray will eject. Carefully place a CD or DVD onto the tray, ensuring it is centered on the spindle. Gently push the tray back into the drive until it clicks into place.
- To Eject a Disc: Press the pop-up button. Alternatively, you can eject the disc through your operating system (e.g., right-click the drive icon and select "Eject").
- Reading Discs: Once a disc is inserted, your computer's operating system should automatically detect it. You can then access the disc's contents through File Explorer (Windows) or Finder (macOS).
- Writing/Burning Discs: To burn data to a CD-R/RW or DVD±R/RW, you will need compatible burning software (not included). Follow the instructions provided with your chosen software.
The drive supports CD-R/RW, DVD±R/RW, DVD-RAM, and SVCD formats. It offers up to 8x DVD read/write speed and 24x CD read/write speed.
6.2 Using the 8-in-1 Hub
- USB 3.0 Ports: Connect up to four USB devices to the available USB 3.0 ports for high-speed data transfer (up to 5 Gbps).
- SD/TF Card Readers: Insert your SD or Micro SD (TF) memory cards into the corresponding slots to access or transfer data. Note: The SD and TF card slots cannot be used simultaneously.
6.3 System Compatibility

Figure 5: Wide compatibility with various operating systems.
This device is widely compatible with operating systems including Windows XP, Windows 7, Windows 8, Windows 10, Windows 11, macOS, and Linux. It is designed for use with PCs and laptops. Important: This device is not compatible with tablets, smartphones, or Blu-ray discs.
7. Maintenance
- Cleaning: Use a soft, dry cloth to clean the exterior of the drive. Do not use liquid cleaners or abrasive materials. For the disc tray, use a specialized optical drive cleaning kit if necessary.
- Storage: When not in use, store the drive in a cool, dry place, away from direct sunlight and dust.
- Handling: Always handle discs by their edges to avoid fingerprints and scratches.
8. Troubleshooting
| Problem | Possible Cause | Solution |
|---|---|---|
| Drive not recognized by computer. | Loose connection, insufficient power, driver issue. |
|
| Disc not reading or burning. | Dirty/scratched disc, incorrect disc type, faulty disc. |
|
| USB hub or card readers not working. | Loose connection, power issue, incompatible card. |
|
| Disc tray does not open. | Power issue, mechanical jam. |
|
9. Specifications
| Feature | Description |
|---|---|
| Brand | QUMOX |
| Model Number | Z311 |
| Interface | USB 3.0 (backward compatible with USB 2.0/1.1), USB 3.0 Type-A, USB 3.0 Type-C |
| Optical Storage Read Speed | Up to 8x for DVD, 24x for CD |
| Optical Storage Write Speed | Up to 8x for DVD, 24x for CD |
| Supported Disc Types | CD-R/RW, DVD±R/RW, DVD-RAM, SVCD |
| USB Hub | 4 x USB 3.0 Ports |
| Card Readers | SD Slot, TF (Micro SD) Slot (not simultaneous) |
| Operating System Compatibility | Windows XP/7/8/10/11, macOS, Linux |
| Hardware Platform | Laptop, PC |
| Dimensions (L x W x H) | 19.4 x 16.1 x 2.7 cm (approx. 7.6 x 6.3 x 1.1 inches) |
| Weight | 390 grams (approx. 0.86 lbs) |
| Special Features | Powered, DVD Burner, Portable, RGB lighting |
10. Warranty and Support
QUMOX products are designed and manufactured to the highest quality standards. This product is covered by a standard manufacturer's warranty against defects in materials and workmanship.
For warranty claims, technical support, or any questions regarding your QUMOX External CD/DVD Drive, please contact your retailer or visit the official QUMOX website for customer service information.
Please retain your proof of purchase for warranty purposes.