1. Introduction
This manual provides essential instructions for the safe and effective operation, setup, and maintenance of your FEIFANKE MIG Welder 135A. This versatile machine supports three welding modes: Flux Core MIG, ARC (Stick), and Lift TIG. Please read this manual thoroughly before using the welder to ensure proper function and safety.
2. Safety Instructions
Always prioritize safety when operating welding equipment. Failure to follow safety guidelines can result in serious injury or damage to equipment.
- Personal Protective Equipment: Always wear appropriate welding gloves, a welding helmet with a suitable shade lens, protective clothing, and safety shoes.
- Ventilation: Ensure the welding area is well-ventilated to disperse fumes and gases. Welding fumes can be hazardous to health.
- Fire Prevention: Keep a fire extinguisher nearby. Remove all flammable materials from the welding area. Hot sparks and molten metal can cause fires.
- Electrical Safety: This welder is designed for dual voltage operation (110V/220V). Ensure the power source matches the machine's requirements and is properly grounded. Avoid welding in damp or wet conditions.
- Overload Protection: The machine features voltage variation compensation, overcurrent protection, overheat protection, overvoltage, and undervoltage protection. Do not bypass these safety features.
- Certification: This welder is certified with CE, UKCA, FCC, and UL standards, and has an IP21S waterproof rating, indicating protection against solid objects over 12mm and vertically dripping water.
- Children and Bystanders: Keep children and unauthorized personnel away from the welding area.
3. Package Contents
Verify that all items listed below are included in your package. If any items are missing or damaged, contact customer support.

Image: The FEIFANKE MIG Welder 135A shown with all included accessories, including the ground clamp, electrode holder, MIG torch, brush, adapter, conductive nozzles, flux core wire, and welding rods.
- 1 x FEIFANKE MIG Welder 135A
- 1 x 110V/220V Adapter
- 1 x 2m (6.6ft) MIG Torch
- 1 x 1.8m (5.9ft) Electrode Holder
- 1 x 1.2m (3.94ft) Ground Clamp
- 1 x 7in (18cm) Brush & Hammer
- 1 x 0.8mm 0.5KG Flux Core Wire
- 3 x 0.8mm Conductive Nozzles
- 3 x 1.0mm Conductive Nozzles
- 5 x 3/32'' Welding Rods
4. Product Overview
Familiarize yourself with the main components and control panel of your welder.

Image: The front panel of the FEIFANKE MIG Welder 135A, highlighting its 3-in-1 capabilities for MMA/Stick, Flux Core MIG, and Lift TIG welding modes.
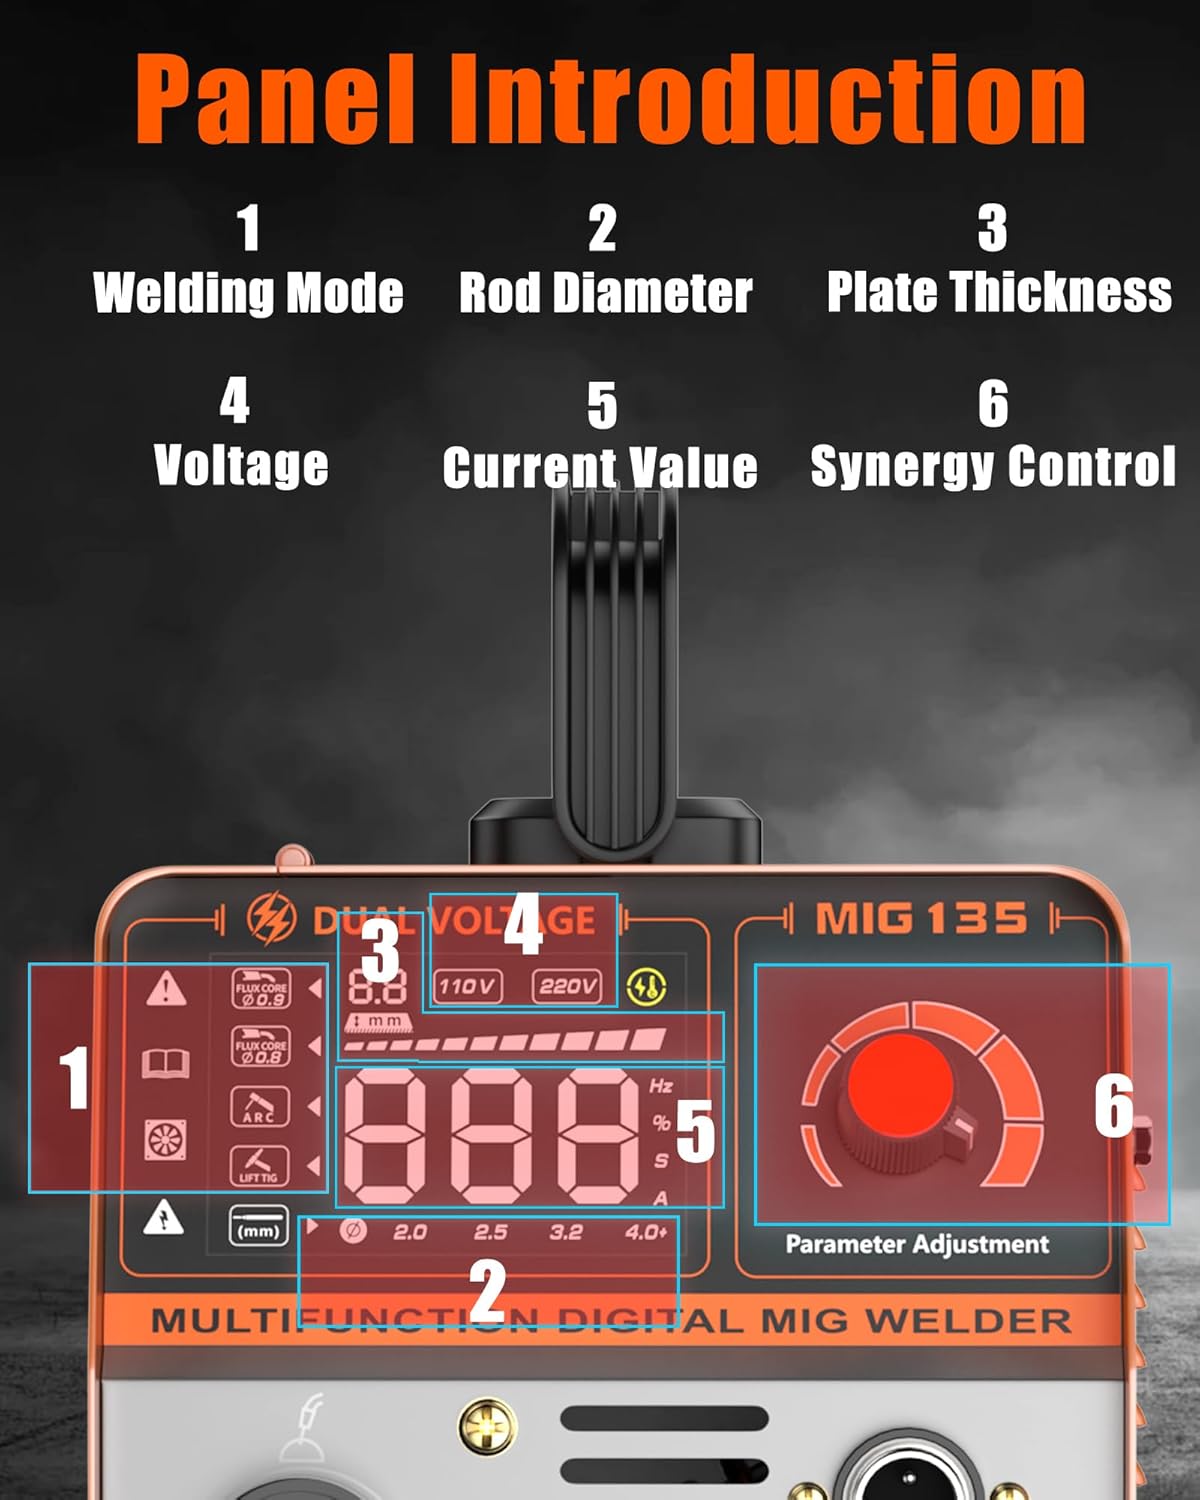
Image: A detailed view of the welder's control panel, indicating (1) Welding Mode selection, (2) Rod Diameter, (3) Plate Thickness, (4) Voltage, (5) Current Value, and (6) Synergy Control knob for parameter adjustment.
Control Panel Functions:
- 1. Welding Mode: Select between Flux Core MIG, ARC (Stick), and Lift TIG.
- 2. Rod Diameter / Wire Diameter: Displays the recommended electrode or wire diameter.
- 3. Plate Thickness: Indicates the recommended material thickness for the selected settings.
- 4. Voltage: Displays the welding voltage.
- 5. Current Value: Displays the welding current (Amperes).
- 6. Parameter Adjustment Knob: Used to fine-tune welding parameters such as current and voltage.
5. Setup
5.1 Wire Installation (Flux Core MIG)
Follow these steps to properly install the flux core welding wire:

Image: An exploded diagram illustrating the components and steps for installing the flux core wire, including the spool lock, spring, spool spacer, flux core wire, and drive roller for 0.8mm/1.0mm wire.
- Open the wire feed compartment cover on the top of the welder.
- Place the spool of 0.8mm flux core wire onto the spool holder, ensuring it rotates freely. Use the spool spacer and spring as shown in the diagram.
- Secure the spool with the spool lock.
- Thread the wire through the guide tube and into the drive roller mechanism. Ensure the wire is seated correctly in the groove corresponding to its diameter (0.8mm or 1.0mm).
- Close the drive roller tension arm and adjust the tension. The tension should be firm enough to feed the wire smoothly without slipping, but not so tight that it deforms the wire.
- Feed the wire through the MIG torch liner until it emerges from the contact tip. You may need to press the torch trigger (with power on and mode selected) to activate the wire feed motor.
- Ensure the correct conductive nozzle (0.8mm or 1.0mm) is installed on the MIG torch.
5.2 Power Connection
The FEIFANKE MIG Welder 135A supports dual voltage input (110V/220V).
- The machine comes with a standard US 110V NEMA 5-15 plug attached to a 14 AWG cord.
- For 220V operation, use the included adapter cord which has a NEMA 6-50 plug. Note that the adapter cord also uses 14 AWG wire and passes through the 5-15 plug.
- Always connect the welder to a dedicated circuit with appropriate amperage ratings (e.g., 15A or 20A for 110V, higher for 220V as per local electrical codes).
- Ensure the power switch on the welder is in the OFF position before connecting to a power outlet.
6. Operating Instructions
6.1 General Operation
- Connect the ground clamp to the workpiece, ensuring good electrical contact.
- Turn on the welder using the power switch.
- Select the desired welding mode (MIG, ARC, or Lift TIG) using the mode selection button on the control panel.
- Adjust welding parameters using the parameter adjustment knob. The digital display will show current, voltage, and recommended settings.
6.2 Flux Core MIG Welding
This mode is suitable for welding carbon and stainless steel from 1mm to 5mm thickness.
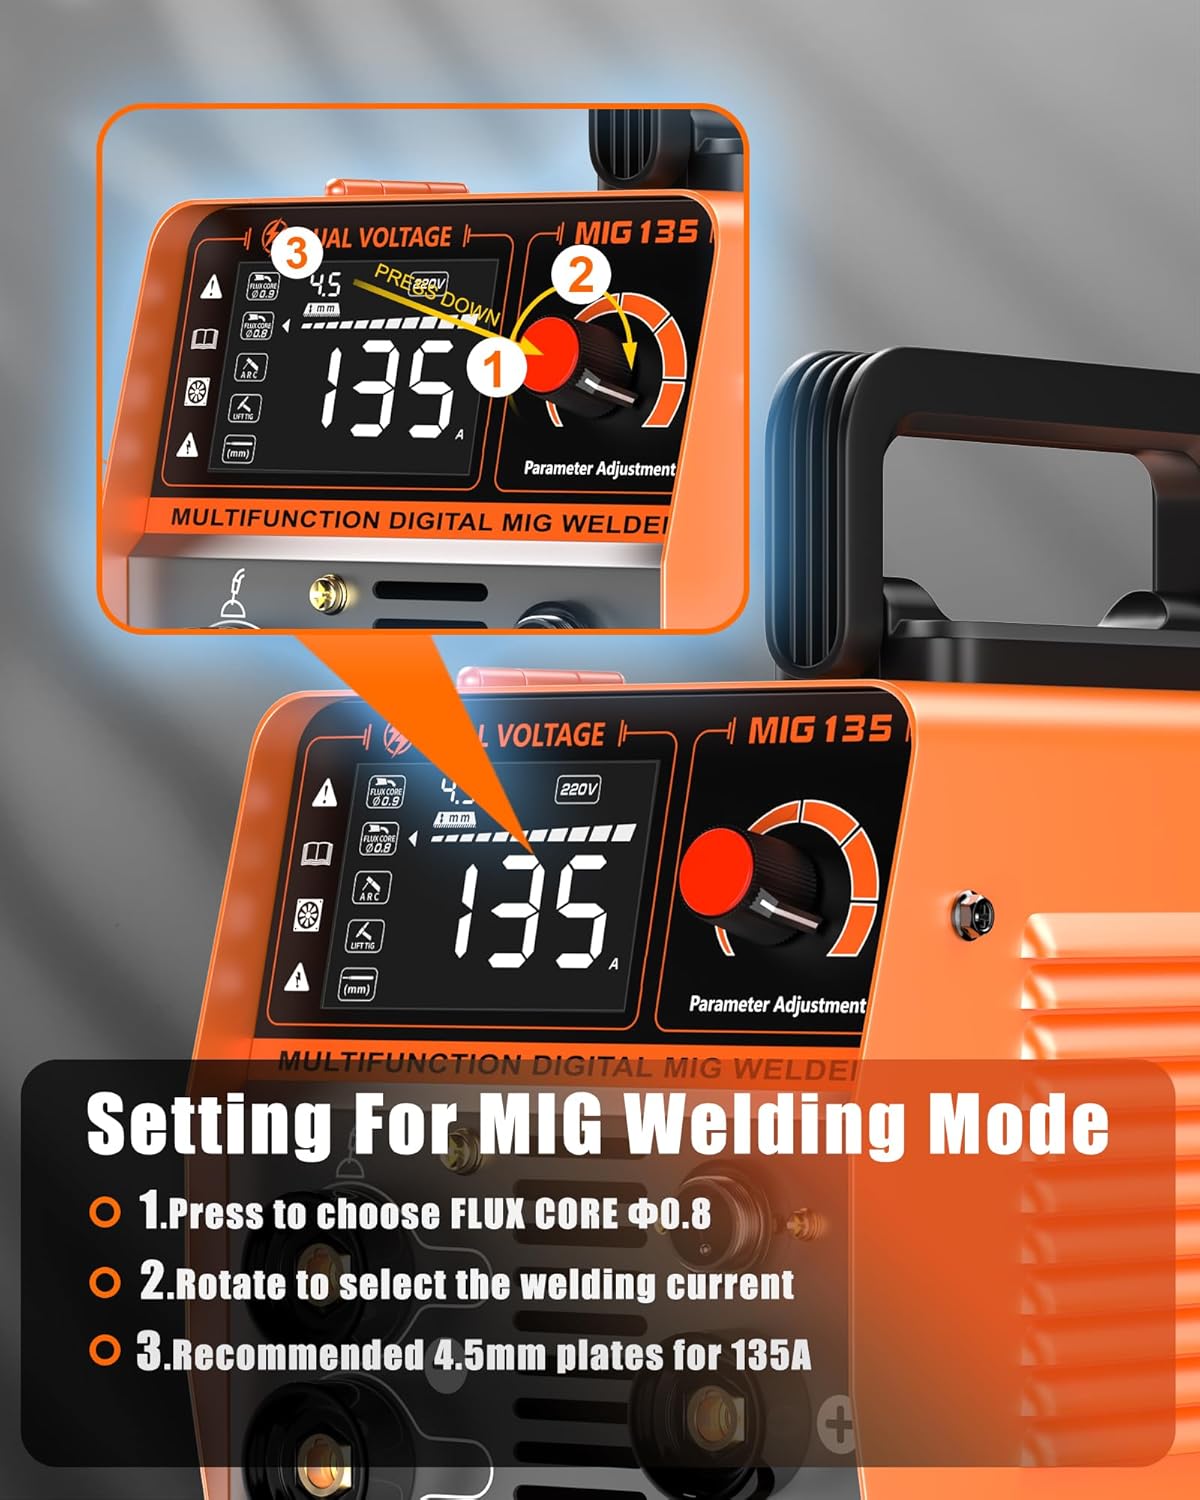
Image: The control panel displaying settings for MIG welding mode. It shows pressing to choose FLUX CORE Φ0.8, rotating to select welding current, and a recommendation of 4.5mm plates for 135A output.
- Select the Flux Core MIG mode.
- Use the parameter adjustment knob to set the desired welding current. The machine features synergistic control, meaning wire feed speed will adjust automatically with current.
- Before starting a weld, trim the welding wire so it protrudes only slightly from the contact tip. This helps prevent the wire from bending before the arc is established.
- Position the MIG torch at the starting point of the weld.
- Press the torch trigger to initiate the arc and begin welding. Maintain a consistent travel speed and torch angle.
6.3 ARC (Stick) Welding
This mode uses covered electrodes (welding rods).
- Select the ARC mode on the control panel.
- Connect the electrode holder to the positive (+) terminal and the ground clamp to the negative (-) terminal (or vice-versa depending on electrode type).
- Insert a welding rod into the electrode holder.
- Adjust the welding current using the parameter adjustment knob according to the electrode type and material thickness.
- Strike the arc by lightly touching and quickly lifting the electrode from the workpiece.
6.4 Lift TIG Welding
This mode provides precise welding for various metals. A TIG torch is required and sold separately.
- Select the Lift TIG mode on the control panel.
- Connect the TIG torch (purchased separately) and ground clamp according to the TIG torch's instructions.
- Adjust the welding current.
- Touch the tungsten electrode lightly to the workpiece and then lift it slightly to initiate the arc.
7. Maintenance
Regular maintenance ensures the longevity and optimal performance of your welder.

Image: The FEIFANKE MIG Welder 135A highlighting its high-efficiency heat dissipation system, featuring a powerful cooling fan and multiple louvre design.
- Cleaning: Periodically clean the welder's exterior with a dry, soft cloth. Use compressed air to clear dust from the cooling vents and internal components. Ensure the power is disconnected before cleaning.
- Cooling System: The welder features a powerful cooling fan and louvre design for efficient heat dissipation. Ensure these vents are not obstructed during operation.
- Cable Inspection: Regularly inspect all cables (power, torch, ground) for damage, cuts, or frayed insulation. Replace damaged cables immediately.
- Contact Tips and Nozzles: Replace worn or clogged contact tips and nozzles on the MIG torch to ensure consistent wire feeding and arc stability.
- Storage: Store the welder in a clean, dry environment, away from excessive dust, moisture, and corrosive materials.
8. Troubleshooting
If you encounter issues with your welder, refer to the following common problems and solutions:
| Problem | Possible Cause | Solution |
|---|---|---|
| No power to the machine | Power cord disconnected, circuit breaker tripped, faulty power outlet. | Check power connections, reset circuit breaker, test outlet with another device. |
| Wire not feeding (MIG) | Wire tangled, drive roller tension incorrect, clogged contact tip, wire spool empty. | Check wire path, adjust drive roller tension, replace contact tip, replace wire spool. |
| Poor weld quality / Excessive spatter | Incorrect settings (current/voltage), improper technique, dirty workpiece. | Adjust parameters, ensure proper torch angle and travel speed, clean workpiece thoroughly. |
| Overheat protection activated | Extended welding time, obstructed cooling vents. | Allow the machine to cool down. Ensure cooling vents are clear. |
| Arc difficult to strike (ARC/TIG) | Incorrect current, damp electrodes, poor ground connection. | Adjust current, use dry electrodes, ensure solid ground connection. |
If the problem persists after attempting these solutions, please contact FEIFANKE customer support.
9. Specifications
| Feature | Specification |
|---|---|
| Model Number | MIG-135A |
| Manufacturer | FEIFANKE |
| Welding Modes | Flux Core MIG, ARC (Stick), Lift TIG |
| Input Voltage | 110V/220V Dual Voltage |
| Output Current Range | 30-135A |
| Suitable Material Thickness | 1mm to 5mm (Carbon and Stainless Steel) |
| Power Source Type | AC/DC |
| Item Weight | 6.64 kg (14.5 pounds) |
| Package Dimensions | 35 x 26 x 17.5 cm |
| Certifications | CE, UKCA, FCC, UL |
| Included Components | 1 x 110V/220V MIG Welder (and accessories as listed in Section 3) |
10. Warranty and Support
FEIFANKE is committed to providing quality products and customer satisfaction.
- Money Back Guarantee: A 30-day money-back guarantee is provided from the date of purchase.
- Warranty: The product comes with a 2-year warranty.
- Defective Product Replacement: Defective welding machines can be replaced within 60 days of purchase.
- Customer Support: For any questions, concerns, or warranty claims, please contact FEIFANKE customer service. Refer to your product packaging or purchase documentation for contact details.