
Introduction
This manual provides detailed instructions for the installation, operation, and maintenance of your 10L0L Golf Cart Carburetor Fuel Pump and Tune-Up Kit. This kit is designed to restore optimal performance to your Club Car gas golf cart by replacing key components of the fuel and air systems. Please read all instructions carefully before beginning any work.
Important Safety Information
Warning: Always ensure the engine is cool, the key is off, and the parking brake is engaged before performing any installation or maintenance. Disconnect the battery to prevent accidental starting. Wear appropriate personal protective equipment (PPE) such as safety glasses and gloves. Fuel is flammable; handle with extreme care and ensure adequate ventilation. Do not smoke or use open flames near fuel.
Package Contents
Verify all components are present before beginning installation.

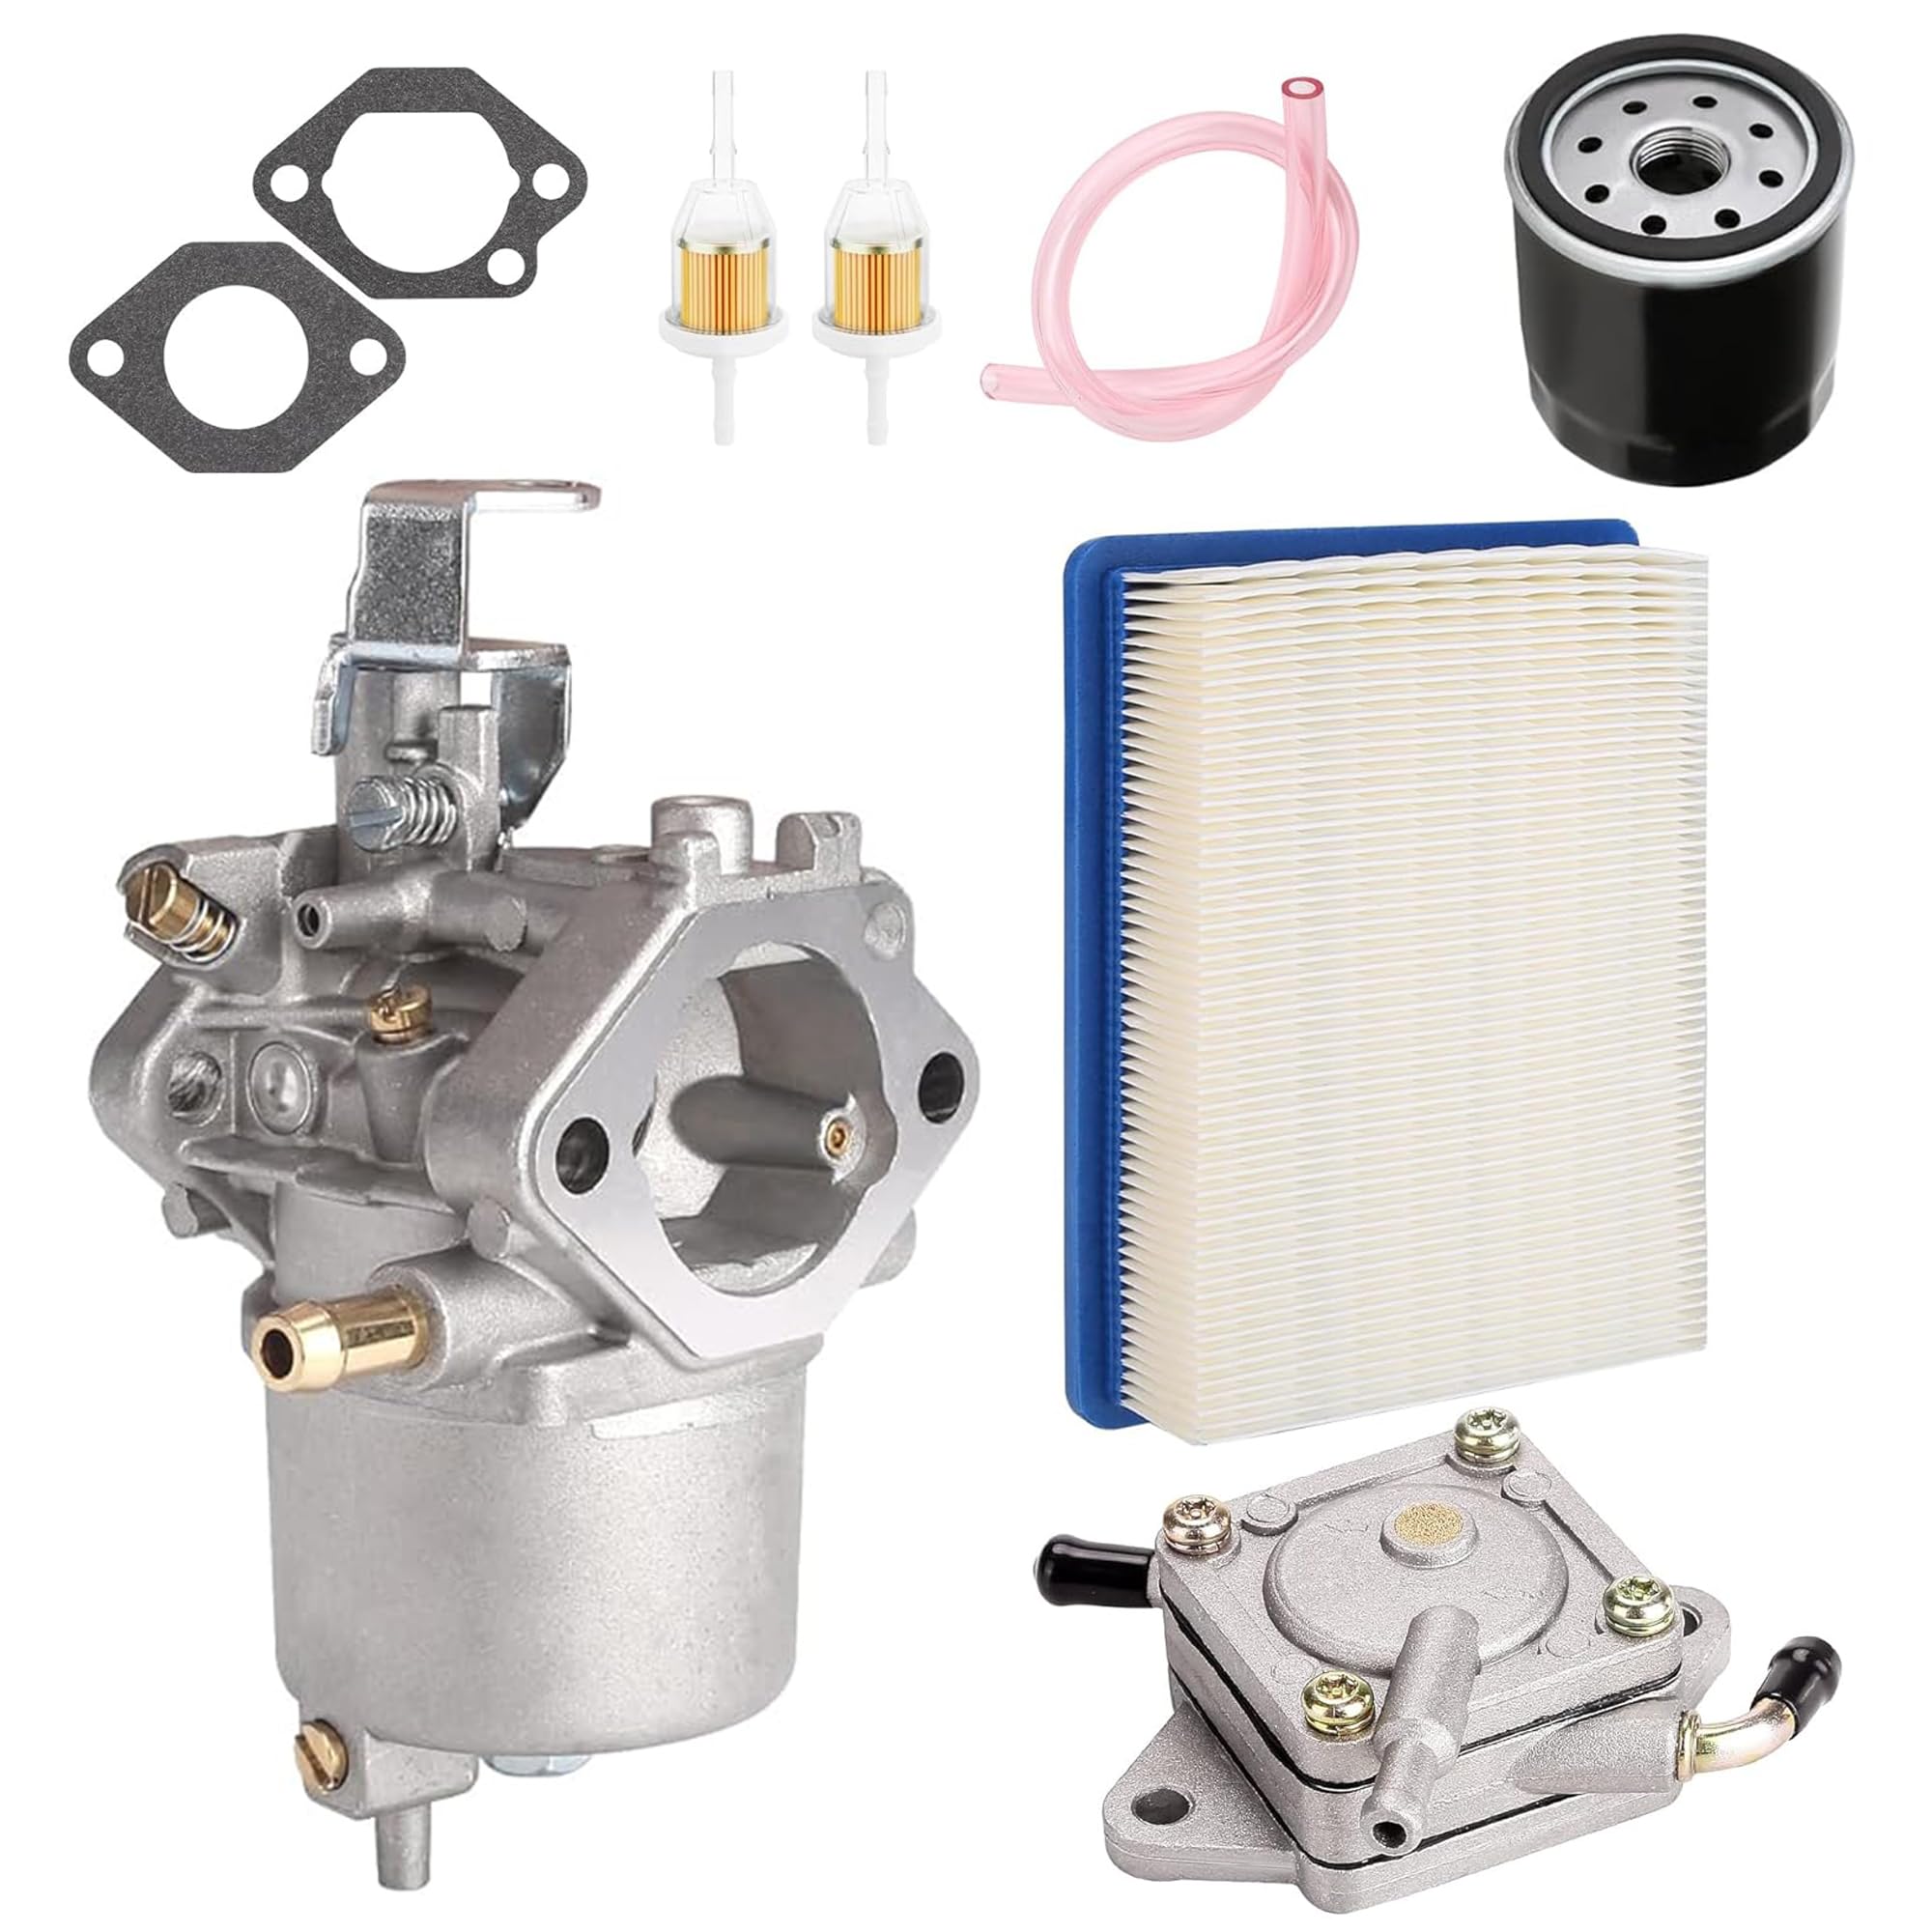
This image displays the complete tune-up kit, including the carburetor, fuel pump, air filter, oil filter, two fuel filters, fuel line, and two gaskets.
- 1 x Carburetor
- 1 x Fuel Pump
- 1 x Air Filter
- 1 x Oil Filter
- 2 x Fuel Filters
- 1 x Fuel Line
- 2 x Gaskets
Compatibility
This kit is designed for the following Club Car gas golf cart models equipped with the FE290 engine:
- Club Car DS (1992–1997)
- Club Car DS & Precedent (1998-Up)
- Club Car Carryall gas models
Replaces OEM Part Numbers: 1016438, 1016439, 1016440, 1016441, 1016478, 101805601, 101905601, 17561, 1014523, 1014524, 1015426, 1016467, 41016467, 1013684, 1014522, 102003201.
Installation Instructions
Follow these steps carefully for proper installation. Refer to the diagrams for visual guidance.
1. Fuel Pump Installation

This diagram illustrates the placement of the fuel pump and connection of the fuel lines to the engine system.
- Locate the existing fuel pump on your golf cart engine.
- Carefully disconnect the fuel lines and remove the old fuel pump.
- Install the new fuel pump in the same location, ensuring proper orientation.
- Connect the new fuel lines and secure them with the provided clamps. Ensure all connections are tight to prevent leaks.
- Replace the fuel filters in the fuel lines as shown in the diagram.
2. Carburetor Installation
This diagram details the installation of the carburetor, including gaskets and mounting points.
- Remove the old carburetor and its gaskets from the engine manifold.
- Clean the mounting surface thoroughly.
- Place a new gasket on the manifold, then position the new carburetor.
- Place the second new gasket on top of the carburetor, then attach the air filter housing.
- Secure the carburetor assembly with the appropriate bolts, tightening them evenly.
- Connect all fuel lines, vacuum lines, and throttle linkage to the new carburetor.
3. Air Filter and Oil Filter Installation

This diagram shows the components of the air filter assembly and how they fit together.

This diagram illustrates the location and installation of the oil filter on the engine.
- Replace the old air filter with the new one provided in the air filter housing. Ensure it is seated correctly.
- Remove the old oil filter by unscrewing it.
- Apply a thin film of clean engine oil to the gasket of the new oil filter.
- Screw on the new oil filter by hand until the gasket makes contact, then tighten an additional 3/4 to 1 full turn. Do not overtighten.
4. Spark Plug Installation
While spark plugs are not explicitly listed in the package contents for this specific kit, they are often replaced during a tune-up. If you are replacing spark plugs:
- Remove the spark plug wire.
- Use a spark plug wrench to remove the old spark plug.
- Install the new spark plug, ensuring it is properly gapped according to your golf cart's service manual.
- Tighten the spark plug to the manufacturer's recommended torque.
- Reconnect the spark plug wire.
5. Post-Installation Check
- Double-check all connections for tightness and proper routing.
- Inspect for any fuel leaks.
- Ensure all tools are removed from the engine compartment.
- Reconnect the battery.
Operation
After installation, start the golf cart engine and allow it to warm up. Monitor for smooth idling and proper acceleration. The new carburetor and fuel pump are designed to provide consistent air-fuel mixture and stable fuel delivery, restoring optimal engine performance. If the engine does not start or runs poorly, refer to the Troubleshooting section.
Maintenance
Regular maintenance of your golf cart's fuel and air systems is crucial for longevity and performance.
This image demonstrates the effectiveness of the air and oil filters in preventing contaminants from reaching the engine.
- Air Filter: Inspect the air filter regularly (e.g., every 50-100 operating hours or annually) and replace it if it appears dirty or clogged. A clean air filter ensures proper air intake and prevents engine damage.
- Oil Filter: Replace the oil filter every time you change the engine oil, typically every 100-200 operating hours or annually, whichever comes first.
- Fuel Filters: Inspect fuel filters for debris or discoloration. Replace them annually or if fuel flow appears restricted.
- Fuel Lines: Periodically inspect fuel lines for cracks, leaks, or deterioration. Replace any damaged lines immediately.
Troubleshooting
| Problem | Possible Cause | Solution |
|---|---|---|
| Engine won't start | No fuel reaching carburetor; clogged fuel filter; faulty fuel pump; incorrect carburetor adjustment. | Check fuel level. Replace fuel filters. Inspect fuel lines for kinks. Verify fuel pump operation. Check carburetor settings. |
| Rough idling or poor acceleration | Clogged air filter; carburetor out of adjustment; vacuum leak. | Replace air filter. Adjust carburetor idle and mixture screws. Check for loose connections or cracked hoses. |
| Fuel leaks | Loose fuel line connections; damaged gaskets; cracked fuel lines. | Tighten all fuel line clamps. Replace damaged gaskets. Replace any cracked fuel lines. |
| Engine misfires or lacks power | Dirty spark plug; incorrect spark plug gap; fuel delivery issue. | Inspect and clean/replace spark plug. Verify spark plug gap. Check fuel filters and fuel pump. |
Specifications
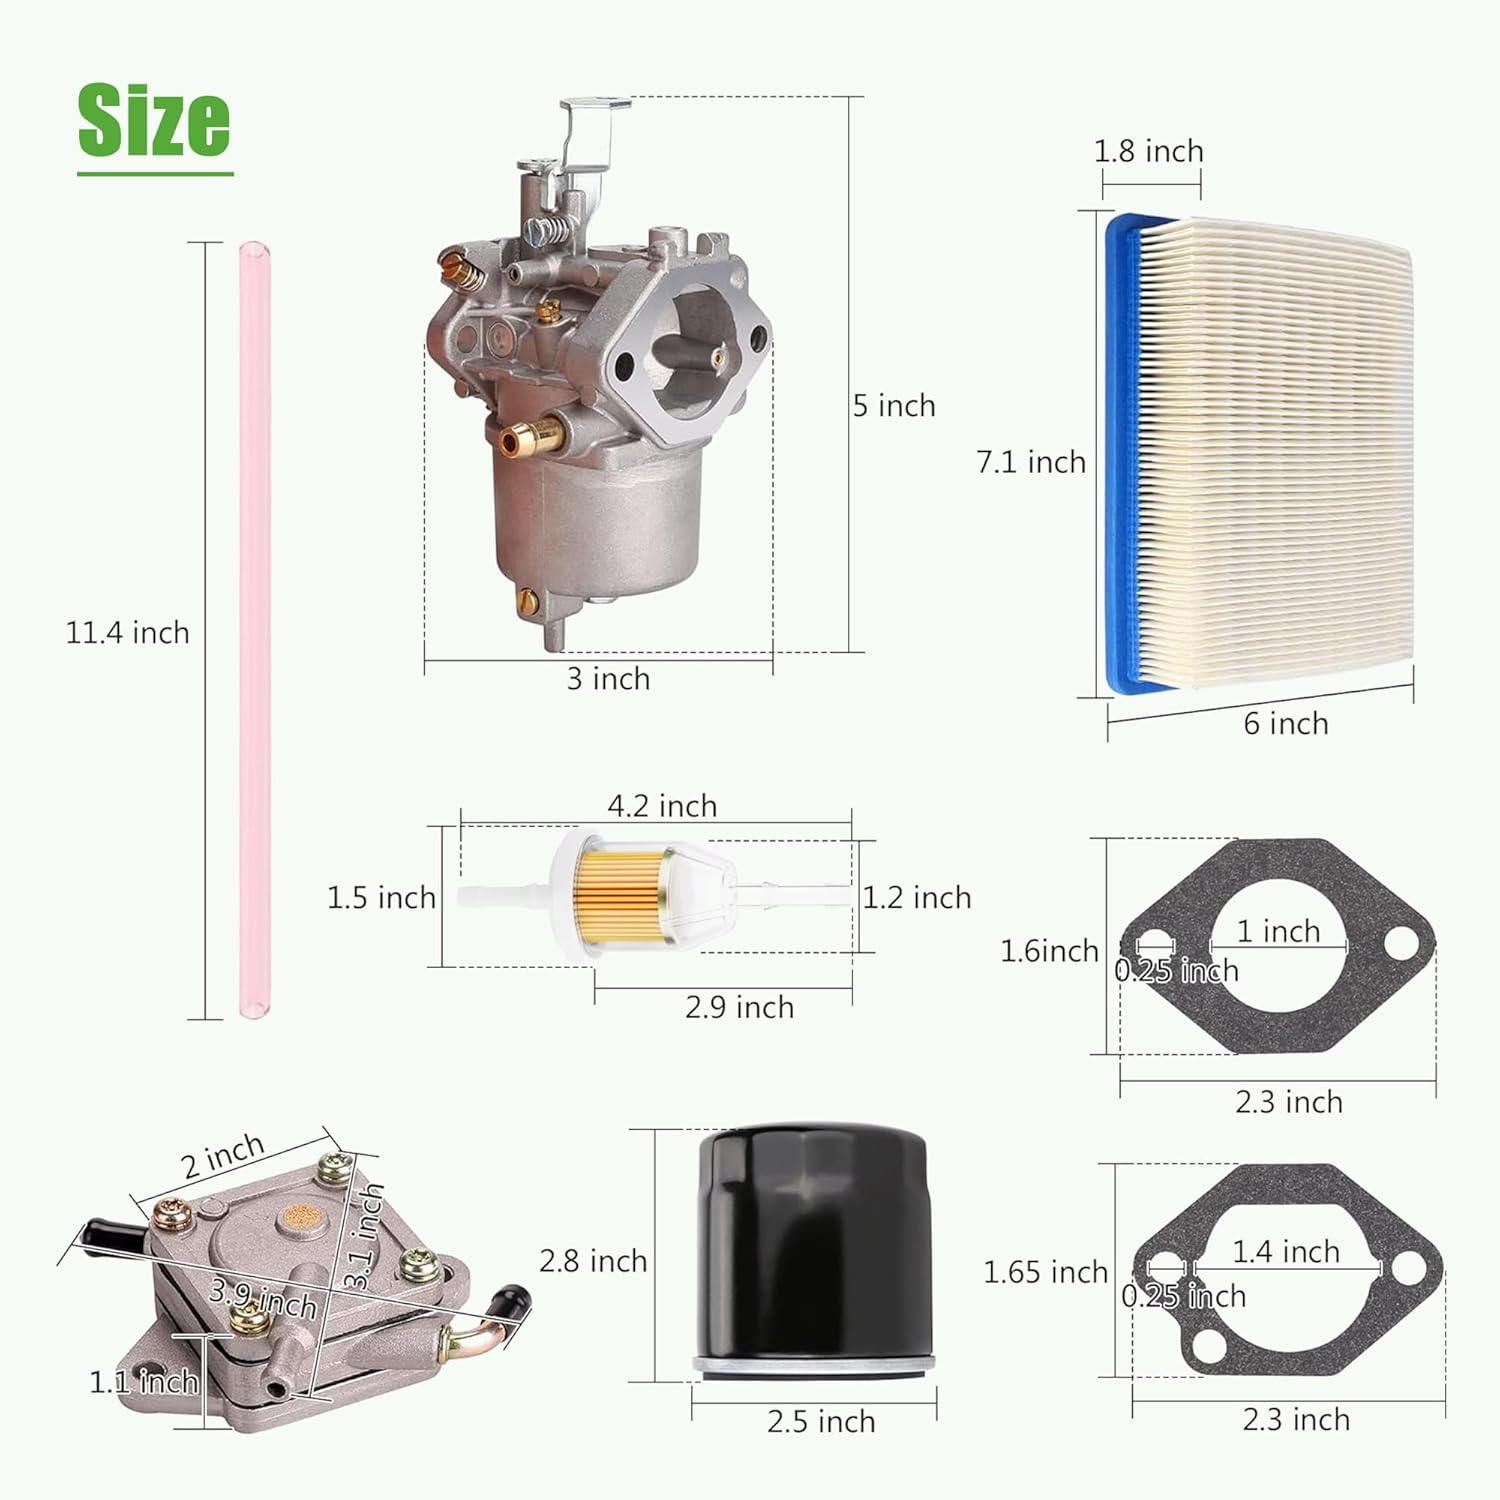
Refer to the following specifications for the components included in this kit.
This image provides detailed dimensions for the carburetor, fuel pump, various filters, and gaskets.
- Material: Premium aluminum alloy and rubber (for fuel pump and carburetor components)
- Fit Type: Vehicle Specific Fit (Club Car DS, Precedent, Carryall with FE290 engine)
- Operation Mode: Automatic
- Fuel Type: Gasoline
- OEM Replacement Numbers: 1016438, 1016439, 1016440, 1016441, 1016478, 101805601, 101905601, 17561, 1014523, 1014524, 1015426, 1016467, 41016467, 1013684, 1014522, 102003201
Official Product Video
This video provides a visual overview of the 10L0L Golf Cart Carburetor Fuel Pump and Tune Up Kit for FE290 engines, showcasing the components included.
Warranty and Support
For warranty information or technical support, please contact the manufacturer, 10L0L Direct, through their official channels. Keep your purchase receipt as proof of purchase.