KuWFi AP830
KuWFi AX3000 Gigabit Outdoor Access Point (Model AP830) User Manual
Dual Band Next-Level WiFi Experience 360-degree Omnidirectional WiFi Extender
1. Introduction
The KuWFi AX3000 Gigabit Outdoor Access Point (Model AP830) is a high-performance, dual-band Wi-Fi 6 (802.11ax) device designed to provide extensive and reliable wireless coverage in outdoor environments. With its robust IP67 waterproof housing and advanced features, it is ideal for extending Wi-Fi signals to backyards, parks, farms, and other large outdoor areas. This manual provides detailed instructions for the installation, configuration, and maintenance of your AP830.
2. Safety Information
- Read all instructions carefully before installation and operation.
- Ensure the power supply meets the device's requirements (48V 0.5A PoE).
- Do not open or attempt to repair the device yourself. Refer all servicing to qualified personnel.
- Install the device in a location that provides adequate ventilation and is free from excessive heat, dust, and moisture.
- The PoE converter is not waterproof and must be protected from moisture.
- Ensure proper grounding for lightning protection, especially when mounting on metal poles.
3. Package Contents
Verify that all items are present in your package:
- One KuWFi AX3000 Gigabit Outdoor Access Point (AP830)
- One Ethernet Cable
- One PoE Power Injector (48V 0.5A)
- Mounting Parts (for pole or wall mounting)
- Quick Start Guide
4. Product Overview
The AP830 features a robust design with multiple components for optimal performance and durability.
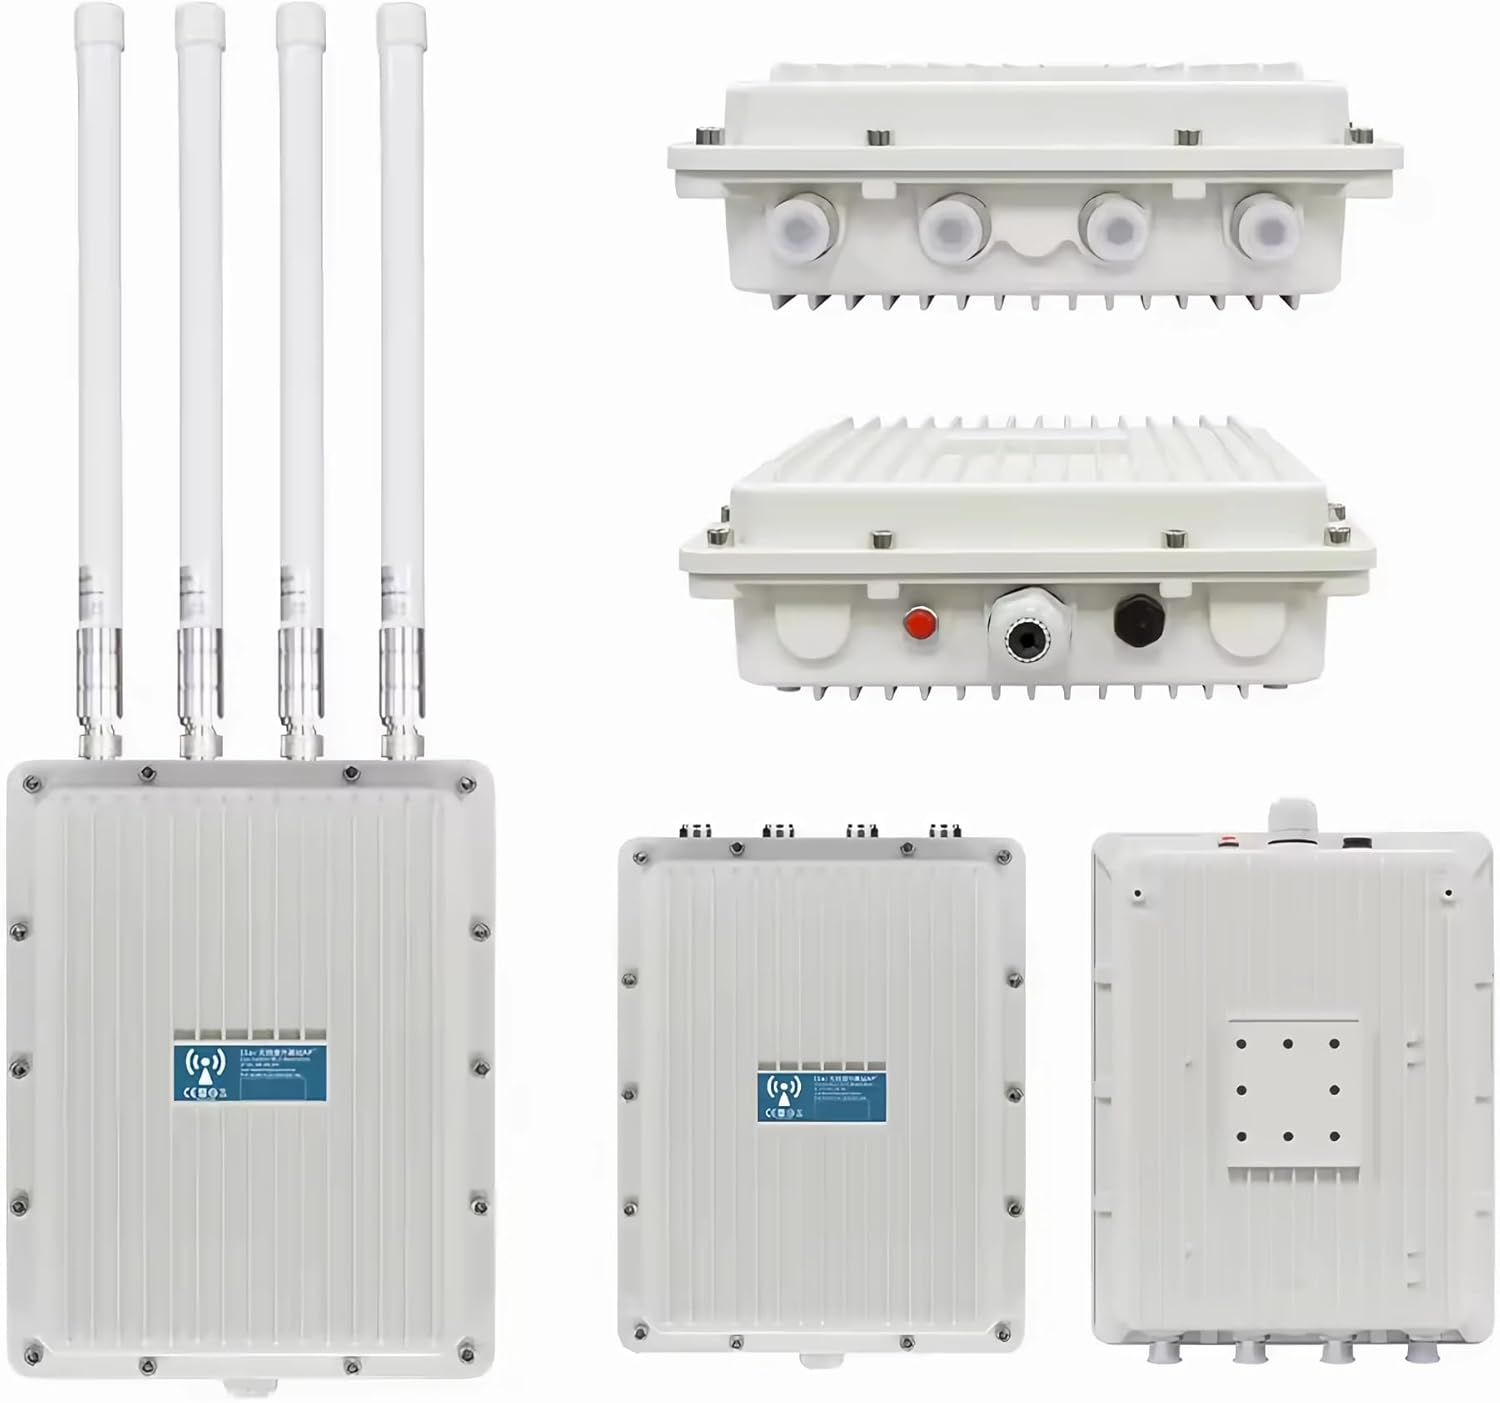
Figure 4.1: Multiple views of the AP830, highlighting its rugged aluminum alloy casing and port locations.
4.1 Components
- Main Unit: The central processing unit with an aluminum alloy shell for effective signal shielding and heat dissipation.
- MIMO Antennas: Four detachable 6dBi omnidirectional antennas (2x 2.4GHz, 2x 5.8GHz) for enhanced signal coverage.
- WAN Port: One 10/100/1000/2500 Mbps Gigabit Ethernet port, supporting 48V 0.5A PoE power supply. This port is protected by a waterproof plug.
- Reset Button: Used to restore factory settings. Located near the WAN port.
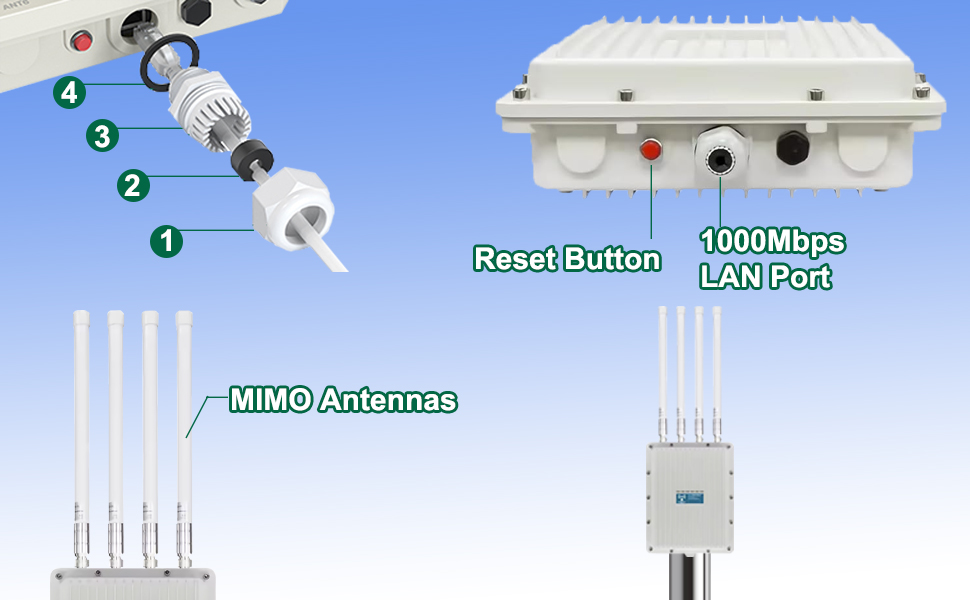
Figure 4.2: Detailed view of the AP830's ports and antennas.
5. Setup and Installation
Follow these steps to set up and install your KuWFi AX3000 Access Point.
5.1 Physical Installation
- Attach Antennas: Carefully screw the four 6dBi omnidirectional antennas onto the corresponding connectors on the top of the AP830. Ensure they are finger-tight.
- Prepare Mounting: The AP830 supports both wall and pole mounting. Use the provided mounting parts. For pole mounting, attach the bracket to the back of the AP830.
- Mount the Device: Secure the AP830 to your desired outdoor location. For pole mounting, thread the cable ties through the fixing points of the bracket and secure the product to the post. Ensure the device is installed in a location that provides optimal signal coverage and is protected from direct impact.

Figure 5.1: Antenna attachment and basic PoE connection diagram.

Figure 5.2: Step-by-step guide for pole mounting the AP830.
5.2 Power and Network Connection
- Connect Ethernet Cable: Connect one end of the provided Ethernet cable to the WAN port of the AP830. Ensure the waterproof plug is properly sealed around the cable.
- Connect PoE Injector: Connect the other end of the Ethernet cable to the 'PoE Out' port of the PoE power injector.
- Connect to Network: Connect another Ethernet cable from the 'LAN In' port of the PoE injector to your router or network switch.
- Power On: Plug the PoE power injector into a standard electrical outlet. The device will power on automatically.
Note: The Ethernet cable should be shorter than 100m/328ft for optimal performance. The PoE converter is not waterproof and must be installed indoors or in a protected enclosure.
6. Operating Modes
The KuWFi AX3000 Access Point supports two primary operating modes:
6.1 Fat AP Mode
In Fat AP mode, the device functions as a standalone access point. Users can directly access and configure it via its WEB interface. This mode is suitable for smaller deployments or when a dedicated AP controller is not available.
6.2 Fit AP Mode
In Fit AP mode, the device is managed by an external AP controller, cloud platform, or mobile application. This mode is ideal for larger networks requiring centralized management, seamless roaming, and advanced features like MAC filtering and client isolation.

Figure 6.1: AP/Router Mode setup illustration.
7. Configuration
Initial configuration is typically done via a web browser. Refer to the Quick Start Guide for the default IP address and login credentials.
- Connect to the AP: Connect your computer directly to the LAN port of the PoE injector, or connect wirelessly to the AP's default SSID.
- Access Web Interface: Open a web browser and enter the default IP address (e.g., 192.168.1.1).
- Login: Enter the default username and password (refer to the Quick Start Guide).
- Configure Settings: Follow the on-screen prompts to configure your Wi-Fi network name (SSID), password, operating mode (Fat AP or Fit AP), and other advanced settings. You can also adjust the RF power based on your environment to optimize performance and reduce interference.
For Fit AP mode, follow the instructions provided by your AP controller or cloud management platform for device adoption and configuration.
8. Maintenance
Regular maintenance ensures the longevity and optimal performance of your AP830.
- Cleaning: Periodically clean the exterior of the device with a soft, dry cloth. Do not use liquid cleaners or aerosols.
- Firmware Updates: Check the manufacturer's website for firmware updates. Keeping the firmware updated can improve performance, add new features, and fix bugs.
- Antenna Check: Ensure antennas are securely attached and free from damage.
- Cable Inspection: Periodically inspect the Ethernet cable and connections for any signs of wear or damage.
9. Troubleshooting
Here are solutions to common issues you might encounter:
| Problem | Possible Cause | Solution |
|---|---|---|
| No power/Device not turning on | PoE injector not powered, faulty cable, or incorrect connection. | Ensure the PoE injector is plugged in and receiving power. Check all Ethernet cable connections. Verify the PoE injector is connected to the correct ports. |
| No Wi-Fi signal | Device not powered, incorrect configuration, or antennas not properly attached. | Check power status. Log into the web interface to verify Wi-Fi settings (SSID broadcast, enabled). Ensure antennas are securely attached. |
| Poor Wi-Fi signal or slow speeds | Interference, distance, obstacles, or incorrect channel/bandwidth settings. | Adjust AP location for better line of sight. Change Wi-Fi channel to avoid interference. Ensure 160MHz bandwidth is enabled if supported by client devices. Adjust RF power. |
| Cannot access web interface | Incorrect IP address, network configuration issues, or device not responding. | Verify your computer's IP address is in the same subnet as the AP. Try a different browser. If all else fails, perform a factory reset. |
| Device needs to be reset | Configuration issues or system instability. | Locate the reset button. With the device powered on, press and hold the reset button for 6 seconds until the indicators flash, then release. The device will restart with factory default settings. |
10. Specifications
| Feature | Description |
|---|---|
| Model | AP830 |
| Wireless Standards | IEEE 802.11a/b/g/n/ac/ax (Wi-Fi 6) |
| Frequency Bands | Dual-Band (2.4GHz & 5.8GHz) |
| Max Data Rate | 2.4GHz: 600Mbps, 5.8GHz: 2400Mbps (Total AX3000) |
| Antennas | 4 x 6dBi Detachable Omni-directional MIMO Antennas |
| Ethernet Port | 1 x 10/100/1000/2500 Mbps WAN (PoE Supported) |
| PoE Standard | IEEE 802.3AT (48V 0.5A) |
| Chipset | IPQ5018 |
| Bandwidth Support | 160MHz |
| Weatherproof Rating | IP67 |
| Special Features | Lightning Protection, Adjustable RF Power, SSID Hidden, Seamless Roaming, MAC Filter, Client Isolation, Independent PA+LNA Design |
| Dimensions | 11.6 x 9.1 x 3.1 inches |
| Weight | 1.1 pounds |
11. Warranty and Support
Your KuWFi AX3000 Access Point comes with a 1-year worry-free warranty.
For any questions or technical assistance regarding your AP830, please do not hesitate to contact KuWFi customer support. We are committed to providing solutions within 24 hours.
Contact Information: Please refer to the contact details provided in your Quick Start Guide or visit the official KuWFi website for support resources.
Related Documents - AP830
 |
Tenda AC1200 Access Point & O3 Outdoor CPE | Wireless Network Solutions Comprehensive information on Tenda's AC1200 Dual Band Gigabit Wireless Access Point and O3 Outdoor CPE, designed for robust indoor and long-range wireless connectivity. Includes installation guidance and product specifications. |
 |
TP-Link TL-WA3001 Gigabit Wi-Fi 6 Access Point Quick Installation Guide Quick installation guide for the TP-Link TL-WA3001 Gigabit Wi-Fi 6 Access Point, covering setup in Access Point, Range Extender, Client, and Multi-SSID modes, with performance tips and FAQ. |
 |
KuWFi AX1800/AX3000 Outdoor WiFi 6 AP Quick Setup Guide Comprehensive quick setup guide for KuWFi AX1800 and AX3000 outdoor dual-band WiFi 6 wireless access points, covering installation, connection, configuration, and troubleshooting. |
 |
Ubiquiti UniFi UAP-AC-LR Quick Start Guide Quick start guide for the Ubiquiti UniFi UAP-AC-LR 802.11ac Dual-Radio Long Range Access Point, covering installation, hardware overview, and specifications. |
 |
KuWFi AP1200F Outdoor Access Point User Manual Comprehensive user manual for the KuWFi AP1200F Outdoor Access Point, detailing installation, configuration, advanced settings, troubleshooting, and technical support for this dual-band wireless device. |
 |
KuWfi Outdoor CPE Quick Installation Guide A comprehensive guide for installing and configuring KuWfi Outdoor CPE wireless bridges, detailing setup, specifications, modes, IP configuration, and field applications for long-range wireless transmission up to 5KM. |
Ask a question about this manual
Ask about setup, troubleshooting, compatibility, parts, safety, or missing instructions. Manuals+ will review the question and use this page’s manual context to help answer it.