1. Introduction
Thank you for purchasing the RCA 50-inch UHD 4K LCD TV. This manual provides essential information for setting up, operating, and maintaining your television. Please read this manual thoroughly before using the product to ensure safe and optimal performance. Keep this manual for future reference.
2. Important Safety Information
Always follow these basic safety precautions when using your television:
- Do not expose the TV to rain or moisture to prevent fire or electric shock.
- Do not block ventilation openings. Ensure adequate space around the TV for proper airflow.
- Place the TV on a stable, level surface to prevent it from falling.
- Use only the power cord supplied with the TV. Do not overload power outlets.
- Unplug the TV during lightning storms or when unused for long periods.
- Do not open the TV cabinet. Refer all servicing to qualified service personnel.
- Keep small parts and batteries out of reach of children.
3. Package Contents
Carefully unpack your television and check that all items are included. If any items are missing or damaged, please contact your retailer.

Figure 3.1: Included Accessories
- RCA 50-inch UHD 4K LCD TV
- Remote Control (requires 2 AAA batteries, included)
- Power Cable
- TV Stand Bases (x2)
- Screws for Stand Installation (x4)
- Anti-tip Screw (x1) and Clips (x3)
- Instruction Manual (Japanese)
4. Setup
4.1. Physical Setup (Stand / Wall Mount)
You can install your TV on the included stand or mount it on a wall using a VESA-compatible bracket (sold separately).

Figure 4.1: TV Dimensions and Stand Installation
Stand Installation:
- Place the TV screen-down on a soft, flat surface to prevent damage.
- Align the stand bases with the screw holes on the bottom of the TV.
- Secure the stand bases using the provided screws.
Wall Mounting:
This TV supports VESA mount standard 400x300mm. Use a compatible wall mount bracket and follow the instructions provided with the bracket. Ensure the wall can support the TV's weight (approximately 9 kg).

Figure 4.2: Wall Mounting Options
4.2. Connecting External Devices
Connect your external devices to the appropriate ports on the TV's rear and side panels.

Figure 4.3: TV Connectivity Ports

Figure 4.4: Rear Panel and Connection Terminals
| Port Type | Description |
|---|---|
| HDMI (x3) | Connect to Blu-ray players, game consoles, set-top boxes, etc. HDMI 2 supports ARC. |
| USB (x2) | Connect external USB HDD for recording (FAT32 format compatible). |
| AV Input | Connect older devices using composite video and stereo audio cables. |
| Optical Digital Audio Out | Connect to a soundbar or home theater system for digital audio. |
| LAN | For service or firmware updates. This TV does not support internet streaming services. |
| mini B-CAS Slot | Insert your mini B-CAS card for digital broadcast reception. |
| BS/CS Antenna Input | Connect to a BS/CS satellite antenna. |
| Terrestrial Digital Antenna Input | Connect to a terrestrial digital antenna. |
| 3.5mm Audio Input | Connect external audio sources. |
4.3. Initial Power On and Channel Setup
- After connecting all necessary cables, plug the power cord into an electrical outlet.
- Press the Power button on the remote control or on the TV.
- Follow the on-screen instructions to perform initial setup, including language selection and channel scanning.
5. Operating Instructions
5.1. Remote Control Functions
The remote control allows you to access all TV functions. Insert two AAA batteries (included) into the remote control before use.

Figure 5.1: Remote Control Layout and Key Functions
- Power: Turns the TV on or off.
- Number Buttons (0-12): Directly select channels.
- Input: Select input source (HDMI, AV, etc.).
- Volume (+/-): Adjust volume level.
- Channel (Up/Down): Change channels sequentially.
- Directional Buttons (Up/Down/Left/Right) & OK: Navigate menus and confirm selections.
- Menu: Access the main settings menu.
- EPG (Electronic Program Guide): Display the program guide.
- Record: Start recording the current program.
- Playback Controls: Play, Pause, Stop, Fast Forward, Rewind for recorded content.
5.2. Background Program Recording
Your RCA TV is equipped with dual tuners, allowing you to record one digital broadcast program while watching another. An external USB Hard Disk Drive (HDD) is required for recording (FAT32 format compatible, up to 6TB).

Figure 5.2: Dual Tuner Recording Function

Figure 5.3: External HDD Recording
Recording Steps:
- Connect a FAT32-formatted external USB HDD to one of the TV's USB ports.
- Access the program guide (EPG) to select a program for recording.
- Use the remote control to set a recording timer or initiate instant recording.
- The TV supports series recording and automatically adjusts for broadcast time changes or extended final episodes.
5.3. Picture and Sound Settings
Optimize your viewing experience by adjusting picture and sound settings.
Picture Quality:
This TV features a high-performance image processing engine that reproduces fine details and natural colors. It supports UHD 4K resolution and HDR content for enhanced contrast and vibrant colors.
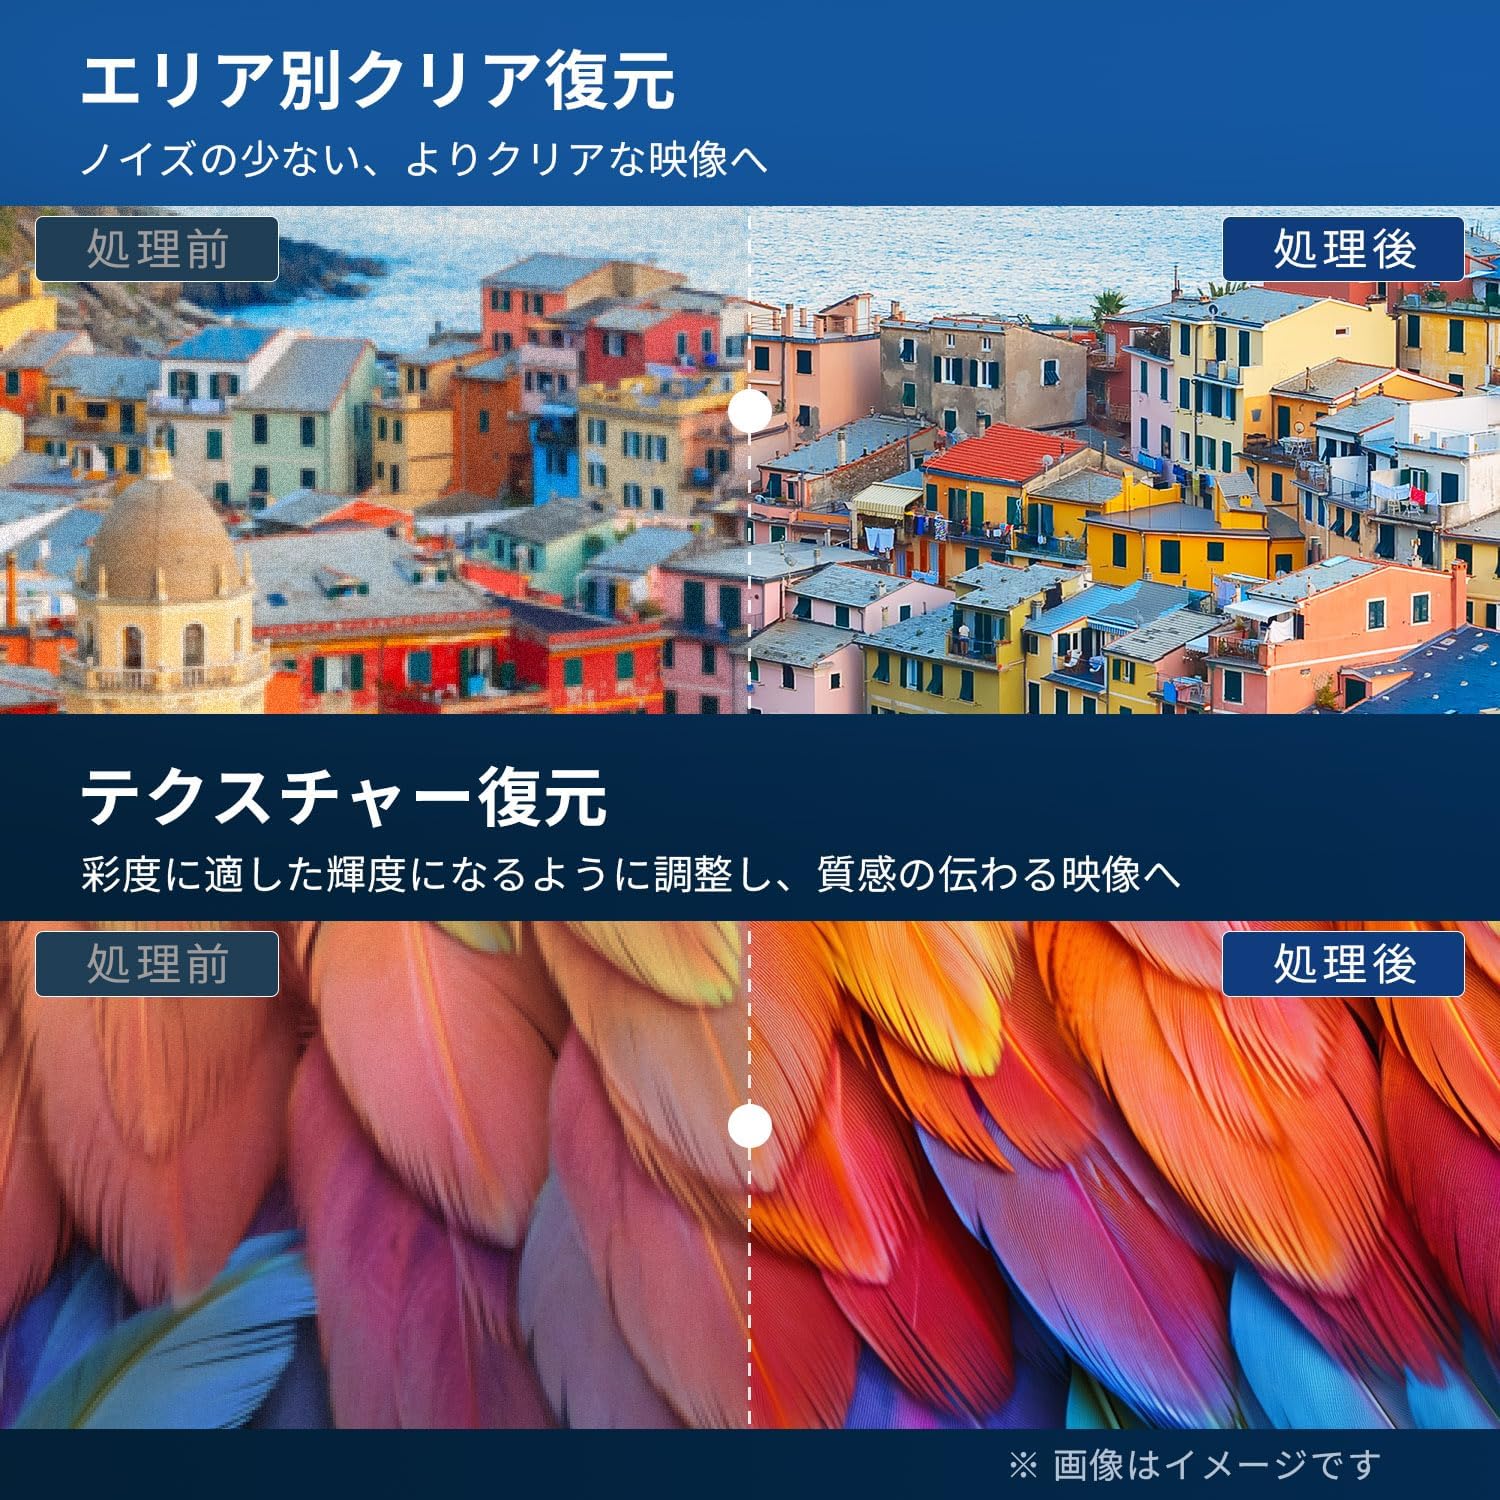
Figure 5.4: Image Processing for Clarity and Texture

Figure 5.5: High-Performance Multi-Speed Processing for Motion Clarity
Game Mode:
Activate Game Mode to reduce input lag and image processing delay, providing a smoother and more responsive gaming experience, especially for fast-paced games like FPS and fighting games.
Dolby Audio:
Experience immersive, high-quality sound with built-in Dolby Audio technology. Adjust sound modes in the audio settings menu to suit your preferences.

Figure 5.6: Dolby Audio for Immersive Sound
6. Maintenance
Proper maintenance ensures the longevity and performance of your TV.
- Cleaning the Screen: Gently wipe the screen with a soft, lint-free cloth. For stubborn marks, use a screen cleaner specifically designed for LCD/LED displays. Do not spray cleaner directly onto the screen.
- Cleaning the Cabinet: Use a soft, dry cloth to wipe the TV cabinet. Do not use abrasive cleaners, waxes, or solvents.
- Ventilation: Ensure the ventilation openings on the back of the TV are not blocked.
- Power Cord: Regularly check the power cord for any damage. If damaged, contact customer support for replacement.
7. Troubleshooting
Before contacting customer support, try the following solutions for common issues:
| Problem | Possible Solution |
|---|---|
| No power | Check if the power cord is securely plugged into the TV and the outlet. Press the power button on the remote or TV. |
| No picture, but sound is present | Check the input source. Ensure external devices are powered on and connected correctly. |
| No sound, but picture is present | Check the volume level. Ensure Mute is not activated. Check audio cables for external devices. |
| Remote control not working | Replace batteries. Ensure there are no obstructions between the remote and the TV's IR sensor. |
| Poor picture quality / distorted image | Check antenna connection. Adjust picture settings in the menu. Try a different input source. |
| Cannot record programs | Ensure an external USB HDD is connected and formatted to FAT32. Check available storage space. Verify tuner reception. |
| TV freezes or becomes unresponsive | Unplug the TV from the power outlet, wait for 1 minute, then plug it back in and power on. |
8. Specifications
| Feature | Detail |
|---|---|
| Model Number | RCA-NS-50Q1 |
| Screen Size | 50 inches |
| Display Technology | LED Module |
| Resolution | 4K UHD (3840 x 2160) |
| Refresh Rate | 60 Hz |
| Aspect Ratio | 16:9 |
| Viewing Angle | 178 degrees |
| Response Time | 2 ms |
| Contrast Ratio | 200:1 |
| Max Brightness | 220 cd/m² |
| HDR Support | HDR |
| Tuners | Dual Terrestrial/BS/110-degree CS Digital Tuners (ISDB-T) |
| Recording | External USB HDD Recording (FAT32 compatible, up to 6TB) |
| Audio | Dolby Audio, Built-in Speakers (Max Output: 10W) |
| Connectivity | HDMI (x3), USB (x2), AV Input, Optical Digital Audio Out, LAN, 3.5mm Audio Input |
| VESA Mount Standard | 400 x 300 mm |
| Power Supply | AC 100-240V, 50/60Hz |
| Power Consumption | 120 W |
| Dimensions (with stand) | 111.8 cm (W) x 69.6 cm (H) x 21.5 cm (D) |
| Weight (with stand) | Approx. 9 kg |
| Smart TV Features | None. This TV does not support internet connection or streaming services. |
9. Warranty and Support
9.1. Product Warranty
This RCA television comes with a Three-Year Warranty from the date of purchase, covering manufacturing defects. Please retain your proof of purchase for warranty claims. Note that some specific components may have a 12-month quality guarantee.

Figure 9.1: Warranty Information
9.2. Customer Support
For any inquiries, technical assistance, or warranty claims, please contact our customer support team. Our offices are located in Tokyo, and our customer service team provides nationwide support.

Figure 9.2: RCA Customer Support Network
Contact Methods:
- LINE Support: Scan the QR code below to add our after-sales service account on LINE for quick assistance.
- Email Support: Send your inquiries to our dedicated email address. We aim to respond within 24 hours.

Scan for LINE Support: https://lin.ee/AOq4pQs

Email: tutu@tutuelec.com