1. Introduction
Thank you for choosing the LIORQUE Wireless Weather Station, Model YGH6208. This device is designed to provide accurate indoor and outdoor temperature and humidity readings, atmospheric pressure, and weather forecasts. It also includes a digital clock with alarm and snooze functions, and a calendar with day display in 7 languages. This manual will guide you through the setup, operation, and maintenance of your new weather station to ensure optimal performance.
2. What's in the Box
Please check the package contents to ensure all items are present:
- 1 x LIORQUE Wireless Weather Station (Main Unit)
- 1 x Outdoor Sensor
- 1 x User Manual
- 5 x AAA Batteries

Figure 2.1: Package Contents. The image displays the main weather station unit, the outdoor sensor, the user manual, and five AAA batteries.
3. Product Overview
The LIORQUE Wireless Weather Station consists of a main display unit and a wireless outdoor sensor. The main unit features a large LCD screen that displays various environmental data and time information.
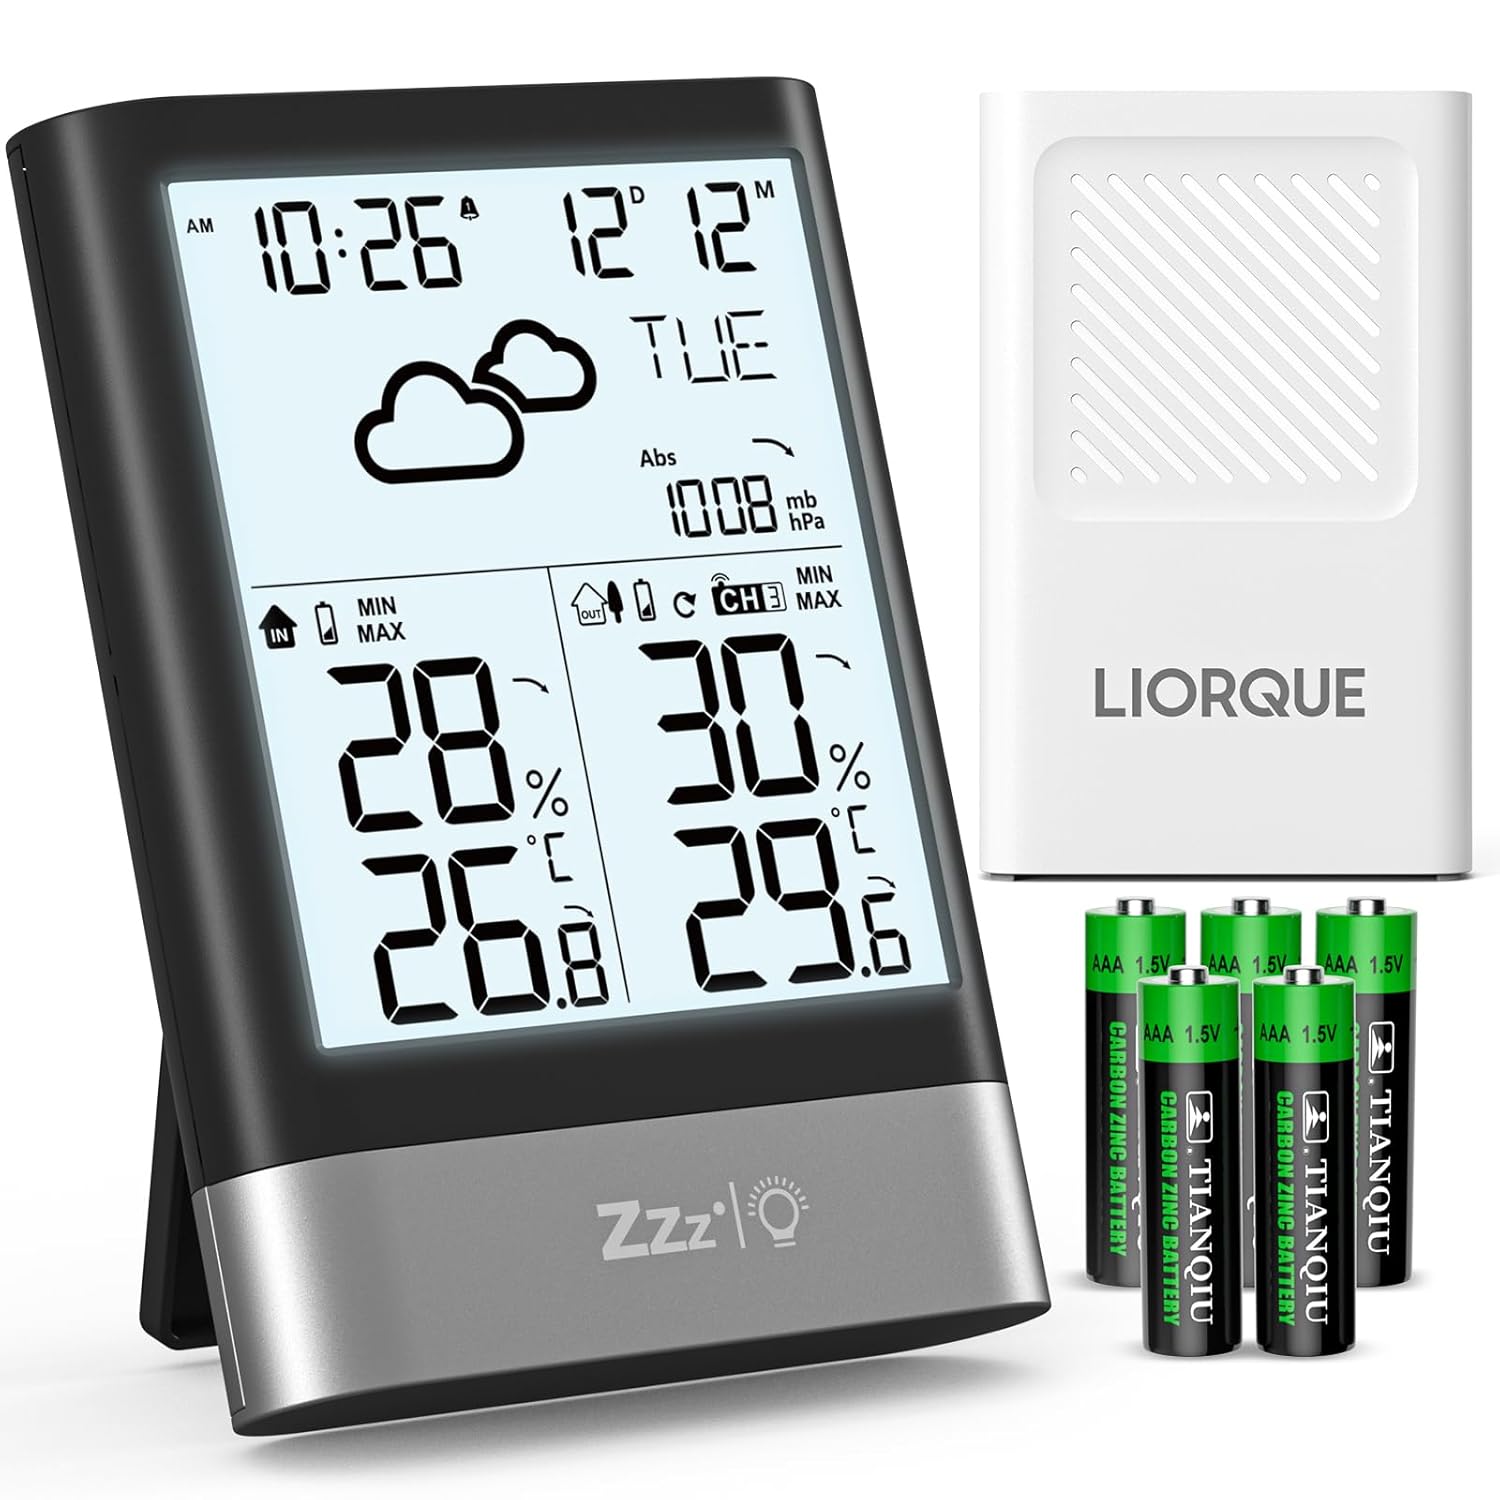
Figure 3.1: LIORQUE Wireless Weather Station. This image shows the main weather station unit with its display, the white outdoor sensor, and a set of AAA batteries.
3.1 Main Unit Features
- Large 4.3-inch LCD display with backlight
- Indoor temperature and humidity display
- Outdoor temperature and humidity display (from sensor)
- Atmospheric pressure display
- Weather forecast icons
- Time (12/24h format) and Date display
- Day of the week in 7 languages
- Alarm with snooze function
- Max/Min temperature and humidity records
- Temperature and humidity trend indicators
3.2 Outdoor Sensor Features
- Measures outdoor temperature and humidity
- Wireless transmission up to 100 meters (open air)
- Supports up to 3 sensors (one included)
- IPX4 waterproof rating
4. Setup
4.1 Battery Installation
Both the main unit and the outdoor sensor require AAA batteries for operation. Please follow these steps:
- Main Unit: Open the battery compartment cover on the back of the main unit. Insert 3 AAA batteries, observing the correct polarity (+/-). Close the cover.
- Outdoor Sensor: Open the battery compartment cover on the back of the outdoor sensor. Insert 2 AAA batteries, observing the correct polarity (+/-). Close the cover.
The main unit will power on automatically once batteries are inserted. The outdoor sensor will begin transmitting data.

Figure 4.1: Battery Installation. This diagram illustrates where to insert the AAA batteries into both the main unit and the outdoor sensor, indicating the number of batteries required for each.
4.2 Sensor Placement
For accurate readings and optimal wireless transmission, consider the following guidelines for placing your outdoor sensor:
- Protection: Place the sensor in a shaded area, away from direct sunlight and rain, to ensure accurate temperature and humidity readings and prolong its lifespan.
- Height: Mount the sensor approximately 2.5 meters (8.2 feet) above the ground.
- Location: Choose a location that allows for good air circulation and is within the 100-meter wireless range of the main unit. Avoid placing it near large metal objects or electrical appliances that could interfere with the signal.

Figure 4.2: Sensor Installation Suggestions. This image provides visual guidance on where to place the outdoor sensor, emphasizing protection from rain and direct sunlight, and recommending a specific mounting height.
4.3 Initial Setup and Pairing
After battery installation, the main unit will automatically search for the outdoor sensor. This process may take a few minutes. Once connected, the outdoor temperature and humidity will appear on the display. If the sensor does not connect, try the following:
- Ensure both units have fresh batteries.
- Bring the sensor closer to the main unit.
- Press the 'CH' button on the main unit to cycle through channels (if you have multiple sensors).
- Press the 'RESET' button on both units (usually a small hole requiring a pin) to restart the pairing process.
The weather station supports up to three outdoor sensors. If you purchase additional sensors, ensure they are set to different channels (CH1, CH2, CH3) before pairing.

Figure 4.3: Multi-Sensor Support. This illustration demonstrates how the weather station can connect to and display data from up to three separate outdoor sensors, allowing monitoring of different areas.
5. Operating Instructions
5.1 Display Overview
The LCD screen provides a comprehensive overview of current weather conditions and time information. Key display areas include:
- Time & Date: Top left, showing current time and date.
- Weather Forecast: Icons indicating predicted weather conditions.
- Atmospheric Pressure: Displayed in mb/hPa.
- Indoor Temperature & Humidity: Bottom left section.
- Outdoor Temperature & Humidity: Bottom right section.
- Trend Indicators: Arrows next to temperature/humidity/pressure indicating rising, stable, or falling trends.

Figure 5.1: Multifunction Display. This image illustrates the various data points shown on the weather station's LCD screen, including temperature, humidity, time, date, and weather forecast icons.
5.2 Setting Time and Date
The time and date must be set manually. Use the buttons located on the top of the unit to navigate and adjust settings:
- Press and hold the 'MODE' button (or similar button, refer to specific button labels on your device) to enter time setting mode.
- Use the '+' or '-' buttons to adjust the flashing value (e.g., hour, minute, year, month, day).
- Press 'MODE' again to confirm the setting and move to the next parameter.
- Continue until all settings (12/24h format, date format, day language) are configured.
- The day of the week can be displayed in 7 languages.
5.3 Alarm and Snooze Function
The weather station includes an alarm clock with a snooze feature:
- Setting Alarm: Press the 'ALARM' button to view the alarm time. Press and hold 'ALARM' to enter alarm setting mode. Use '+' or '-' to adjust the hour and minute. Press 'ALARM' to confirm.
- Activating Alarm: Press 'ALARM' repeatedly to toggle the alarm on/off. An alarm icon will appear when active.
- Snooze: When the alarm sounds, press the 'SNOOZE/LIGHT' button on the front to activate the snooze function. The alarm will sound again after a few minutes (typically 5-10 minutes).
- Stopping Alarm: To stop the alarm completely, press any other button on the top of the unit.

Figure 5.2: Alarm and Snooze. This image shows the weather station functioning as an alarm clock, with a person using the snooze feature.
5.4 Backlight Operation
The LCD screen features an energy-saving backlight:
- Press the 'SNOOZE/LIGHT' button on the front of the unit to activate the backlight.
- The backlight will automatically turn off after approximately 10 seconds to conserve battery power.

Figure 5.3: Backlit Display. This image demonstrates the weather station's LCD screen with its backlight on, enhancing readability in low-light conditions.
5.5 Weather Forecast
The weather station analyzes atmospheric pressure changes to predict upcoming weather conditions. The display shows one of six weather icons:
- Sunny
- Partly Cloudy
- Cloudy
- Light Rain
- Heavy Rain
- Snowy
These forecasts are based on atmospheric pressure trends and may not always perfectly match local weather conditions, especially in rapidly changing environments.

Figure 5.4: Weather Forecast Icons. This image displays the six different weather icons used by the station to indicate predicted weather conditions.
5.6 Max/Min Records and Trends
The station records maximum and minimum temperature and humidity values for both indoor and outdoor environments. It also displays trend indicators:
- Max/Min: Press the 'MAX/MIN' button to view the recorded maximum and minimum values. Press again to cycle through indoor max, indoor min, outdoor max, outdoor min.
- Trend Indicators: Small arrows next to temperature, humidity, and pressure readings indicate if the value is rising (up arrow), stable (horizontal line), or falling (down arrow).
6. Maintenance
6.1 Battery Replacement
When the battery indicator appears on the display, it's time to replace the batteries. Use fresh AAA batteries for both the main unit and the outdoor sensor. Always replace all batteries in a unit at the same time to ensure consistent power.
6.2 Cleaning
To clean the weather station and sensor, use a soft, damp cloth. Do not use abrasive cleaners, alcohol, or corrosive chemicals, as these can damage the display or casing. Ensure no liquid enters the device.
6.3 Sensor Care
Periodically check the outdoor sensor for any debris or blockages that might affect its readings. Ensure its placement continues to protect it from direct weather elements as described in Section 4.2.
7. Troubleshooting
If you encounter issues with your LIORQUE Wireless Weather Station, please refer to the following common problems and solutions:
| Problem | Possible Cause | Solution |
|---|---|---|
| No outdoor temperature/humidity display | Sensor not paired or out of range; low sensor battery. | Ensure sensor batteries are fresh. Bring sensor closer to main unit. Press 'CH' button on main unit. Reset both units. |
| Inaccurate temperature/humidity readings | Sensor exposed to direct sunlight/rain; interference from other devices. | Relocate the outdoor sensor to a shaded, protected area. Ensure proper ventilation. Avoid placing near heat sources or electronics. |
| Display is dim or blank | Low batteries in main unit. | Replace all 3 AAA batteries in the main unit with fresh ones. |
| Time/Date is incorrect | Manual setting error. | Refer to Section 5.2 to manually set the time and date correctly. |
8. Specifications
Here are the technical specifications for the LIORQUE Wireless Weather Station, Model YGH6208:
- Model Number: YGH6208
- Brand: LIORQUE
- Product Dimensions (L x W x H): 8.7 x 2.3 x 12.4 cm
- Weight: 300 grams
- Main Unit Power: 3 x AAA batteries (included)
- Outdoor Sensor Power: 2 x AAA batteries (included)
- Connectivity Technology: RF (Radio Frequency)
- Wireless Range: Up to 100 meters (open air)
- Material: Acrylonitrile Butadiene Styrene (ABS)
- Color: Black
- Special Features: Large LCD display, alarm clock, adjustable brightness, weather forecast, temperature, humidity, adjustable day language.
- Recommended Use: Home
- Specific Use: Temperature monitoring
9. Warranty and Support
LIORQUE is committed to providing high-quality products and excellent customer service. While specific warranty details are not provided in this manual, we strive to offer a friendly and responsive service to our customers worldwide. If you encounter any issues or have questions regarding your LIORQUE Wireless Weather Station, please contact our customer support team through the retailer where you purchased the product or visit the official LIORQUE brand store for assistance.
For more information and support, you may visit the LIORQUE Brand Store.


