Introduction
This manual provides comprehensive instructions for the installation, operation, and maintenance of your Jortan 2MP IP NVR 4-Channel Wireless Security Camera Kit. This system is designed for ease of use with its integrated wireless and Plug and Play features, making it suitable for both experienced users and DIY enthusiasts. It offers remote viewing capabilities via a free smartphone application, ensuring you can monitor your property from anywhere.
The kit includes a 4-channel NVR and four 2MP wireless IP cameras, along with necessary power supplies and accessories. The integrated wireless system allows the NVR and cameras to connect automatically upon power-up, eliminating the need for complex network configurations or video cabling.
Package Contents
Please verify that all items listed below are present in your package:
- 1 x 4-Channel NVR (Network Video Recorder)
- 4 x 2MP Wireless IP Cameras
- 4 x Power Adapters for Cameras
- 1 x Power Adapter for NVR
- 1 x USB Mouse
- 1 x Remote Control
- Necessary Cables (e.g., Ethernet cable for NVR internet connection)
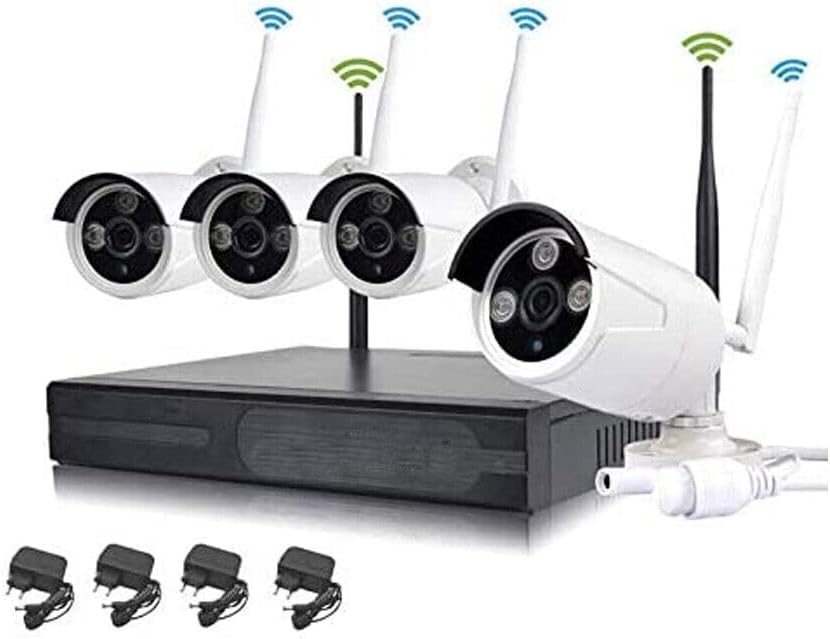
Image: Complete Jortan 4-Channel Wireless Security Camera Kit showing the NVR, four cameras, and individual power adapters.
Setup Instructions
1. NVR Connection
- Connect the NVR:
- Connect the included USB mouse to a USB port on the NVR.
- Connect the NVR to a monitor or TV using an HDMI or VGA cable (not included).
- Connect the NVR to your router using an Ethernet cable for internet access (required for remote viewing). The NVR also features 3 LAN ports which can be used as a network switch.
- Connect the NVR power adapter to the DC12V port and plug it into a power outlet.
- Initial Boot-up: The NVR will power on automatically. Follow the on-screen prompts for initial setup, including language selection and password creation.
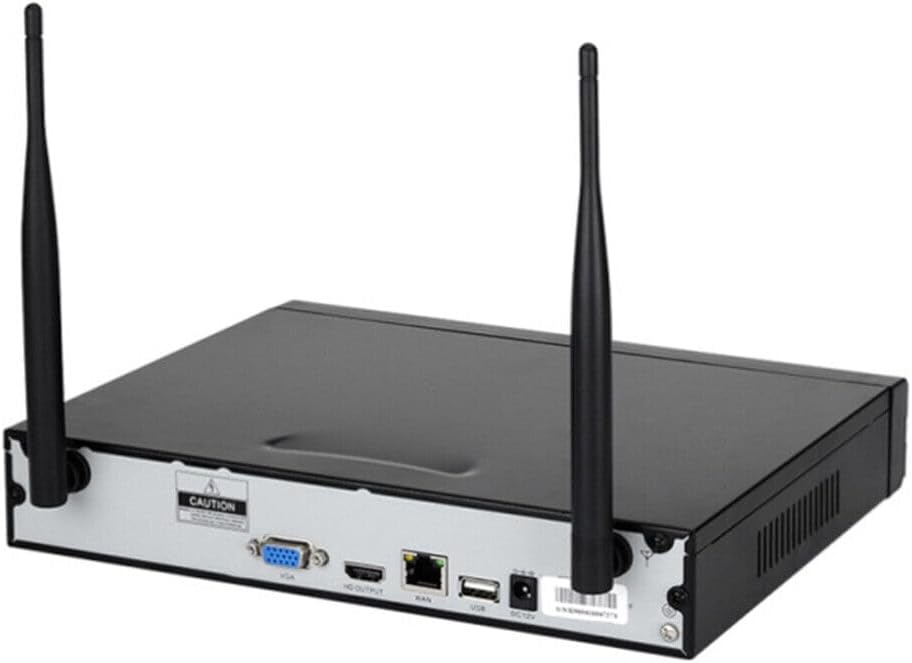
Image: Rear panel of the NVR showing ports for VGA, HDMI, LAN, USB, and DC12V power input.
2. Camera Installation and Power
- Mount Cameras: Choose suitable locations for your cameras, ensuring they have a clear line of sight to the areas you wish to monitor. The cameras are designed for both indoor and outdoor use.
- Power Cameras: Connect each camera to its individual power adapter and plug the adapters into power outlets.
- Automatic Pairing (Plug and Play): Once powered, the cameras will automatically connect to the NVR's integrated wireless system. The NVR screen should display the camera feeds within a few moments. No manual pairing is typically required.

Image: Close-up view of three Jortan wireless security cameras, highlighting their design and antennas.
Wireless Signal Range: The NVR's integrated Wi-Fi, equipped with two antennas, offers a wireless range of approximately 100 meters (328 feet) in open fields and about 60 meters (197 feet) indoors, even through thick walls.
Operating Instructions
1. Local Viewing and Control
- Live View: Once cameras are connected, the NVR will display live feeds on the connected monitor.
- Menu Navigation: Use the USB mouse or remote control to navigate the NVR's on-screen menu. Right-click to access the main menu for settings, playback, and system information.
- Recording: The NVR supports continuous recording, scheduled recording, and motion-triggered recording. Configure these options in the system settings. An internal hard drive (not included) is required for recording storage.
- Playback: Access recorded footage through the playback menu. You can search by date, time, and event.
2. Remote Viewing (P2P)
The Jortan system features P2P (Peer-to-Peer) technology for easy remote access via a smartphone application. This eliminates the need for static IP addresses or port forwarding on your router.
- Download the App: Search for the official Jortan security camera app on your smartphone's app store (e.g., App Store for iOS, Google Play Store for Android).
- Register an Account: Open the app and follow the instructions to create a new user account.
- Add Device: On the NVR's monitor, during initial setup or in the system information menu, locate the QR code. In the smartphone app, select "Add Device" or "Scan QR Code" and scan the QR code displayed on the NVR screen.
- View Live Feed: Once the device is added, you can view live camera feeds, access recorded footage, and manage system settings remotely from your smartphone.
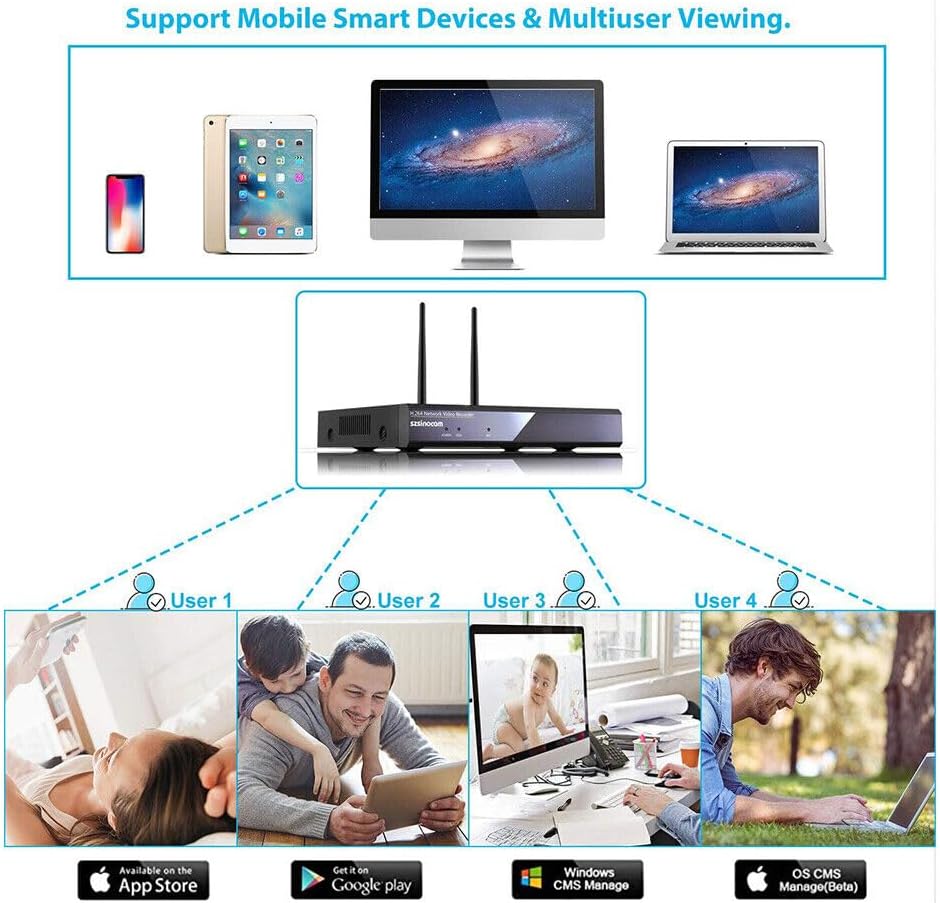
Image: Diagram illustrating how multiple users can view camera feeds on smartphones, tablets, and computers via the mobile application.
Maintenance
- Regular Cleaning: Periodically clean the camera lenses with a soft, dry cloth to ensure clear image quality.
- Firmware Updates: Check the manufacturer's website or the NVR's system settings for available firmware updates. Keeping your system updated ensures optimal performance and security.
- Hard Drive Management: If using a hard drive for recording, ensure it has sufficient space. Configure the NVR to overwrite old footage or set up scheduled backups as needed.
- Power Supply Check: Ensure all power adapters are securely connected and free from damage.
Troubleshooting
- No image on monitor/TV:
- Ensure the NVR is powered on and the power adapter is securely connected.
- Check the HDMI/VGA cable connection between the NVR and the monitor.
- Verify the monitor input source is correctly selected (HDMI/VGA).
- Cameras not displaying on NVR:
- Ensure all cameras are powered on and their power adapters are securely connected.
- Check if cameras are within the wireless range of the NVR. Relocate if necessary.
- Restart both the NVR and the cameras.
- If issues persist, check the NVR's camera management settings to see if cameras are detected but not displaying.
- Remote viewing not working:
- Ensure the NVR is connected to the internet via an Ethernet cable.
- Verify your smartphone has an active internet connection.
- Confirm the QR code was scanned correctly and the device was added to the app.
- Check the NVR's network settings to ensure P2P is enabled.
- Poor wireless signal/intermittent connection:
- Reduce the distance between cameras and the NVR.
- Minimize obstacles (thick walls, metal objects) between cameras and the NVR.
- Ensure NVR antennas are properly oriented.
Product Specifications
| Manufacturer | Jortan |
|---|---|
| Model Number | Jortan |
| Product Dimensions (L x W x H) | 15 x 15 x 10 cm (5.9 x 5.9 x 3.9 inches) |
| Color | White |
| Style | Modern |
| Shape | Circular (Cameras) |
| Power Type | Wired Electric |
| Special Features | Integrated Wireless System, P2P Remote Vision |
| Included Components | NVR, Cables |
| Connectivity Technology | Wireless |
| Video Recording Resolution | 720p |
| Number of Channels | 4 |
| Compatible Devices | Smartphones |
Warranty and Support
Specific warranty information for this product is not available in the provided details. Please refer to the retailer's return policy or contact the seller directly for warranty claims and technical support.
For further assistance, please consult the official Jortan website or contact their customer service if available.


