Introduction
This manual provides essential instructions for the safe and efficient operation of your Dragonhawk L3 Cordless Battery Power Supply. Designed for seamless compatibility with Dragonhawk L3, Atom2 Pro, and Mast Fold Pro/Fold2 Pro/Flip3 tattoo machines, this power supply ensures reliable and consistent power for your tattooing needs. It features a 2000mAh capacity for extended sessions, advanced power management for stable operation, and a color LED display for real-time monitoring of voltage, battery percentage, and session time.

Figure 1: Dragonhawk L3 Cordless Battery Power Supply.
Product Features
- Perfect Compatibility: Expertly engineered for seamless use with Dragonhawk L3, Atom2 Pro, and Mast Fold Pro/Fold2 Pro/Flip3 machines.
- Professional Power Supply: 2000mAh capacity supports extended sessions with minimal downtime; advanced power management ensures cool, stable operation with high energy efficiency.
- Precision Monitoring: Color LED displays real-time voltage and battery percentage, plus built-in session timer.
- User-friendly Operation: Features simple double-click startup and three-button control; includes Kick Start function for large magnum shaders.
- Safe & Sustainable: Constructed with eco-conscious materials and rigorous safety standards.
Setup
Attaching the Power Supply
The Dragonhawk L3 Cordless Battery Power Supply is designed for easy attachment to compatible tattoo pen machines. Align the connector on the power supply with the port on your tattoo machine and gently push until it clicks securely into place. Ensure a firm connection for stable power delivery.
Video 1: Demonstrates attaching the Dragonhawk Cordless Tattoo Pen Battery to the L3 tattoo machine, showing the connection and initial power-on.
Video 2: Shows the Dragonhawk RCA Tattoo Battery being attached to various tattoo machines, including the L3, Mast Fold2 Pro, and Mast Mini, illustrating compatibility.

Figure 2: Illustration of the replaceable and rechargeable battery design, highlighting how the power supply connects to the tattoo pen machine.
Charging the Battery
To charge the power supply, connect a Type-C charging cable to the charging port located on the unit. The LED display will indicate the charging status. A full charge typically takes approximately 2 hours and provides 5-7 hours of working time, depending on usage.

Figure 3: Close-up view of the Type-C charging port on the battery power supply.

Figure 4: Visual representation of the working time (5-7 hours) and charging time (2 hours) for the 2000mAh battery.
Operating Instructions
Power On/Off and Voltage Adjustment
To power on the device, double-click the power button. The color LED display will illuminate, showing the current voltage, battery percentage, and session timer. Use the '+' and '-' buttons to adjust the voltage to your desired setting. The DragonhawkLabs smart chip maintains stable output even at low battery levels. To power off, double-click the power button again.
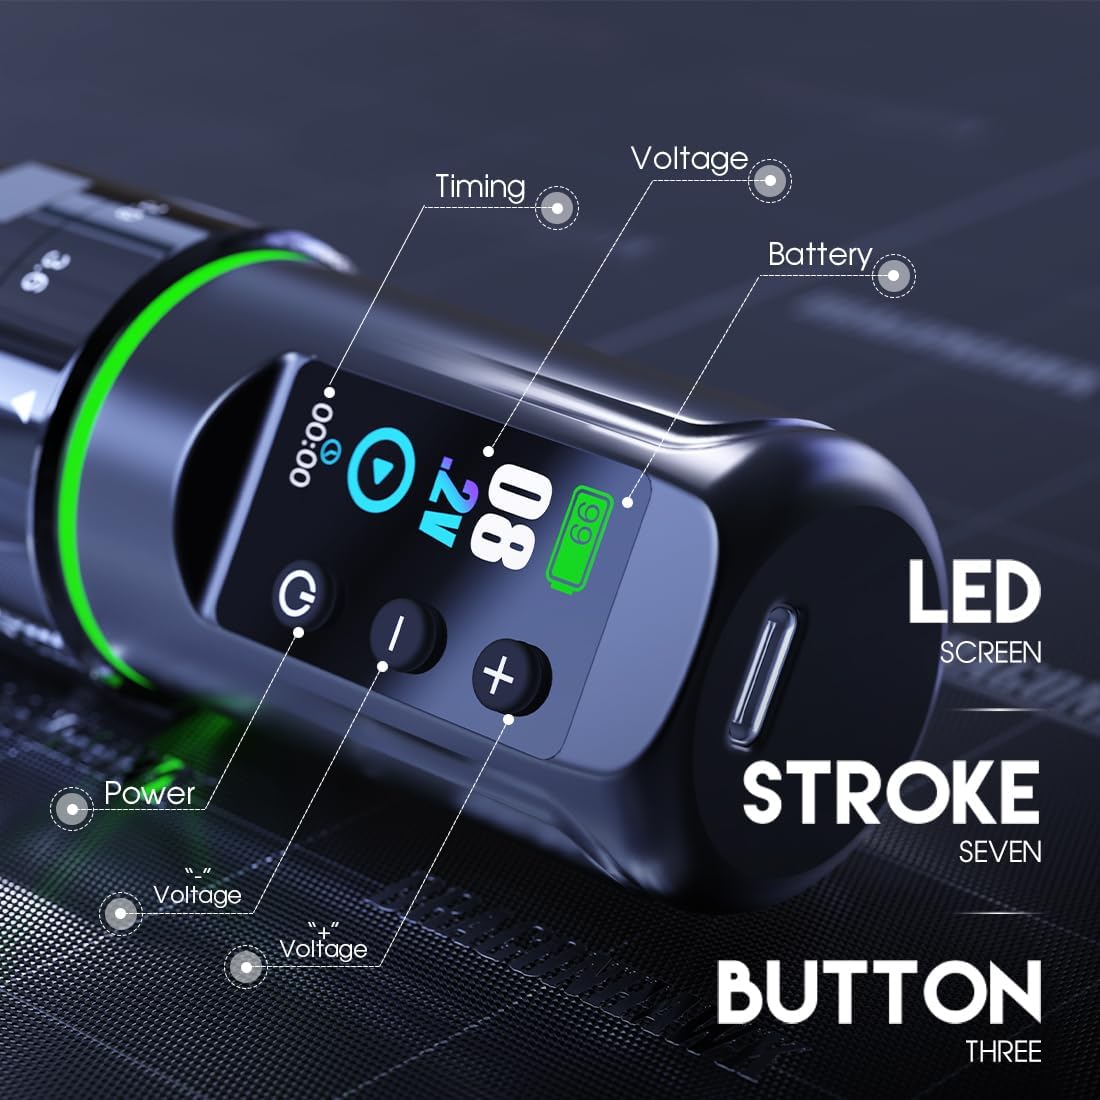
Figure 5: Detailed view of the LED screen, indicating timing, voltage, battery level, and the power and voltage adjustment buttons.
Video 3: This preview video demonstrates the unboxing and basic operation of a similar tattoo battery, including power-on and voltage adjustment.
Kick Start Function
The power supply includes a Kick Start function, which provides a brief surge of power to help start larger magnum shaders. Refer to your tattoo machine's specific instructions for optimal use of this feature in conjunction with the power supply.
Maintenance
Cleaning and Storage
Regularly clean the exterior of the power supply with a soft, dry cloth. Avoid using abrasive cleaners or solvents. Store the unit in a cool, dry place away from direct sunlight and extreme temperatures. Ensure the device is powered off before cleaning or storing.
Battery Care
To prolong battery life, avoid fully discharging the unit frequently. Charge the battery when the indicator shows low power. If storing for an extended period, charge the battery to approximately 50-70% capacity and recharge every few months to prevent deep discharge.
Safety Precautions
Use this product with caution to avoid injury. Do not disassemble or attempt to repair the unit yourself. Keep away from water and other liquids. Do not expose to open flames or extreme heat. Always ensure proper hygiene and sterilization practices when using with tattoo equipment.
Troubleshooting
- Device not powering on: Ensure the battery is sufficiently charged. Double-check that the power supply is securely attached to the tattoo machine.
- Unstable voltage output: The DragonhawkLabs smart chip is designed to maintain stable output. If you experience instability, ensure the battery is not critically low. If the issue persists, contact customer support.
- Screen not displaying correctly: Check for physical damage. If the screen is broken or malfunctioning, discontinue use and contact customer support.
- Short battery life: Ensure the battery is fully charged before use. Operating at higher voltages or with demanding machines may reduce battery life. Consider charging practices as outlined in the Maintenance section.
Specifications
| Feature | Detail |
|---|---|
| Brand | Dragonhawk |
| Model | L3 Battery Power Supply |
| Battery Capacity | 2000 Milliamp Hours |
| Battery Cell Type | Lithium |
| Number of Batteries | 1 (included) |
| Battery Weight | 73 Grams |
| Recommended Uses | For L3 Tattoo Machine, Atom2 Pro, Mast Fold Pro/Fold2 Pro/Flip3 |
| Manufacturer | Dragonhawk |
Warranty and Support
Dragonhawk provides coverage for this product. For any inquiries, issues with your order, or to claim warranty support, please reach out through Amazon's messaging system. Our customer service team is available to assist you with product-related questions, troubleshooting, and technical support.
For additional resources, including video tutorials and setup guides, visit Youtube.com/@Dragonhawkofficial.


