Gotofine P7
Gotofine Automatic Foaming Soap Dispenser P7
Model: P7 | User Manual
Introduction
This manual provides detailed instructions for the safe and efficient operation of your Gotofine Automatic Foaming Soap Dispenser, Model P7. Please read this manual thoroughly before use and retain it for future reference.
Important Safety Information
- Do not immerse the dispenser in water. The unit is IPX5 waterproof, meaning it is protected against low-pressure water jets, but not full submersion.
- Keep out of reach of children.
- Use only the specified soap types and dilution ratios to prevent clogging or damage.
- Do not attempt to disassemble or repair the unit yourself. Contact customer support for assistance.
- Ensure the USB charging port is properly sealed with the rubber plug when not charging to maintain water resistance.
Package Contents
- Gotofine Automatic Foaming Soap Dispenser (Model P7)
- USB-C Charging Cable
- Wall-Mount Adhesive Hook
- Soap Labels (Hand Soap, Dish Soap)
- User Manual
Product Overview
Familiarize yourself with the components of your soap dispenser.

Image: Diagram illustrating the key features and controls of the Gotofine P7 dispenser, including the touch control switch, continuous foam button, foam level indicator, and battery indicator.
- Infrared Sensor: Detects hand movement for automatic dispensing.
- Touch Control Switch: Power on/off and adjust foam volume.
- Continuous Foam Button: Activates continuous foam dispensing.
- Foam Level Indicator: Displays the selected foam volume level.
- Battery Indicator: Shows current battery status.
- Soap Reservoir: Holds up to 380ml (12.8oz) of soap.
- USB-C Charging Port: For recharging the internal battery.
Setup Instructions
1. Charging the Dispenser
Before first use, fully charge the dispenser. A full charge provides approximately 90 days of regular use (around 5000 dispenses).
- Locate the USB-C charging port on the side of the dispenser.
- Open the rubber plug covering the charging port.
- Connect the provided USB-C cable to the dispenser and a suitable USB power source (e.g., wall adapter, computer USB port).
- The battery indicator lights will show charging progress. Once fully charged, disconnect the cable and securely close the rubber plug to maintain IPX5 waterproofing.

Image: The USB-C charging port on the side of the dispenser, with a charging cable connected.
2. Filling the Soap Reservoir
The dispenser has a 380ml (12.8oz) capacity. Ensure the dispenser is turned off before filling.
- Gently twist the top section of the dispenser counter-clockwise to separate it from the soap reservoir.
- For Foam Soap: Pour foam soap directly into the reservoir.
- For Ordinary Liquid Soap (Hand Soap, Dish Soap, Body Wash, Shampoo): Dilute the liquid soap with water at a ratio of 1:4 to 1:6 (1 part soap to 4-6 parts water). Stir gently to mix, avoiding excessive bubbles.
- Do not overfill. The transparent gauge allows monitoring of the soap level.
- Reattach the top section by aligning and twisting clockwise until secure.

Image: Illustration of separating the dispenser components for refilling and the recommended dilution ratio for liquid soaps.

Image: Examples of included soap labels for Hand Soap and Dish Soap.
3. Placement Options (Countertop or Wall-Mount)
The dispenser can be placed on a countertop or mounted on a wall.
- Countertop Placement: Simply place the dispenser on a flat, stable surface near a sink.
- Wall-Mount Installation: Use the provided adhesive hook for space-saving convenience. Ensure the wall surface is clean and dry before applying the adhesive. Attach the hook to the wall, then slide the dispenser onto the hook.

Image: The dispenser shown both on a countertop and wall-mounted, demonstrating installation flexibility.
Operating Instructions
1. Power On/Off
- To power on, press and hold the power button (located on the top panel) for 2 seconds. The indicator lights will illuminate.
- To power off, press and hold the power button for 2 seconds. The indicator lights will turn off.

Image: The top control panel of the dispenser, highlighting the power button.
2. Automatic Dispensing
The dispenser features an intelligent infrared sensor for touchless operation.
- Place your hand approximately 0-2.7 inches (0-7 cm) below the nozzle.
- The sensor will detect your hand and dispense foam within 0.25 seconds.

Image: Diagram showing the infrared sensor's detection range and angle for automatic foam dispensing.
3. Adjusting Foam Volume (4 Levels)
You can adjust the amount of foam dispensed to suit your needs.
- While the dispenser is on, briefly press the power button (do not hold).
- Each press will cycle through the 4 foam volume levels: 0.3s, 0.8s, 1.5s, and 2s.
- The foam level indicator lights on the top panel will show the currently selected level.
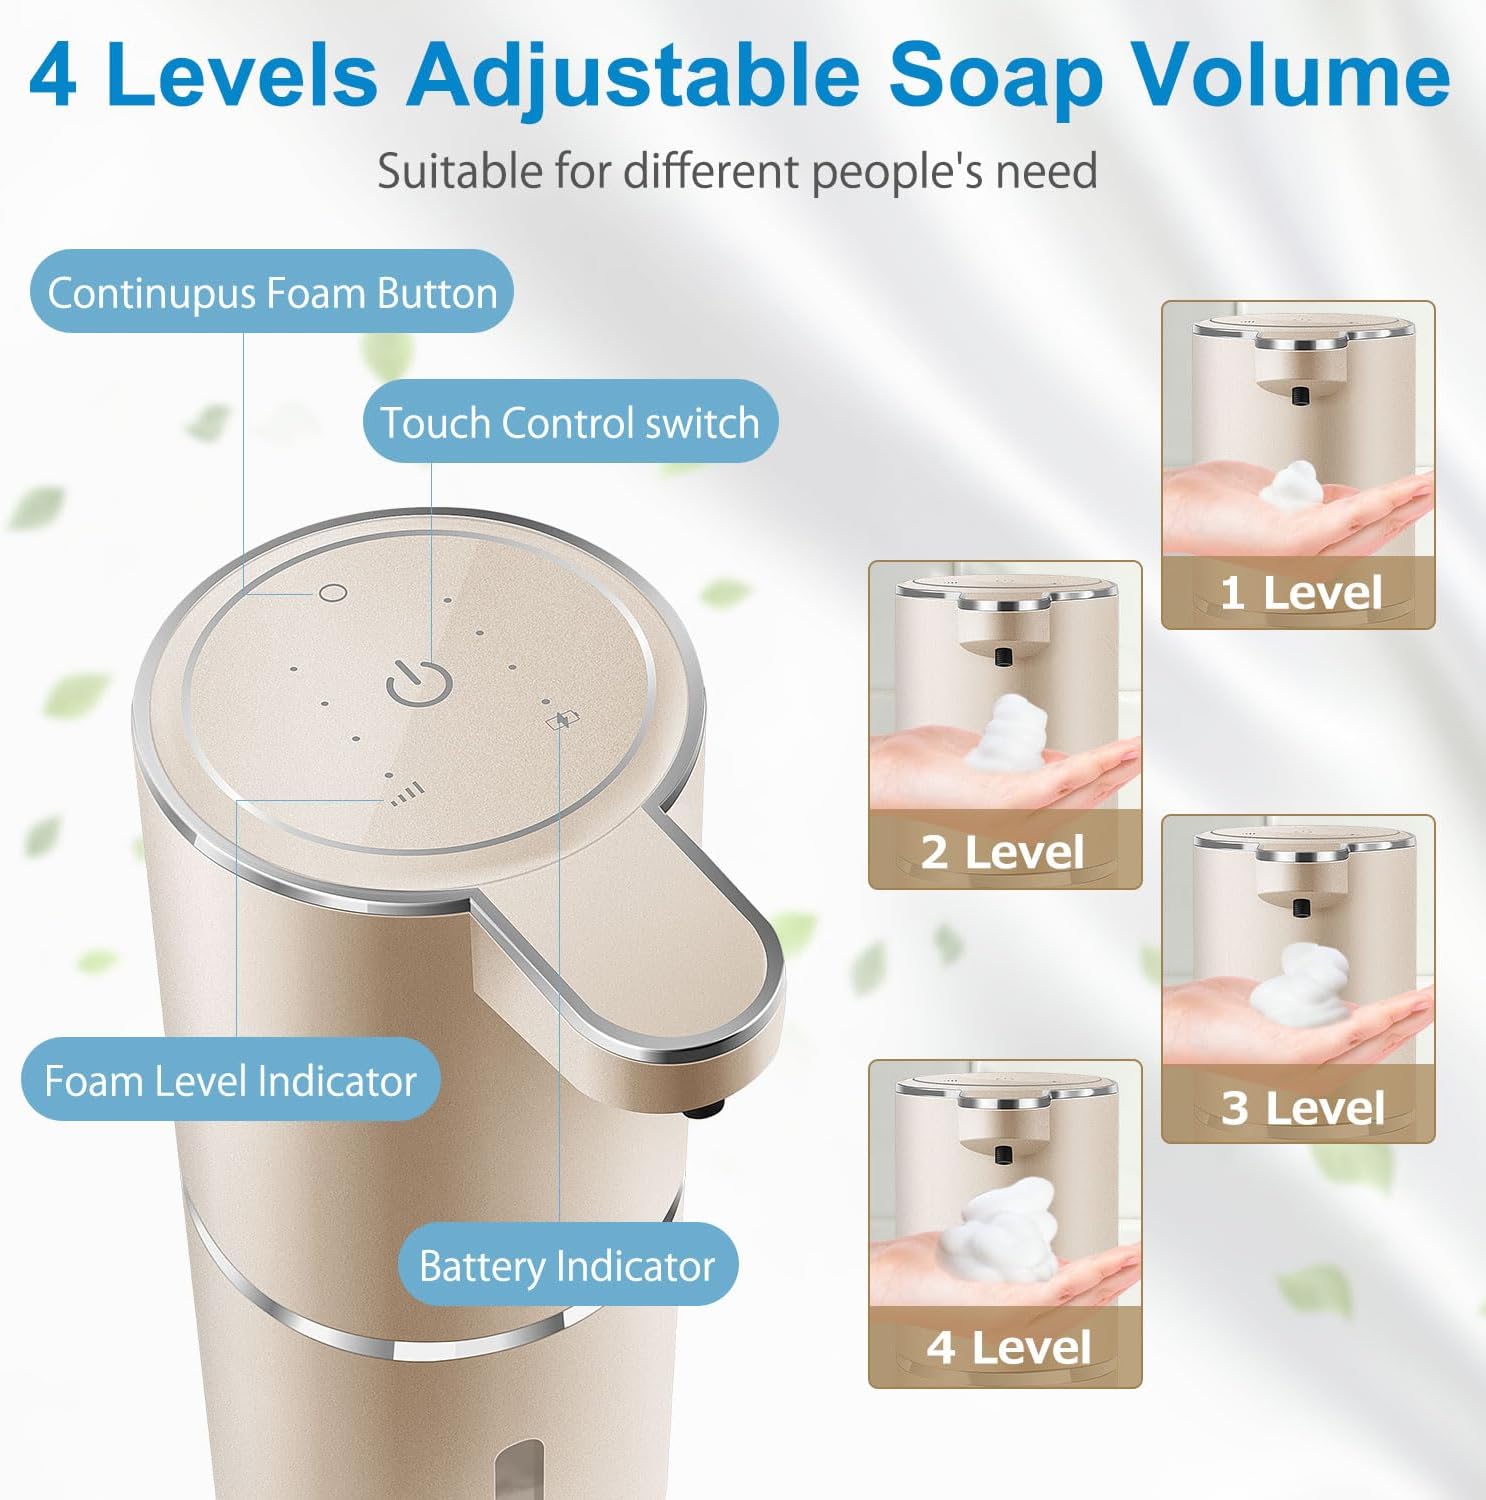
Image: Visual representation of the four adjustable foam volume levels.
4. Continuous Foam Dispensing
For situations requiring a larger amount of foam, such as washing dishes or cleaning surfaces.
- Press the dedicated continuous foam button (located on the top panel, distinct from the power button).
- The dispenser will generate a continuous stream of foam until the button is released.

Image: The dispenser in continuous foam mode, suitable for tasks like washing dishes or cleaning a cooktop.
Maintenance
Cleaning the Dispenser
- Turn off the dispenser before cleaning.
- Wipe the exterior of the dispenser with a soft, damp cloth. Do not use abrasive cleaners or solvents.
- Do not rinse the top unit directly under running water.
- If the nozzle becomes clogged, try dispensing warm water through it.

Image: The dispenser with water droplets, demonstrating its IPX5 water resistance for easy cleaning.
Battery Care
- Recharge the dispenser when the battery indicator shows low power.
- Always ensure the rubber plug for the USB-C port is securely closed after charging to prevent water ingress.
Troubleshooting
| Problem | Possible Cause | Solution |
|---|---|---|
| Dispenser does not turn on. | Low battery. | Charge the dispenser fully using the provided USB-C cable. |
| No foam dispensed. | 1. Soap reservoir empty. 2. Sensor obstructed. 3. Soap too thick or clogged nozzle. | 1. Refill the soap reservoir. 2. Ensure nothing is blocking the sensor. 3. Dilute liquid soap further (1:4-6 ratio) or clean the nozzle. |
| Foam volume is too low/high. | Incorrect foam level setting. | Briefly press the power button to cycle through the 4 foam volume levels until desired amount is selected. |
| Dispenser activates unexpectedly. | Sensor interference or accidental activation. | Ensure the dispenser is placed in an area free from constant movement or direct sunlight. Turn off when not in use for extended periods. |
Specifications
| Feature | Detail |
|---|---|
| Model Number | P7 |
| Brand | Gotofine |
| Material | Plastic (BPA Free, Phthalate Free) |
| Color | Champagne Gold |
| Product Dimensions | 4.4"L x 3"W x 7.9"H |
| Item Weight | 11.3 ounces |
| Liquid Volume Capacity | 380 ml (12.8 oz) |
| Battery | 1 Lithium Ion battery (included) |
| Charging Port | USB-C |
| Waterproof Rating | IPX5 |
| Sensor Response Time | 0.25 seconds |
| Adjustable Foam Levels | 4 levels (0.3s, 0.8s, 1.5s, 2s) |
Warranty and Customer Support
Gotofine products are manufactured to high-quality standards. For warranty information, technical support, or any questions regarding your product, please contact Gotofine customer service. Refer to the product packaging or the official Gotofine website for contact details.

Image: Customer service representative ready to assist with product inquiries.
Ask a question about this manual
Ask about setup, troubleshooting, compatibility, parts, safety, or missing instructions. Manuals+ will review the question and use this page’s manual context to help answer it.