1. Introduction
Thank you for purchasing the Radiola 3L Electric Deep Fryer, model RADF93BXF. This manual provides essential information for the safe and efficient operation, maintenance, and troubleshooting of your new appliance. Please read these instructions carefully before first use and keep them for future reference.
2. Important Safety Instructions
When using electrical appliances, basic safety precautions should always be followed to reduce the risk of fire, electric shock, and injury to persons, including the following:
- Read all instructions before operating the deep fryer.
- Do not touch hot surfaces. Use handles or knobs.
- To protect against electric shock, do not immerse cord, plugs, or the appliance in water or other liquid.
- Close supervision is necessary when any appliance is used by or near children.
- Unplug from outlet when not in use and before cleaning. Allow to cool before putting on or taking off parts.
- Do not operate any appliance with a damaged cord or plug, or after the appliance malfunctions or has been damaged in any manner.
- The use of accessory attachments not recommended by the appliance manufacturer may cause injuries.
- Do not use outdoors.
- Do not let cord hang over edge of table or counter, or touch hot surfaces.
- Do not place on or near a hot gas or electric burner, or in a heated oven.
- Extreme caution must be used when moving an appliance containing hot oil or other hot liquids.
- Always attach plug to appliance first, then plug cord into the wall outlet. To disconnect, turn any control to "off", then remove plug from wall outlet.
- Do not use appliance for other than intended use.
- Ensure the oil level is between the MIN and MAX marks inside the tank.
- Never mix different types of oil or old and new oil.
- Always ensure the lid is properly closed during operation to prevent splashes.
3. Product Overview
The Radiola 3L Electric Deep Fryer is designed for convenient and efficient frying. Familiarize yourself with its components:
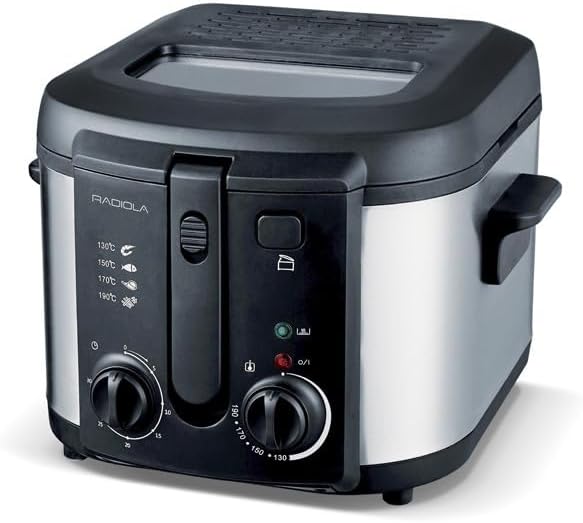

Key Components:
- Lid with Viewing Window: Allows monitoring of the cooking process without opening.
- Anti-Odor Filter: Integrated into the lid to reduce frying odors.
- Temperature Control Dial: Adjustable from 130°C to 190°C for precise cooking.
- Timer Dial: Up to 30 minutes for timed cooking.
- Fixed Oil Tank: 3L capacity with non-stick coating for easy cleaning.
- Frying Basket: Removable basket with integrated lifting system for draining food.
- Stainless Steel Housing: Durable and easy to clean exterior.
- Power Cord: 0.9 meter length.
4. Setup and First Use
- Unpacking: Carefully remove the deep fryer and all accessories from the packaging. Retain packaging for future storage or transport.
- Initial Cleaning: Before first use, clean the frying basket, lid, and the interior of the oil tank with warm soapy water. Rinse thoroughly and dry completely. The main unit containing electrical components should only be wiped with a damp cloth.
- Placement: Place the deep fryer on a stable, heat-resistant, and dry surface, away from walls and flammable materials. Ensure adequate ventilation.
- Add Oil: Pour cooking oil (suitable for deep frying) into the fixed tank. Ensure the oil level is between the MIN and MAX indicators marked inside the tank. Do not overfill or underfill.
- Assemble Basket: Place the frying basket into the oil tank. Ensure the handle is securely attached and in the raised position.
- Close Lid: Close the lid securely.
- Connect Power: Plug the power cord into a grounded 220V wall outlet.
5. Operating Instructions
- Preheating Oil:
- Ensure the lid is closed and the basket is empty and in the raised position.
- Turn the temperature control dial to the desired frying temperature (e.g., 170°C for fries). The power indicator light will illuminate.
- Allow the oil to preheat. The indicator light will turn off once the set temperature is reached. This may take 10-15 minutes depending on the oil volume and desired temperature.
- Frying Food:
- Carefully lower the food into the frying basket. Do not overload the basket; fry in smaller batches if necessary to maintain oil temperature and ensure even cooking.
- Lower the basket into the hot oil using the handle.
- Close the lid.
- Set the timer dial to the desired cooking time (up to 30 minutes). The timer will alert you when the time is up.
- Monitor the cooking process through the viewing window.
- Draining Food:
- Once cooking is complete, use the integrated lifting system to raise the basket above the oil level.
- Allow excess oil to drain back into the tank for a few minutes.
- Carefully remove the basket from the fryer and transfer the fried food to a serving dish lined with paper towels to absorb any remaining oil.
- After Use:
- Turn the temperature dial to the "OFF" position.
- Unplug the appliance from the wall outlet.
- Allow the oil and the fryer to cool completely before cleaning or storing. This can take several hours.
6. Cleaning and Maintenance
Regular cleaning ensures optimal performance and extends the lifespan of your deep fryer. Always ensure the appliance is unplugged and completely cool before cleaning.
- Draining Oil: Once the oil has cooled, carefully pour it into a suitable container for disposal or reuse (if filtered and still good). Do not pour hot oil down the drain.
- Cleaning the Oil Tank: The fixed tank has a non-stick coating. Clean it with warm soapy water and a soft sponge or cloth. Do not use abrasive cleaners or scouring pads, as these can damage the non-stick surface. Rinse thoroughly and dry completely.
- Cleaning the Basket and Lid: The frying basket and lid can be washed in warm soapy water. Rinse and dry thoroughly.
- Cleaning the Exterior: Wipe the stainless steel exterior with a damp cloth and mild detergent. Dry with a soft cloth. Never immerse the main unit in water.
- Anti-Odor Filter: The anti-odor filter in the lid may need occasional replacement depending on usage. Refer to the product packaging or manufacturer's website for replacement filters.
- Storage: Store the deep fryer in a clean, dry place once it is completely cool and clean.
7. Troubleshooting
If you encounter issues with your deep fryer, refer to the following common problems and solutions:
| Problem | Possible Cause | Solution |
|---|---|---|
| Fryer does not turn on. | Not plugged in; power outlet faulty; thermal cut-out activated. | Ensure the plug is securely in a working outlet. Check household circuit breaker. Allow fryer to cool completely and reset if equipped with a manual reset button (consult manufacturer for location). |
| Oil not heating up. | Temperature dial not set; insufficient oil; faulty heating element. | Ensure the temperature dial is set to a desired temperature. Check oil level. If problem persists, contact customer support. |
| Food is not crispy. | Oil temperature too low; basket overloaded; food too moist. | Ensure oil is preheated to the correct temperature. Fry in smaller batches. Pat food dry before frying. |
| Excessive smoke. | Oil temperature too high; old/dirty oil; food residue in oil. | Reduce temperature. Replace old oil with fresh oil. Clean the tank thoroughly after each use. |
If the problem persists after attempting these solutions, please contact Radiola customer support.
8. Specifications
| Model Number | RADF93BXF |
| Brand | Radiola |
| Capacity | 3 Liters (Oil), up to 1 kg of fresh fries |
| Power | 1800 Watts |
| Voltage | 220 Volts |
| Temperature Range | 130°C - 190°C |
| Timer | Up to 30 minutes |
| Material | Stainless Steel (Housing), Non-stick coating (Inner Tank) |
| Product Dimensions (L x W x H) | 25 x 30 x 25 cm |
| Item Weight | 2.9 Kilograms |
| Cord Length | 0.9 meters |
9. Warranty and Support
The Radiola RADF93BXF Deep Fryer comes with a 2-year warranty for spare parts, as per EU regulations. This warranty covers manufacturing defects and material faults under normal use conditions.
For warranty claims, technical support, or inquiries about replacement parts (such as the anti-odor filter), please contact your retailer or the official Radiola customer service. Please have your proof of purchase and the product model number (RADF93BXF) ready when contacting support.