1. Product Overview
The KEMIMOTO Electronic Device Holder is designed to securely mount your smartphone or tablet on the dashboard of compatible Pioneer 1000 models. It features an adjustable clamp, shock-absorbing sponge strips for device protection, and an integrated storage compartment.
- Adjustable Tablet Holder: Compatible with most 5.1-8 inch devices. Designed for easy installation near a power source for convenient charging.
- Shock-resistant Sponge Strip: Constructed from durable HDPE material, this mount includes shock-absorbing sponge pads to reduce vibrations and protect your device during off-roading.
- Expandable Storage Box: Provides additional dashboard storage for small essentials such as smartphones, keys, and sunglasses, enhancing cabin organization.
2. Package Contents
The package includes the following items:
- 1 x Electronic Device Holder unit
- 1 x Interchangeable Smartphone Holder
- Sponge strips for cushioning
- Push pins for installation
3. Compatibility
This device holder is compatible with the following models:
- Pioneer 1000 (2022, 2023, 2024, 2025 models)
- Pioneer 1000-5 (2022, 2023, 2024, 2025 models)
- Pioneer 1000-6 (2022, 2023, 2024, 2025 models)
NOTE: NOT compatible with 2016-2021 versions of Pioneer models.

Image: Visual representation of compatible Pioneer 1000 models (3P, 5P, 6P) from 2022-2025.
4. Setup and Installation
Follow these steps for quick and secure installation of your KEMIMOTO Electronic Device Holder:
- Prepare the Dashboard: Ensure the installation area on your Pioneer 1000 dashboard is clean and free of dust or debris.
- Remove Original Cover: Carefully remove the existing dashboard cover by pulling out any retaining pins or screws.
- Position the Holder: Place the KEMIMOTO device holder in the desired position on the dashboard. It is designed to fit into existing slots.
- Drill Holes: Using a power drill, create 3/8-inch holes at the designated mounting points on your plastic panels.
- Secure with Push Pins: Insert the four provided push pins into the drilled holes to firmly secure the device holder to the dashboard.
- Apply Sponge Strips: Stick the provided shock-absorbing sponge strips to the feet, top, and back interior surfaces of the holder. This provides cushioning and prevents vibration noise.

Image: Illustration of drilling holes and securing the device holder with push pins.

Image: Close-up of the shock-resistant sponge strip and easy access to charging solutions for devices.
Installation Videos:
Installation of Electronic Tablet Holder for Pioneer 520
Video: A detailed guide demonstrating the installation process of the electronic tablet holder on a Pioneer 520 dashboard, including securing screws and applying sponge strips.
3 Easy Steps to Install Your KEMIMOTO UTV Device Mount
Video: A quick, 30-second overview of the installation process for the KEMIMOTO UTV device mount, highlighting key steps for fast setup.
5. Operating Instructions
The KEMIMOTO device holder is designed for ease of use and secure device retention.
- Adjusting the Clamp: The holder features an adjustable clamp. To insert a device, gently pull the top clamp upwards. The clamp will automatically adjust to the width of your device (5.1-8 inches).
- Inserting Your Device: Place your smartphone or tablet into the holder, ensuring it sits securely against the sponge strips. The clamp will hold it firmly.
- Securing the Device: For added security, rotate the internal knob to tighten the clamp around your device. This dual-secure mechanism (auto-clamp + knob lock) prevents movement during rides.
- Accessing Storage: The top section of the holder features a push-button release to access the expandable storage compartment. Press the 'PUSH' button to open and close the compartment.
- Charging Devices: The design allows for easy access to charging ports, enabling you to charge your device while it is mounted.
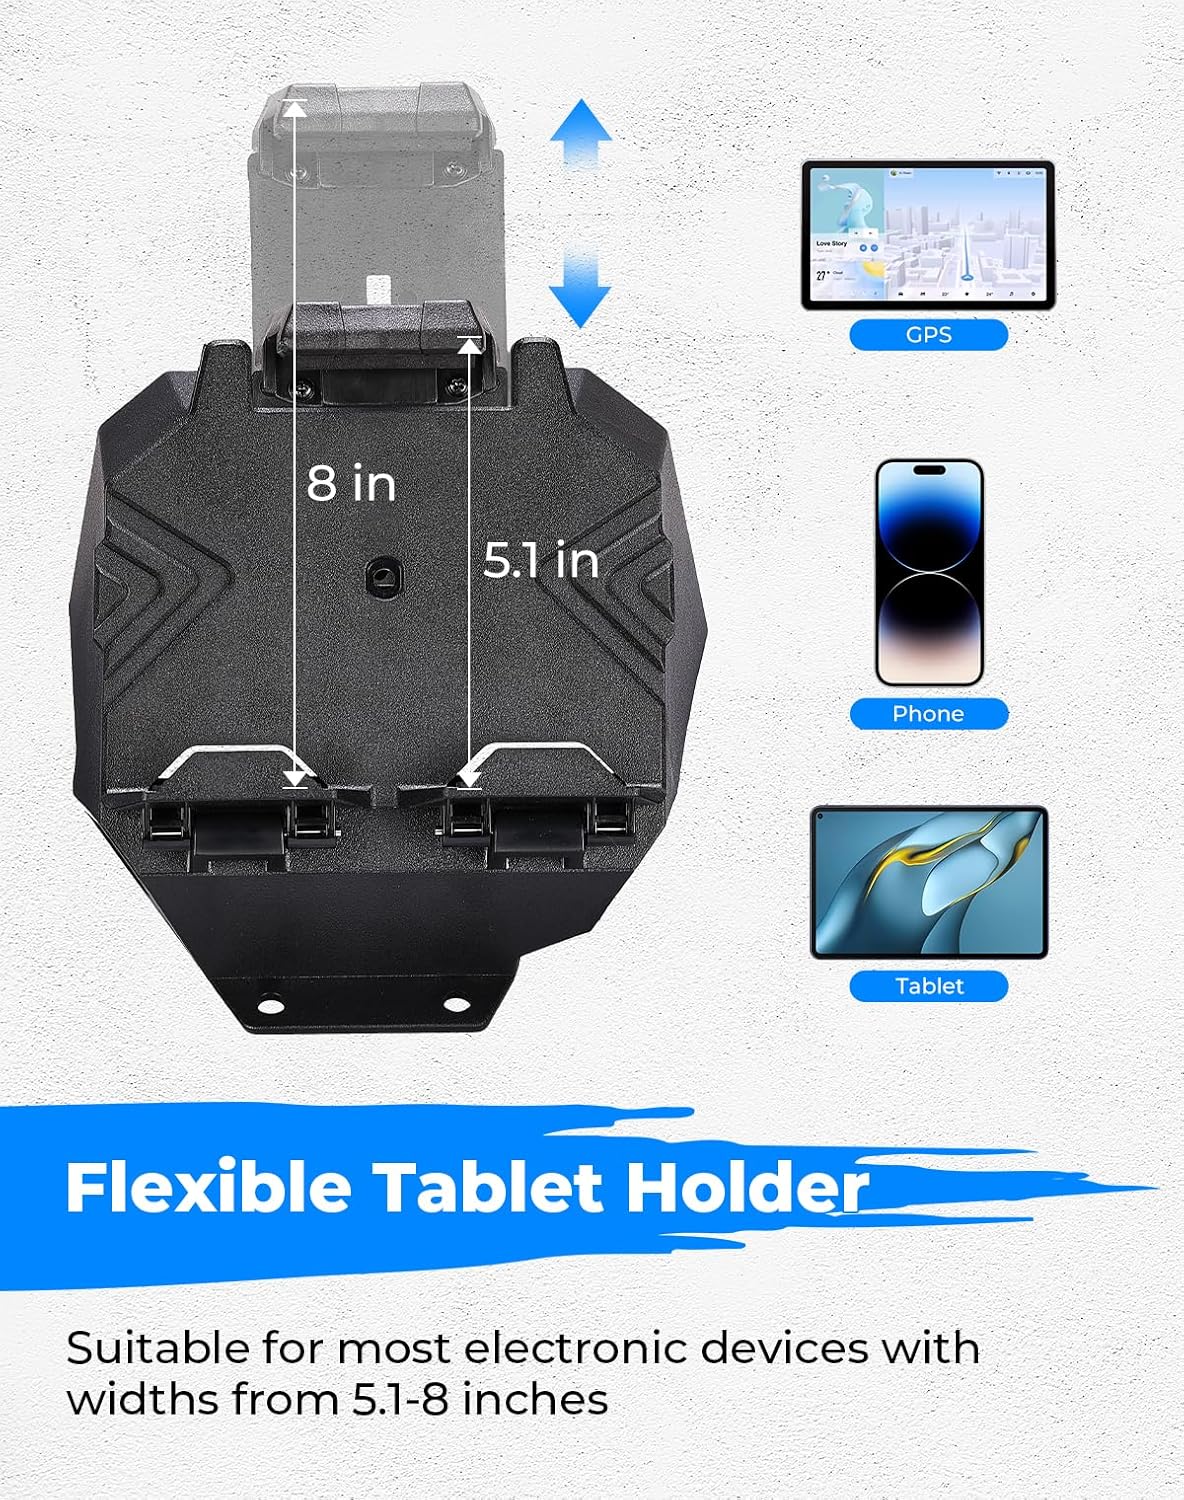
Image: Demonstrates the adjustable clamp accommodating devices from 5.1 to 8 inches in width.

Image: Shows the interchangeable phone and tablet holder options, allowing users to switch based on device size.

Image: The KEMIMOTO Electronic Device Tablet Holder mounted on a dashboard, displaying a tablet with GPS navigation.
Operation Videos:
KEMIMOTO Electronic Device Tablet Holder Overview
Video: A brief overview of the KEMIMOTO Electronic Device Tablet Holder, showcasing its features and how devices are secured.
Display of Electronic Device Tablet Holder for Pioneer 520
Video: Demonstrates the electronic device holder in action on a Pioneer 520, showing how a device is placed and used for navigation.
6. Maintenance
To ensure the longevity and optimal performance of your KEMIMOTO Electronic Device Holder, follow these simple maintenance guidelines:
- Cleaning: Regularly wipe the holder with a soft, damp cloth to remove dust and dirt. Avoid using harsh chemicals or abrasive cleaners.
- Check Fasteners: Periodically inspect the push pins and any other fasteners to ensure they remain tight and secure. Tighten if necessary.
- Sponge Strip Integrity: Check the sponge strips for wear and tear. If they become damaged or lose their cushioning ability, replace them to maintain device protection.
7. Troubleshooting
If you encounter any issues with your KEMIMOTO Electronic Device Holder, refer to the following common solutions:
- Device Not Fitting: Ensure your device's width is within the 5.1-8 inch range. Adjust the clamp mechanism fully before inserting.
- Holder Feels Loose: Verify that all push pins are fully inserted and secure. If the dashboard panel itself is loose, consult your vehicle's manual.
- Vibration Noise: Confirm that the sponge strips are correctly installed and provide adequate cushioning for your device. Ensure the internal knob is tightened to secure the device.
8. Specifications
| Feature | Detail |
|---|---|
| Package Dimensions | 9.5 x 9 x 9 inches |
| Item Weight | 2.1 pounds |
| Item Model Number | KMB0111-14701BK |
| Special Features | Adjustable, Shock Resistant, Storage |
| Color | BLACK |
| Manufacturer | KEMIMOTO |
| Compatible Devices | Smartphones, Tablets (5.1-8 inches) |
| Mounting Type | Dashboard |
9. Warranty and Support
KEMIMOTO stands behind the quality of its products. For warranty information, product support, or any inquiries, please refer to the contact details provided with your purchase or visit the official KEMIMOTO website.
Please retain your proof of purchase for any warranty claims.


