1. Product Overview
The GW Security 64 Channel 12MP NVR Security Camera System is a comprehensive surveillance solution designed for extensive monitoring. This system includes a 64-channel Network Video Recorder (NVR) and 48 8MP 4K Power over Ethernet (PoE) IP bullet cameras. Key features include advanced AI human and vehicle detection, full-time color night vision, and support for significant storage capacity.
The NVR is equipped with 8 SATA ports, supporting up to 10TB each for a total of 80TB storage, and comes with a pre-installed 20TB hard drive. The cameras feature a built-in microphone and a 2.8mm wide-angle lens providing a 130° field of view, ensuring detailed audio and video capture.

Image 1.1: Front and rear view of the NVR unit, illustrating connectivity ports and mobile app setup for remote viewing.
2. System Components
The GW Security 64 Channel NVR System typically includes the following components:
- 64 Channel 12MP Network Video Recorder (NVR) with pre-installed 20TB HDD.
- 48 x 8MP 4K PoE IP Bullet Cameras with built-in microphones.
- Power adapter for NVR.
- USB mouse for NVR operation.
- Ethernet cables for camera connection.
- Mounting hardware for cameras.
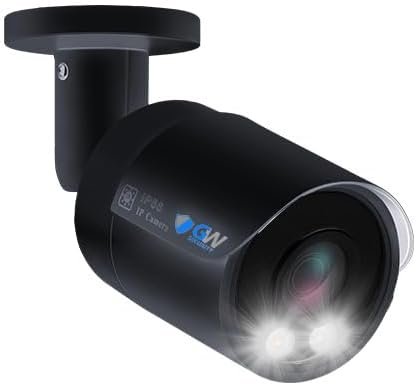
Image 2.1: A single 8MP 4K PoE IP bullet camera, part of the security system.
3. Setup Guide
3.1 NVR Connection
- Connect the NVR to a power source using the provided power adapter.
- Connect the NVR to a monitor via HDMI or VGA cable for local viewing and configuration.
- Connect the NVR to your network router using an Ethernet cable for remote access.
- Connect the USB mouse to the NVR for navigation.
3.2 Camera Installation and Connection
The cameras utilize Power over Ethernet (PoE), simplifying installation with a single network cable for both power and data.
- Mount each camera in your desired location using the provided mounting hardware. Ensure the camera has a clear line of sight and is within range of an Ethernet cable connection to the NVR or a PoE switch connected to the NVR.
- Connect each camera to an available PoE port on the NVR using an Ethernet cable. If using a separate PoE switch, connect the cameras to the switch and the switch to the NVR's network port.
- Once connected, the NVR should automatically detect and configure the cameras.
3.3 Mobile App Setup for Remote Viewing
To view your security system remotely on a smartphone or tablet:
- Download the designated smartphone application (e.g., "RXCamView" as indicated in some product materials) from your device's app store (available for iPhone and Android).
- Open the app and follow the on-screen instructions to add your NVR system. This typically involves scanning the QR code displayed on the NVR's monitor or entering the NVR's serial number (S/N).
- Once added, you can begin live viewing and recording from your mobile device.
4. Operating Instructions
4.1 Live View and Recording
After setup, you can view live feeds and manage recordings through the NVR's local interface (connected monitor) or remotely via the mobile app or PC software. The system supports widescreen display and continuous recording.
4.2 AI Human & Vehicle Detection
The system features advanced AI motion detection that differentiates between humans and vehicles, reducing false alarms. When a person or vehicle is detected, the system can send real-time alert notifications via email, FTP, or the mobile app.

Image 4.1: Illustration of AI-powered human and vehicle detection, showing on-screen alerts and mobile notifications.
4.3 Full-time Color Night Vision
The cameras are equipped with full-time color night vision technology, providing high-quality color video even in low-light conditions. This offers more detail and contrast compared to traditional black and white infrared night vision.

Image 4.2: Visual comparison demonstrating the clarity and color retention of starlight color night vision versus standard black and white night vision.
4.4 Video Compression (H.265+)
The system utilizes H.265+ video compression technology, which significantly reduces file sizes without compromising video quality. This results in lower storage requirements, reduced bandwidth usage, and longer recording times compared to older H.264 compression.

Image 4.3: Infographic illustrating the advantages of H.265 compression over H.264, including reduced storage space and bandwidth.
5. Storage Management
The NVR comes with a pre-installed 20TB hard drive. It supports up to 8 SATA hard drives, with each drive capable of holding up to 10TB, for a maximum total storage capacity of 80TB. This allows for extensive video recording archives.
To manage storage, access the NVR's menu via the connected monitor. You can configure recording schedules, overwrite old footage, and check the status of installed hard drives.
6. Maintenance
Regular maintenance ensures optimal performance and longevity of your security system:
- Firmware Updates: Periodically check the GW Security website for firmware updates for your NVR and cameras. Keeping firmware updated can improve performance, add new features, and enhance security.
- Lens Cleaning: Gently clean camera lenses with a soft, lint-free cloth to remove dust, dirt, or smudges that may affect image clarity. Avoid abrasive cleaners.
- Cable Inspection: Periodically inspect all power and Ethernet cables for any signs of wear, damage, or loose connections. Secure or replace damaged cables promptly.
- Hard Drive Health: Monitor the health of your NVR's hard drives through the system settings. Replace failing drives to prevent data loss.
- Environmental Considerations: Ensure cameras are free from obstructions and protected from extreme weather conditions where possible.
7. Troubleshooting
This section addresses common issues you might encounter:
| Issue | Possible Solution |
|---|---|
| No video display on monitor | Check HDMI/VGA cable connection to NVR and monitor. Ensure monitor input is correctly selected. Verify NVR power. |
| Cameras not showing video | Check PoE cable connections from cameras to NVR/PoE switch. Ensure cameras are powered. Restart NVR. |
| Remote viewing not working | Verify NVR is connected to the internet. Check network settings on NVR. Ensure mobile app is correctly configured and NVR QR code/S/N is entered. Check router firewall settings. |
| No motion detection alerts | Ensure AI detection is enabled in NVR settings for relevant channels. Check alert notification settings (email, app). Verify network connectivity for alerts. |
| Poor night vision quality | Clean camera lenses. Ensure there are no obstructions blocking the camera's view. Verify camera settings for night vision mode. |
8. Specifications
Detailed technical specifications for the GW Security 64 Channel NVR System:
| Feature | Detail |
|---|---|
| Brand | GW Security |
| Model Number | 64CH802501M48 |
| Connectivity Technology | Wired (PoE) |
| Video Capture Resolution | 4K UHD 2160p (8MP) |
| Special Features | AI Human & Vehicle Detection, Full-time Color Night Vision |
| Number of Channels | 64 |
| Memory Storage Capacity | 80 TB (Max, 8 SATA ports, 10TB each) |
| Pre-installed HDD | 20TB |
| Power Source | Power Over Ethernet (PoE) |
| Compatible Devices | Smartphones, PC, Tablets |
| Camera Lens | 2.8mm (130° wide angle) |
| Built-In Media | Microphone |
| Video Compression | H.265+ |
| Item Dimensions | 25 x 25 x 25 inches (NVR) |
| UPC | 810025439989 |
9. Warranty and Support
9.1 Product Warranty
This GW Security system comes with a Two-Year Warranty from the date of purchase. This warranty covers manufacturing defects and ensures the product functions as intended under normal use. Please retain your proof of purchase for warranty claims.
9.2 Technical Support
GW Security provides US-based Free Tech Support to assist with any questions or issues you may encounter during setup or operation. Our highly-trained technical support staff are available to help you.
- Support Hours: Monday - Friday, 6:00 AM - 7:00 PM PST
- Contact Information: Please refer to the contact details provided in your product packaging or on the official GW Security website for the most current support channels (phone, email, chat).

Image 9.1: GW Security support emblem, signifying available technical assistance.