Introduction
This manual provides instructions for the assembly, operation, and maintenance of your Bituman 36-inch Bathroom Vanity and Sink Combo. Please read these instructions carefully before beginning assembly or use to ensure proper installation and safe operation. Keep this manual for future reference.
Safety Information
- Always use appropriate safety gear, such as gloves and eye protection, during assembly.
- Ensure all parts are securely fastened before use. Loose connections can lead to instability.
- Do not overload drawers or cabinets. Refer to the specifications for weight capacity.
- Keep small parts away from children to prevent choking hazards.
- If any parts are missing or damaged, do not proceed with assembly. Contact customer support for assistance.
- This vanity is designed for indoor use in a bathroom environment.
Package Contents
Verify that all components are present before starting assembly.
- 1x Vanity Cabinet
- 1x Ceramic Sink
- 1x Instruction Manual
- Hardware (screws, metal door hinges, handles, drawer slides, anti-toppling device, etc.)

Image: Overview of the assembled vanity with open storage compartments.
Assembly Instructions
Assembly is required for this bathroom vanity. It is recommended to have two people for assembly. Ensure you have basic tools such as a screwdriver and wrench (not included).
Step 1: Unpack and Identify Parts
Carefully unpack all components and lay them out on a clean, soft surface to prevent scratches. Refer to the parts list in the instruction manual to identify each piece of hardware and wooden component.
Step 2: Assemble the Vanity Cabinet Frame
Follow the diagrams provided in the included instruction manual to connect the side panels, back panel, and base of the vanity cabinet using the provided screws and connectors. Ensure all connections are tight and stable.
Step 3: Install Drawer Slides and Hinges
Attach the drawer slides to the cabinet frame and the drawer boxes according to the manual's diagrams. Install the metal door hinges onto the cabinet frame and the cabinet doors.

Image: Details of hardware components including handles, hinges, and drawer slides.
Step 4: Attach Doors and Drawers
Mount the cabinet doors onto the installed hinges. Insert the assembled drawers onto their respective slides. Adjust hinges and slides as needed for smooth operation and proper alignment.
Step 5: Install Handles
Attach the gold metal handles to the cabinet doors and drawer fronts using the provided screws.
Step 6: Place the Ceramic Sink
Carefully place the ceramic sink onto the top of the vanity cabinet. Ensure it is properly aligned with the cabinet and any pre-drilled holes for plumbing. The sink features pre-drilled three holes for an 8-inch centerset faucet (faucet not included) and a chrome-finish overflow.

Image: Features of the ceramic sink, including faucet holes and overflow.
Step 7: Secure the Vanity (Optional but Recommended)
If an anti-toppling device is included, install it to secure the vanity to the wall, especially if there are children or pets in the household. This enhances stability and safety.
Operation
The Bituman Bathroom Vanity is designed for functional storage and daily use.
- Cabinet Storage: The cabinet with two doors provides enclosed space for larger items such as towels, cleaning supplies, or toiletries.
- Drawer Storage: The three drawers with smooth slide rails are suitable for organizing smaller bathroom essentials like soaps, shampoos, and tissue paper.
- Sink Use: The ceramic sink is designed for daily washing. Ensure the faucet (not included) is properly installed and sealed to prevent leaks. The overflow feature helps prevent water from spilling over the basin.

Image: Storage configuration of the vanity, showing cabinet and drawers.
Maintenance and Care
Proper care will extend the life and appearance of your vanity.
- Cleaning: Wipe the vanity surfaces with a damp cloth. Avoid abrasive cleaners or harsh chemicals that can damage the painted finish or ceramic sink.
- Spills: Promptly wipe up any water spills on the vanity top or cabinet to prevent water damage to the engineered wood components.
- Hardware: Periodically check and tighten any loose screws on handles, hinges, or drawer slides.
- Ceramic Sink: Clean the ceramic sink regularly with a mild soap and water solution. The smooth, water-proof finish is designed to resist stains.
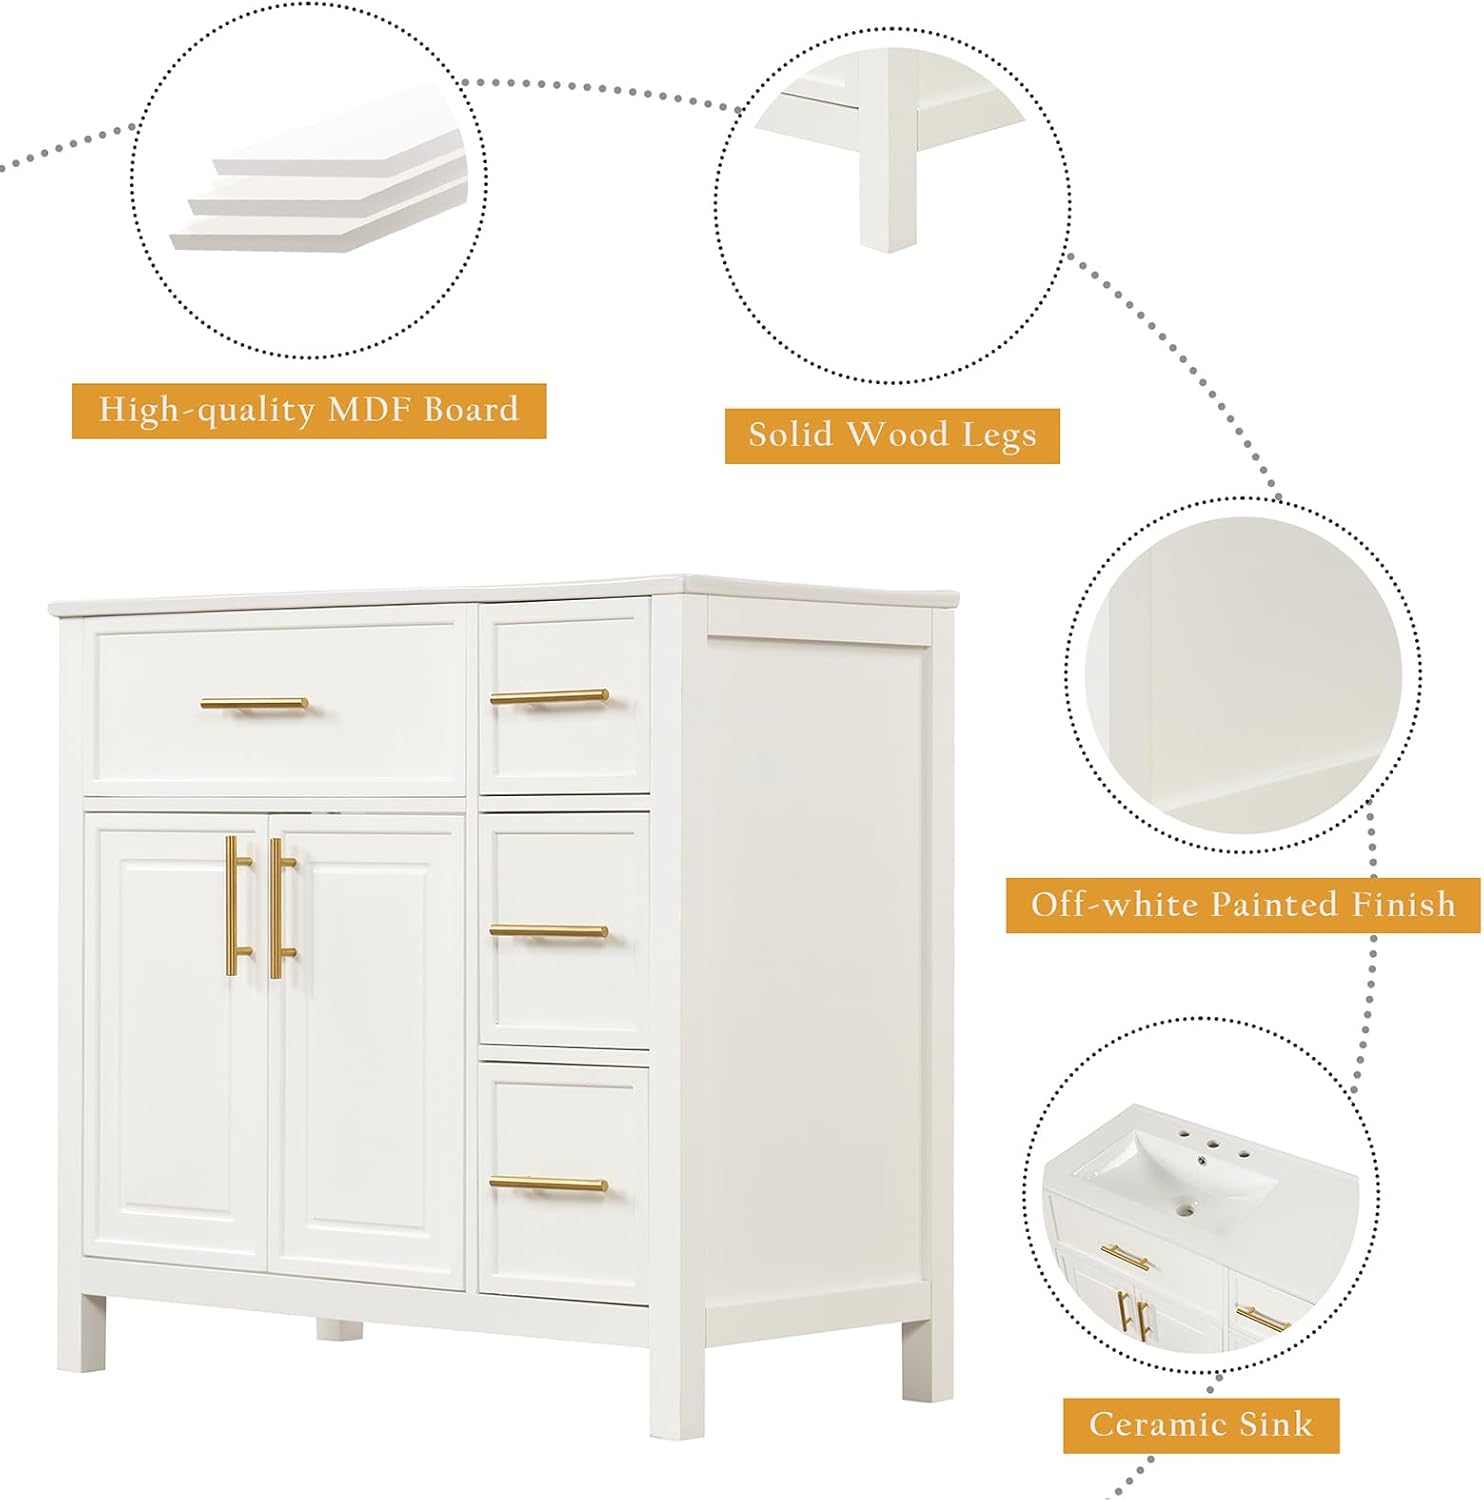
Image: Construction details and materials of the vanity.
Troubleshooting
If you encounter issues with your vanity, refer to the following common solutions:
- Drawers not closing smoothly: Check if the drawer slides are properly aligned and free of obstructions. Ensure all screws on the slides are tightened.
- Cabinet doors misaligned: Adjust the screws on the door hinges to correct alignment.
- Water leaks from sink: Verify that the faucet and drain connections are properly sealed and tightened. Consult a plumber if leaks persist.
- Vanity feels unstable: Ensure all assembly screws are fully tightened. If applicable, secure the vanity to the wall using the anti-toppling device.
Specifications
| Feature | Detail |
|---|---|
| Brand | Bituman |
| Model Number | WF319757AAK |
| Color | White a |
| Material | Solid Rubber Wood & MDF Board & Ceramic Sink |
| Product Dimensions (D x W x H) | 18.3" x 36" x 33.9" |
| Mounting Type | Freestanding |
| Number of Doors | 2 |
| Number of Drawers | 3 |
| Sink Type | Undermount; Drop-In Single Basin |
| Faucet Mount | 8" centerset (faucet not included) |
| Weight Capacity | 250 lbs |
| Assembly Required | Yes |
| Country of Origin | Vietnam |

Image: Front and side dimensions of the vanity.

Image: Back dimensions of the vanity, indicating plumbing access area.
Warranty Information
Specific warranty details are not provided in this manual. For information regarding product warranty, please refer to the product packaging or contact the retailer where the product was purchased. Keep your proof of purchase for any warranty claims.
Customer Support
If you have any questions, require assistance with assembly, or need to report missing or damaged parts, please contact the seller or manufacturer directly through the platform where the product was purchased. Provide your model number (WF319757AAK) and purchase date for faster service.