Introduction
Thank you for choosing the VEVOR Commercial Hard Ice Cream Machine, Model BQL-128YH. This machine is designed for efficient and high-quality hard ice cream production in commercial settings. To ensure safe and optimal performance, please read this instruction manual thoroughly before operating the machine. Keep this manual for future reference.
Safety Instructions
- Always connect the machine to a grounded power outlet with the correct voltage as specified on the rating label.
- Do not operate the machine with wet hands or in wet conditions to prevent electric shock.
- Keep hands and utensils out of the mixing cylinder during operation.
- Ensure proper ventilation around the machine to prevent overheating. Maintain adequate clearance from walls and other equipment.
- Unplug the machine before cleaning, maintenance, or if it will be unused for an extended period.
- Do not attempt to repair or modify the machine yourself. Contact qualified service personnel for any repairs.
- Use only food-grade ingredients and follow proper hygiene practices to prevent contamination.
- Keep children and unauthorized personnel away from the machine during operation.
Product Overview
The VEVOR BQL-128YH Commercial Hard Ice Cream Machine is constructed from durable SUS201 stainless steel with a food-grade SUS304 stainless steel cylinder. It features a powerful compressor for rapid cooling and a digital control panel for easy operation.
Key Features:
- High Productivity: Produces up to 18 liters (4.8 gallons) of hard ice cream per hour, with rapid production cycles of approximately 20 minutes.
- Quality Ice Cream: Integrated 6-liter cooling cylinder, advanced buffer technology, and a triple-rotation mixer ensure a creamy and smooth texture.
- User-Friendly Operation: Digital control panel with automatic cooling, one-click cleaning, and adjustable time settings. Production time and remaining quantity are displayed on the intuitive screen.
- Durable Construction: Made from SUS201 stainless steel body and SUS304 food-grade stainless steel cooling cylinder for longevity and hygiene.
- Mobility: Equipped with casters for easy relocation within your commercial space.
Components:
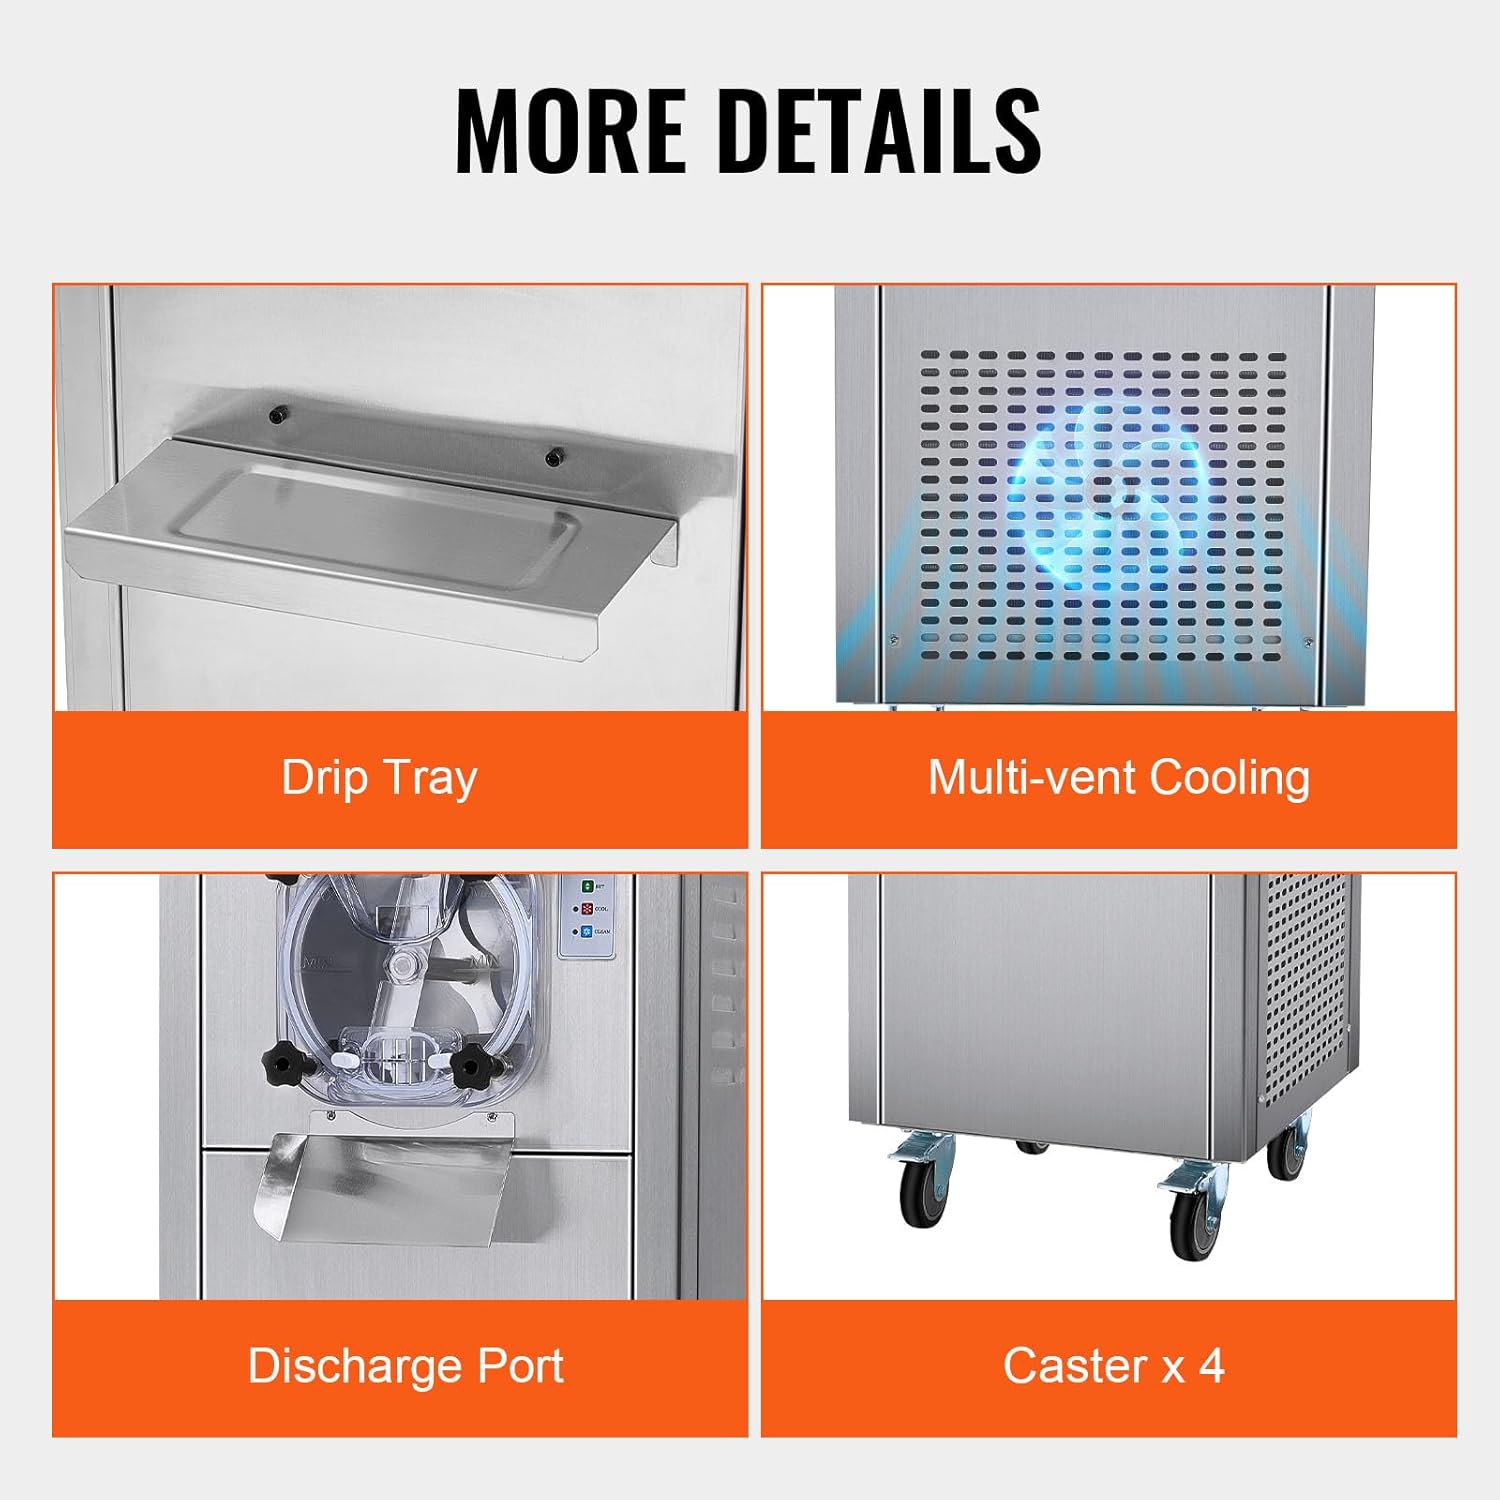
Figure 1: Machine Components. This image highlights key features such as the removable drip tray for easy cleaning, multi-vent cooling system for efficient heat dissipation, the ice cream discharge port, and four durable casters for mobility.

Figure 2: Included Accessories. The machine comes with essential accessories for assembly and maintenance, including a star nut, bell tube, oval seal, acoustic wall fixing nut, and an Allen key.
Setup
1. Unpacking and Inspection:
- Carefully remove the machine from its packaging.
- Inspect the machine for any signs of damage during transit. Report any damage to your supplier immediately.
- Verify that all included accessories (refer to Figure 2) are present.
2. Placement:
- Place the machine on a stable, level surface in a well-ventilated area.
- Ensure there is sufficient clearance (at least 20 cm or 8 inches) around all sides of the machine, especially the ventilation grilles, to allow for proper airflow and heat dissipation.
- The operating temperature range for the machine is 5-32 °C (41-89.6 °F). Avoid placing it in direct sunlight or near heat sources.
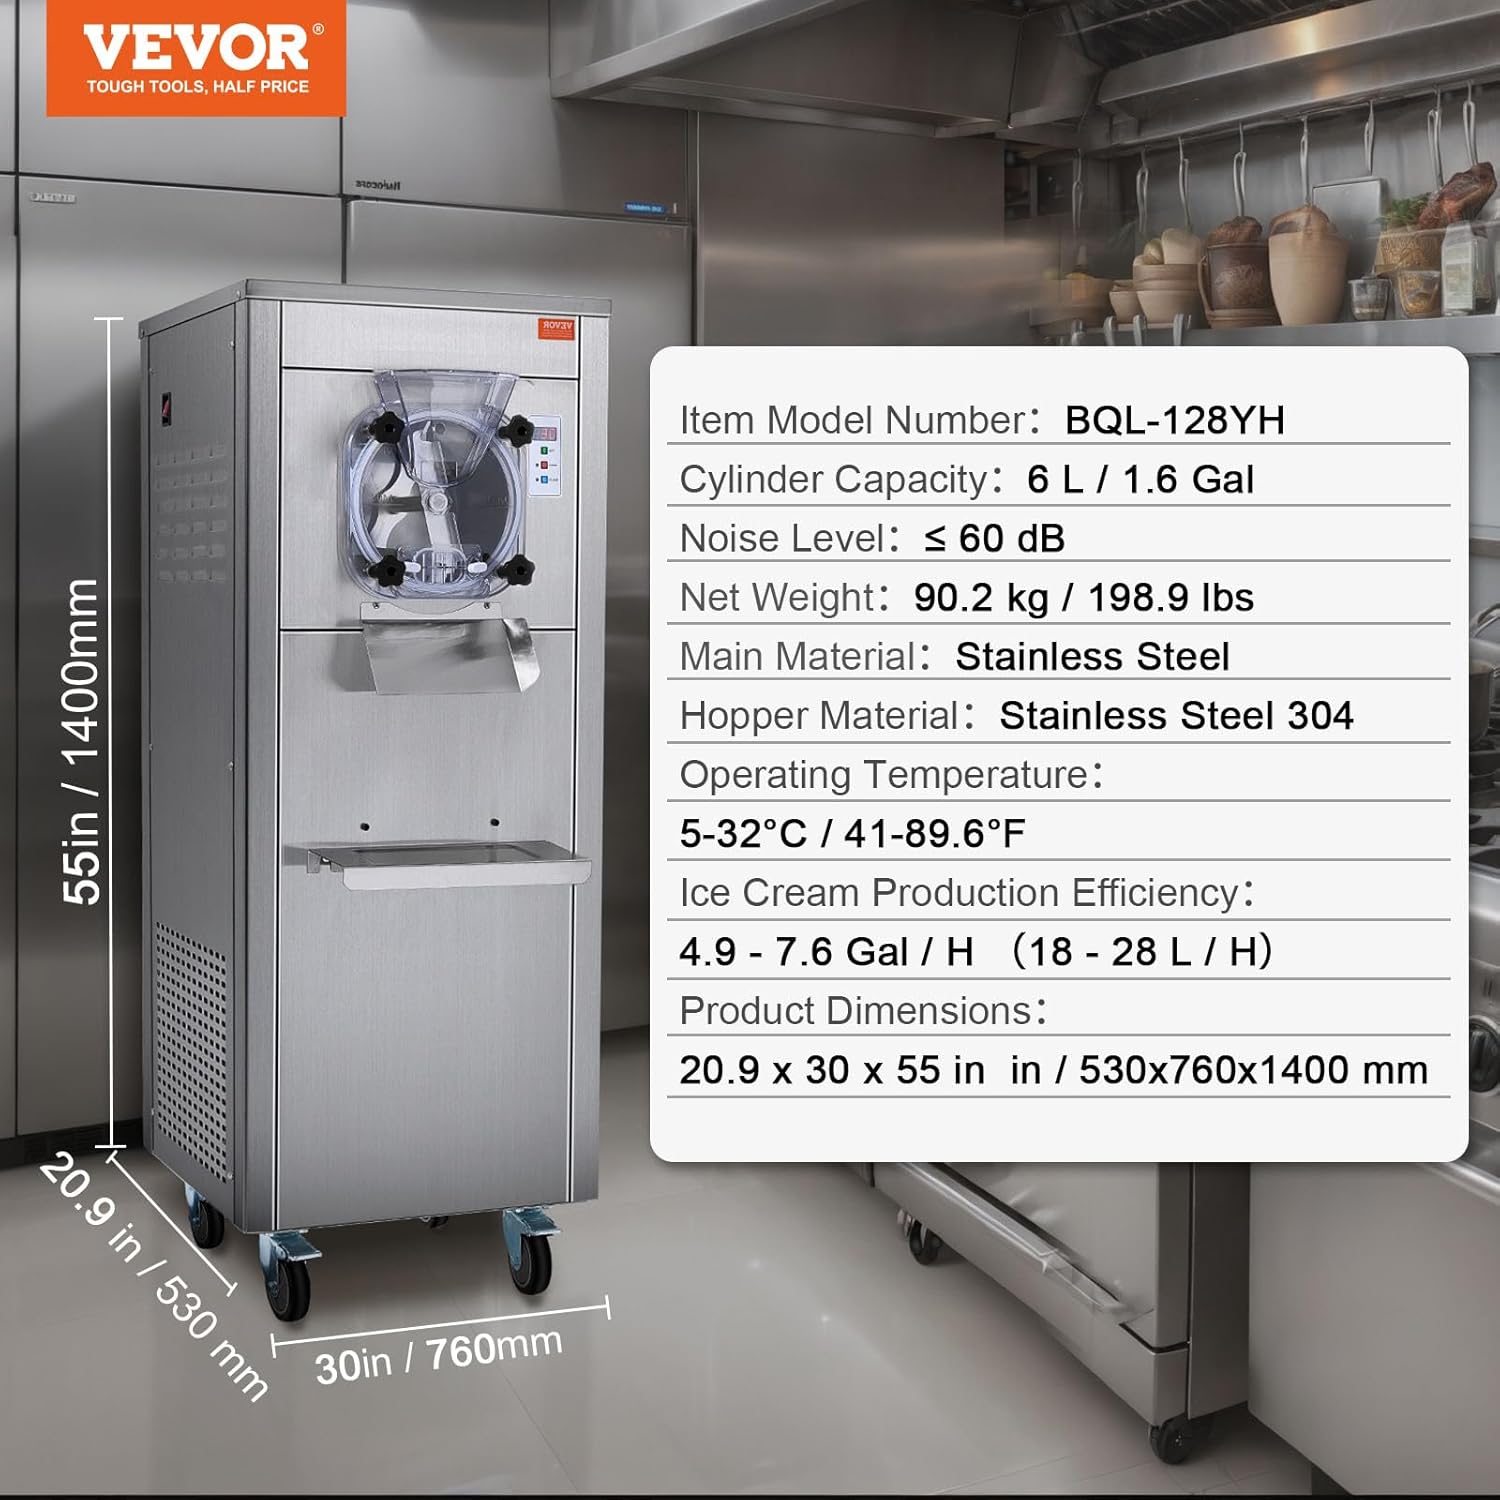
Figure 3: Product Dimensions. This diagram illustrates the overall dimensions of the machine, crucial for planning its placement in a commercial kitchen. The machine measures approximately 53.1 cm (20.9 in) wide, 76.2 cm (30 in) deep, and 139.7 cm (55 in) high.

Figure 4: Machine in Commercial Setting. An example of the machine's placement in a commercial kitchen, demonstrating the space it occupies and its professional appearance.
3. Initial Cleaning:
Before first use, thoroughly clean all parts that will come into contact with food. Refer to the "Maintenance and Cleaning" section for detailed instructions.
Operating Instructions
1. Prepare the Ice Cream Mixture:
Prepare your desired hard ice cream mixture according to your recipe. Ensure the mixture is well-chilled before adding it to the machine for optimal results.
2. Fill the Hopper:
- Ensure the machine is plugged in and the power switch is ON.
- Carefully pour the prepared ice cream mixture into the 6-liter capacity hopper. Do not overfill.

Figure 5: Filling the Hopper. This image demonstrates the process of pouring the ice cream mixture into the machine's 6-liter capacity hopper, which is designed for a single flavor.
3. Digital Control Panel Operation:
The machine features an intuitive digital LED display for easy control.

Figure 6: Digital LED Display. The control panel allows users to set parameters, initiate cooling, and activate the automatic cleaning function. The display shows current settings and operational status.
- SET Button: Use to adjust production time or ice cream hardness settings. Follow on-screen prompts.
- COOL Button: Press to start the cooling and mixing process. The machine will begin to churn and freeze the mixture.
- CLEAN Button: Activates the automatic cleaning cycle. (Refer to Maintenance section for details).
- The display will show the remaining production time and other relevant status indicators.
4. Ice Cream Production:
- Once the mixture is in the hopper, press the COOL button. The machine will start the freezing and churning process.
- Production typically takes around 20 minutes, depending on the mixture and desired consistency.
- Monitor the display for progress. The machine will automatically stop when the desired hardness is reached or the set time expires.
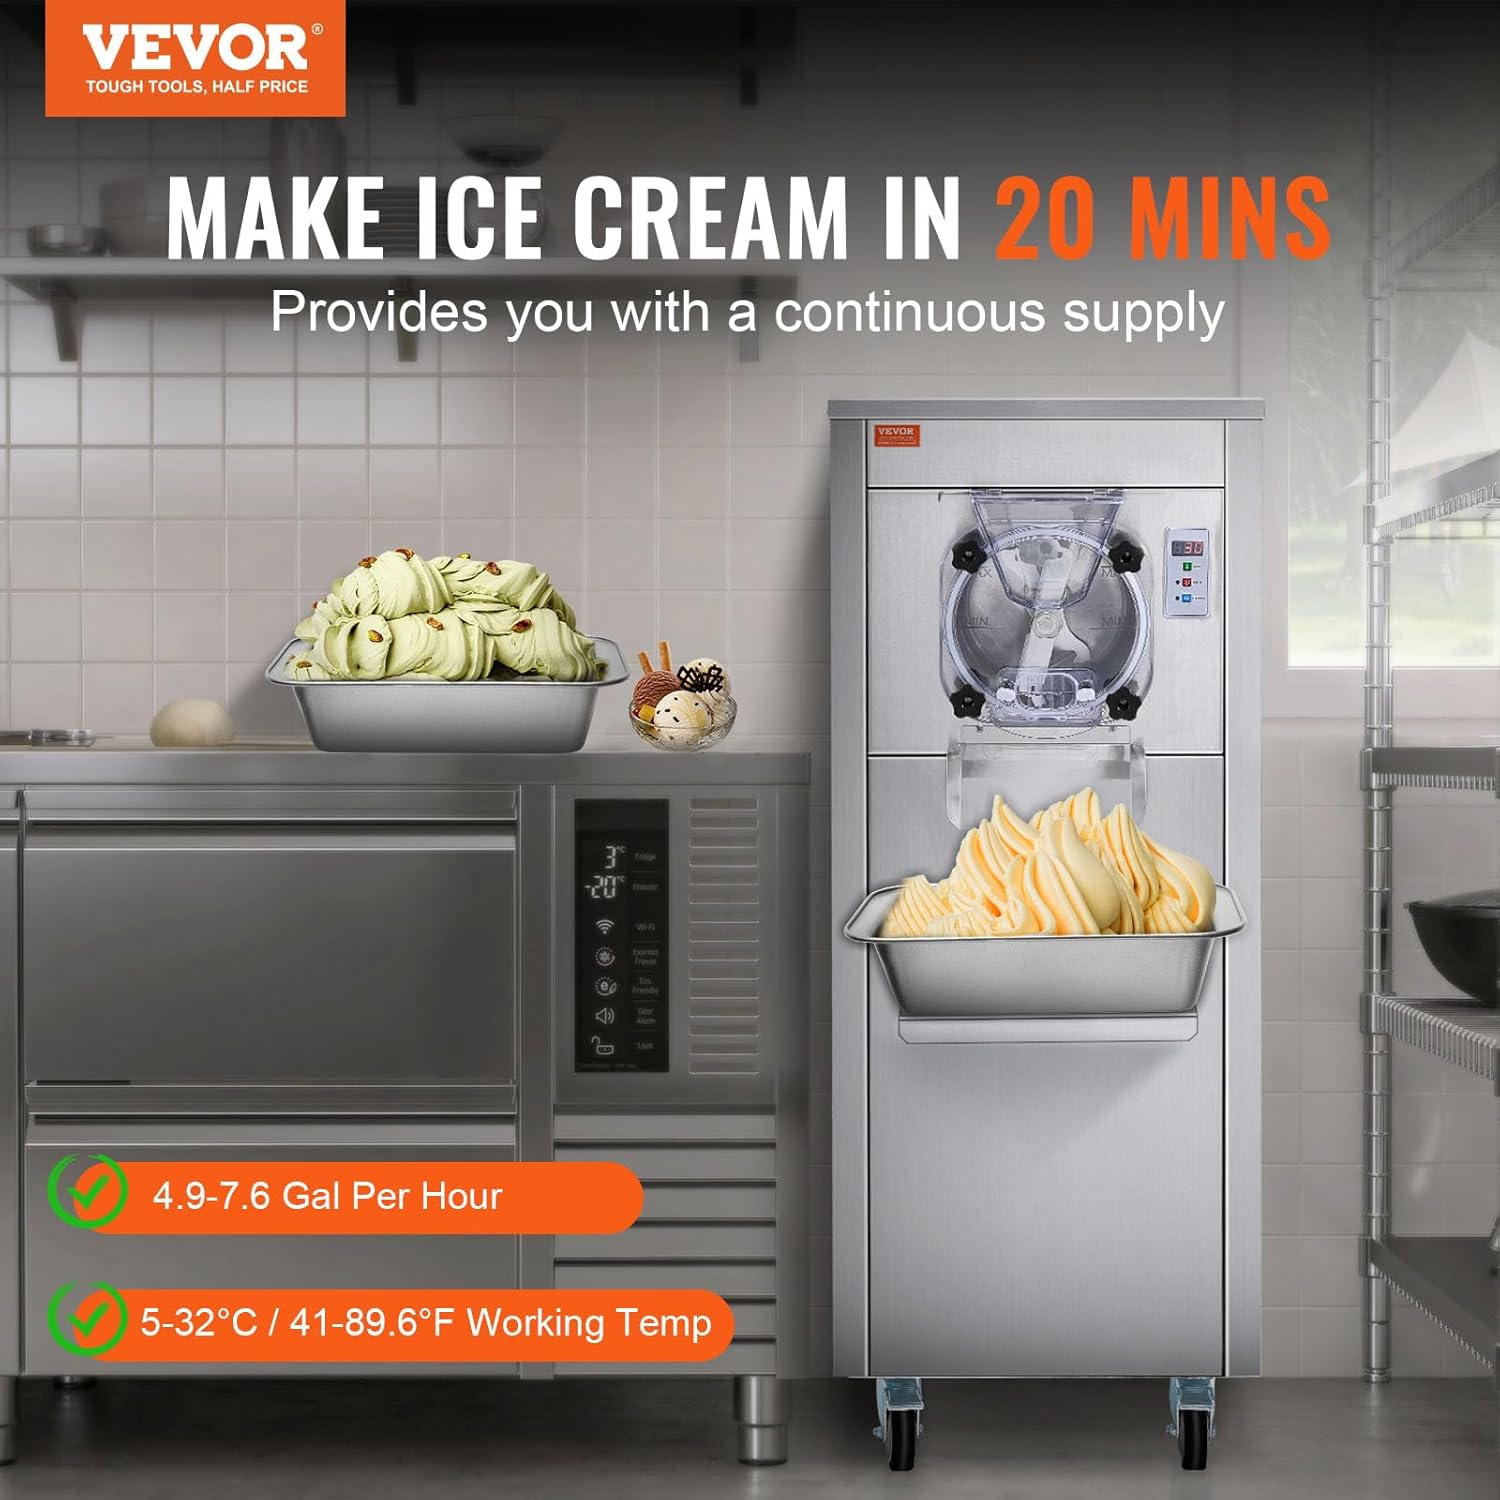
Figure 7: Ice Cream Production. The machine in operation, demonstrating its ability to produce ice cream efficiently, with a batch ready in approximately 20 minutes.
5. Dispensing Ice Cream:
Once the ice cream is ready, use the discharge port to dispense it into containers or serving dishes. The drip tray (Figure 1) will catch any spills.
Maintenance and Cleaning
Regular cleaning and maintenance are crucial for hygiene, optimal performance, and extending the lifespan of your machine.
1. Daily Cleaning:
- After each use, or at the end of the day, ensure the machine is unplugged.
- Remove any remaining ice cream from the cylinder.
- Add warm soapy water to the hopper.
- Press the CLEAN button to activate the automatic cleaning cycle. This will agitate the water within the cylinder.
- Drain the soapy water through the discharge port.
- Rinse the hopper and cylinder thoroughly with clean water, then drain.
- Wipe down all exterior surfaces with a damp cloth.
- Remove and clean the drip tray.

Figure 8: Easy Cleaning Features. The image illustrates the internal components and materials (SUS304 hopper, stainless steel body) that facilitate easy cleaning, emphasizing the automatic cleaning function activated by adding water and pressing the wash button.
2. Deep Cleaning (Periodically):
- Periodically, disassemble the mixing paddle and other removable parts for a more thorough cleaning.
- Wash these parts with warm soapy water, rinse, sanitize, and air dry completely before reassembling.
- Inspect seals and gaskets for wear and tear and replace if necessary.
3. Care Instructions:
Clean the ice cream machine with warm soapy water and avoid abrasive cleaners, scouring pads, or harsh chemicals that could damage the stainless steel surfaces or internal components.
Troubleshooting
| Problem | Possible Cause | Solution |
|---|---|---|
| Machine does not start | Not plugged in; Power switch off; Circuit breaker tripped. | Check power connection; Turn power switch on; Reset circuit breaker. |
| Ice cream is too soft/not freezing | Mixture not pre-chilled; Ambient temperature too high; Insufficient cooling time; Refrigerant issue. | Pre-chill mixture to 4°C (40°F); Ensure proper ventilation; Increase cooling time via SET button; Contact service if problem persists. |
| Ice cream is too hard | Excessive cooling time; Hardness setting too high. | Reduce cooling time; Adjust hardness setting via SET button. |
| Unusual noise during operation | Loose components; Obstruction in mixing cylinder; Motor issue. | Turn off and unplug machine; Inspect for loose parts or obstructions; Contact service if noise persists. |
| Leakage from discharge port | Seal/gasket worn or improperly installed. | Inspect and properly seat or replace seals/gaskets. |
Specifications
| Parameter | Value |
|---|---|
| Model Number | BQL-128YH |
| Operating Temperature Range | 5-32 °C (41-89.6 °F) |
| Ice Cream Production Efficiency | 18 L/H (4.8 gal/hour) |
| Cylinder Capacity | 6 L (1.6 gal) |
| Noise Level | ≤ 66 dB |
| Hopper Material | SUS304 Stainless Steel |
| Main Body Material | SUS201 Stainless Steel |
| Net Weight | 90.2 kg (205.03 lbs) |
| Product Dimensions (L x W x H) | 53.1 x 76.2 x 139.7 cm (20.9 x 30 x 55 inches) |
| Special Feature | Automatic pre-cooling with cleaning |
| Included Components | Ice cream machine, star nut, bell tube, oval seal, acoustic wall fixing nut, Allen key |
Warranty and Support
VEVOR products are designed for durability and performance. For warranty information, technical support, or service inquiries, please refer to the warranty card included with your purchase or visit the official VEVOR website. Please have your model number (BQL-128YH) and purchase date available when contacting support.


