1. Product Overview
The LEDSONLINE COB 5V USB-powered LED Strip Kit provides efficient and versatile lighting for various indoor applications. This kit features a 6.56ft (2m) COB LED strip with 960 LEDs, offering a dotless, uniform light output at 6000K Pure White. It includes an inline USB controller for basic ON/OFF and dimming functions, and an RF wireless remote control for advanced brightness adjustment, timer settings, and special lighting modes. The high Color Rendering Index (CRI) of 95 ensures accurate color representation, making it suitable for spaces like pantries, kitchens, closets, and cabinets.

Image 1.1: Overview of the LEDSONLINE COB LED Strip Kit, including the LED strip, USB cable with inline controller, and RF remote control.
2. What's in the Box
- COB LED Strip Light (6.56ft / 2m)
- USB Cable with Inline Dimmer ON/OFF Switch
- RF Wireless Remote Controller (CR2025 button battery included)

Image 2.1: All components included in the LED Strip Kit: the coiled COB LED strip, the USB power cable with inline controller, and the RF wireless remote.
3. Product Specifications
| Model Number | USB Strip Light |
| LED Type | COB (Chip-on-Board) |
| LED Count | 960 LEDs |
| Color Temperature | 6000K (Pure White) |
| Strip Length | 6.56ft (2 meters) |
| Strip Width | 0.3 inches (8mm) |
| Input Voltage | 5V DC (USB-powered) |
| Power Consumption | 10W (5W/meter) |
| Luminous Flux | 800 Lumens |
| CRI (Color Rendering Index) | 95 |
| Beam Angle | 180 degrees |
| Water Resistance | IP20 (Indoor Use Only) |
| Control Method | Inline Button Control, RF Remote Control |
| Special Features | Dimmable, Timer Function |

Image 3.1: Detailed view of the COB LED strip, highlighting the continuous light emission without visible individual LED dots.
4. Safety Information
- Ensure the power source is 5V DC and provides at least 2A current. Using an inadequate power supply may result in dimming or malfunction.
- This product is rated IP20 for indoor use only. Do not expose to water or high humidity.
- Do not bend the LED strip sharply at angles less than 90 degrees to avoid damaging the circuit.
- Keep out of reach of children.
- Do not stare directly into the illuminated LEDs for extended periods.
5. Installation Guide
5.1 Surface Preparation
Before installation, ensure the mounting surface is clean, dry, and smooth. Dust, oil, or moisture can reduce the adhesive's effectiveness.
5.2 Applying the LED Strip
- Carefully peel off the protective backing from the 3M adhesive tape on the back of the LED strip.
- Press the LED strip firmly onto the desired surface, ensuring good contact along the entire length.
- Avoid repositioning the strip multiple times, as this can weaken the adhesive.

Image 5.1: Demonstrates peeling the protective backing from the adhesive on the LED strip, preparing it for mounting.
5.3 Connecting Power
- Connect the USB plug of the inline controller cable to a compatible 5V 2A (or higher) USB power adapter (not included) or a USB port on a device.
- Ensure the connection is secure.
5.4 Cutting the LED Strip (Optional)
The LED strip can be cut to your desired length at designated cutting marks, typically indicated by a copper pad and a scissor icon. Each cutting unit is approximately 0.39 inches (10mm).
- Only cut along the marked lines to avoid damaging the circuit.
- Once cut, the trimmed section will not be functional unless re-connected with appropriate connectors (not included).

Image 5.2: Close-up of the LED strip showing the designated cutting marks, indicated by copper pads and a scissor icon.
5.5 Installation Video
Video 5.1: This video demonstrates the connection of the USB power cable to the LED strip and the basic operation of the inline controller and RF remote control.
6. Operating Instructions
6.1 Using the Inline USB Controller
The inline controller on the USB cable provides basic control over the LED strip:
- Power Button: Press to turn the LED strip ON or OFF.
- Brightness Buttons (+/-): Press to adjust the brightness level. There are 6 levels of dimming.
6.2 Using the RF Wireless Remote Control
The RF remote control offers more comprehensive functions. Ensure the CR2025 battery is correctly installed.

Image 6.1: Layout of the RF Wireless Remote Control, showing buttons for power, brightness, timer, and special modes.
- ON/OFF Buttons: Turn the LED strip ON or OFF.
- Brightness Adjustment: Use the sun icon buttons (bright/dim) to increase or decrease the light intensity.
- Night Light Mode: Press the moon icon button for a low-brightness setting suitable for night use.
- Breathing Light Mode: Press the heart icon button to activate a gentle pulsating light effect.
- Timer Functions: Set the light to turn off automatically after a specified duration (30 minutes, 1 hour, 2 hours, 3 hours, 4 hours). Press the 'C' button to cancel the timer.

Image 6.2: Close-up of the remote control sensor, which receives signals from the RF remote.
7. Maintenance
- Cleaning: Gently wipe the LED strip with a dry, soft cloth. Do not use liquid cleaners or abrasive materials.
- Storage: If storing the LED strip, ensure it is coiled loosely and kept in a dry, cool environment away from direct sunlight.
- Handling: Avoid excessive bending or twisting of the strip, especially near connection points.
8. Troubleshooting
- LED Strip Not Turning On:
- Check if the USB power cable is securely connected to a 5V 2A (or higher) power source.
- Ensure the power source is active.
- Verify that the ON button on either the inline controller or the RF remote has been pressed.
- LED Strip is Dim:
- Adjust the brightness using the '+' button on the inline controller or the bright sun icon on the RF remote.
- Ensure your USB power source provides sufficient current (at least 2A).
- RF Remote Not Responding:
- Check if the CR2025 battery in the remote is correctly inserted and has sufficient charge. Replace if necessary.
- Ensure there are no obstructions between the remote and the USB receiver.
- Inconsistent Lighting:
- Inspect the LED strip for any physical damage or sharp bends.
- Ensure all connections are firm.
9. Warranty and Support
This LEDSONLINE product comes with a 2-year manufacturer's warranty from the date of purchase. This warranty covers defects in materials and workmanship under normal use.
For technical support, warranty claims, or further assistance, please visit the official LEDSONLINE store or contact customer service through the platform where you purchased the product.
LEDSONLINE Store: https://www.amazon.com/stores/LEDSONLINE/page/1DACABEE-1836-47BE-9B58-C3E20FF3F1FE
10. Application Examples
The flexible and dotless design of this COB LED strip makes it ideal for various accent and task lighting applications:
- Under-cabinet lighting in kitchens
- Pantry and closet illumination
- Desk and workstation lighting
- TV backlight for reduced eye strain
- Decorative lighting for shelves and displays
- DIY lighting projects
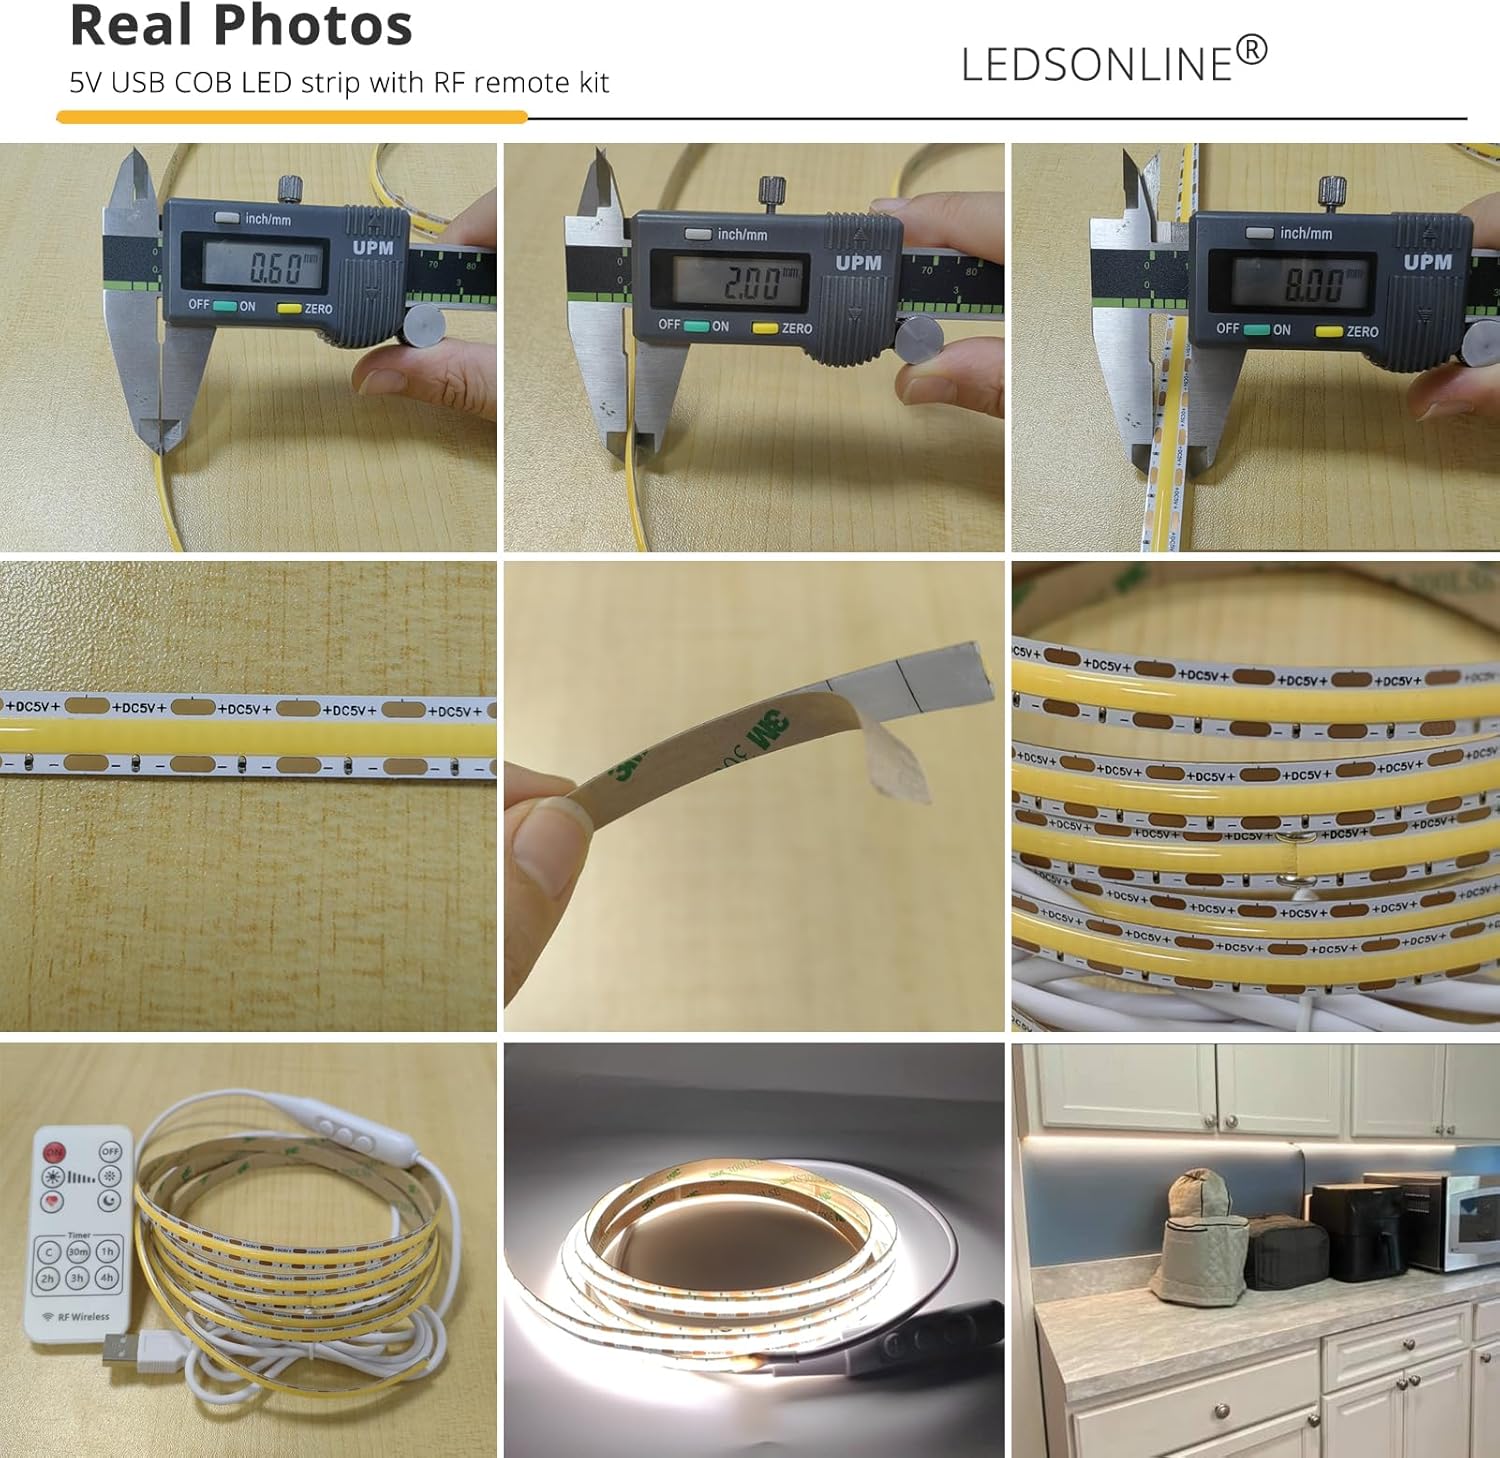
Image 10.1: Example of the LED strip installed under a kitchen cabinet, providing bright and uniform task lighting.

Image 10.2: Collage showing the LED strip used in various settings, including kitchen, cabinet, and DIY projects.