1. Introduction
Thank you for choosing the Sunoony BX-A22G-V1 Portable Multi-Band Radio. This device is designed to provide reliable reception across AM, FM, Shortwave (SW), and Weather Band (WB) frequencies, along with media playback capabilities. This manual provides detailed instructions for setup, operation, maintenance, and troubleshooting to ensure optimal performance and longevity of your radio.
2. Product Overview
2.1 Key Features
- Multi-band reception: AM, FM, Shortwave (SW), Weather Band (WB)
- Digital tuner with automatic and manual station search
- Large LCD screen for clear display of frequency and settings
- Built-in 4000mAh rechargeable battery
- Supports D-size batteries for extended use
- USB and TF card slots for MP3 playback
- 3.5mm earphone jack for private listening
- Portable design with a convenient handle
- Sleep timer function (up to 90 minutes)
2.2 Radio Components
Familiarize yourself with the radio's controls and ports:
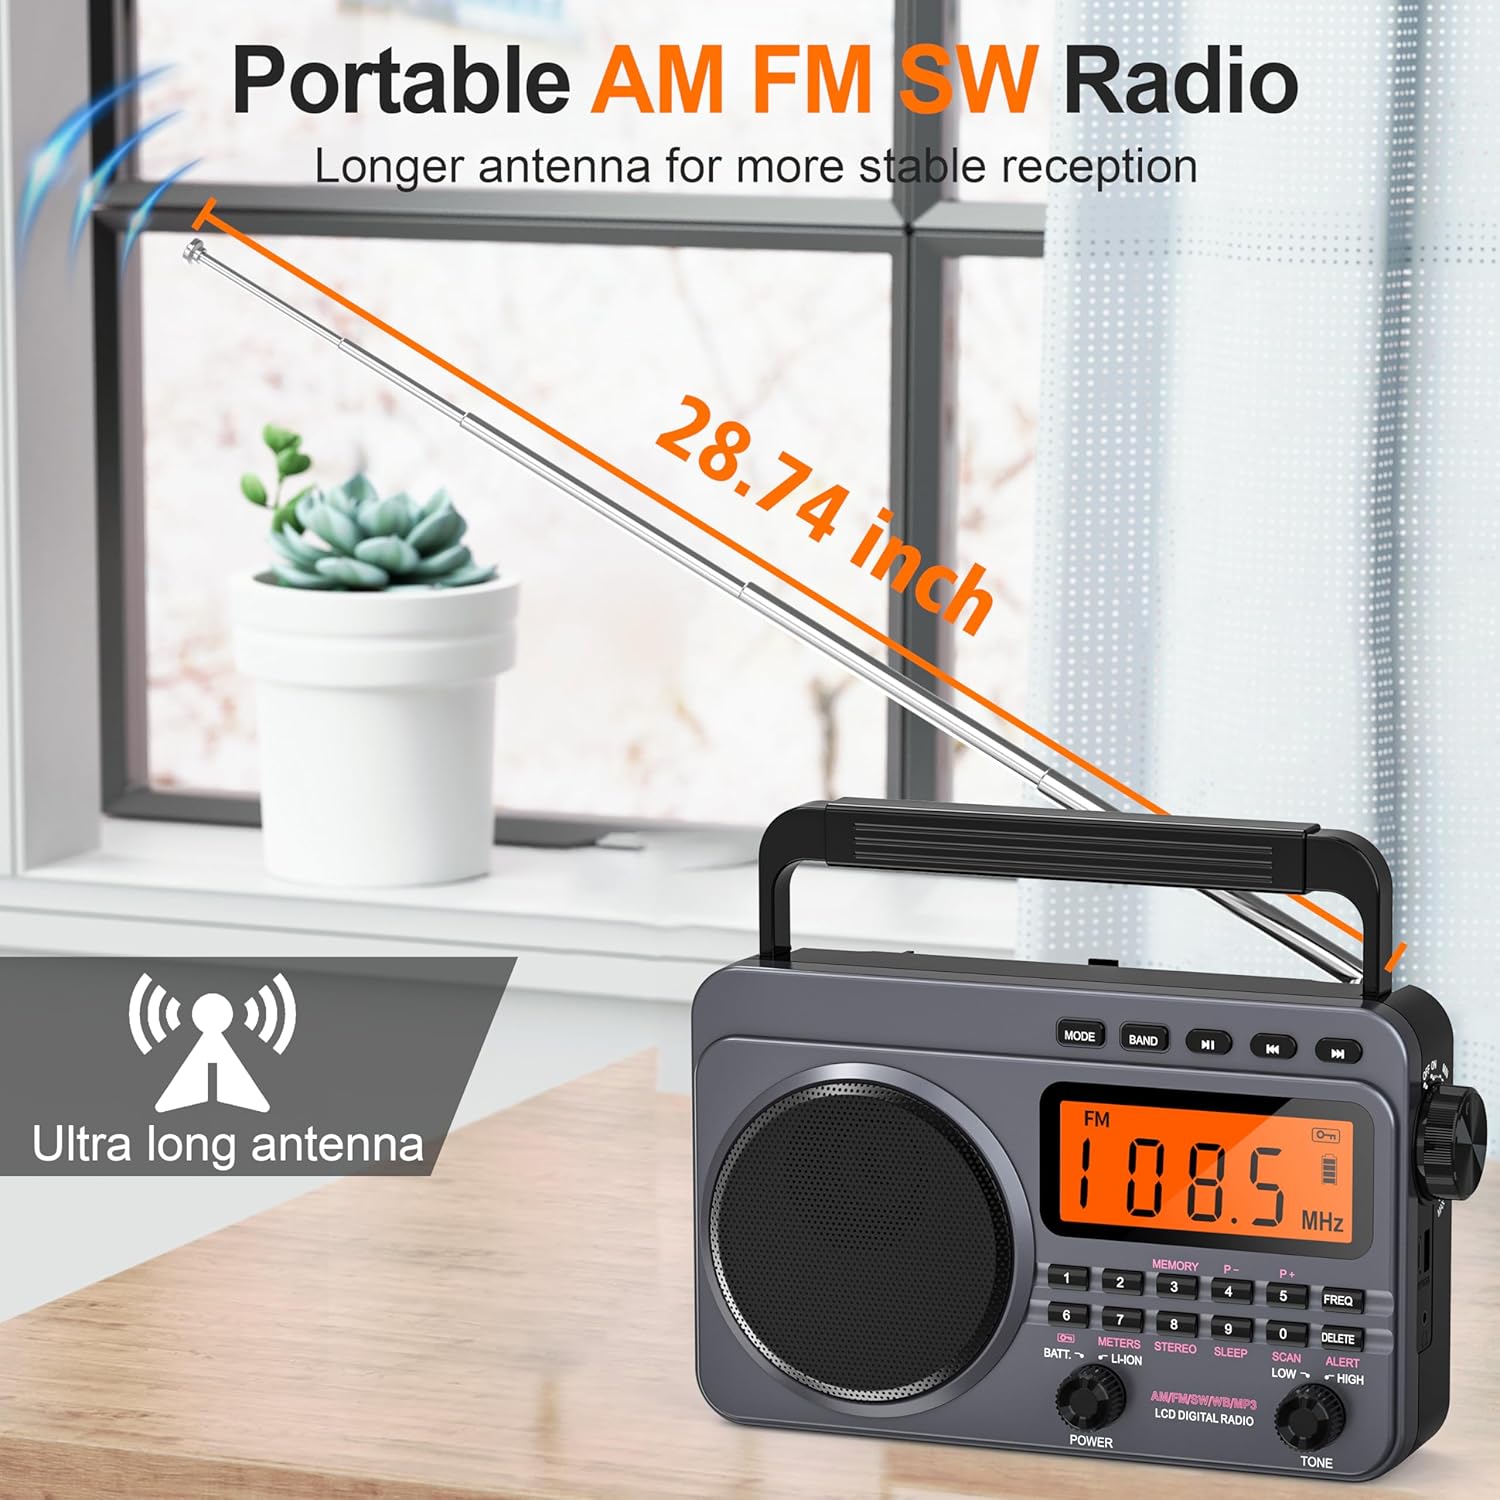
Figure 1: Front Panel Controls and Digital Tuner. This image focuses on the radio's control panel, showing the digital tuner and numeric keypad. Users can directly input frequencies for precise tuning or use the scan function to find stations. A lock button is also visible, preventing accidental changes to settings.
- LCD Display: Shows frequency, time, battery status, and mode.
- Power Knob: Turns the radio on/off and selects battery source.
- Volume Knob: Adjusts audio output level.
- Tuning Buttons (P+/P-): Adjusts frequency or navigates tracks.
- Number Keys (0-9): For direct frequency input and preset selection.
- MODE Button: Switches between radio bands (AM/FM/SW/WB) and MP3 player.
- BAND Button: Cycles through available bands within radio mode.
- SCAN Button: Initiates automatic station scanning.
- MEMORY Button: Saves and recalls preset stations.
- ALERT Button: Activates/deactivates Weather Alert function.
- TONE Switch: Adjusts audio tone (Low/High).
- USB Port: For USB flash drive playback.
- TF Card Slot: For TF (microSD) card playback.
- 3.5mm Earphone Jack: For connecting headphones.
- Type-C Charging Port: For charging the built-in battery.
- Telescopic Antenna: For radio signal reception.
- Battery Compartment: For D-size batteries.
3. Setup
3.1 Power Supply
The radio offers two power options:

Figure 2: Dual Power Options. This image illustrates the dual power options for the radio. It can be powered by its internal 4000mAh rechargeable battery, charged via a USB-C cable (adapter not included), or by four D-size alkaline or NiMH batteries inserted into the rear compartment.
- Built-in Rechargeable Battery: The radio includes a 4000mAh Lithium-Ion battery. To use, ensure the power switch is set to 'LI-ION'.
- D-size Batteries: For extended use or as a backup, you can insert four (4) D-size batteries (not included) into the battery compartment on the rear of the radio. Ensure correct polarity. Set the power switch to 'BATT' to use D-size batteries.
3.2 Charging the Built-in Battery
To charge the built-in battery:
- Connect the provided Type-C charging cable to the radio's Type-C charging port.
- Connect the other end of the cable to a USB power adapter (5V/1A recommended, not included) or a computer's USB port.
- The LCD screen will indicate charging status. A red LED indicator will also illuminate if the radio is off during charging.
- Charging is complete when the battery indicator shows full or the red LED turns off.
Note: It is recommended to fully charge the battery before first use. Presets may be lost if the internal battery completely drains or if D-batteries are removed without the internal battery being charged.
4. Operating Instructions
4.1 Power On/Off and Volume
- Turn the POWER knob clockwise to power on the radio. Select 'LI-ION' for the internal battery or 'BATT' for D-size batteries.
- Adjust the VOLUME knob to your desired listening level.
- To power off, turn the POWER knob counter-clockwise to the 'OFF' position.
4.2 Radio Reception (AM/FM/SW/WB)

Figure 3: Extended Telescopic Antenna. The radio features an extendable telescopic antenna, measuring 28.74 inches when fully extended. This long antenna is designed to enhance signal reception across all supported radio bands (AM, FM, SW, WB), providing more stable and clear audio.
- Extend the Antenna: For optimal reception, fully extend the telescopic antenna. For AM reception, rotating the radio may improve signal.
- Select Band: Press the MODE button repeatedly to cycle through radio modes (FM, AM, SW, WB). Alternatively, use the BAND button to cycle through specific bands within a mode (e.g., different SW bands).
- Tuning Stations:
- Automatic Scan: Press the SCAN button to automatically search for and store available stations.
- Manual Tuning: Use the P+ or P- buttons to fine-tune the frequency step by step.
- Direct Frequency Input: Use the number keys (0-9) to directly enter the desired frequency, then press FREQ.
- Saving Presets: After tuning to a station, press the MEMORY button, then use the number keys (0-9) to select a preset number (e.g., 1-40) and press MEMORY again to confirm.
- Recalling Presets: In radio mode, simply press the corresponding number key (0-9) for the desired preset.
- Deleting Presets: Tune to the station you wish to delete, then press the DELETE button.
4.3 Weather Band (WB) and Alert Function
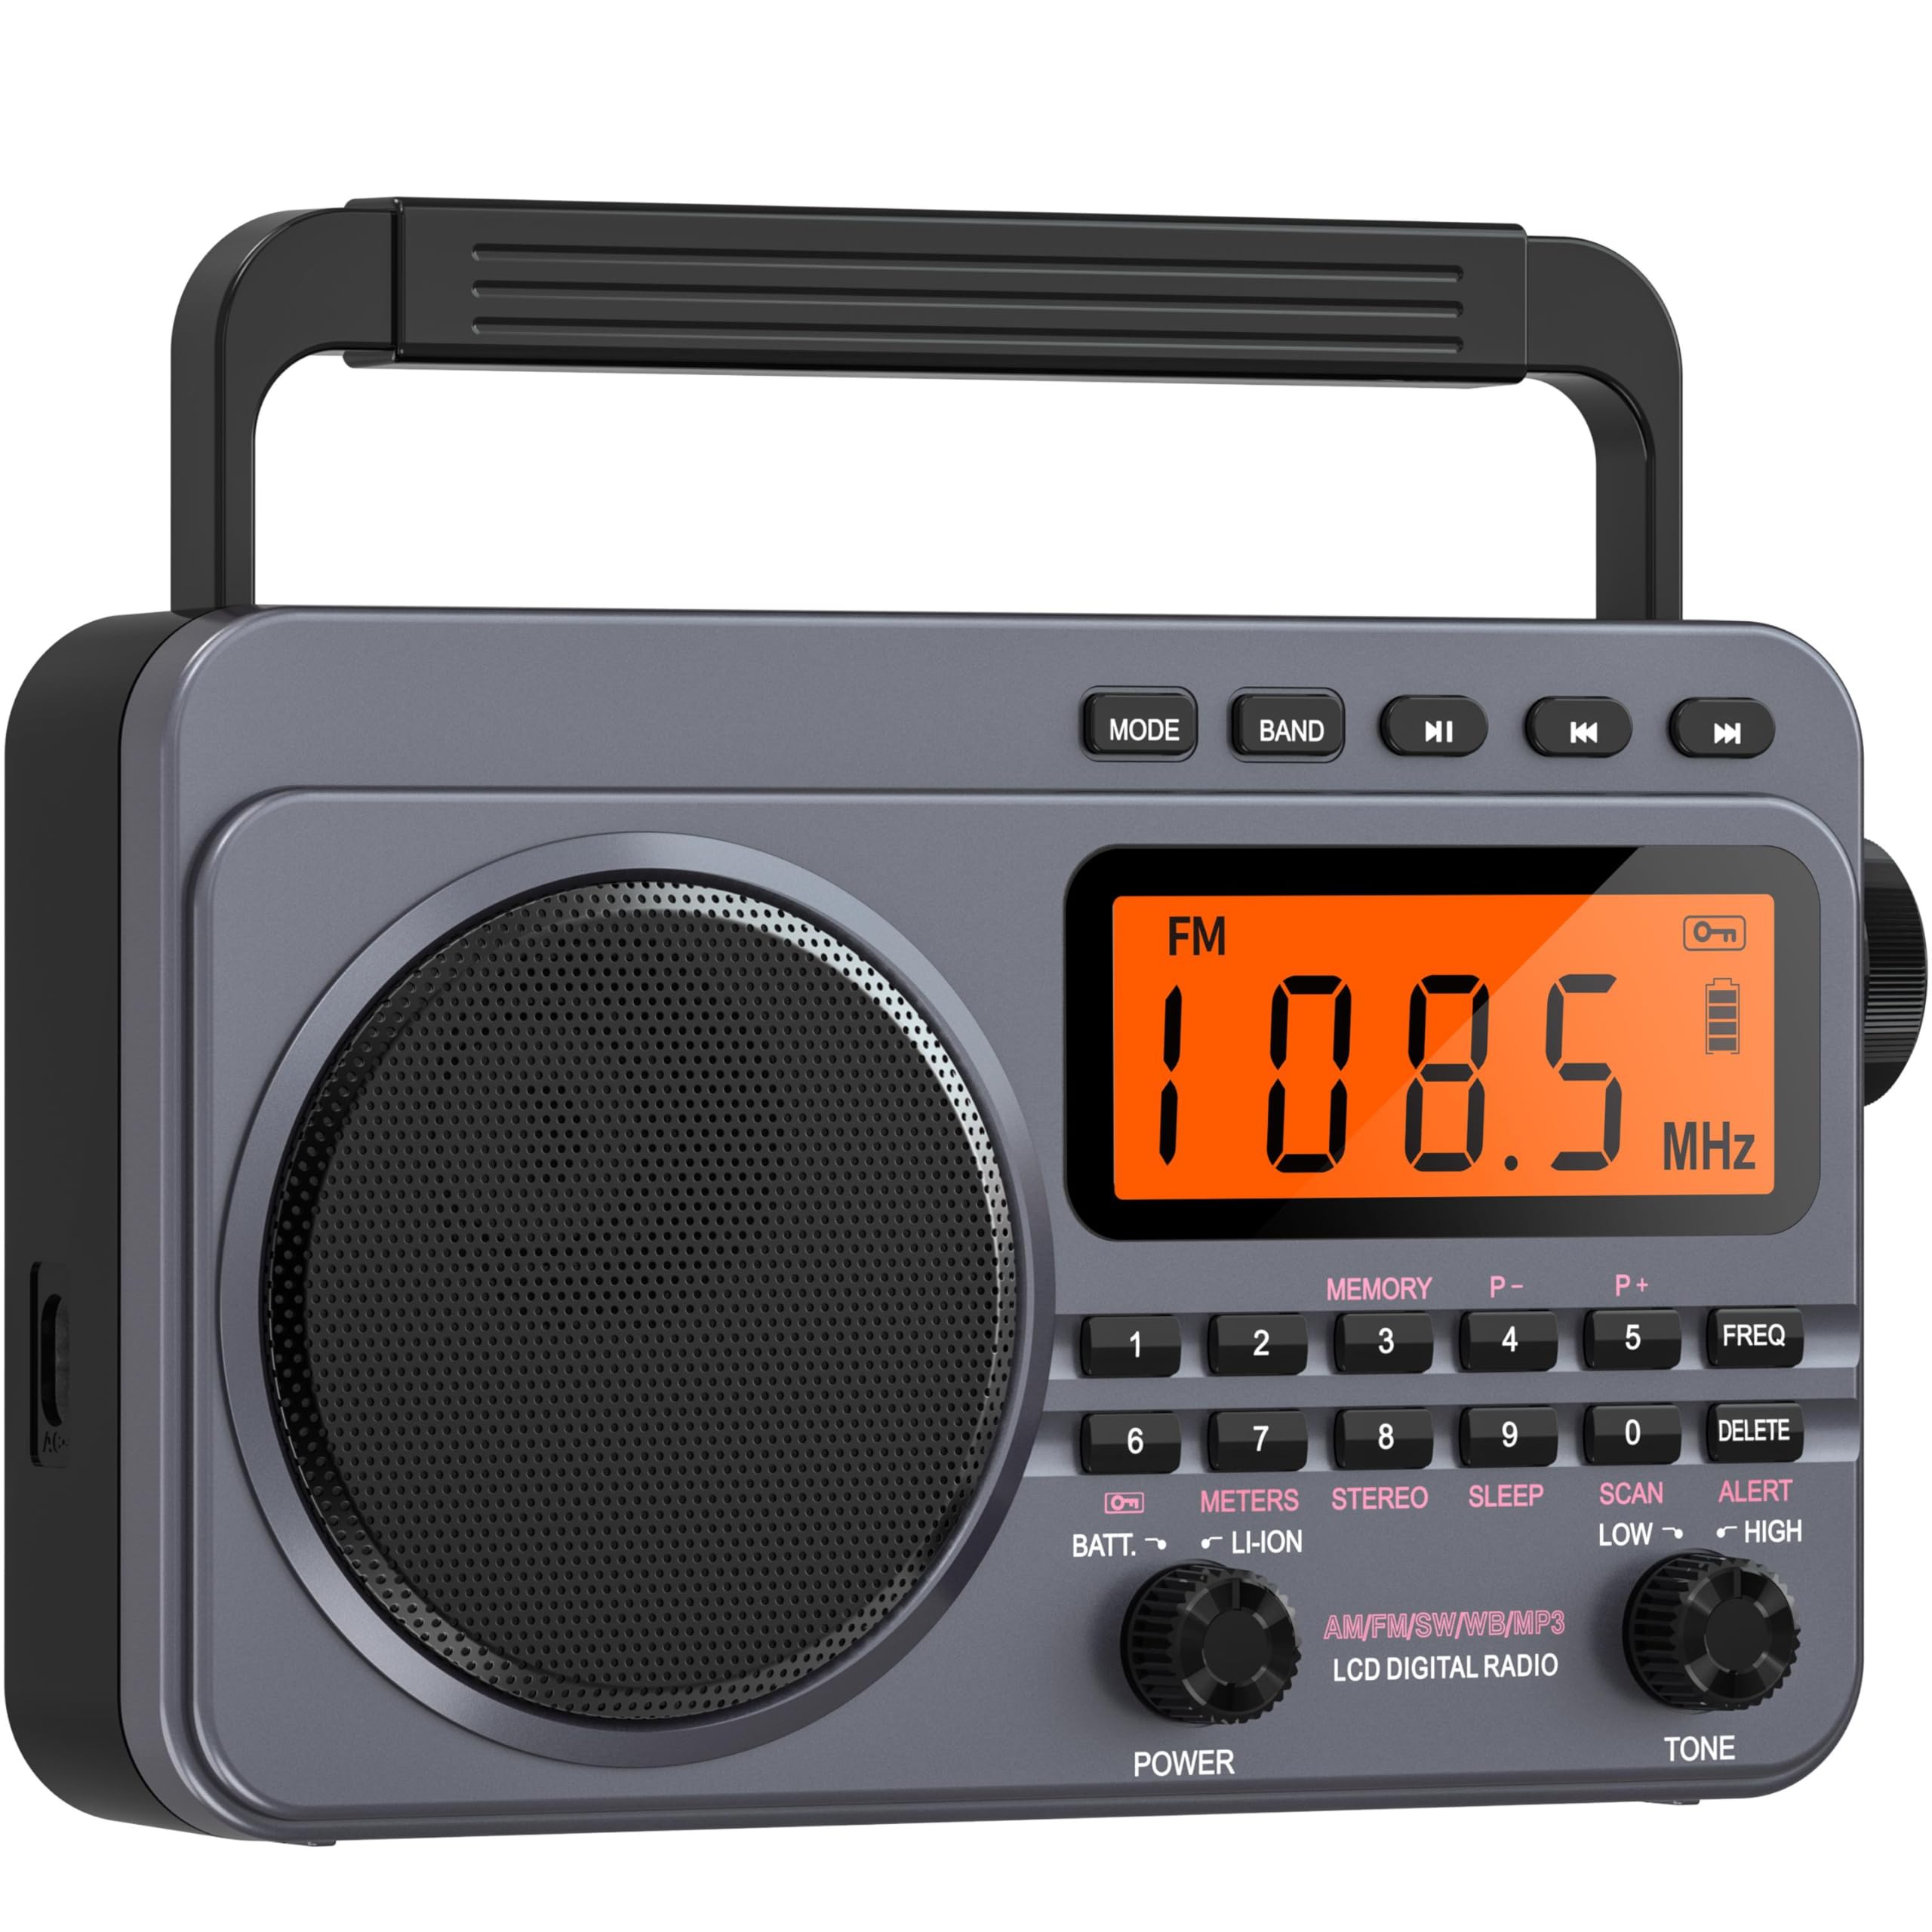
Figure 4: Weather Band Display with Alert. This image shows the radio's display in Weather Band (WB) mode, tuned to 162.400 MHz, indicating an active weather alert. The screen highlights the NOAA weather alert feature, designed to provide timely warnings for sudden disasters.
The Weather Band (WB) provides access to NOAA weather broadcasts. The alert function can notify you of severe weather conditions.
- Press MODE until 'WB' is displayed.
- Tune to your local NOAA weather frequency.
- To activate the weather alert, press the ALERT button. The radio will monitor for alert signals and sound an alarm if one is detected. Press ALERT again to deactivate.
4.4 Media Playback (USB/TF Card)

Figure 5: Media Playback via USB/TF Card. This image demonstrates the radio's capability to play music from external storage. Users can insert a TF (microSD) card or a USB flash drive into the designated slots to enjoy their favorite audio files. A 3.5mm headphone jack allows for private listening.
The radio supports MP3 audio playback from USB flash drives and TF (microSD) cards.
- Insert a USB flash drive into the USB port or a TF card into the TF card slot.
- Press the MODE button until 'MP3' or a similar indicator appears on the display.
- The radio will automatically begin playing audio files. Use the P+ and P- buttons to skip tracks.
- To listen privately, plug 3.5mm headphones into the earphone jack.
4.5 Sleep Timer
The sleep timer allows the radio to automatically turn off after a set period.
- While the radio is on, press the SLEEP button.
- Repeatedly press SLEEP to cycle through available sleep times (e.g., 10, 20, 30, 60, 90 minutes).
- The radio will automatically power off after the selected duration.
5. Maintenance
- Cleaning: Use a soft, dry cloth to clean the radio's exterior. Do not use abrasive cleaners or solvents.
- Battery Care: If using D-size batteries, remove them if the radio will not be used for an extended period to prevent leakage. For the built-in Lithium-Ion battery, charge it regularly to maintain its lifespan, even if not in frequent use.
- Storage: Store the radio in a cool, dry place away from direct sunlight and extreme temperatures.
- Antenna: Handle the telescopic antenna carefully to avoid bending or breaking. Retract it when not in use.
6. Troubleshooting
| Problem | Possible Cause | Solution |
|---|---|---|
| Radio does not power on | Low battery (internal or D-cells); Power switch in wrong position. | Charge the built-in battery or replace D-size batteries. Ensure power switch is set to 'LI-ION' or 'BATT' correctly. |
| Poor radio reception | Antenna not extended; Weak signal; Interference. | Fully extend the telescopic antenna. Try repositioning the radio or rotating it for AM. Move away from electronic devices causing interference. |
| Sound distortion at high volume | Volume too high; Tone setting. | Reduce the volume. Adjust the TONE switch (Low/High) to find a clearer sound profile. |
| MP3s not playing from USB/TF | Incorrect file format; Media not inserted correctly; Radio not in MP3 mode. | Ensure files are in MP3 format. Reinsert USB drive/TF card. Press MODE to select MP3 playback. |
| Presets are lost | Internal battery completely drained. | Keep the internal battery charged. Presets are generally preserved when switching between D-batteries and internal battery if the internal battery has some charge. |
7. Specifications
- Model: BX-A22G-V1
- Radio Bands: AM, FM, SW, WB (4-Band)
- Tuner Type: Digital
- Power Source: Built-in 4000mAh Lithium-Ion Battery, 4 x D-size Batteries (not included)
- Charging: USB Type-C (5V/1A)
- Connectivity: USB, TF Card, 3.5mm Earphone Jack
- Display: LCD
- Antenna Length: Approximately 28.74 inches (fully extended)
- Product Dimensions (L x W x H): 25.3 x 9.7 x 20 cm (9.96 x 3.82 x 7.87 inches)
- Weight: Approximately 997.9 g (2.2 lbs)
- Included Components: Type-C Charging Cord
- Water Resistance Level: Not Water Resistant
8. Warranty and Support
For warranty information or technical support, please refer to the product packaging or contact your retailer. Keep your purchase receipt as proof of purchase.


