
ALIBELL SC-R18, APE220 2-4
ALIBELL Remote Strobe Siren Kit User Manual
Model: SC-R18, APE220 2-4
Brand: ALIBELL
Introduction
The ALIBELL Remote Strobe Siren Kit is a powerful and versatile emergency alarm system designed to enhance safety and security in various environments. This wireless system comprises a portable flashing siren and panic call buttons, providing an immediate and loud alert with a flashing red light in emergency situations. It is suitable for use in homes, hospitals, factories, schools, shops, warehouses, and more, ensuring timely alerts and protection for your family, property, and premises.

Figure 1: ALIBELL Remote Strobe Siren Kit components.
Safety Information
- Ensure the siren is installed in a location where its sound and light can be effectively perceived.
- Keep the panic buttons within easy reach of individuals who may need to activate the alarm.
- Do not expose the siren or panic buttons to extreme temperatures outside the specified operating range (-20°C to 55°C / -4°F to 130°F).
- Use only specified AAA batteries for the siren. Ensure correct polarity when inserting batteries.
- If using USB power, ensure the power adapter meets safety standards.
- Do not attempt to disassemble or repair the device yourself. Refer to qualified personnel for service.
- Dispose of used batteries according to local regulations.

Figure 2: Operating temperature range for the ALIBELL Strobe Siren.
Package Contents
Please check the package contents upon opening to ensure all items are present and undamaged:
- 1 x ALIBELL Portable Strobe Siren
- 2 x ALIBELL Panic Call Buttons
- 3 x AAA Batteries (pre-installed or included for siren)
- 1 x USB Charging Cable
- Mounting Screws and Wall Plugs
- Adhesive Stickers for Panic Buttons
- User Manual (this document)
Product Overview
Strobe Siren
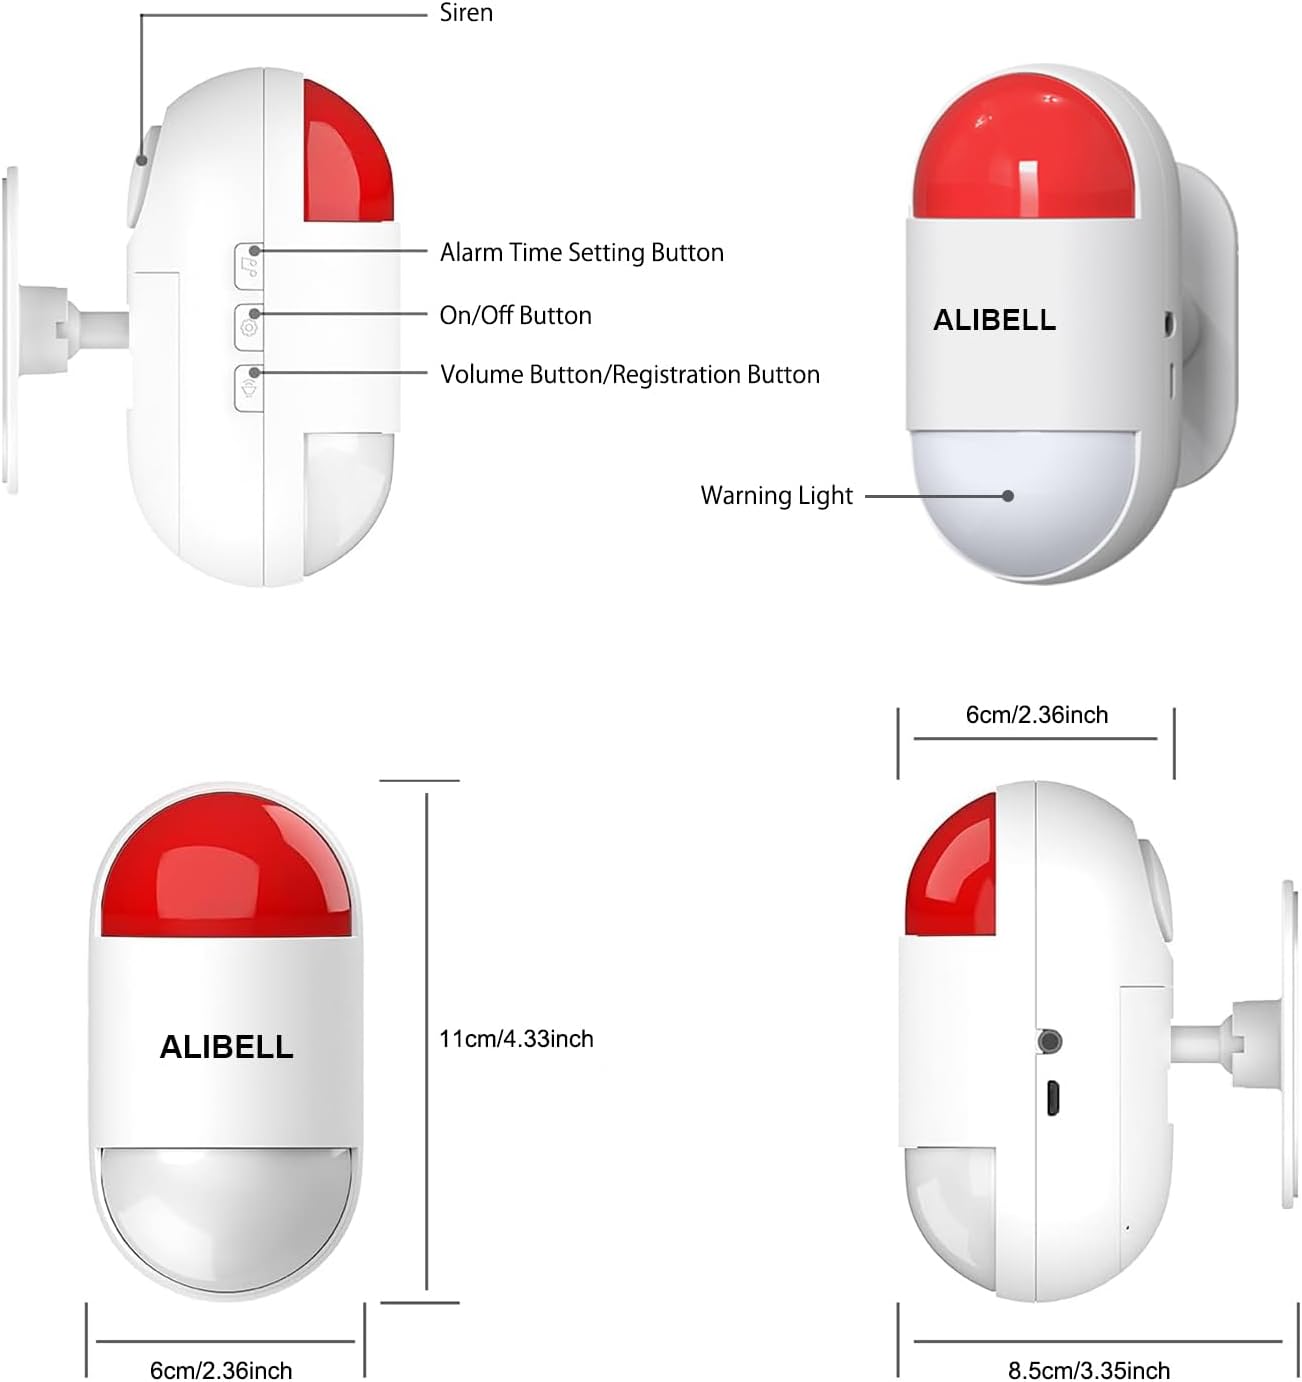
Figure 3: Strobe Siren components and dimensions.
- Siren: Emits a loud audible alarm.
- Warning Light: Flashes red during an alarm.
- Alarm Time Setting Button: Adjusts the duration of the alarm.
- On/Off Button: Powers the siren on or off.
- Volume Button/Registration Button: Adjusts alarm volume and is used for pairing panic buttons.
- Power Port: USB port for continuous power or charging.
Panic Call Button

Figure 4: Panic Call Button layout.
- Call Button: Press to activate the alarm.
- Cancel Button: Press to deactivate the alarm.
- Indicator Light: Provides visual feedback (e.g., low battery, signal transmission).
Setup
1. Powering the Strobe Siren
The siren can be powered by 3 AAA batteries or continuously via USB charging.
- Battery Installation:
- Pull down the base of the siren to detach it.
- Remove the base and use a screwdriver to take off any screws securing the battery compartment.
- Insert 3 AAA batteries, ensuring correct polarity (+/-).
- Reattach the base and secure it.

Figure 5: Battery installation steps for the siren.
- USB Charging: Connect the provided USB cable to the siren's power port and to a USB power adapter (not included) or a computer USB port. The siren can operate normally while connected to USB power.
2. Mounting the Strobe Siren
The siren can be fixed to a wall using screws or placed on a flat surface.
- Wall Mounting:
- Choose a prominent location for the siren, ensuring it is within the wireless range of the panic buttons (up to 100m/328ft in open areas).
- Use the siren's base as a template to mark drilling points on the wall.
- Drill holes, insert wall plugs, and secure the siren's base to the wall using the provided screws.
- Slide the siren unit onto the mounted base until it clicks into place.
- Placement: Alternatively, place the siren on a stable, elevated surface where it can be easily seen and heard.
3. Mounting the Panic Call Buttons
The panic buttons are waterproof and can be fixed using adhesive stickers or screws.
- Adhesive Mounting:
- Clean the desired surface thoroughly.
- Peel off the protective backing from the adhesive sticker and firmly press the panic button onto the surface.
- Screw Mounting: If a more permanent fixture is desired, use small screws (not explicitly mentioned as included for buttons, but implied by "screws for siren" and general installation practices) to secure the button to a wall.
- Placement: Place panic buttons in strategic locations such as bedrooms, living rooms, near entryways, or in areas where emergencies might occur.

Figure 6: Example installation locations for siren and panic button.
4. Pairing Panic Buttons with Siren (Registration)
The siren can register up to 20 panic call buttons. The included buttons are usually pre-paired, but if you need to add new buttons or re-pair existing ones, follow these steps:
- Ensure the siren is powered on.
- Press and hold the Volume Button/Registration Button on the siren for approximately 3 seconds until the siren emits a short beep, indicating it is in pairing mode.
- Within 10 seconds, press the Call Button on the panic button you wish to pair. The siren will beep once to confirm successful pairing.
- Repeat step 3 for any additional panic buttons.
- To exit pairing mode, briefly press the Volume Button/Registration Button again, or wait 10 seconds for it to automatically exit.
Operating Instructions
1. Activating the Alarm
To activate the alarm, simply press the Call Button on any paired panic call button. The siren will immediately trigger with a loud sound and a flashing red light.

Figure 7: Activating the alarm by pressing the Call button.
2. Deactivating the Alarm
To deactivate the alarm, you have two options:
- Press the Cancel Button on the panic call button that triggered the alarm.
- Briefly press any button on the siren unit itself.
3. Adjusting Alarm Volume
The siren offers four volume levels: 0 dB (silent), 80 dB, 100 dB, and 120 dB (default). To adjust the volume:
- Press the Volume Button/Registration Button on the siren repeatedly to cycle through the available volume levels.
- Stop pressing when you reach your desired volume.

Figure 8: Alarm volume and time settings.
4. Setting Alarm Duration
The alarm duration can be set to 30 seconds, 1 minute, 3 minutes, or 10 minutes. To adjust the duration:
- Press the Alarm Time Setting Button on the siren repeatedly to cycle through the available durations.
- Stop pressing when you reach your desired duration.
5. Low Battery Reminder
When the siren's battery is low, the LED indicator will flash once every 40 seconds, and the siren will emit three short beeps. This indicates that the batteries need to be replaced soon. If the siren is connected via USB, it will continue to function even with low internal battery power.
Maintenance
1. Battery Replacement
Refer to the "Powering the Strobe Siren" section under Setup for detailed instructions on replacing the AAA batteries in the siren unit.
The panic buttons also operate on batteries (type not specified in provided data, but typically coin cells). If a panic button stops responding or its indicator light behaves unusually, replace its battery. Consult the button's specific instructions or contact support for battery type and replacement procedure.
2. Cleaning
Wipe the siren and panic buttons with a soft, dry cloth. Do not use abrasive cleaners or solvents, as these may damage the surface or internal components. Ensure no liquid enters the devices.
Troubleshooting
| Problem | Possible Cause | Solution |
|---|---|---|
| Siren does not activate when panic button is pressed. |
|
|
| Alarm is too quiet or too loud. | Volume setting is not optimal. | Adjust the volume using the Volume Button/Registration Button on the siren. |
| Siren LED flashes and beeps three times. | Low battery in the siren. | Replace the AAA batteries in the siren or connect it to USB power. |
| Alarm duration is too short or too long. | Alarm time setting is not optimal. | Adjust the alarm duration using the Alarm Time Setting Button on the siren. |
Specifications
| Feature | Detail |
|---|---|
| Model Number | SC-R18, APE220 2-4 |
| Power Source (Siren) | 3 x AAA Batteries (included), USB Charging (5 Volts) |
| Control Method | Tactile |
| Mounting Type | Wall Mount (Screws), Adhesive (Panic Button) |
| Wireless Range | Up to 100 meters (328 feet) in open areas |
| Alarm Volume Levels | 0 dB, 80 dB, 100 dB, 120 dB |
| Alarm Duration Options | 30 seconds, 1 minute, 3 minutes, 10 minutes |
| Operating Temperature | -20°C to 55°C (-4°F to 130°F) |
| Siren Dimensions (L x W x H) | Approx. 12 cm x 6.5 cm x 7 cm (4.72 in x 2.56 in x 2.76 in) |
| Panic Button Dimensions (L x W x H) | Approx. 8.6 cm x 8.6 cm x 1.75 cm (3.39 in x 3.39 in x 0.69 in) |
| Weight | 960 grams (total package) |
| Waterproof Rating (Panic Button) | IP55 (implied by "waterproof" and common ratings for such devices) |
| Max Registered Buttons | 20 |

Figure 9: Detailed product dimensions.
Warranty and Support
For warranty information, technical support, or any inquiries regarding your ALIBELL Remote Strobe Siren Kit, please contact ALIBELL customer service through the retailer's platform or refer to the contact information provided on the product packaging. Please have your model number (SC-R18, APE220 2-4) and purchase details ready when contacting support.
Ask a question about this manual
Ask about setup, troubleshooting, compatibility, parts, safety, or missing instructions. Manuals+ will review the question and use this page’s manual context to help answer it.