Product Overview
The CREWORKS 180 PPD Commercial Dehumidifier is designed for effective humidity control in large spaces, ranging from 600 to 1600 square feet. This unit features a robust design with upgraded components for efficient moisture removal and durability. Key features include automatic defrost, a user-friendly control panel, and portability for flexible placement.

Image: Front view of the CREWORKS 180 PPD Commercial Dehumidifier, highlighting its compact and robust design.
- Effective Dehumidification: Capable of removing up to 180 PPD (Pints Per Day) at saturation, suitable for areas up to 1600 sq. ft.
- Automatic Defrost: Prevents frost buildup on coils, ensuring continuous operation and efficiency.
- Durable Construction: Features upgraded copper coils for enhanced heat dissipation and longevity.
- User-Friendly Controls: An intuitive display panel allows for easy adjustment of humidity levels and timer settings.
- Portable Design: Equipped with large rear wheels and a convenient handle for easy movement.
Setup Instructions
Follow these steps to properly set up your CREWORKS 180 PPD Commercial Dehumidifier.
1. Unpacking and Placement
- Carefully remove the dehumidifier from its packaging. Inspect for any shipping damage.
- Place the unit on a level, stable surface in the desired location. Ensure there is at least 12 inches (30 cm) of clear space around all sides for proper airflow.
- Consider the dimensions of the unit for optimal placement.

Image: Diagram showing the dimensions of the dehumidifier (23.11"D x 17.32"W x 34.13"H).

Image: Examples of suitable environments for the dehumidifier, including warehouses, garages, basements, and fitness centers.
2. Drainage Connection
The unit includes a drain hose for continuous drainage. This eliminates the need for manual emptying of a water tank.
- Locate the drain outlet on the unit.
- Connect the provided drain hose securely to the drain outlet.
- Route the other end of the hose to a suitable drain point, such as a floor drain, sink, or large container. Ensure the hose is sloped downwards to allow for gravity drainage and is free from kinks or obstructions.

Image: Illustration of the drain hose connection and the overflow alarm feature, which notifies users if drainage is improper.
3. Power Connection
Plug the power cord into a grounded electrical outlet. Ensure the voltage matches the unit's requirements.
Operating Instructions
This section details how to operate your dehumidifier using the control panel.
Control Panel Overview
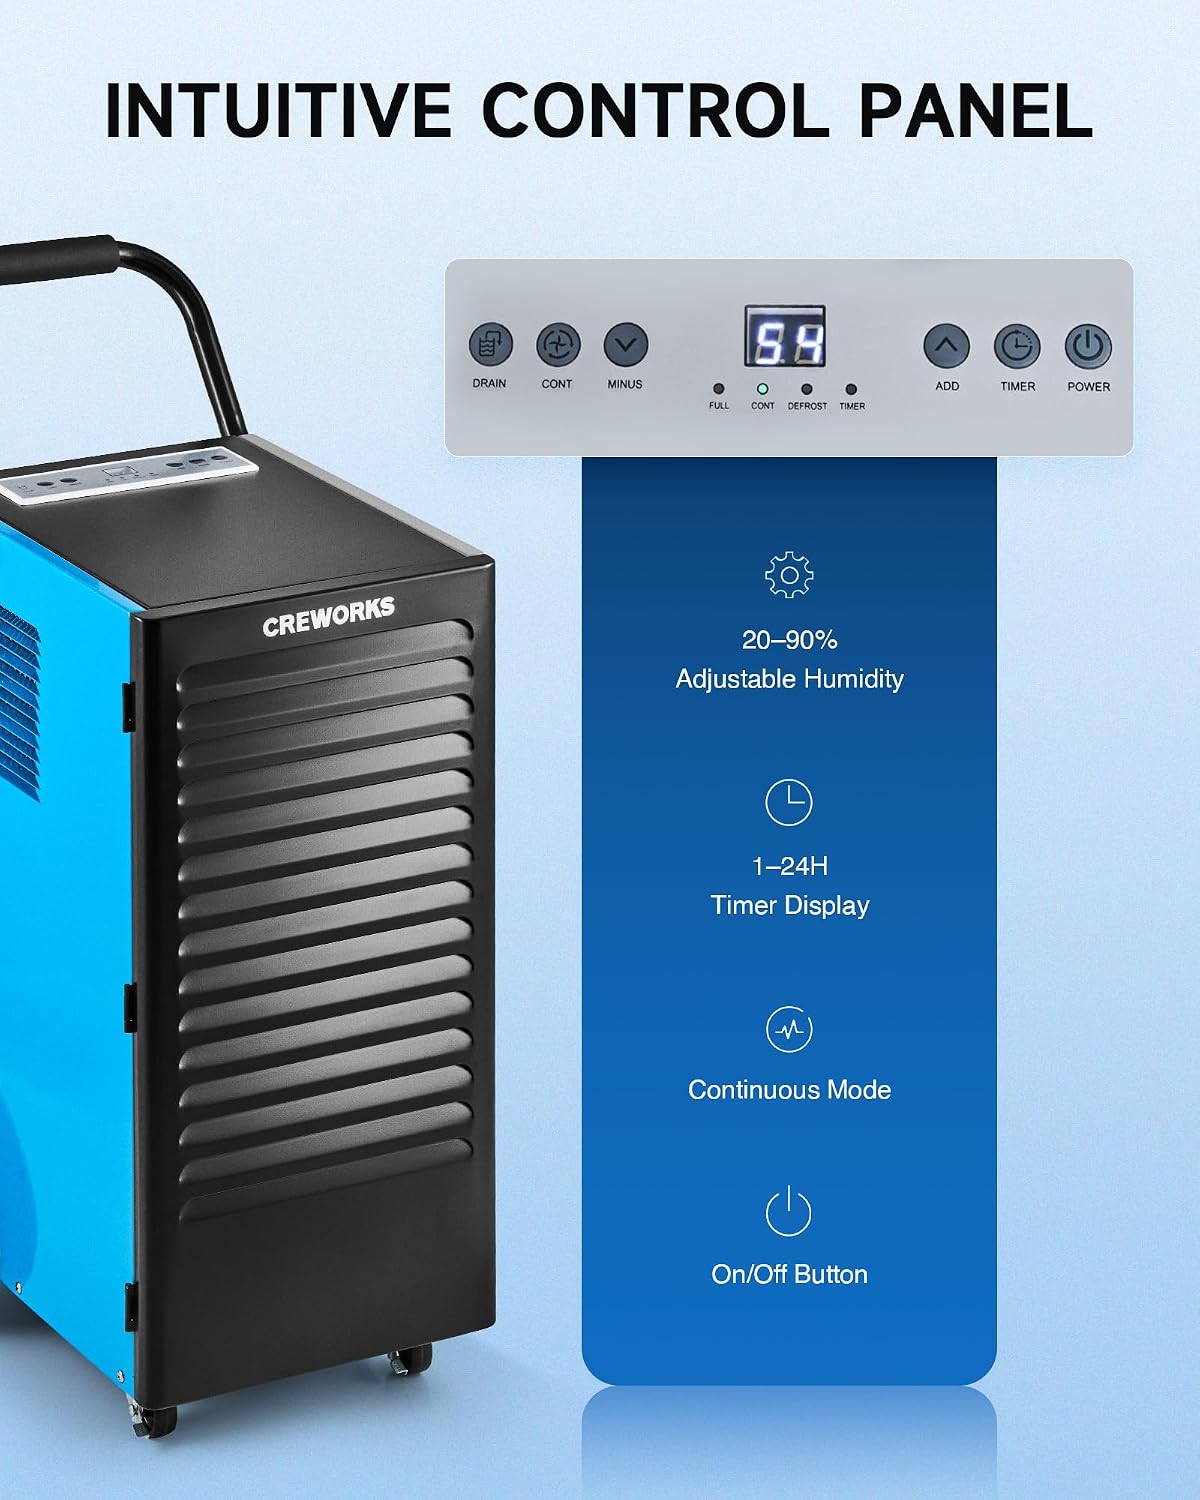
Image: Close-up view of the dehumidifier's intuitive control panel with various buttons and a digital display.
The control panel features a digital display and several buttons for managing the dehumidifier's functions:
- Power Button: Turns the unit ON or OFF.
- ADD / MINUS Buttons: Adjusts the desired humidity level (20-90%) or timer setting (1-24 hours).
- Timer Button: Sets the operational timer.
- CONT (Continuous) Button: Activates or deactivates continuous dehumidification mode.
- DRAIN Button: Activates or deactivates the drain pump (if applicable to the model).
- Display Indicators: Shows current humidity, timer, and status indicators for FULL, CONT, DEFROST, and TIMER.
Basic Operation
- Power On: Press the POWER button to turn on the dehumidifier. The display will show the current room humidity.
- Set Desired Humidity: Use the ADD or MINUS buttons to set your desired humidity level between 20% and 90% Relative Humidity (RH). The unit will operate until the set humidity is reached, then cycle on and off to maintain it.
- Continuous Mode: Press the CONT button for continuous operation, where the unit will run constantly regardless of the humidity level. This is useful for very damp conditions or for faster drying.
- Timer Function: Press the TIMER button to set an auto-on or auto-off time (1-24 hours).
Video: Demonstration of setting the desired humidity level and activating continuous mode on the dehumidifier's control panel.
Automatic Defrost
The dehumidifier is equipped with an automatic defrost function. If frost builds up on the evaporator coils, the compressor will temporarily shut off, and the fan will continue to run to melt the frost. The DEFROST indicator light will illuminate during this cycle. Once defrosted, the unit will resume normal dehumidification.

Image: Illustration showing the automatic defrost function, where the dehumidifier temporarily halts the compressor to prevent frosting.
Maintenance
Regular maintenance ensures optimal performance and extends the lifespan of your dehumidifier.
1. Cleaning the Air Filter
The dehumidifier is equipped with a washable air filter. A dirty filter can reduce efficiency and airflow.
- Turn off the dehumidifier and unplug it from the power outlet.
- Locate and remove the air filter from the unit. Refer to the product diagram for filter location.
- Wash the filter with warm, soapy water. Rinse thoroughly and allow it to air dry completely before reinserting. Do not use a dishwasher or harsh chemicals.
- Reinsert the dry filter into the unit.
Recommendation: Clean the air filter every 2-4 weeks, or more frequently depending on usage and air quality.

Image: Illustration showing the removable and reusable air filter for easy cleaning.
2. Cleaning the Exterior
Wipe the exterior of the unit with a soft, damp cloth. Do not use abrasive cleaners or solvents.
3. Storage
If storing the unit for an extended period, ensure it is clean and dry. Coil the power cord and store the unit in a cool, dry place.
Troubleshooting Guide
Refer to this guide for common issues and their solutions.
| Problem | Possible Cause | Solution |
|---|---|---|
| Dehumidifier does not turn on. | No power, power cord loose, unit not plugged in. | Ensure the unit is properly plugged into a working outlet. Check circuit breaker. |
| Unit runs but does not collect water. | Humidity setting too high, room temperature too low, air filter clogged, unit in defrost mode. | Lower the desired humidity setting. Ensure room temperature is above 41°F (5°C). Clean the air filter. Wait for defrost cycle to complete. |
| Unit is freezing up (frost on coils). | Low room temperature, refrigerant issue. | The unit has an automatic defrost function. If freezing persists, ensure room temperature is within operating range. If problem continues, contact support. |
| Water is leaking. | Drain hose not connected properly, drain hose kinked or blocked, unit not level. | Check drain hose connection and ensure it is secure. Clear any kinks or blockages in the hose. Ensure the unit is on a level surface. |
| Unit is noisy. | Loose parts, unit not level, fan obstruction. | Ensure the unit is on a stable, level surface. Check for any loose components. Inspect fan for obstructions. |
Product Specifications
Detailed technical specifications for the CREWORKS 180 PPD Commercial Dehumidifier.
| Feature | Detail |
|---|---|
| Brand | CREWORKS |
| Model Name | 180PPD |
| Dehumidification Capacity (Saturation) | 180 Pints per Day |
| Dehumidification Capacity (AHAM) | 85 Pints per Day |
| Recommended Coverage Area | 600 to 1600 Square Feet |
| Product Dimensions (D x W x H) | 23.11" x 17.32" x 34.13" |
| Air Flow Capacity | 350 Cubic Centimeters Per Minute |
| Operation Mode | Continuous |
| Special Features | Automatic Defrost, Portable, Timer, Wheels, Drain Hose, Display Panel |
| Material | Metal |
| Refrigerant | R32 (Low-Impact) |
Warranty and Support
Warranty Information
CREWORKS products typically come with a manufacturer's warranty. Specific warranty terms, including duration and coverage, may vary. Please refer to the warranty card included with your product or contact CREWORKS customer service for detailed information. Keep your purchase receipt as proof of purchase for warranty claims.
Note: Some customer reviews indicate a potential for issues after approximately one year of use. Regular maintenance and proper operation as outlined in this manual can help ensure product longevity.
Customer Support
For technical assistance, troubleshooting beyond this guide, or warranty inquiries, please contact CREWORKS customer support. Contact information can typically be found on the manufacturer's official website or in the product packaging.
When contacting support, please have your product model number (180PPD) and purchase date available.