1. Introduction
This manual provides detailed instructions for the installation, operation, and maintenance of your ngnsky Watering Timer, Model GGDSQ. This device is designed to automate your irrigation system, offering features such as rain delay, manual watering, and programmable schedules for efficient water management in your garden, yard, or lawn.

Figure 1: Front view of the ngnsky Watering Timer, showing the digital display and control interface.
2. Safety Information and Precautions
- Battery Type: Use two (2) 1.5V alkaline batteries only. Lithium batteries are prohibited.
- Water Pressure: The device is designed for water pressure between 0.05KG-8KG (approximately 0.5-8 bar or 7-116 PSI). Ensure your water supply is within this range.
- Operating Temperature: The timer operates optimally between 0°C and 60°C. Protect the device from freezing temperatures.
- Installation: The device must be installed vertically to ensure proper operation and prevent water ingress.
- Low Battery Warning: When the battery is low, a warning will display, and the valve will automatically close to prevent continuous watering. Replace batteries promptly.
3. Product Components and Features
The ngnsky Watering Timer is built with durable ABS and copper materials, featuring an optimized structural design for improved leak resistance and longevity.
- Digital LCD Display: Large screen showing current time, watering mode, start/end times, frequency, and battery status.
- Control Buttons: Intuitive buttons for setting parameters and navigating modes.
- Built-in Metal Filter: Prevents debris from entering the timer, ensuring clean water flow.
- Leak-Proof Sealing Gasket: Enhances water tightness at connection points.
- Reinforcing Ribs: Added to the structure for increased strength and durability.

Figure 2: Key features contributing to the timer's durability and leak resistance.

Figure 3: Illustration of the low power auto-shutoff feature and battery longevity.

Figure 4: Control panel layout and button functions for programming the timer.
4. Setup and Installation
4.1. Battery Installation
- Locate the battery compartment on the back of the timer.
- Open the compartment cover.
- Insert two (2) new 1.5V alkaline batteries, ensuring correct polarity (+/-).
- Close the battery compartment cover securely. The device will perform a self-test and close the valve upon successful battery loading.
4.2. Connecting to Faucet
- Ensure the faucet is clean and free of debris.
- Screw the timer onto your outdoor faucet securely by hand. Do not overtighten.
- Connect your garden hose or irrigation system to the outlet at the bottom of the timer.
- Turn on the faucet fully. The timer is designed to handle the water pressure.
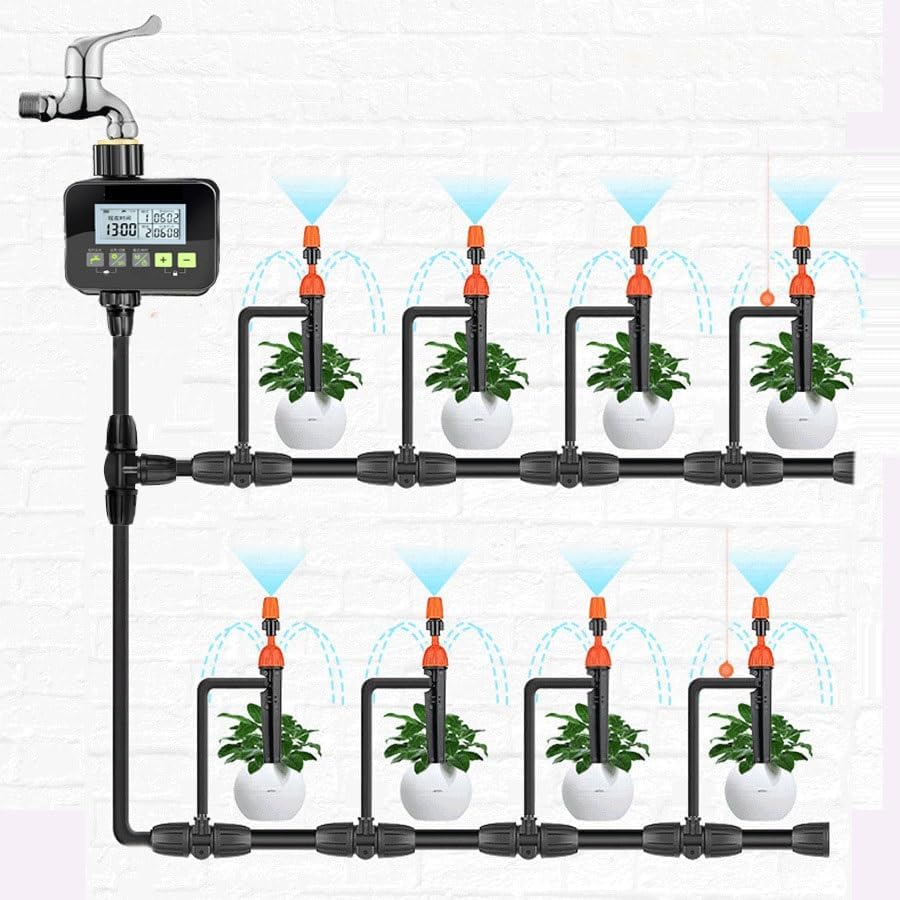
Figure 5: Example setup with a drip irrigation system.
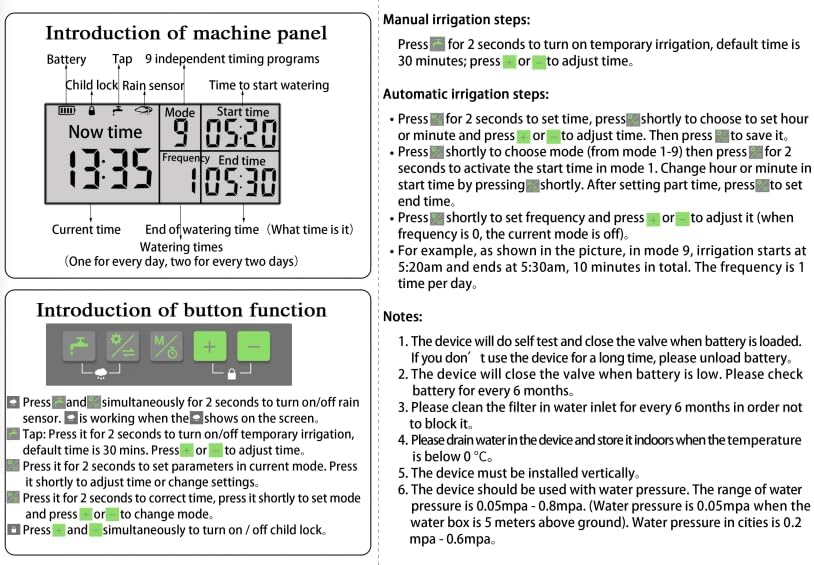
Figure 6: Example setup with a sprinkler irrigation system.
5. Operating Instructions
Refer to Figure 4 for a visual guide to the control panel and button functions.
5.1. Setting Current Time
- Press the Settings/Switch button (
 ) for 2 seconds to enter time setting mode.
 - Use the + and - buttons to adjust the hour.
- Press Settings/Switch again to move to minutes, then adjust with + and -.
- Press Settings/Switch to confirm and exit.
5.2. Manual Watering (Temporary Irrigation)
This function allows for immediate watering without affecting your programmed schedules.
- Press the Temporary Water Out button () for 2 seconds to initiate temporary irrigation. The default duration is 30 minutes.
- Use the + and - buttons to adjust the watering duration as needed.
- The timer will automatically revert to its scheduled program after the manual watering duration ends.

Figure 7: Manual watering in progress, showing no interruption to scheduled programs.
5.3. Automatic Irrigation Program Setup
The timer supports up to 9 independent timing programs. Each program can be customized for watering duration and frequency.
- Press the Mode/Time button () for 2 seconds to enter program setting mode. The display will show "Mode" and a program number (1-9).
- Use the + and - buttons to select the desired program number (1-9).
- Press Mode/Time briefly to move to the "Start Time" setting. Adjust the hour and minutes using + and -.
- Press Mode/Time briefly to move to the "End Time" setting. Adjust the hour and minutes using + and -.
- Press Mode/Time briefly to move to the "Frequency" setting.
- Frequency can be set for 1/2 time (every other day), 1 day (daily), or several days.
- If frequency is set to 0, the current mode is off.
- Example: For program 9, if start time is 5:20 AM and end time is 5:30 AM, this means 10 minutes of watering. If frequency is 1, it waters once per day.
- Press Mode/Time briefly to save the settings and exit the program.
5.4. Rain Delay Function
The rain delay function allows you to temporarily pause your watering schedule to prevent overwatering during rainy periods.
- Press the Temporary Water Out button () and Settings/Switch button () simultaneously for 2 seconds to activate or deactivate the rain delay function.
- The display will indicate that rain delay is active. The timer will pause its schedule for a set period (e.g., 24, 48, 72 hours, depending on model specifics, or until manually deactivated).
5.5. Child Lock Mode
To prevent accidental changes to your settings, activate the child lock.
- Press the + and - buttons simultaneously for 2 seconds to turn on/off the child lock. A lock icon will appear on the display when active.
6. Maintenance
- Clean the Filter: Clean the filter in the water inlet every 6 months to prevent blockages and ensure optimal water flow.
- Battery Replacement: Replace batteries when the low-battery warning appears. If the device is not used for a long time, unload the batteries to prevent leakage.
- Winterization: Drain all water from the device and store it indoors when temperatures are below 0°C (32°F) to prevent freezing damage.
7. Troubleshooting
| Issue | Possible Cause | Solution |
|---|---|---|
| Timer not watering | Low batteries; valve closed due to low battery; program not set correctly; water supply off; filter blocked. | Replace batteries; check program settings; ensure faucet is open; clean the filter. |
| Water leakage from connections | Loose connection; damaged gasket; incorrect installation. | Tighten connections; check and replace gasket if damaged; ensure vertical installation. |
| Display not working | Dead batteries; incorrect battery installation. | Replace batteries; check battery polarity. |
| Timer not responding to buttons | Child lock active; low batteries. | Deactivate child lock (press + and - simultaneously for 2 seconds); replace batteries. |
8. Specifications
| Feature | Detail |
|---|---|
| Model | GGDSQ |
| Brand | ngnsky |
| Power Source | 2 x 1.5V Alkaline Batteries (AA size, not included) |
| Max Water Pressure | 116 PSI (8 KG) |
| Min Water Pressure | 0.5 KG (approx. 7 PSI) |
| Watering Duration | 1 minute - 23 hours 59 minutes |
| Working Temperature | 0°C - 60°C |
| Material | ABS + Copper |
| Dimensions (L x W x H) | 11.2 x 8.8 x 13.7 cm (approx. 4.4 x 3.5 x 5.4 inches) |
| Item Weight | 0.5 Kilograms |
| Control Mode | Auto / Manual |
| Certifications | FCC, CE, RoHS |
| UPC | 742404063174 |

Figure 8: Product certifications and manufacturing origin.
9. Warranty and Support
For warranty information and technical support, please refer to the product packaging or contact the retailer from whom you purchased the ngnsky Watering Timer. Keep your purchase receipt as proof of purchase.