1. Introduction and Safety Information
This manual provides instructions for the assembly, operation, and maintenance of your HOOBRO Kitchen Island with Storage and Power Outlet. Please read all instructions carefully before assembly and use to ensure safe and proper functionality.
Important Safety Instructions:
- Always assemble the unit on a soft, clean surface to prevent scratches.
- Ensure all screws and fasteners are securely tightened before use. Periodically check and re-tighten as necessary.
- Do not exceed the maximum weight capacity of 66 lb (30 kg) per shelf.
- Use the adjustable feet to level the island on uneven surfaces to prevent tipping.
- Keep children and pets away from the assembly area.
- Do not place hot items directly on the surface without protection.
- Ensure the power cord is not pinched or damaged during assembly or use.
- Only use the integrated power outlets for small kitchen appliances within their specified voltage and current limits (120V/12A for AC, 5V/2A for USB).
2. Package Contents
Please verify that all components are present before beginning assembly. If any parts are missing or damaged, contact customer support.
Note: The exact number of small parts may vary slightly. Refer to the included parts list in your product packaging for precise quantities.

Image: A full view of the HOOBRO Kitchen Island, showcasing its three tiers, integrated power outlet on the side, and S-shaped hooks. The power cord is visible extending from the unit.
3. Assembly Instructions
Assembly typically requires an Allen key and a screwdriver (not included, but often provided with the product). Follow the numbered steps below.
- Step 1: Unpack and Identify Parts. Carefully remove all components from the packaging. Lay them out on a clean, soft surface. Identify each part by comparing it to the parts list in your product packaging.
- Step 2: Assemble the Frame. Attach the side frames to the main support bars using the provided screws. Do not fully tighten screws until all parts are loosely assembled.
- Step 3: Install Shelves. Slide the engineered wood shelves into their designated slots on the frame. Secure them with screws. The top shelf is the main countertop, the middle shelf is for appliances, and the bottom slatted shelf is for storage or wine bottles.
- Step 4: Attach Power Outlet. Secure the power outlet unit to the designated side panel of the island using the provided screws. Ensure the power cord is routed safely and not pinched.
- Step 5: Install S-shaped Hooks. Attach the S-shaped hooks to the side rail as desired for hanging utensils.
- Step 6: Tighten All Screws. Once all components are in place, systematically tighten all screws using the Allen key and screwdriver. Ensure the structure is stable.
- Step 7: Adjust Feet. Turn the adjustable feet at the bottom of the island to level the unit on your floor. This prevents wobbling and ensures stability.

Image: A detailed diagram illustrating the dimensions of the HOOBRO Kitchen Island in both centimeters and inches, highlighting the length, width, and height of the unit and its shelves.

Image: A collage showing four key features: protective rails to prevent items from falling, S-shaped hooks for hanging utensils, a slatted bottom shelf designed as a wine rack, and adjustable feet for leveling the unit.
4. Operating Instructions
Your HOOBRO Kitchen Island is designed for versatile use in various home environments.
Using the Power Outlet:
- Plug the island's main power cord into a standard 120V wall outlet.
- The integrated power strip provides two AC outlets (120V/12A) and two USB ports (5V/2A).
- Connect small kitchen appliances such as coffee makers, toasters, or blenders to the AC outlets.
- Use the USB ports to charge compatible electronic devices.
- Do not overload the power strip. Ensure the total wattage of connected devices does not exceed the specified limit.
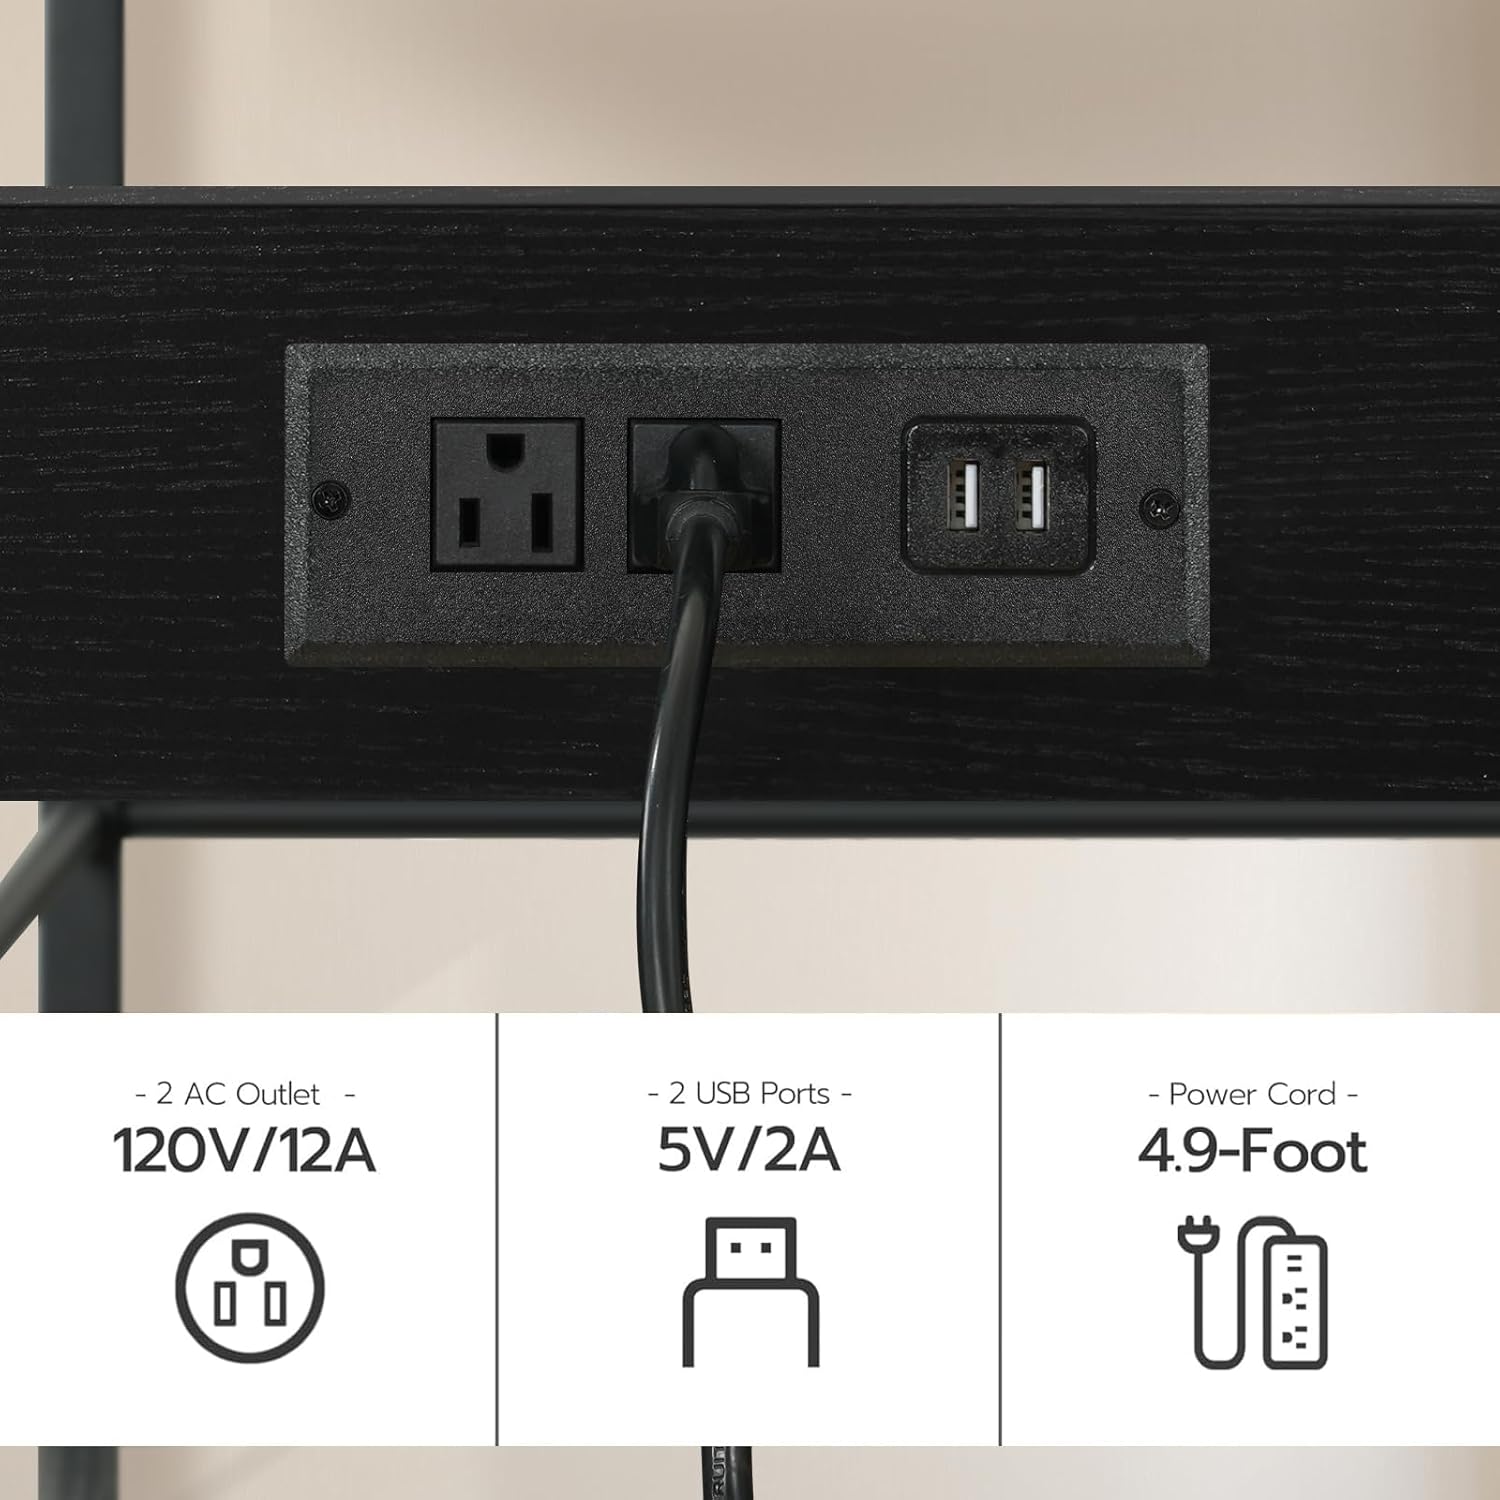
Image: A close-up view of the integrated power outlet on the side of the kitchen island, clearly showing two standard AC outlets and two USB charging ports, along with the attached power cord.
Utilizing Storage and Features:
- The top surface serves as a countertop for food preparation or serving.
- The middle shelf is suitable for microwaves, coffee machines, or other small appliances.
- The bottom slatted shelf can store pots, pans, dishes, or function as a wine rack.
- Use the S-shaped hooks to hang kitchen utensils, towels, or other accessories for easy access.
- The protective rails on the middle shelf help prevent items from falling off.

Image: The HOOBRO Kitchen Island positioned in a dining room, serving as a coffee station with a coffee maker, mugs, and decorative items on the top shelf, and a microwave on the middle shelf.

Image: The HOOBRO Kitchen Island in a kitchen setting, showcasing a microwave, various bottles, and kitchenware stored on its shelves, demonstrating its practical storage capabilities.
5. Maintenance
Proper maintenance will extend the lifespan of your kitchen island.
- Cleaning: Wipe surfaces with a dry cloth. For spills, use a damp cloth immediately and dry thoroughly. Avoid harsh chemicals or abrasive cleaners.
- Inspection: Periodically check all screws and connections to ensure they remain tight. Re-tighten if necessary.
- Power Cord: Inspect the power cord and plug for any signs of damage. If damaged, discontinue use and contact customer support.
6. Troubleshooting
Refer to this section for common issues and their solutions.
| Problem | Possible Cause | Solution |
|---|---|---|
| Island is wobbly/unstable. | Uneven floor; loose screws. | Adjust the leveling feet at the bottom of the island. Tighten all assembly screws. |
| Power outlets not working. | Island not plugged in; wall outlet not working; overloaded circuit; damaged cord. | Ensure the island's power cord is securely plugged into a functional wall outlet. Check your home's circuit breaker. Do not exceed the power strip's capacity. If the cord is damaged, discontinue use. |
| Parts do not fit during assembly. | Incorrect orientation; wrong parts used. | Review the assembly instructions and diagrams carefully. Ensure parts are oriented correctly and that you are using the right components for each step. Do not force parts together. |
7. Specifications
| Feature | Detail |
|---|---|
| Model Number | BB021ZD01 |
| Dimensions (L x W x H) | 35.4" x 18.9" x 35.8" (90cm x 48cm x 91cm) |
| Color | Black |
| Material | Engineered Wood, Metal Frame |
| Number of Tiers | 3 |
| Weight Capacity (per shelf) | 66 lb (30 kg) |
| Power Outlet | 2 AC Outlets (120V/12A), 2 USB Ports (5V/2A) |
| Power Cord Length | 4.9 feet (1.5 meters) |
| Special Features | Protective rails, S-shaped hooks, adjustable feet |
8. Warranty and Support
HOOBRO products are designed for quality and durability. For warranty information, product support, or to report missing/damaged parts, please refer to the contact information provided in your product packaging or visit the official HOOBRO website. Please retain your proof of purchase for warranty claims.