1. Introduction
This instruction manual provides essential information for the safe and effective operation of your wheelfun MTM 1:14 RC Hydraulic Wheeled Excavator EC380. Please read this manual thoroughly before operating the model to ensure proper setup, function, and longevity of your product. This model is a detailed replica designed for enthusiasts and requires careful handling and maintenance.
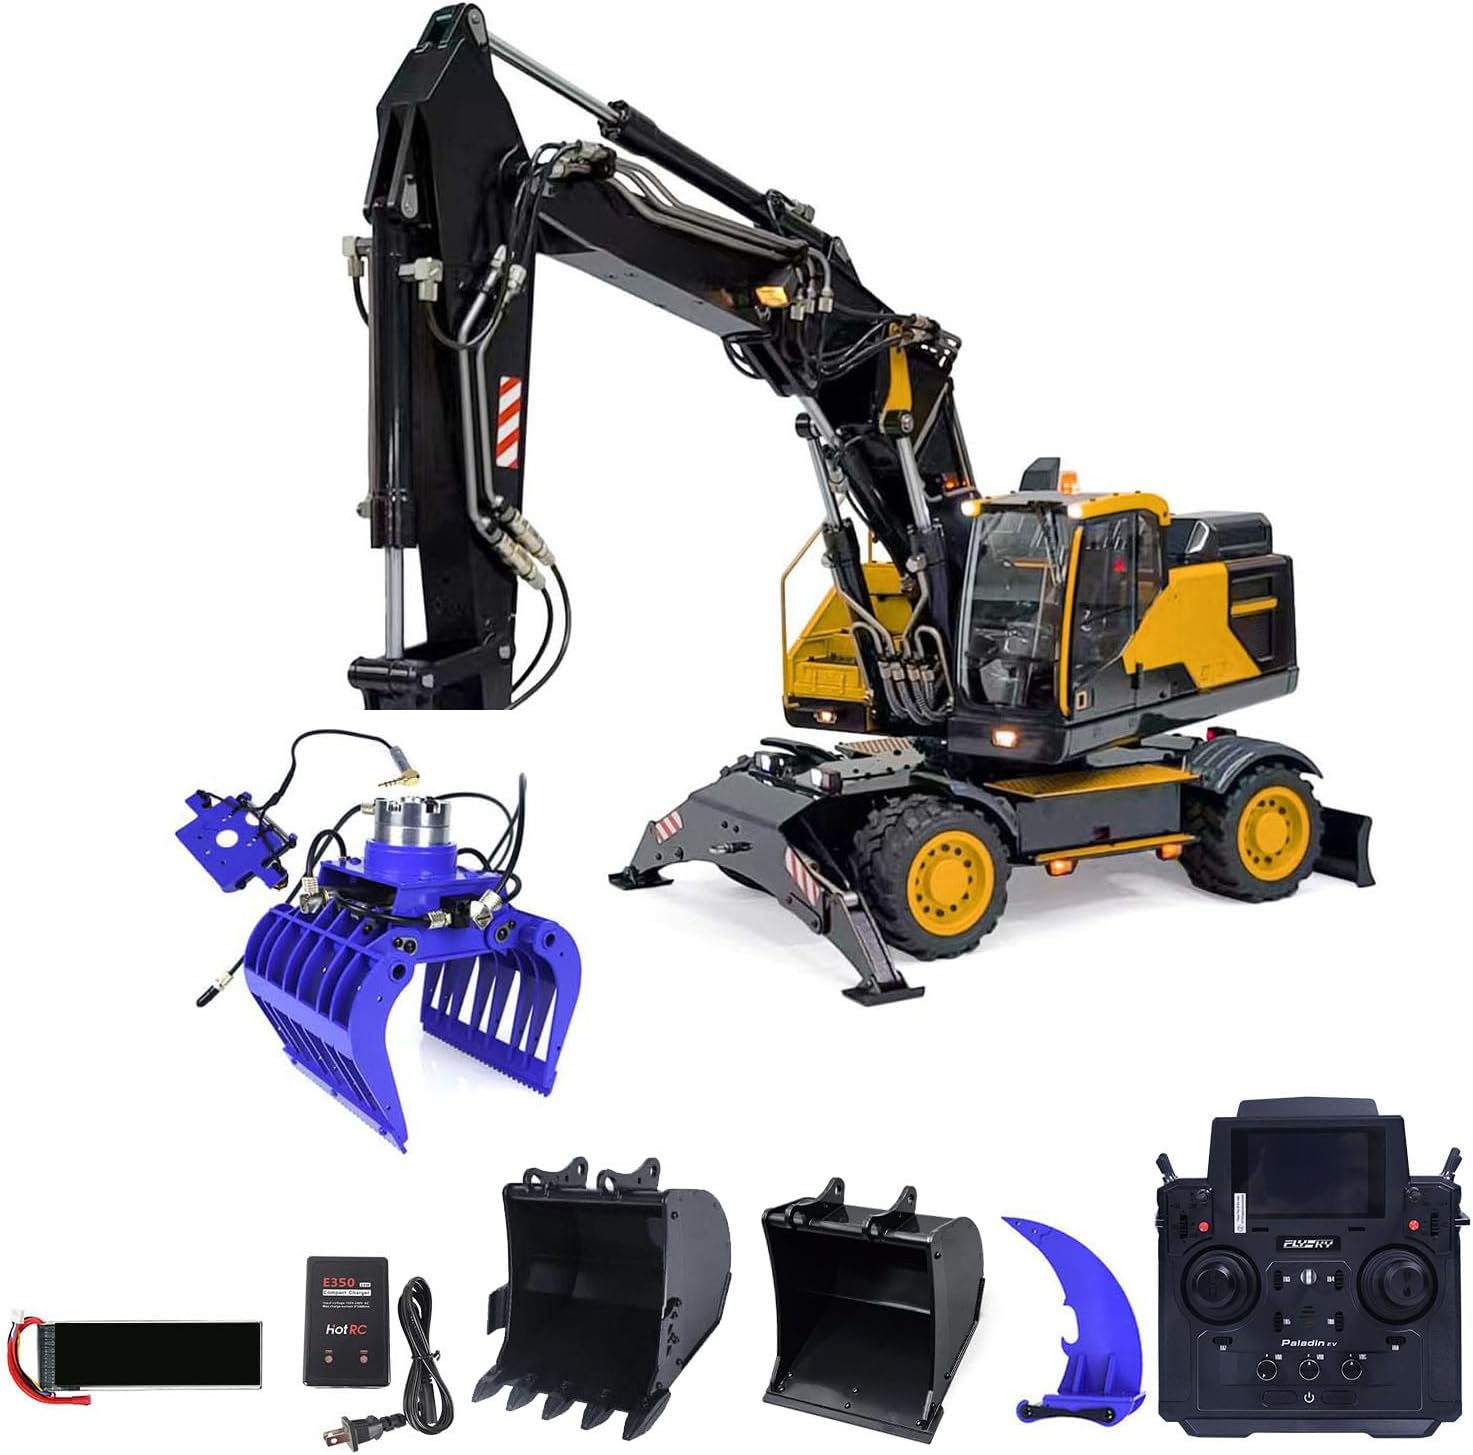
Image 1.1: The wheelfun MTM 1:14 RC Hydraulic Wheeled Excavator EC380, shown with its included hydraulic grab, two metal buckets, a ripper, battery, charger, and Flysky PL18EV radio controller.
2. Safety Information
Operating a hydraulic RC model requires adherence to safety guidelines to prevent injury or damage. This product is recommended for users aged 21 years and up due to its complexity and operational characteristics.
- Always operate the model in a safe, open area, away from people, pets, and obstacles.
- Ensure all components are securely attached before operation.
- Keep hands and loose clothing away from moving parts, especially the hydraulic arm and wheels.
- Do not modify the hydraulic system or any electronic components. Unauthorized modifications can lead to malfunction or injury.
- Use only the specified battery and charger. Follow battery charging instructions carefully to prevent fire hazards.
- Store the model and its components in a dry, cool place, out of reach of children.
- Disconnect the battery when the model is not in use or during maintenance.
3. Package Contents
Carefully unpack your wheelfun MTM 1:14 RC Hydraulic Wheeled Excavator EC380 and verify that all items listed below are present. If any items are missing or damaged, please contact customer support immediately.
3.1 Included Items:
- 1/14 Scale Hydraulic Excavator Model (Assembled and Painted)
- Motor
- Servo
- ESC (Electronic Speed Controller)
- Hydraulic System
- 2 x Metal Buckets (various sizes)
- 1 x Metal Ripper
- 1 x Hydraulic Grab
- Flysky PL18EV RC Controller and Receiver
- Sound System
- Lights (Simulated Lighting)
- Battery
- Charger
3.2 Items Not Included (Required for Operation):
- Hydraulic Oil
4. Setup
4.1 Initial Inspection
Before first use, inspect the model for any visible damage or loose connections. Ensure all hydraulic lines are securely connected and free from kinks.
4.2 Battery Charging and Installation
- Connect the provided battery to the charger. Follow the charger's specific instructions for safe charging. Do not overcharge the battery.
- Once fully charged, disconnect the battery from the charger.
- Locate the battery compartment on the excavator model. Carefully insert the charged battery and connect it to the excavator's power connector. Ensure a secure connection.
- Close the battery compartment cover.
4.3 Hydraulic Oil Filling
The hydraulic system requires hydraulic oil for operation. This is not included in the package and must be purchased separately. Use only high-quality, recommended hydraulic oil for RC models.
- Locate the hydraulic oil reservoir on the excavator.
- Carefully fill the reservoir with hydraulic oil, ensuring not to overfill. Refer to the reservoir's markings for the appropriate level.
- Bleed the hydraulic system according to standard RC hydraulic model procedures to remove any air bubbles. This typically involves cycling the hydraulic functions slowly without load.
4.4 Radio Controller (Flysky PL18EV) Setup
The Flysky PL18EV radio controller is pre-bound to the receiver in the excavator. If re-binding is necessary, refer to the Flysky PL18EV manual for detailed instructions.
- Install batteries into the PL18EV radio controller.
- Power on the controller first, then power on the excavator.
- Verify that all control surfaces (arm, bucket, wheels) respond correctly to controller inputs before operating.
5. Operating Instructions
Familiarize yourself with the controls of the Flysky PL18EV radio controller and the excavator's functions before beginning operation.
5.1 Basic Movement
- Use the left joystick for forward/backward movement and steering of the wheeled chassis.
- The excavator features an 8-way reversing valve for precise hydraulic control.
5.2 Hydraulic Arm and Attachment Operation
The excavator is equipped with a hydraulic claw, large bucket, small bucket, and ripper. These attachments can be interchanged to suit various tasks. The claw, buckets, and ripper can rotate 270 degrees, enhancing operational flexibility.

Image 5.1: The excavator fitted with the hydraulic grab attachment, suitable for lifting and moving various objects.

Image 5.2: The excavator equipped with a metal bucket, ideal for digging and scooping materials.
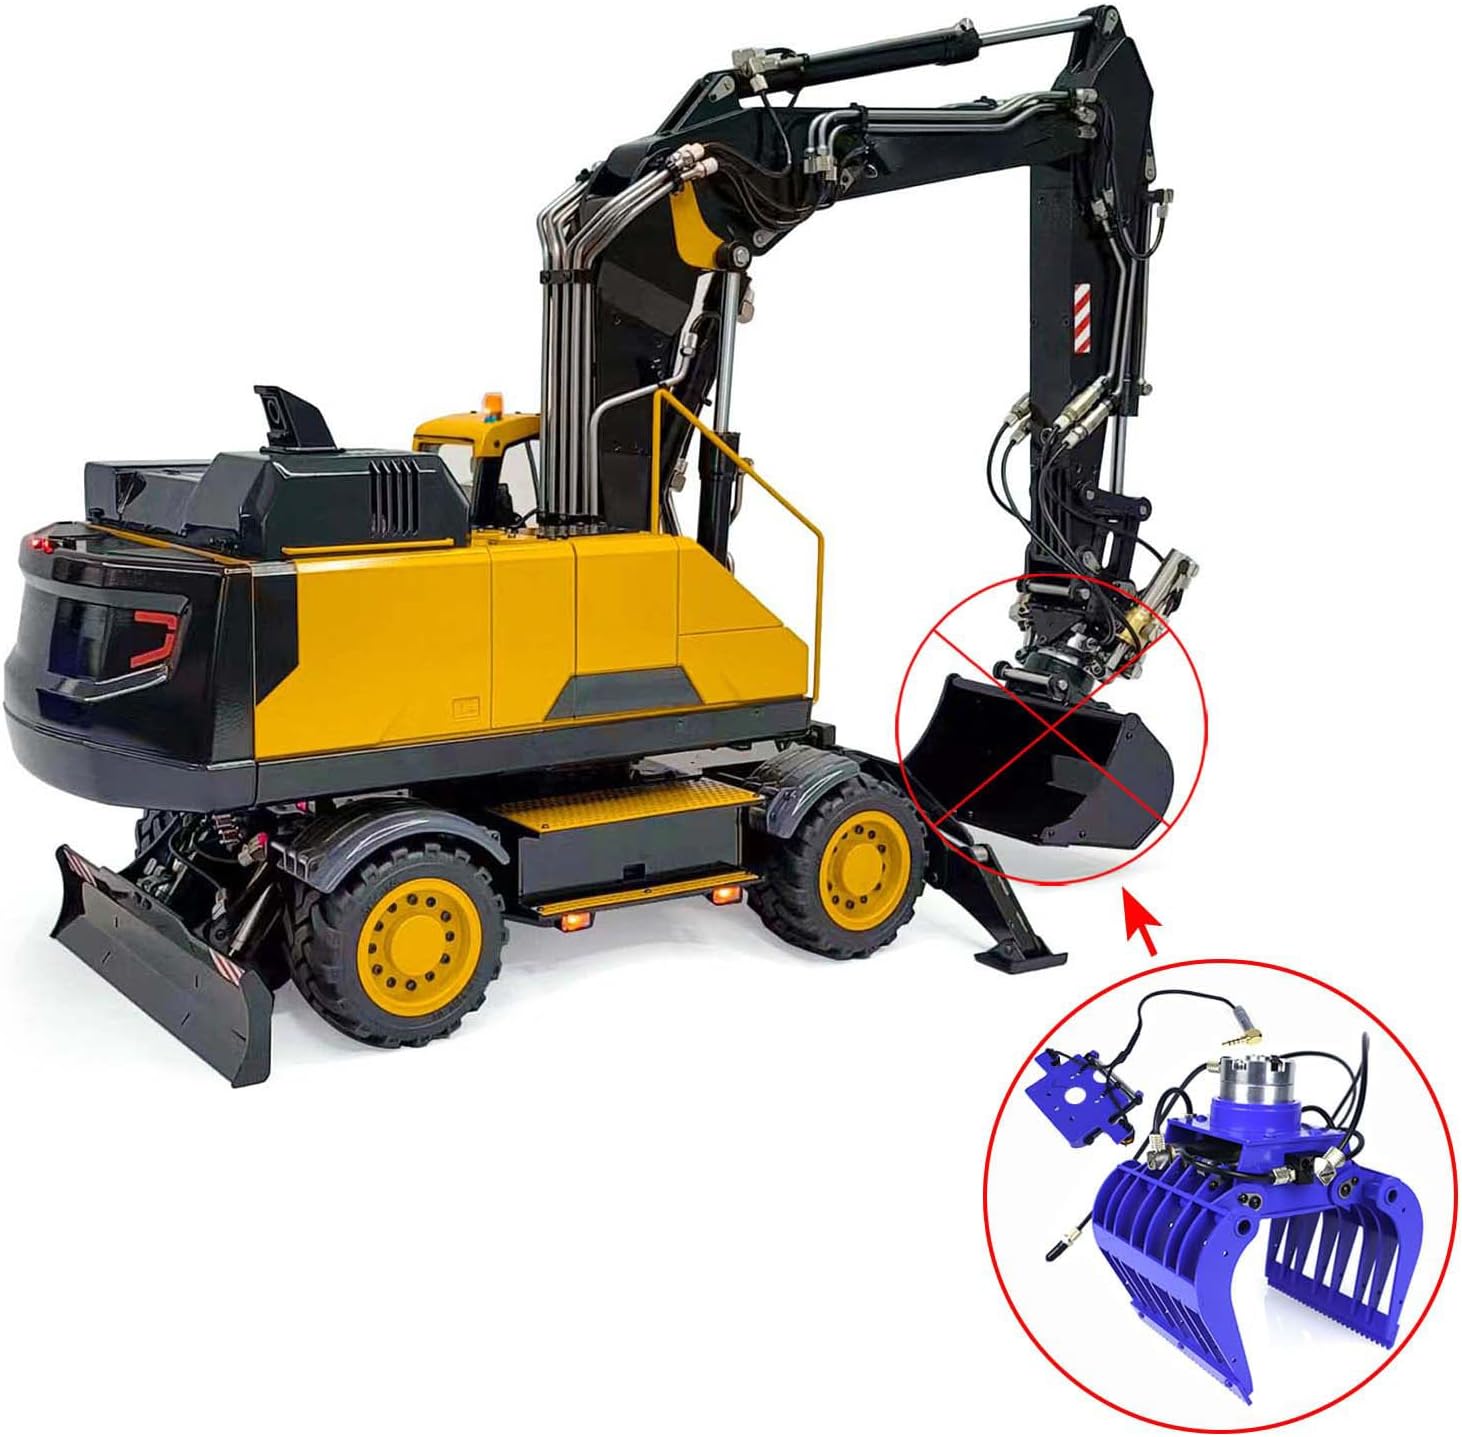
Image 5.3: The excavator utilizing the ripper attachment, designed for breaking up hard ground or surfaces.
- The three arms, support leg, and front blade are hydraulically controlled. Use the corresponding switches/joysticks on the PL18EV controller to operate these functions.
- Practice smooth and controlled movements to avoid sudden jerks that could damage the model or hydraulic system.
5.3 Sound and Lights
- The excavator features a simulated sound system that mimics the sounds of a real excavator during operation. Refer to the PL18EV manual for sound control options.
- Simulated lighting is integrated into the model.
6. Maintenance
Regular maintenance is crucial for the longevity and optimal performance of your hydraulic excavator.
- Cleaning: After each use, clean the model to remove dirt, dust, and debris. Use a soft brush or cloth. Avoid using water directly on electronic components.
- Hydraulic System Check: Regularly inspect hydraulic lines for leaks, kinks, or damage. Check the hydraulic oil level and top up if necessary. Ensure all hydraulic cylinders operate smoothly.
- Lubrication: Periodically lubricate moving joints and pivot points with appropriate RC-safe lubricant.
- Battery Care: Store batteries in a cool, dry place. Do not leave batteries fully charged or fully discharged for extended periods. Follow manufacturer guidelines for battery storage.
- Fasteners: Check all screws and bolts for tightness. Vibrations during operation can cause them to loosen over time.
7. Troubleshooting
This section addresses common issues you might encounter with your RC hydraulic excavator.
| Problem | Possible Cause | Solution |
|---|---|---|
| Excavator does not power on. | Battery not charged or improperly connected. | Ensure battery is fully charged and correctly installed. Check power switch. |
| No response from controller. | Controller batteries low; excavator and controller not bound; range issue. | Replace controller batteries. Re-bind controller and receiver (refer to PL18EV manual). Operate within recommended range. |
| Hydraulic functions are weak or unresponsive. | Low hydraulic oil level; air in system; hydraulic pump issue. | Check and refill hydraulic oil. Bleed the hydraulic system. Inspect hydraulic pump for proper function. |
| Unusual noises during operation. | Loose parts; motor/gear issue; hydraulic system cavitation. | Inspect for loose components. Check motor and gear mesh. Ensure hydraulic system is properly filled and bled. |
8. Specifications
| Feature | Detail |
|---|---|
| Manufacturer | wheelfun (MTM Model) |
| Model ID | EC380 (Mtm-Rd-Ec380-Hydraulicgrab-Pl18Ev-Pnp-Y) |
| Scale | 1:14 |
| Material | Metal, Plastic |
| Color | Yellow |
| Product Dimensions | 38 x 16.8 x 16 inches |
| Recommended Age | 21 years and up |
| Control System | Flysky PL18EV RC Controller and Receiver |
| Hydraulic System | 8-way reversing valve, controls three arms, support leg, front blade. |
| Attachments | Hydraulic Grab, 2 Metal Buckets, Metal Ripper (270-degree rotation) |
| Features | Simulated Sound System, Simulated Lighting |
9. Warranty and Support
For any questions, concerns, or support regarding your wheelfun MTM 1:14 RC Hydraulic Wheeled Excavator EC380, please contact the seller or manufacturer directly. Please retain your proof of purchase for warranty claims.
Manufacturer: wheelfun
For assistance, please refer to the contact information provided at the point of purchase or on the official wheelfun website.