1. Introduction
This manual provides essential information for the safe and effective use of your JORGENSEN No.4 Wood Planer Blade. Please read these instructions carefully before installation and operation to ensure optimal performance and longevity of the blade.
2. Safety Information
WARNING: Planer blades are extremely sharp. Handle with extreme care to prevent injury.
- Always wear appropriate personal protective equipment, including safety glasses and gloves, when handling or working with the blade.
- Ensure the planer is disconnected from any power source (if applicable) or secured before attempting to install, remove, or adjust the blade.
- Keep fingers and other body parts clear of the blade's cutting edge at all times.
- Store the blade in a protective cover or case when not in use to prevent accidental contact and maintain sharpness.
- Do not use a dull or damaged blade, as this can lead to inefficient planing and potential kickback.
3. Product Overview
The JORGENSEN No.4 Wood Planer Blade is designed for use with No.4 smooth planes, offering high hardness and long edge retention for efficient woodworking. It is crafted from professional-level O1 tool steel.
Key Features
- Professional Level Blade: Made of 9CrWMn, a professional-level O1 tool steel.
- Enhanced Efficiency: Improves cutting efficiency while minimizing blade wear.
- Optimal Sharpness: Finely sharpened for efficient wood planing.
- Durability: High hardness and long edge retention.
- Reusable: Can be repeatedly utilized, sharpened, and adjusted for a long service life.
Blade Material and Quality

This image displays a close-up of the JORGENSEN O1 steel planer blade, highlighting its hardened surface and indicating its professional-grade quality with a hardness rating of HRC 62-64.
Product Dimensions

The diagram illustrates the key dimensions of the planer blade: 50.8mm width, 176mm length, and 3mm thickness. The blade features a 25-degree bevel angle and weighs 158g. Its heavy gauge (1/8 inch or 3.0mm) is up to 1.6 times thicker than other products, contributing to a solid cut with minimal vibration.
4. Setup
Blade Assembly and Replacement
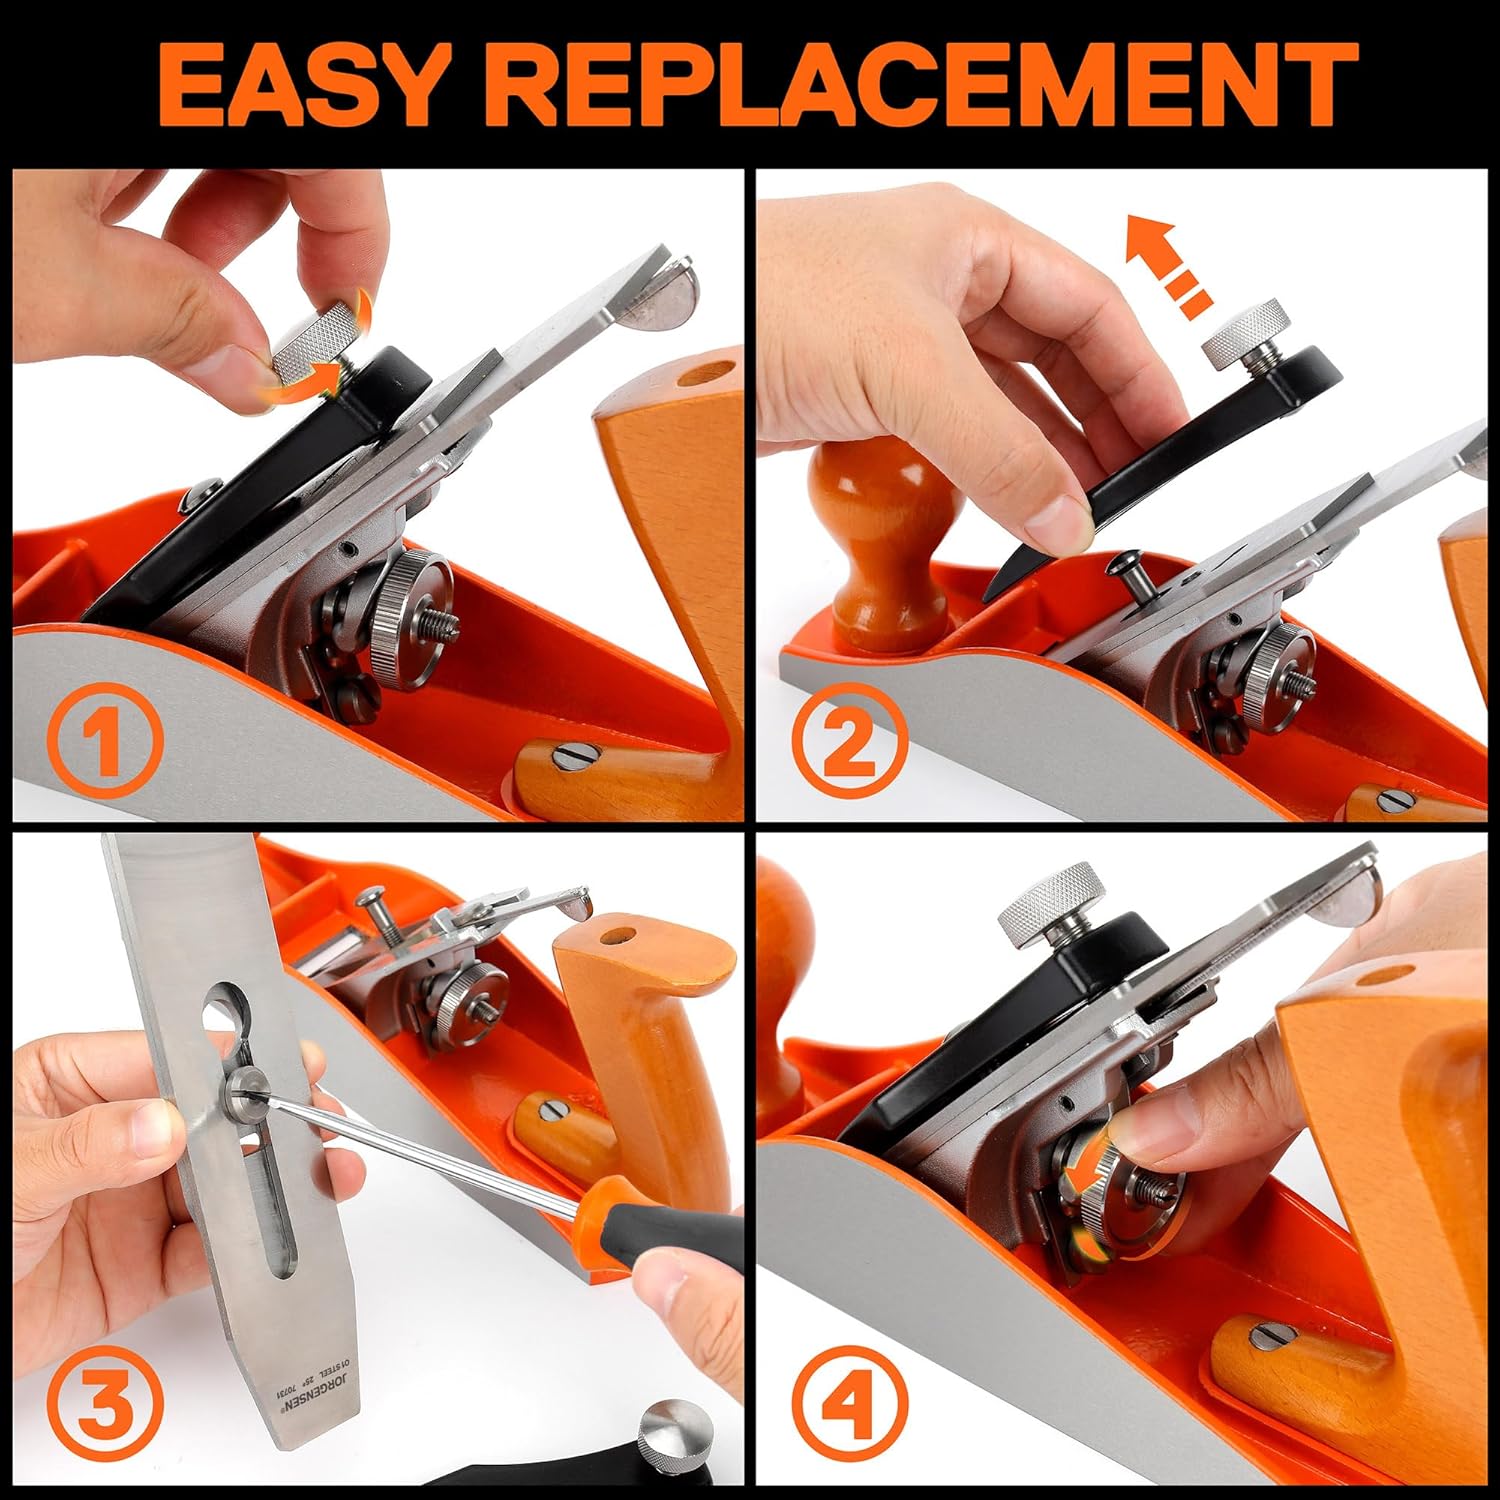
This image provides a step-by-step guide for replacing the planer blade. Step 1 shows loosening the clamping mechanism. Step 2 illustrates removing the old blade assembly. Step 3 details attaching the new blade to the chip breaker. Step 4 shows reinserting the assembled blade into the plane body.
For a visual demonstration of the assembly process, please refer to the video below:
This video demonstrates the process of disassembling and reassembling a hand planer, including how to remove the old blade, attach the new blade to the chip breaker, and reinsert the assembly into the plane body. It also shows initial adjustments.
- Loosen the clamping screw on your plane to release the blade assembly.
- Carefully remove the old blade and chip breaker assembly.
- Separate the old blade from the chip breaker.
- Attach the new JORGENSEN No.4 Wood Planer Blade to the chip breaker. Ensure the screw is tightened sufficiently to hold the blade securely, but allow for minor adjustments.
- Reinsert the blade and chip breaker assembly into the plane body.
- Proceed to the Operating section for fine-tuning the blade's position.
5. Operating
Adjusting Blade Depth
The depth of cut is controlled by the depth adjustment wheel. The tightness of the clamping screw can affect the depth adjustment wheel's ability to control the speed of adjusting the blade's depth. Ensure the clamping screw is appropriately tightened to allow for smooth, controlled adjustments.
This video segment demonstrates how to adjust the depth of the planer blade using the depth adjustment wheel. It highlights the clamping screw's role in controlling the adjustment speed.
- With the blade assembly in place, turn the depth adjustment wheel (typically located at the rear of the plane) to extend or retract the blade.
- Turn clockwise to extend the blade for a deeper cut, and counter-clockwise to retract it for a shallower cut.
- Make small adjustments and test on a scrap piece of wood until the desired cutting depth is achieved.
Adjusting Lateral Blade Position
The lateral adjustment lever controls the horizontal position of the blade. The tightness of the blade screw can affect the lateral adjustment lever's ability to control the horizontal adjustment speed of the blade. Ensure the blade screw is appropriately tightened for precise control.
This video segment illustrates how to adjust the lateral position of the planer blade using the lateral adjustment lever. It emphasizes the importance of the blade screw's tightness for effective adjustment.
- Use the lateral adjustment lever (typically located near the blade) to shift the blade left or right.
- Adjust until the blade is parallel to the sole of the plane and protrudes evenly across the mouth.
- Once both depth and lateral adjustments are set, ensure all screws are securely tightened before use.
Planing Technique
Proper planing technique involves consistent pressure, a smooth stroke, and understanding wood grain. For a visual guide on effective planing, watch the video below:
This video provides a closer look at a hand planer in action, demonstrating proper technique for smoothing wood surfaces and achieving fine shavings.
6. Maintenance
- Sharpening: Regularly sharpen your blade to maintain its cutting efficiency. A sharp blade reduces effort and produces cleaner cuts. Use appropriate sharpening stones or systems for O1 tool steel.
- Cleaning: After each use, clean the blade and plane body to remove wood dust and resin. This prevents buildup that can hinder performance and cause corrosion.
- Rust Prevention: Apply a thin coat of camellia oil or a rust preventative to the blade and other metal parts after cleaning, especially if storing for extended periods.
- Storage: Store the blade in a dry environment, ideally in its original packaging or a dedicated blade protector, to prevent damage and corrosion.
7. Troubleshooting
| Problem | Possible Cause | Solution |
|---|---|---|
| Rough or torn surface | Dull blade, incorrect blade depth, planing against the grain. | Sharpen blade, adjust blade for shallower cut, plane with the grain. |
| Blade chatters or vibrates | Blade not securely clamped, excessive blade projection, loose components. | Ensure clamping screw is tight, reduce blade projection, check all plane components for tightness. |
| Blade not cutting evenly | Blade not parallel to the sole, unevenly sharpened blade. | Adjust lateral blade position, re-sharpen blade evenly. |
| Difficulty adjusting blade depth/lateral position | Screws too tight, rust/debris in adjustment mechanism. | Loosen clamping/blade screws slightly, clean and lubricate adjustment mechanisms. |
8. Specifications
- Brand: Jorgensen
- Model Number: 70731
- Material: O1 Tool Steel (9CrWMn)
- Color: Silver
- Style: Compact
- Power Source: Manual
- Cutting Depth: 3 Millimeters (Blade Thickness)
- Included Components: Blade
- Item Weight: 191 g
- Parcel Dimensions: 21.79 x 7.01 x 1.9 cm
- UPC: 044295707312
9. Warranty and Support
For warranty information or technical support regarding your JORGENSEN No.4 Wood Planer Blade, please refer to the official JORGENSEN website or contact their customer service directly. Keep your purchase receipt as proof of purchase.


