1. Introduction
This manual provides essential information for the safe and efficient operation, maintenance, and troubleshooting of your VEVOR Electric Vegetable Slicer, Model SL-08. Please read this manual thoroughly before using the appliance and retain it for future reference.

Figure 1: VEVOR Electric Vegetable Slicer with freshly sliced cucumbers.
2. Safety Instructions
WARNING: Always exercise extreme caution when operating this appliance. Failure to follow safety instructions may result in serious injury or damage to the product.
- Keep hands and fingers away from the blades at all times during operation and cleaning. The blades are extremely sharp.
- Always ensure the appliance is stable on a flat, non-slip surface before use. Utilize the provided suction cups for maximum stability.
- Do not attempt to slice frozen foods or items with hard pits/bones.
- Unplug the appliance from the power outlet before cleaning, assembling, or disassembling any parts.
- Do not immerse the motor unit in water or any other liquid.
- Keep children and unauthorized personnel away from the appliance during operation.
- Use only VEVOR-approved accessories and replacement parts.
3. Package Contents
Verify that all items are present and undamaged upon unpacking:
- VEVOR Electric Vegetable Slicer Main Unit
- Power Adapter
- Manual Handle
- Suction Cups (x6)
- Extra Blades (x2)
- Soft Spring (for delicate ingredients)
- User Manual

Figure 2: Included components and accessories.
4. Setup
- Positioning the Slicer: Place the main unit on a clean, dry, and stable countertop.
- Attaching Suction Cups: Insert the six suction cups into the designated slots on the bottom of the slicer's base. Press down firmly on the slicer to ensure the suction cups adhere securely to the surface, preventing movement during operation.
- Attaching Manual Handle (Optional): If using in manual mode, remove the machine's protective casing (if present) and screw the manual handle into the designated port on the blade disc.
- Connecting Power (Electric Mode): For electric operation, connect the power adapter to the appliance's power input port and then plug it into a suitable electrical outlet.

Figure 3: Secure the slicer using the six suction cups for stability.
5. Operating Instructions
5.1. Adjusting Slice Thickness
The slicer features an adjustable thickness mechanism, allowing for slices from 0 to 0.5 inches (0-12mm). To adjust, locate the large knob at the center of the blade disc. Pull the knob outwards and rotate it to your desired thickness. The blade will move in or out accordingly. Release the knob to lock the setting.

Figure 4: Adjust slice thickness using the central knob.
5.2. Electric Mode Operation
- Ensure the slicer is securely placed and plugged in.
- Pull the spring lever of the food pusher back to open the food chute.
- Place the vegetable or fruit into the food chute (dimensions: 8.7" x 5.1" x 6.3"). For soft ingredients like tomatoes or kiwis, consider using the included soft spring to prevent flattening.
- Release the spring lever; it will automatically push the food towards the blade.
- Press the power switch to activate the electric motor. The blades will rotate, and the food will be sliced.
- Collect the sliced food from the discharge area.
- Turn off the power switch when finished.
5.3. Manual Mode Operation
The slicer can be converted to manual operation, ideal for outdoor use or situations without electricity.
- Ensure the appliance is unplugged (if previously in electric mode) and the protective casing is removed.
- Attach the manual handle to the designated port on the blade disc, screwing it in securely.
- Place the food into the chute as described in Electric Mode Operation.
- Manually rotate the handle to operate the blades and slice the food.
- Collect the sliced food from the discharge area.

Figure 5: The slicer can be easily converted for manual use.
5.4. Suitable Ingredients
This slicer is designed for a wide range of fruits and vegetables, including but not limited to: potatoes, lemons, cabbages, carrots, cheese, tomatoes, kiwis, dragon fruit, apples, and onions.
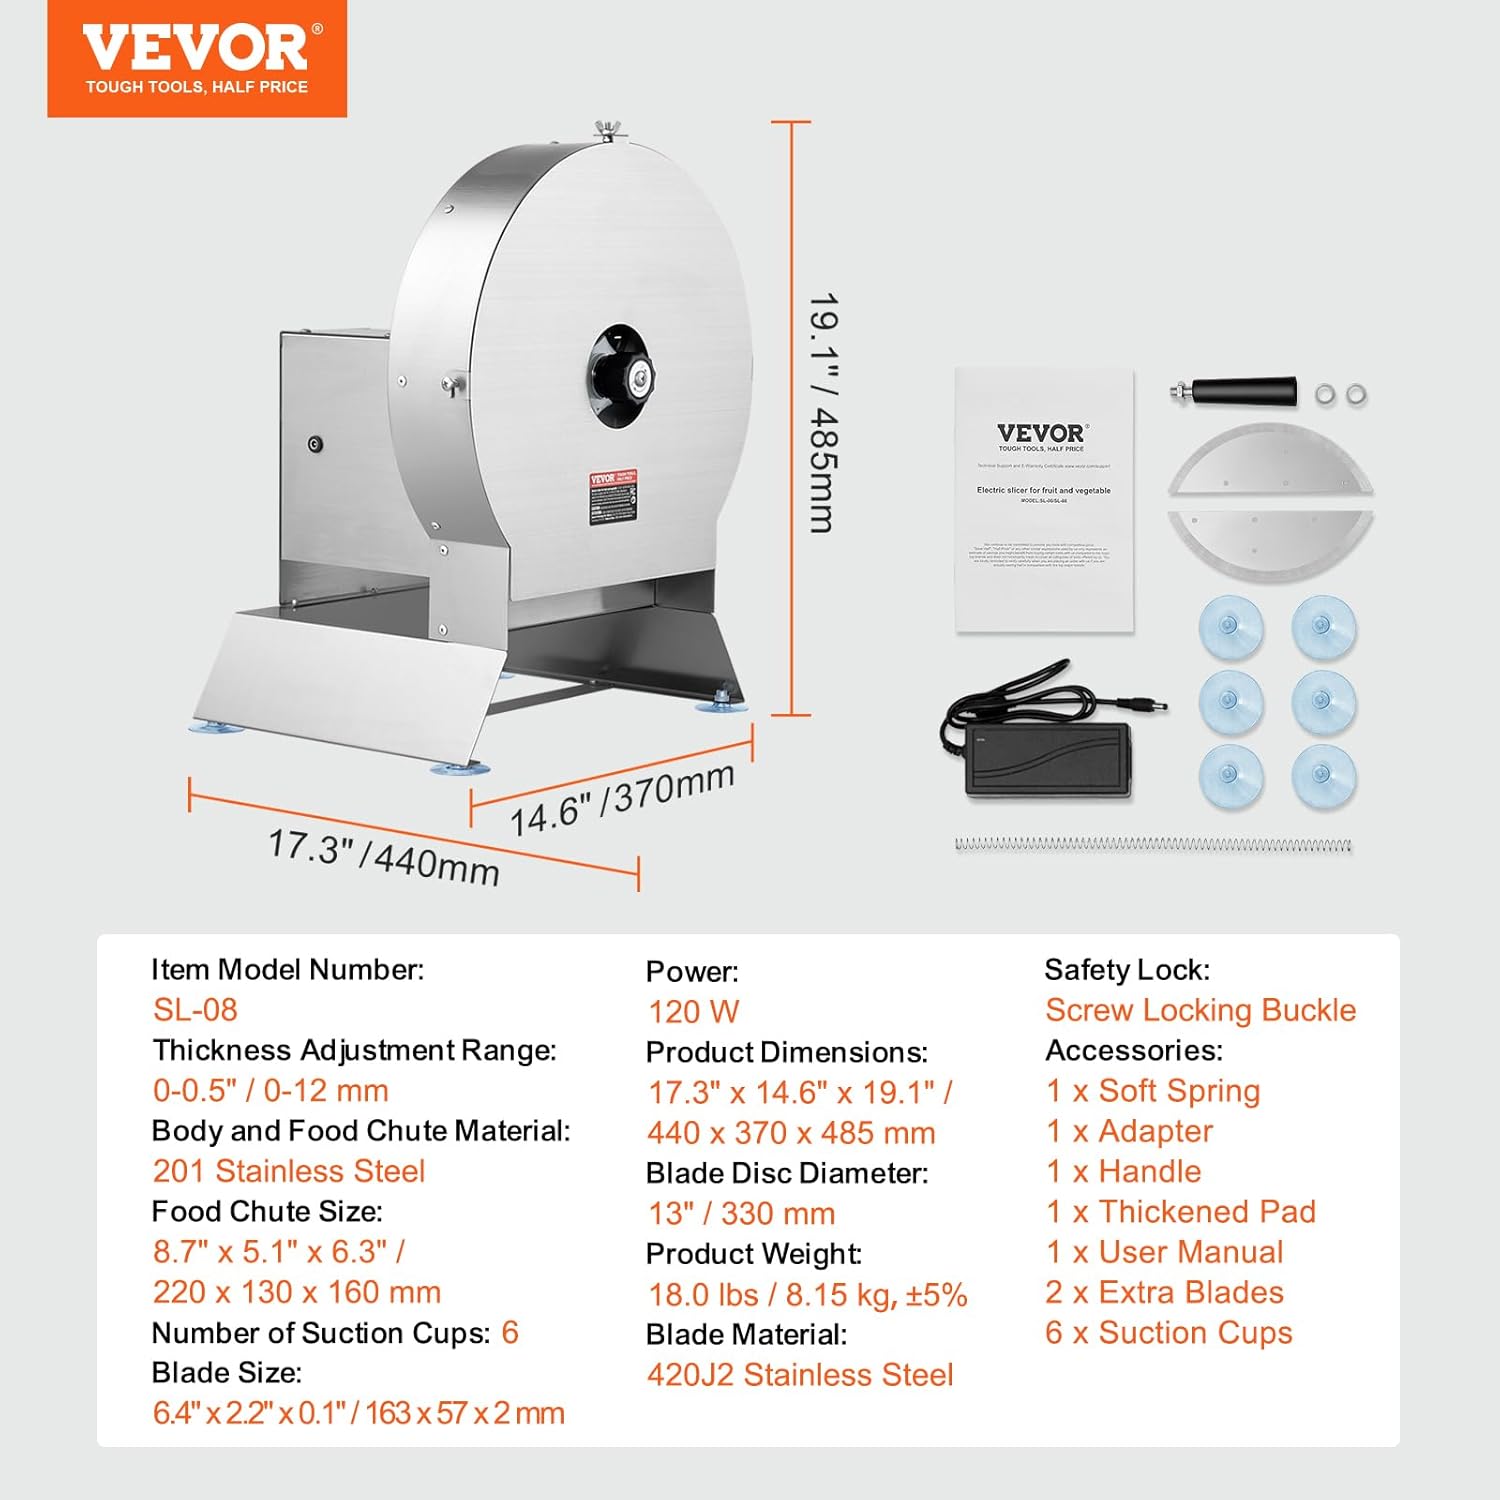
Figure 6: Examples of ingredients suitable for slicing.
5.5. Video Demonstration: Switching to Manual Operation
Video 1: This video demonstrates the process of converting the VEVOR vegetable slicer from electric to manual operation, including attaching the handle.
6. Maintenance and Cleaning
Regular cleaning and maintenance ensure the longevity and optimal performance of your slicer.
- Cleaning Blades: The 420J2 stainless steel blades are sharp and easy to change by releasing the snap mechanism. Always handle blades with extreme care.
- General Cleaning: The entire stainless steel body is designed for easy cleaning. Simply rinse the vegetable fruit slicer with water in the sink. The stainless steel construction prevents rusting, even with daily use.
- Product Care: Hand wash only. Do not use abrasive cleaners or scouring pads that could scratch the stainless steel surface.

Figure 7: The durable stainless steel blades are removable for thorough cleaning.
7. Troubleshooting
If you encounter issues with your VEVOR Electric Vegetable Slicer, refer to the following common problems and solutions:
| Problem | Possible Cause | Solution |
|---|---|---|
| Slicer does not turn on (Electric Mode) | Not properly plugged in; Power switch off; Power outage. | Check power connection; Ensure switch is ON; Verify power supply. |
| Uneven or poor quality slices | Incorrect thickness setting; Dull blades; Improper food placement. | Adjust thickness knob; Replace blades (use extra blades provided); Ensure food is centered in chute. |
| Slicer moves during operation | Suction cups not properly secured. | Ensure all six suction cups are firmly attached to a clean, dry, flat surface. |
8. Specifications
| Feature | Detail |
|---|---|
| Brand | VEVOR |
| Model Number | SL-08 |
| Product Dimensions | 17.32"L x 14.57"W x 19.09"H |
| Material | Stainless Steel (201 Stainless Steel for Body/Food Chute, 420J2 Stainless Steel for Blades) |
| Color | Silver |
| Thickness Adjustment Range | 0-0.5" / 0-12mm |
| Operation Mode | Electric or Manual |
| Power (Electric Mode) | 120W |
| Food Chute Size | 8.7" x 5.1" x 6.3" / 220 x 130 x 160 mm |
| Blade Disc Diameter | 13" / 330 mm |
| Item Weight | 18.6 Pounds / 8.15 kg |
| Safety Lock | Screw Locking Buckle |
| Product Care Instructions | Hand Wash Only |
9. Warranty and Support
For warranty information or technical support, please refer to the contact details provided on the VEVOR official website or your purchase documentation. Keep your proof of purchase for any warranty claims.