1. Introduction
This manual provides essential information for the correct installation, safe use, and maintenance of your Candy CSS4372DW4111 Slim Washing Machine. Please read these instructions carefully before using the appliance and keep them for future reference. Proper use of the appliance will ensure optimal performance and extend its lifespan.
2. Safety Information
Before operating the washing machine, observe the following safety precautions:
- Ensure the appliance is properly grounded to prevent electrical shock.
- Do not touch the appliance with wet hands or bare feet.
- Keep children and pets away from the appliance during operation.
- Do not allow children to play with the appliance or its controls.
- Never force the door open during a cycle. Wait until the cycle is complete and the door lock has disengaged.
- Unplug the appliance from the power supply before cleaning or performing any maintenance.
- Do not use flammable liquids near the appliance.
- Ensure all transport bolts are removed before first use to prevent damage.
3. Installation
3.1 Unpacking
Carefully remove all packaging materials. Remove the transport bolts located at the rear of the machine. These bolts secure the drum during transit and must be removed before operation to prevent damage and excessive vibration. Keep the bolts for future transport if needed.
3.2 Positioning
Place the washing machine on a firm, flat, and stable floor. Ensure there is adequate space around the appliance for ventilation and maintenance. Avoid placing it on carpets or uneven surfaces that could obstruct airflow or cause instability.
3.3 Leveling
Adjust the adjustable feet at the bottom of the machine to ensure it is perfectly level. Use a spirit level to check. A level machine reduces vibration and noise during operation.
3.4 Water Connection
Connect the water inlet hose to a cold water tap with a 3/4" thread. Ensure the connection is tight to prevent leaks. Position the drain hose into a standpipe or securely over the edge of a sink, ensuring it is not kinked or submerged in water.

Image: Rear view of the washing machine, illustrating the water inlet and drain hose connections. Ensure hoses are securely attached and not kinked.
3.5 Electrical Connection
Plug the power cord into a grounded electrical outlet. Ensure the voltage and frequency match the specifications on the appliance's rating plate. Do not use extension cords or adapters.
4. Controls and Programs
4.1 Control Panel Overview
The control panel consists of a program selector dial, function buttons, and a digital display. The program selector dial is used to choose the desired wash cycle. The display shows cycle time, selected options, and error codes.
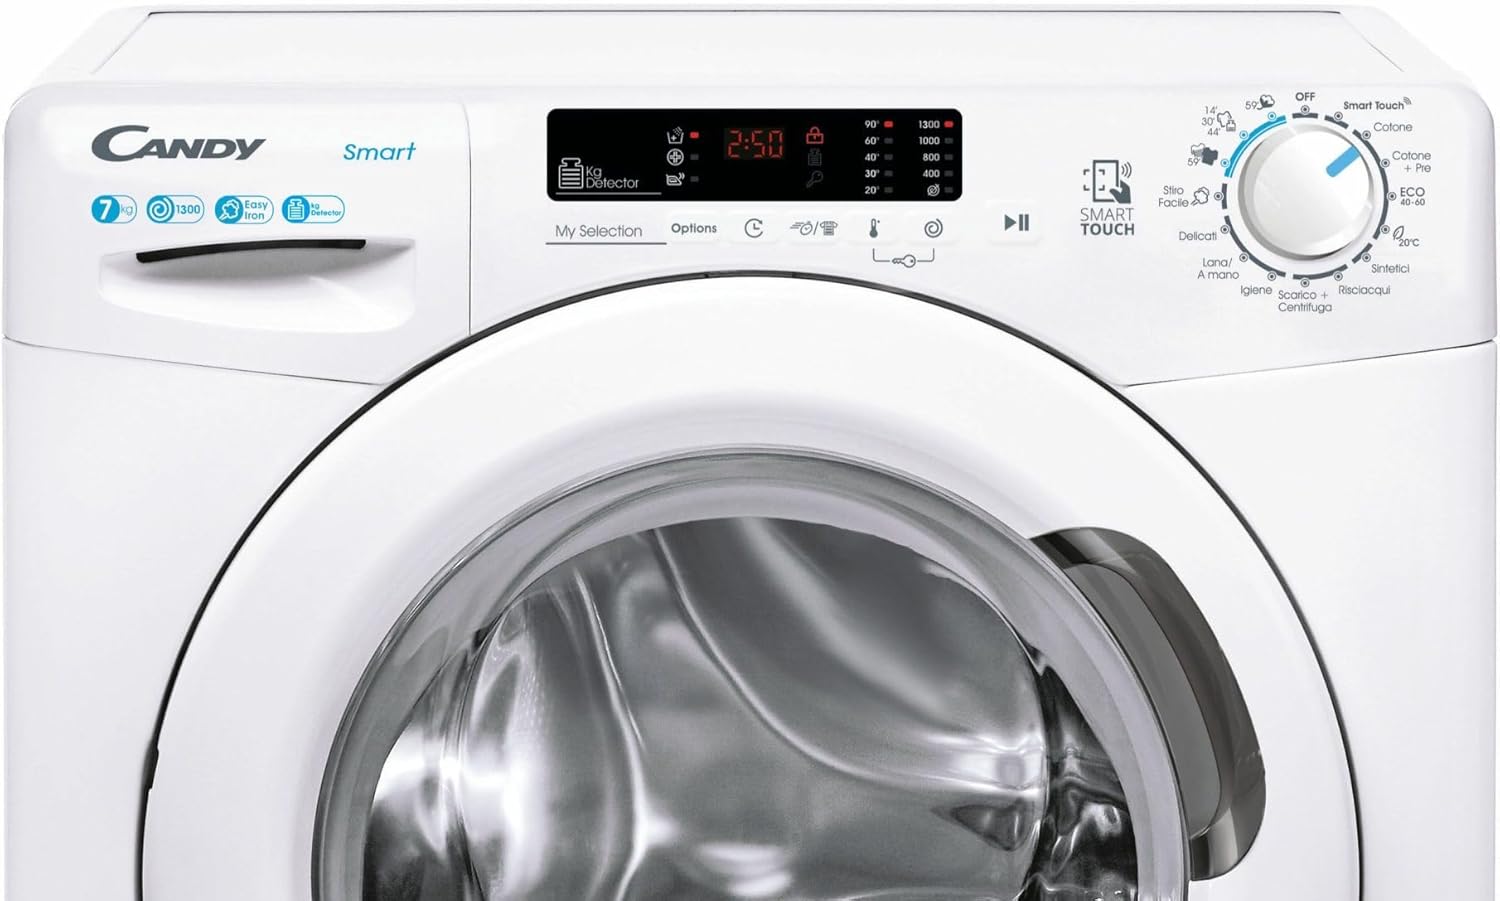
Image: Detailed view of the washing machine's control panel, highlighting the program selector dial, function buttons, and digital display for cycle information.
4.2 Program Selection
Turn the program selector dial to choose from various wash programs such as Cotton, Synthetics, Delicates, Wool, Rinse, Spin, and Eco. Each program is designed for specific fabric types and soil levels. Refer to the program chart in the full manual for detailed descriptions.
4.3 Function Buttons
Use the function buttons to customize your wash cycle. Common options include temperature selection, spin speed adjustment, delay start, and extra rinse. Press the desired button to activate or deactivate a function.
5. Operation
5.1 Loading Laundry
Open the washing machine door and load the sorted laundry into the drum. Do not overload the machine; ensure there is enough space for the clothes to tumble freely. Overloading can reduce washing efficiency and cause excessive wear on the appliance.

Image: The washing machine with its door open, revealing the drum loaded with laundry. This illustrates the loading process.
5.2 Adding Detergent and Additives
Pull out the detergent drawer. Add the appropriate amount of detergent to the main wash compartment and any fabric softener or pre-wash detergent to their respective compartments. Close the drawer gently.
5.3 Starting a Wash Cycle
After loading laundry and adding detergent, close the door firmly. Select your desired program using the dial and choose any additional functions. Press the Start/Pause button to begin the cycle. The display will show the remaining time.

Image: Front view of the washing machine with the door closed, ready for a wash cycle to begin.
5.4 Ending a Cycle
Once the cycle is complete, the machine will signal with an audible alert or a message on the display. The door will unlock automatically. Open the door and remove the clean laundry. Turn the program selector dial to the 'OFF' position and unplug the machine if it will not be used for an extended period.
6. Maintenance
Regular maintenance ensures the longevity and efficient operation of your washing machine.
6.1 Cleaning the Exterior
Wipe the exterior surfaces of the washing machine with a soft, damp cloth. Do not use abrasive cleaners or solvents.
6.2 Cleaning the Detergent Drawer
Periodically remove the detergent drawer by pressing the release lever. Rinse it under running water to remove any detergent residue. Clean the housing of the drawer with a brush. Reinsert the drawer until it clicks into place.
6.3 Cleaning the Drain Filter
The drain filter should be cleaned regularly to prevent blockages. Locate the filter cover at the bottom front of the machine. Place a shallow container underneath to catch any residual water. Unscrew the filter slowly to drain water, then remove and clean it of lint and debris. Reinsert and tighten securely.

Image: The drain filter compartment with the filter removed, demonstrating how to access and clean it. This is crucial for preventing drainage issues.
6.4 Cleaning the Drum
Run a maintenance wash cycle (e.g., a hot wash with no laundry and a descaling agent) periodically to clean the drum and remove any detergent buildup or odors.
7. Troubleshooting
If you encounter issues with your washing machine, consult the following common problems and solutions before contacting service.
- Machine does not start: Check if the power cord is plugged in, the door is fully closed, and the Start/Pause button has been pressed. Ensure the water tap is open.
- Water not draining: Check if the drain hose is kinked or blocked. Clean the drain filter (refer to Section 6.3).
- Excessive vibration/noise: Ensure the machine is level (refer to Section 3.3) and that all transport bolts have been removed (refer to Section 3.1). Check if the laundry load is balanced inside the drum.
- Poor wash results: Ensure you are using the correct amount and type of detergent for the load and water hardness. Do not overload the machine.
- Door will not open: Wait a few minutes after the cycle ends for the door lock to disengage. If the machine is still running or has water inside, the door will remain locked for safety.
For persistent issues, refer to the complete troubleshooting guide in the full product manual or contact customer support.
8. Specifications
| Feature | Specification |
|---|---|
| Model Number | CSS4372DW4111 |
| Brand | Candy Brush |
| Type of Load | Front-loading |
| Capacity | 7 kg |
| Maximum Spin Speed | 1300 rpm |
| Energy Efficiency Class | B |
| Spin Efficiency Class | B |
| Noise Level (Spin) | 78 dB |
| Dimensions (Width x Depth x Height) | 600 mm x 440 mm x 850 mm |
| Color | White |
9. Warranty and Support
For warranty information, please refer to the warranty card included with your product or contact the retailer where the appliance was purchased. For technical assistance or customer support, please contact Candy Brush customer service through their official website or the contact details provided in your purchase documentation.