Introduction
This manual provides detailed instructions for setting up, operating, and maintaining your TONOR Wireless Microphones System. Designed for exceptional sound quality and reliable wireless connectivity, this system is ideal for various applications including church gatherings, conferences, performances, and karaoke. Please read this manual thoroughly before use to ensure optimal performance and longevity of your device.
What's in the Box
Upon unpacking, please verify that all the following components are included:
- 4 x Bodypacks
- 1 x Receiver
- 4 x Headset Microphones
- 4 x Lavalier Microphones
- 1 x 6.35mm Audio Cable
- 1 x Power Adapter
- 1 x User Manual

Image: All components included in the TONOR Wireless Microphones System package.
Product Overview
The TONOR Wireless Microphones System features a robust receiver and four versatile bodypack transmitters, each compatible with either a headset or lavalier microphone. The system is designed for stable performance with anti-interference capabilities and no audio delay.
Receiver Unit
The receiver unit features individual volume controls for each of the four channels (A, B, C, D) and a main power switch. On the rear, it provides a mixed 6.35mm (1/4") audio output and individual balanced XLR outputs for each channel, allowing for flexible connection to various audio devices.


Image: Front and back views of the receiver unit, highlighting controls and ports.
Bodypack Transmitters
Each bodypack transmitter is equipped with a power switch, a mute/volume button, and a set button. An LCD display shows the current channel and battery level. They require 2 AA batteries (not included). The bodypacks feature a professional 3-pin Mini XLR Jack for secure microphone connection and a belt clip for convenient wear.

Image: Features of the UHF Bodypack Transmitter, including power button, mute/volume, and LCD display.
Microphones (Headset & Lavalier)
The system includes both headset and lavalier (lapel) microphones. Both types feature a cardioid pickup condenser mic for clear audio and reduced ambient noise. They connect to the bodypacks via a Mini XLR Connector with a secure locking mechanism to prevent accidental disconnection. Each microphone also comes with a removable foam cover to reduce wind noise.

Image: Details of the Premium Lavalier and Headset Microphones, highlighting their features.
Setup Instructions
- Insert Batteries into Bodypacks: Each bodypack requires two AA batteries (not included). Open the battery compartment and insert the batteries, ensuring correct polarity.

Image: Battery insertion into bodypack.
- Connect Microphones to Bodypacks: Plug your desired headset or lavalier microphone into the 3-pin Mini XLR Jack on the bodypack. Twist the connector to secure it in place, preventing accidental disconnection during use.

Image: Microphone connection to bodypack.
- Connect Receiver to Power: Plug the provided power adapter into the DC IN port on the receiver and then into a power outlet.
- Connect Receiver to Audio System: Use the included 6.35mm audio cable to connect the receiver's MIX output to your mixer, amplifier, or powered speaker. For individual channel control, use XLR cables (not included) to connect the balanced XLR outputs to your audio system.
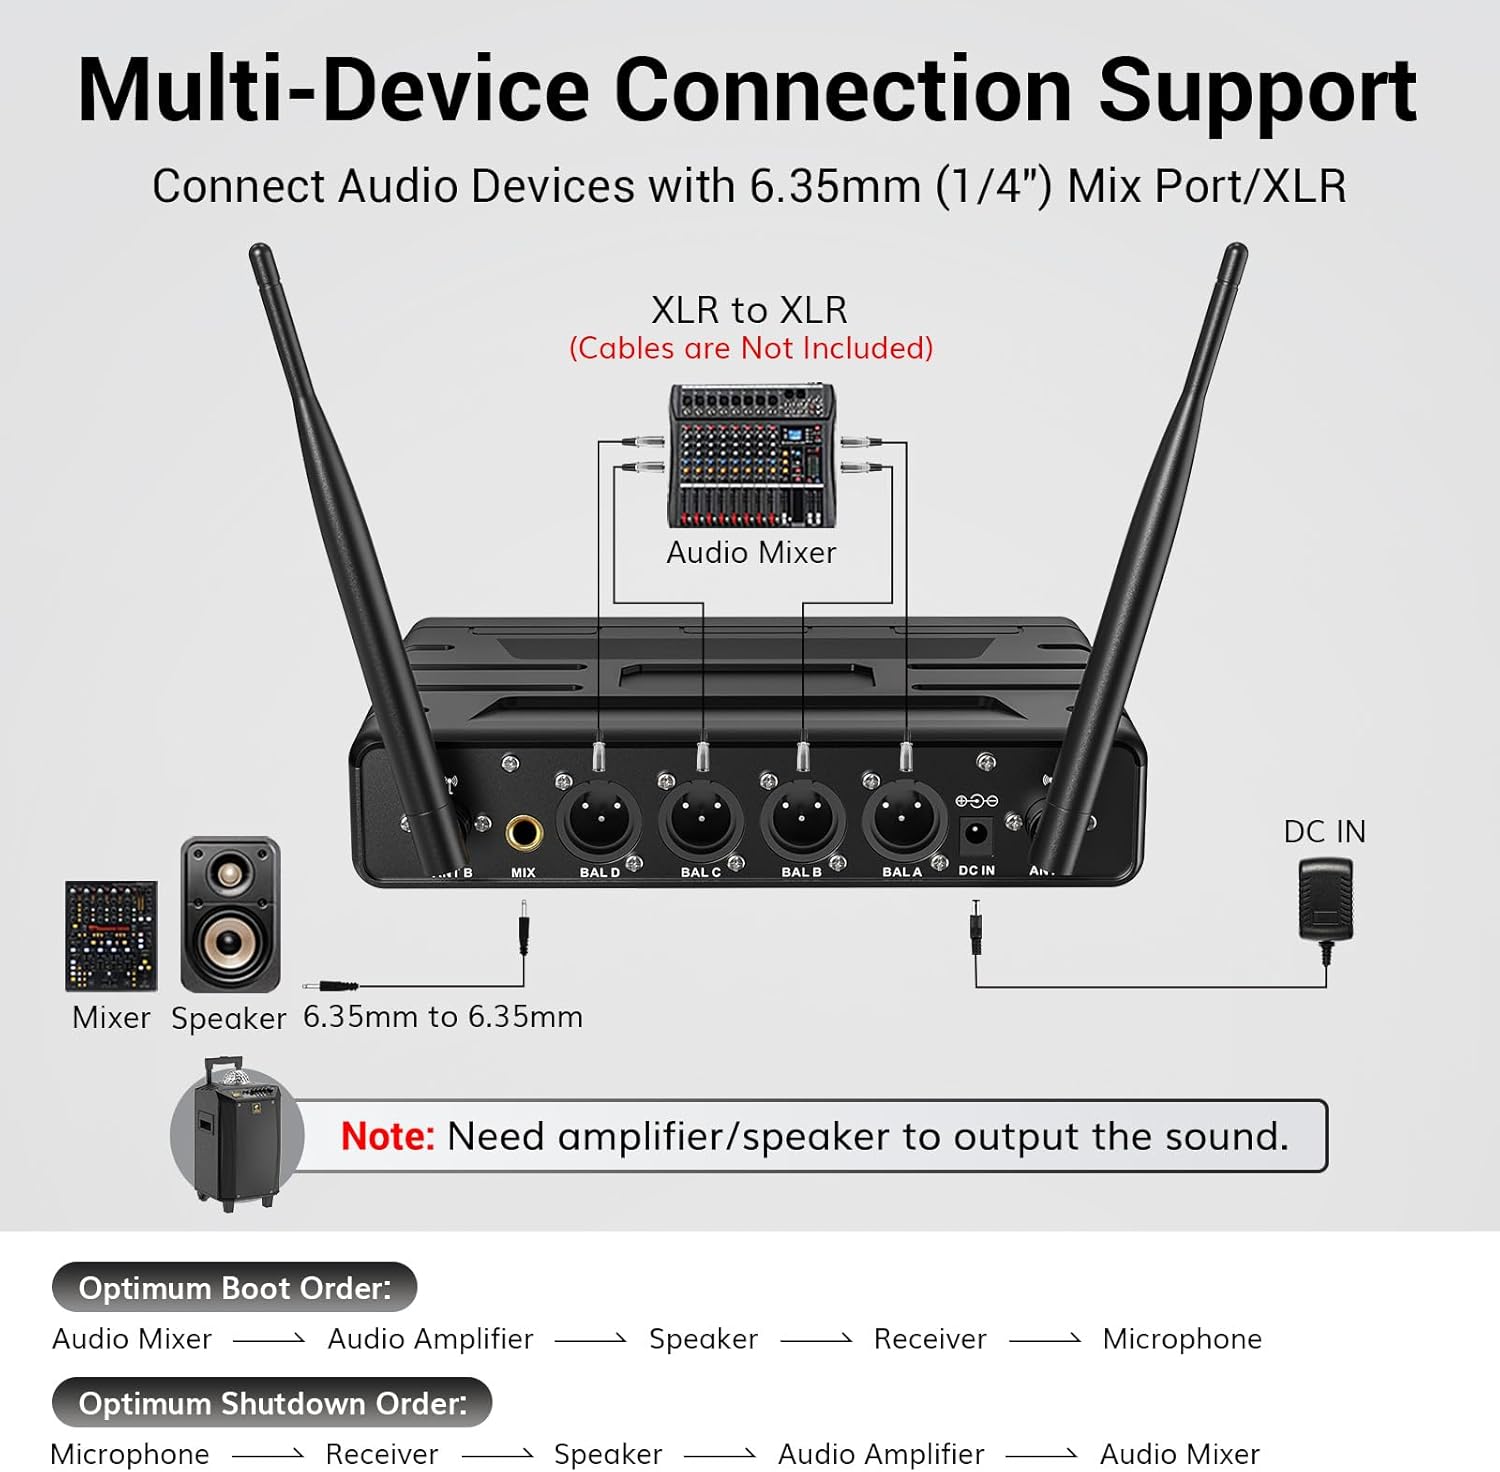
Image: Multi-device connection support diagram.
- Extend Antennas: Ensure the receiver's antennas are fully extended and positioned for optimal signal reception.
- Power On: Turn on the receiver by pressing the power button on the front panel. Then, turn on each bodypack transmitter using its power switch. The system should automatically pair.

Image: Power button on bodypack.
Operating Instructions
Volume Control
- Receiver Volume: Adjust the individual volume knobs (VOL.A+, VOL.B+, VOL.C+, VOL.D+) on the receiver's front panel to control the output level of each microphone.
- Bodypack Volume: Each bodypack has its own internal volume control. To adjust, long press the MUTE/VOL button for 3 seconds until the volume display flashes. Then, use the SET button to increase the volume or the MUTE/VOL button to decrease it. The volume ranges from 0 to 40.

Image: MUTE/VOL and SET buttons on bodypack.
Mute Function
Press the MUTE/VOL button on the bodypack to mute the microphone. The LED indicator on the bodypack will turn red when muted. Press again to unmute.
Changing Frequencies
Each bodypack supports 10 channels to easily avoid interference. To change the frequency, click the SET button on the bodypack. The LCD display will show the new frequency. If interference occurs, try switching to a different channel.

Image: 10 Channels Per Mic diagram.
Wireless Range
The system offers a reliable operating range of up to 200ft/60m in open spaces, providing flexibility for various events. Ensure clear line-of-sight between transmitters and the receiver for best performance.

Image: Stable Wireless Performance diagram.
Compatibility
The TONOR Wireless Microphones System is designed for wide compatibility with various audio devices. It can be easily connected to mixers, karaoke machines, amplifiers, and powered speakers using the included 1/4" (6.35mm) audio cable or XLR cables (not included).
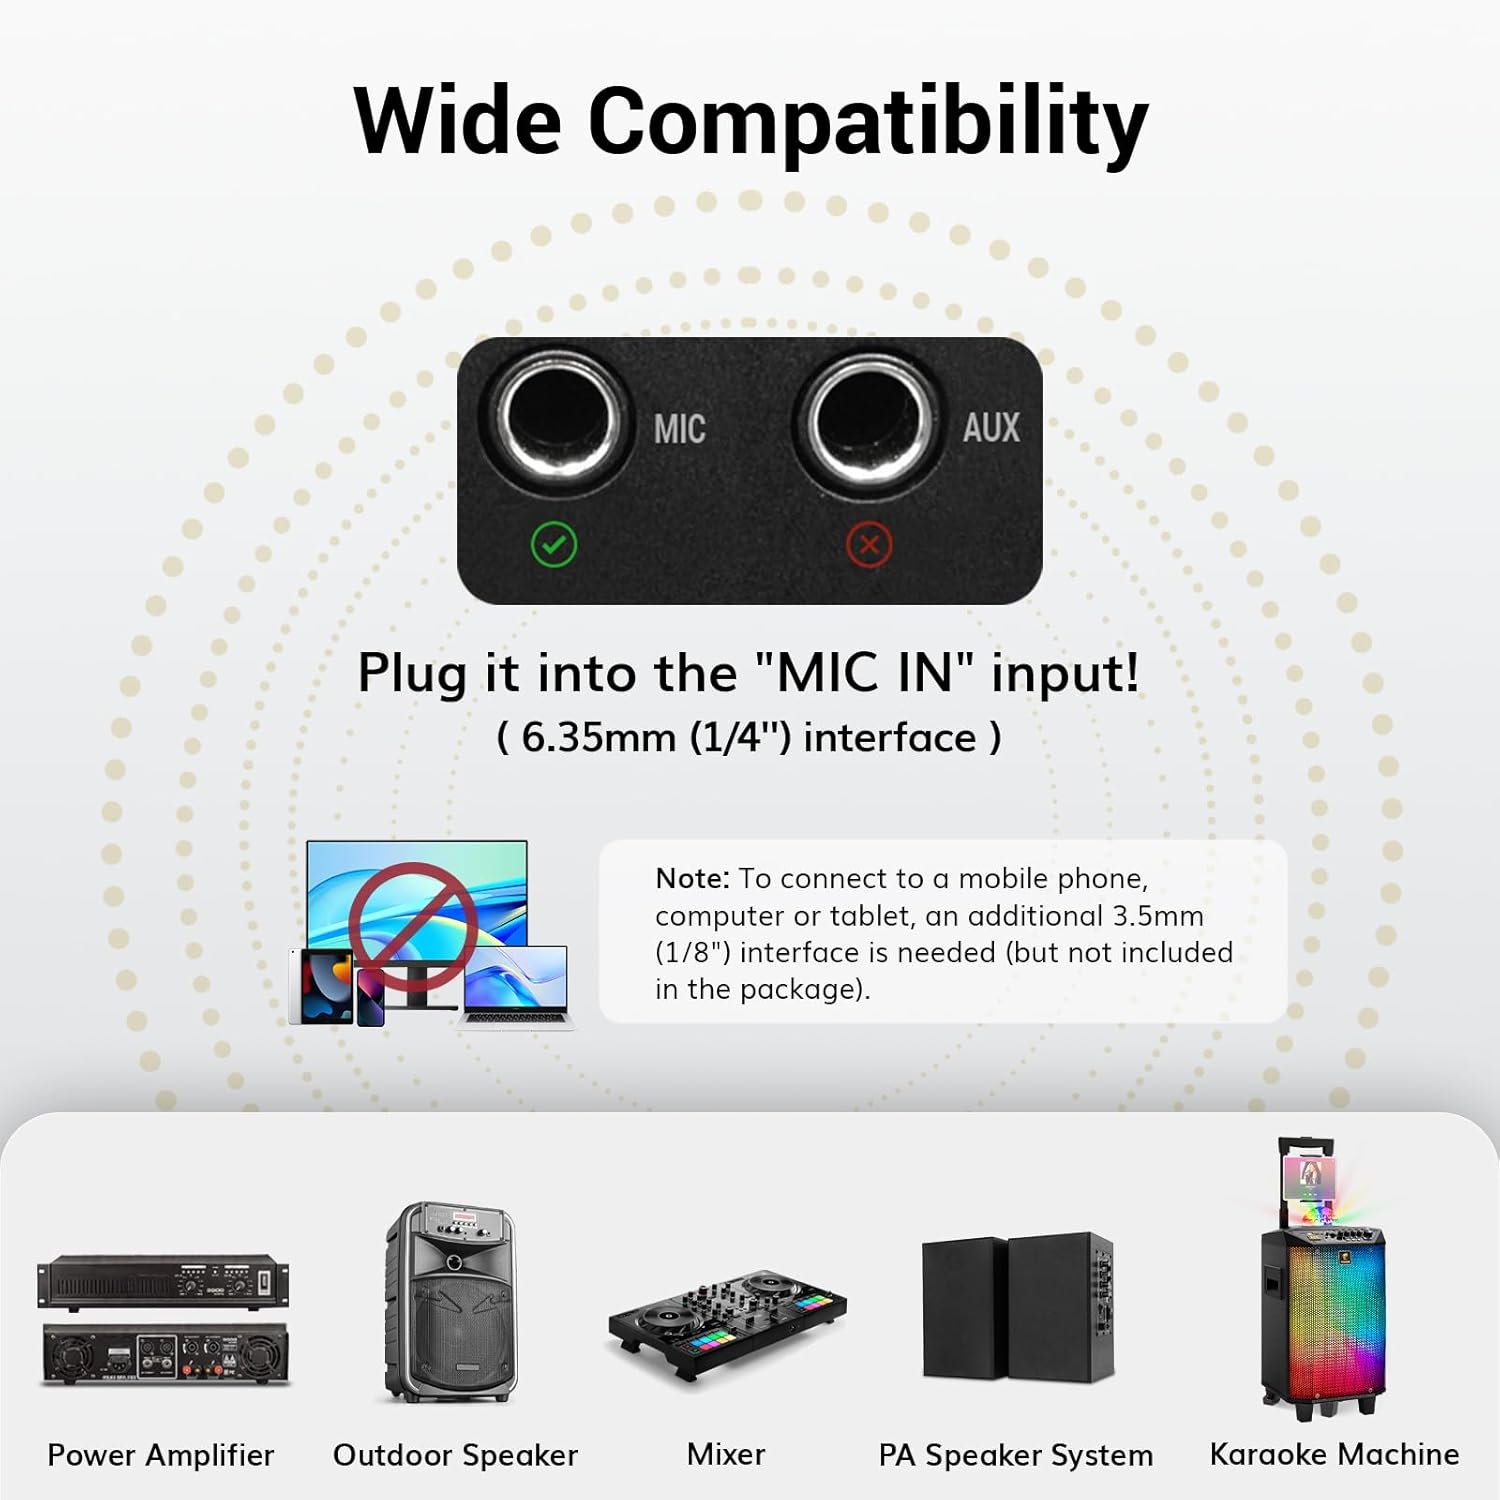
Image: Wide Compatibility diagram.
Important Notes:
- An amplifier or speaker is required to output sound.
- Direct connection to mobile phones, computers, or tablets requires an additional 3.5mm (1/8") interface, not included.
- The system does not support Bluetooth connectivity.
- Connection to TVs or soundbars requires an intermediary audio device.

Image: Tips for Better Usage and Connectivity.
Troubleshooting
If you encounter issues with your TONOR Wireless Microphones System, please refer to the following common troubleshooting steps:
- No Sound:
- Ensure all microphones/bodypacks are turned on.
- Check if the receiver's RF signal lights are illuminated for active channels.
- Verify all cables are securely connected.
- Confirm that the audio system (mixer, amplifier, speaker) is properly configured and its volume is up.
- Received Signal with Noise or Interference:
- Change to other frequencies on the bodypack.
- Check whether the receiving distance exceeds the maximum range (200ft/60m).
- Ensure there are no major obstructions between the bodypack and receiver.
- Microphone or Bodypack Cannot Be Turned On:
- Check if batteries are installed correctly and have sufficient charge. Install new batteries if needed.
- When Multiple Groups Are Used, the Frequency of the Receiver Is Unstable:
- One receiver can only be connected to four microphones or bodypacks.
- Each group has the same factory settings. Therefore, when using multiple groups, the microphones or bodypacks in each group need to be re-paired according to the "Steps to Pair" section below. Each microphone or bodypack needs to be set with a unique frequency so that it will not interfere with each other.
Steps to Pair (If Needed)
The system is pre-paired from the factory. Only follow these steps if you experience pairing issues or need to re-pair a unit:
- Turn on the bodypack or microphone, and check all are in order (A, B, C, or D). If the handheld microphone or bodypack order is wrong, firstly turn off the mic or bodypack and reset the order of wrong one referring to the mic/bodypack function introduction page.
- Long press the SET button for 5 seconds to enter the pairing mode. When the red light on the receiver is on, the pairing is successful. If the red light is still off, repeat steps 1-2.
- If there are more than one trouble mics, repeat steps 1-3 for others to finish pairing.

Image: Manual page detailing pairing steps and troubleshooting.
Specifications
| Feature | Specification |
|---|---|
| Brand | TONOR |
| Model Name | TW366 (Receiver), TW364 (Bodypack) |
| Microphone Form Factor | Microphone System (Headset/Lavalier) |
| Number of Channels | 4 (with 10 frequencies per channel) |
| Connectivity Technology | UHF Wireless, XLR, 6.35 mm Jack |
| Wireless Range | 200ft / 60m |
| Frequency Range | 902-928 MHz |
| Signal-to-Noise Ratio | 70 dB |
| Power Source | Battery Powered (Bodypacks: 2x AA each) |
| Polar Pattern | Unidirectional (Cardioid) |
| Item Weight | 3.1 pounds (System) |
| Package Dimensions | 13.5 x 12.01 x 4.41 inches |
Warranty and Support
TONOR products are designed for durability and performance. For specific warranty information and technical support, please refer to the official TONOR website or contact their customer service directly. Keep your purchase receipt for warranty claims.
For further assistance, you may visit the TONOR Store on Amazon.