1. Product Overview
This manual provides detailed instructions for the installation, operation, and maintenance of your Hikity 8 Core 6+128GB Android Stereo, designed specifically for Chevrolet Chevy Sonic models from 2011 to 2015. This unit features a 9-inch 1280x720P touchscreen, Wireless CarPlay, Android Auto, DSP, 5G WiFi, GPS, and Bluetooth connectivity.
2. What's in the Box
Verify that all components are present before beginning installation.
- Android Car Radio for Chevy Aveo Sonic
- AHD Backup Camera & Camera Input Cable
- Microphone
- Power Cable & GPS Antenna
- RCA Cable & USB Cable

Figure 2.1: Package Contents. This image displays the main Android car radio unit, AHD backup camera, microphone, power cable, GPS antenna, RCA cable, USB cables, and installation tools.
3. Installation Guide
3.1 Tools Required for Disassembly
- Wires
- Protocol Box
- Installation Tools (e.g., pry tool, screwdriver)
3.2 Disassembly Steps
- Use a pry tool to open and remove the outer frame of the original radio.
- Unscrew the four screws securing the radio on both sides.
- Remove the radio and disconnect the cables.
- Remove the air vents on both sides from the original car frame.

Figure 3.1: Compatibility and Installation Overview. This image illustrates the dashboard of a Chevy Sonic, showing how the new Android stereo fits after installation, and the appearance of the original radio unit.
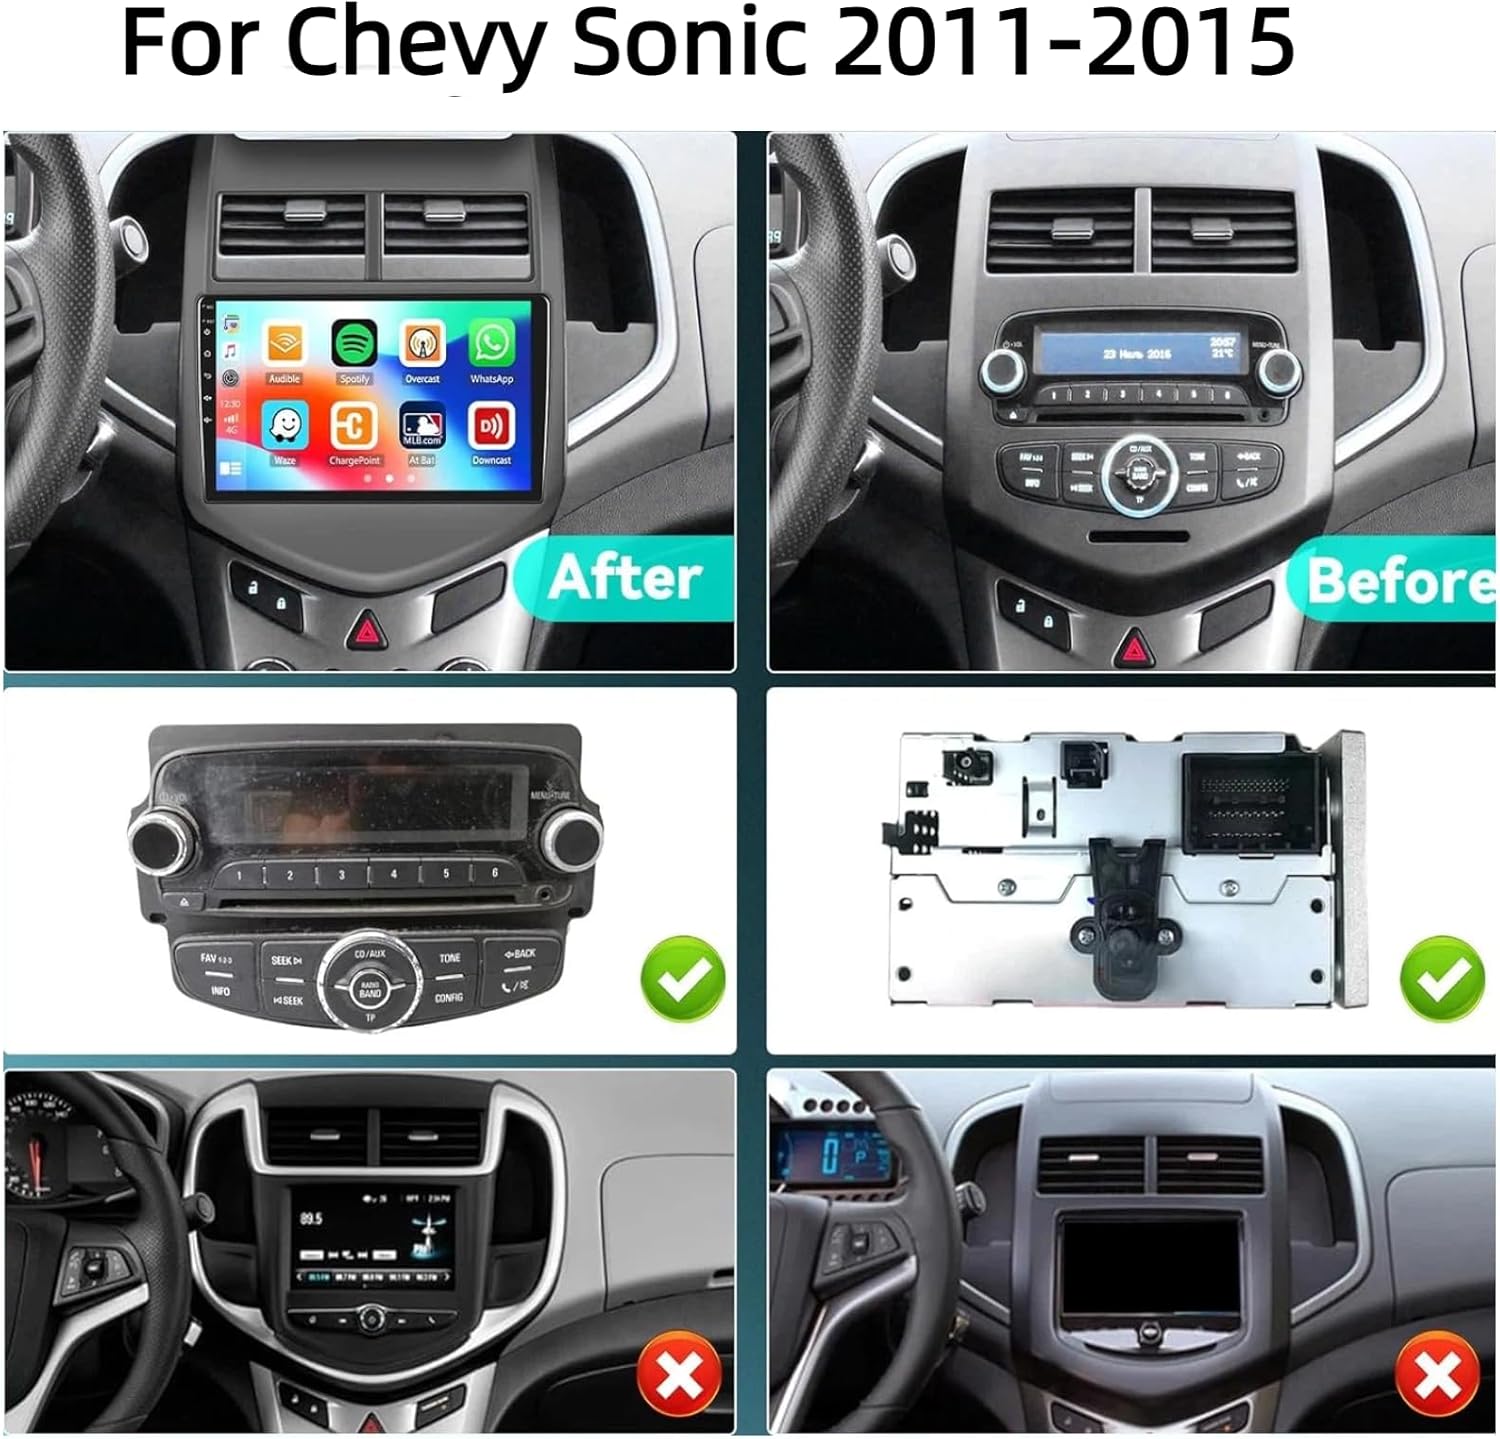
Figure 3.2: Before and After Installation. This image provides a visual comparison of the car's interior with the original radio and with the new Hikity Android Stereo installed, highlighting the fit for Chevy Sonic 2011-2015 models.

Figure 3.3: Disassembly Steps. This image sequence demonstrates the process of carefully removing the original car radio unit from the dashboard.
3.3 Installation Steps
- Install the air vents on both sides onto the new radio panel.
- Secure the new radio to the panel and tighten the five screws.
- Connect the wires of the new radio to the original car harness. If the wiring harness does not match, contact customer service for the correct wiring harness.
- Attach the protocol box.
- Reinstall the new radio into the car, completing the installation.

Figure 3.4: Installation Steps. This image sequence illustrates the process of installing the new Android stereo, including connecting the wiring harness and securing the unit in the dashboard.
3.4 Backup Camera Wiring
The included AHD backup camera requires specific wiring for proper function.
- Connect the BACK line (red wire from the main harness) to the positive pole of the car's reversing light.
- Connect the negative pole of the camera's power supply to the negative pole of the car's reversing light (ground).
- Connect the camera input cable to the designated camera input on the stereo unit.
Video 3.1: How to Connect the Backup Camera. This video demonstrates the correct wiring procedure for the AHD backup camera, including connecting to the stereo unit and the car's reversing light power supply.

Figure 3.5: AHD Backup Camera Wiring Diagram. This diagram illustrates the connections for the backup camera, showing how to connect the red wire to the positive terminal of the reversing light and the black wire to ground.
3.5 CANBUS Decoder Connection
Connect the CANBUS decoder before powering on the unit. Navigate to Apps > Settings > Factory Set Up > 1234 > CAN settings. Select the brand of the CANBUS and then the matching model and year of your vehicle.

Figure 3.6: CANBUS Decoder and Steering Wheel Controls. This image shows the CANBUS decoder and how it integrates with the stereo to enable steering wheel control functions.
4. Operating Instructions
4.1 Wireless CarPlay & Android Auto
The stereo supports both wired and wireless CarPlay and Android Auto. This allows access to your phone's address book, mail, notifications, video, and other information directly on the stereo screen. The unit includes a built-in microphone and an external microphone for clear voice control.
Video 4.1: How to Use CarPlay. This video demonstrates the process of connecting and using CarPlay with the Hikity Android Stereo, showcasing music playback, navigation, and hands-free calling.

Figure 4.1: CarPlay and Android Auto Interface. This image displays the user interface for both CarPlay and Android Auto, showing common applications and features accessible through the stereo.
4.2 GPS Navigation & 5G WiFi
The stereo is equipped with a GPS receiver and supports global navigation satellite systems. It can update your location accurately and quickly using both online and offline maps. 5G WiFi connectivity ensures fast loading of real-time map information and reduces latency.

Figure 4.2: Navigation and Connectivity Features. This image highlights GPS accurate positioning, voice control, the three-split screen function, and 5G WiFi connectivity.
4.3 DSP (Digital Sound Processor)
The pre-installed DSP tuning software allows you to adjust the frequency, AE, and 32-band equalization for a customized audio experience. This provides crystal clear sound quality.

Figure 4.3: Audio and Connectivity Features. This image displays the 32EQ DSP function, Bluetooth 5.0 interface, and FM/RDS radio interface.
4.4 Bluetooth 5.0 & FM/RDS Radio
The latest Bluetooth 5.0 technology offers quick and stable connections for hands-free calling and audio streaming. The FM/RDS radio features 30 preset stations, allowing you to listen to news broadcasts, real-time traffic, and weather forecasts.
4.5 Split Screen & UI Themes
The split-screen function allows you to run two applications simultaneously, such as GPS navigation and video playback. The stereo also offers 59 UI themes and a large selection of wallpapers to personalize your display.

Figure 4.4: Display Customization. This image highlights the 1280x720 IPS screen, various wallpaper options, and the selection of 59 UI desktop themes for personalization.
4.6 Mirror Link
The mirror link function allows you to sync the content of your smartphone to the large screen of the stereo unit.
5. Specifications
| Feature | Description |
|---|---|
| Brand | Hikity |
| Vehicle Service Type | Chevy Sonic Android Stereo 2011-2015 |
| Screen Size | 9 Inches |
| Special Features | 32 EQ DSP, 8 Core 1280*720 IPS HD Screen, Android & 6G RAM & 128G ROM, Wireless Carplay & Android Auto & Mirror Link |
| Connectivity Technology | Bluetooth, USB, Wi-Fi |
| Map Type | Worldwide (Online and Offline) |
| Included Components | Android Car Radio, AHD Backup Camera & Camera Input Cable, Microphone, Power Cable & GPS Antenna, RCA Cable & USB Cable |
| Audio Output Mode | Stereo |
| Operating System | Android |
| Memory Storage Capacity | 128 GB |
| Touch Screen Type | Capacitive |
| Display Type | LCD |
| Human-Interface Input | Microphone, Touchscreen |
| Control Method | App, Remote, Touch, Voice |
| Supported Satellite Navigation System | GPS |
| Item Dimensions L x W x H | 13.58"L x 10.04"W x 3.74"H |
6. Troubleshooting
This section addresses common issues you might encounter with your Hikity Android Stereo.
6.1 Slow Performance
If the unit experiences slow performance or apps load slowly, it may be due to multiple applications running in the background. Regularly close unused applications to free up system resources. Ensure a stable 5G WiFi connection for optimal online performance.
6.2 Bluetooth Connectivity Issues
If Bluetooth stops working or has difficulty connecting, try the following:
- Ensure Bluetooth is enabled on both the stereo and your mobile device.
- Delete previous pairings on both devices and attempt to re-pair.
- Restart both the stereo unit and your mobile device.
6.3 Backup Camera Display Issues
If the rear camera display is too bright or unclear in sunny conditions, ensure the camera lens is clean and free from obstructions. Verify that the camera type settings (CVBS or AHD) are correctly configured in the factory settings menu of the stereo.
6.4 Steering Wheel Button Obstruction
Due to vehicle-specific dashboard designs, the steering wheel may partially block some buttons on the left side of the stereo. Familiarize yourself with the touchscreen controls and voice commands for frequently used functions.
7. Warranty and Support
Your Hikity Android Stereo comes with a 1-year warranty from the date of purchase. For technical support, warranty claims, or any questions regarding installation or operation, please contact Hikity Tech customer service.
You can reach customer support via email at: hikityservices@163.com
For further assistance, you may also visit the Hikity Store on Amazon.


Figure 7.1: Quality Assurance and Customer Support. These images represent Hikity's commitment to product quality and comprehensive customer support services.