1. Introduction
Thank you for choosing the Empyr Bubendorff Multi-Channel Remote Control with Clock, Model B223027. This device is designed to provide convenient and personalized control over your Bubendorff motorized roller shutters, simplifying daily management and maximizing comfort. It allows you to control up to 4 groups of ID2 and ID3 type motors, offering flexibility in managing your home environment.
Please read this manual carefully before using the remote control to ensure proper operation and to fully utilize its features, including the integrated clock function for precise scheduling.
2. Safety Information
- Keep the remote control away from water and high humidity.
- Do not expose the device to extreme temperatures or direct sunlight.
- Do not attempt to disassemble or repair the remote control yourself. Refer to qualified personnel for service.
- Ensure batteries are inserted correctly according to polarity markings.
- Keep batteries out of reach of children.
3. Package Contents
Please check that your package contains the following items:
- Empyr Bubendorff Multi-Channel Remote Control with Clock (Model B223027)
- Wall mount bracket (if included)
- User Manual (this document)
Note: Batteries are not included and must be purchased separately.
4. Product Overview
The Bubendorff Multi-Channel Remote Control features an intuitive design for ease of use.

Figure 4.1: Front view of the remote control. This image displays the remote's digital screen showing a time (e.g., 15:23), two large circular buttons with up and down arrows for shutter control, and a smaller button labeled "Bubendorff" at the bottom. A small indicator light is visible above the Bubendorff button.

Figure 4.2: Bottom view of the remote control. This image shows the underside of the remote, revealing two circular indentations, likely for wall mounting or accessing the battery compartment.
4.1. Components
- Digital Display: Shows current time, channel, and programming indicators.
- Up Button (^): Opens the roller shutter or navigates up in menus.
- Down Button (v): Closes the roller shutter or navigates down in menus.
- Bubendorff Button: Used for channel selection, programming, and confirmation.
- Indicator Light: Provides feedback on commands and programming status.
- Clock Icon: Indicates clock or timer function on the display.
5. Setup
5.1. Battery Installation
- Locate the battery compartment on the back of the remote control.
- Open the compartment cover.
- Insert the required alkaline batteries (not included), ensuring correct polarity (+/-).
- Close the battery compartment cover securely.
5.2. Pairing with Roller Shutters
This remote control can manage up to 4 groups of Bubendorff ID2 and ID3 motors. The pairing process typically involves a sequence of actions on both the remote and the shutter motor. Refer to your Bubendorff motor's specific instructions for entering pairing mode.
- Ensure the roller shutter motor is powered on and in pairing mode (consult your motor's manual).
- On the remote control, select the desired channel/group you wish to assign to the shutter. This is usually done by pressing the Bubendorff button repeatedly until the desired channel number appears on the display.
- Initiate the pairing command from the remote control (e.g., a long press on the Bubendorff button or a specific button combination).
- The shutter should respond (e.g., move slightly) to confirm successful pairing.
- Repeat for additional shutters or groups.
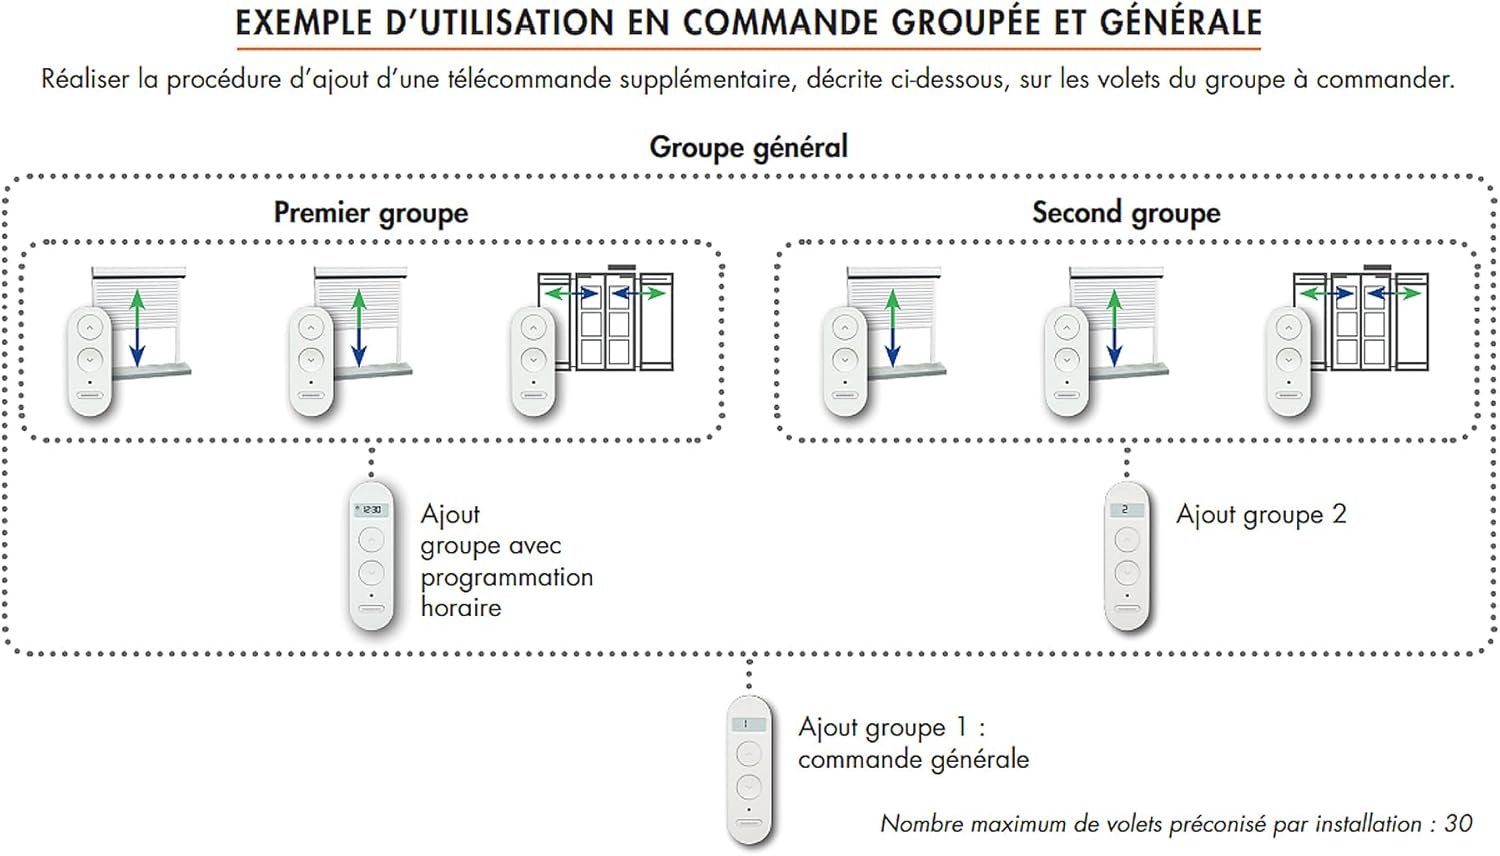
Figure 5.1: Example of Grouped and General Control. This diagram shows how to add supplementary remote controls for grouped and general control of roller shutters. It illustrates two groups of shutters, each controlled by a dedicated remote, and a third remote for general control of all shutters. The diagram highlights "Add group with time programming" for the first group and "Add group 2" for the second, with a general control remote at the bottom labeled "Add group 1: general command." The maximum recommended number of shutters per installation is 30.
6. Operating Instructions
6.1. Basic Shutter Control
- To Open: Press the ^ (Up) button.
- To Close: Press the v (Down) button.
- To Stop: Press either the ^ or v button while the shutter is in motion.
6.2. Multi-Channel Selection
The remote control supports up to 4 channels/groups. To switch between channels:
- Press the Bubendorff button briefly. The channel number on the display will change (e.g., 1, 2, 3, 4, or 'ALL' for general control).
- Once the desired channel is displayed, use the ^ or v buttons to control the associated shutters.
6.3. Setting the Clock and Timer Functions
The integrated clock function allows for precise scheduling of shutter operations.
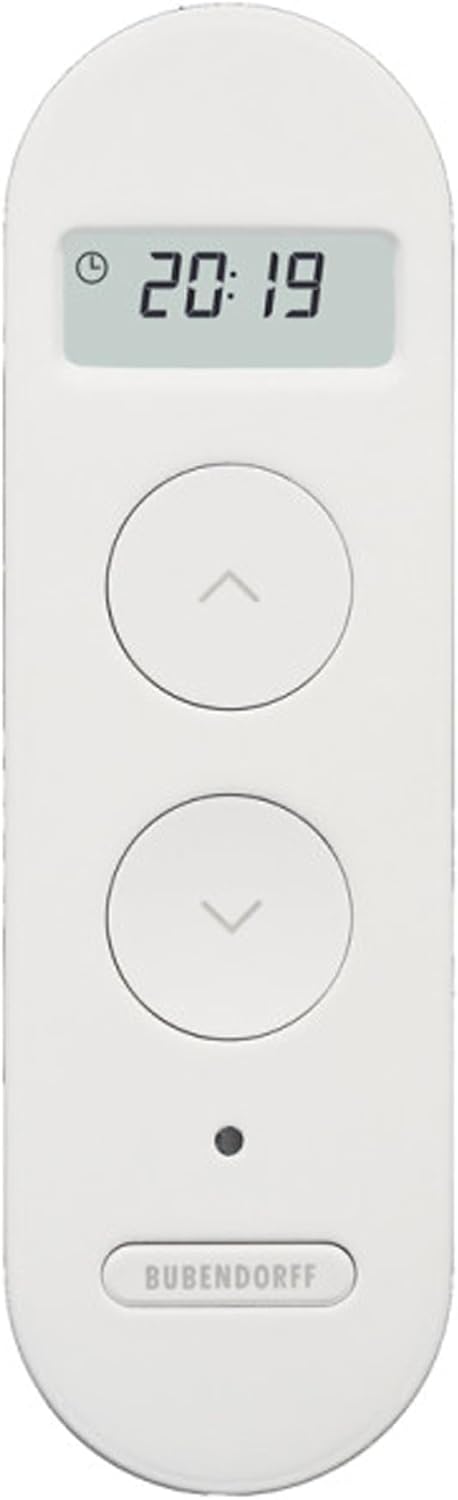
Figure 6.1: Remote control display showing time 20:19. This image highlights the digital display of the remote control, indicating the current time as 20:19, along with a small clock icon.
- Accessing Clock Settings: Press and hold the Bubendorff button until the clock icon flashes or the time setting mode is activated.
- Setting Time: Use the ^ and v buttons to adjust the hour and minute. Press the Bubendorff button to confirm each setting and move to the next.
- Programming Schedules:
- After setting the time, the remote may enter schedule programming mode.
- Select the desired channel/group for the schedule.
- Set the desired open time using ^ and v, then confirm with Bubendorff.
- Set the desired close time using ^ and v, then confirm with Bubendorff.
- Activate or deactivate the schedule for specific days or daily operation as prompted by the display.
- Exiting Programming: The remote will automatically exit programming mode after a period of inactivity, or you may press and hold the Bubendorff button again.
Note: Detailed programming steps may vary slightly. Refer to the specific instructions provided with your Bubendorff motor for advanced timer functions.
7. Maintenance
7.1. Cleaning
- Wipe the remote control with a soft, dry cloth.
- Do not use abrasive cleaners, solvents, or chemical sprays.
7.2. Battery Replacement
When the display dims or the remote control becomes unresponsive, it's time to replace the batteries.
- Follow the steps for battery installation (Section 5.1).
- Dispose of old batteries responsibly according to local regulations.
- After replacing batteries, you may need to reset the clock and verify pairing with your shutters.
8. Troubleshooting
| Problem | Possible Cause | Solution |
|---|---|---|
| Remote not responding. | Dead or incorrectly inserted batteries. | Replace batteries, ensuring correct polarity. |
| Shutter not responding to remote. | Not paired, out of range, or wrong channel selected. | Verify pairing (Section 5.2). Ensure remote is within 10 meters. Select correct channel. |
| Clock/Timer function not working. | Time not set, schedule not activated, or battery low. | Set the current time and program schedules (Section 6.3). Replace batteries if needed. |
| Interference with other devices. | Radio frequency interference. | Move the remote control away from other electronic devices that may cause interference. |
9. Specifications
- Brand: Empyr
- Model: B223027
- Product Dimensions: 8.2 x 8.2 x 2.5 cm
- Product Weight: 100 g
- Compatible Devices: Wireless motor, Roller shutter (Bubendorff ID2 and ID3 types)
- Connectivity Technology: Wireless
- Number of Buttons: 5
- Controller Type: Push button control
- Maximum Channels/Groups: 4
- Maximum Range: 10 Meters
- Battery Type: Alkaline (not included)
- Color: White
10. Warranty and Support
This product comes with a standard manufacturer's warranty. For specific warranty terms and conditions, please refer to the documentation provided at the time of purchase or contact your retailer.
For technical support or further assistance, please contact the retailer or the manufacturer directly. Contact information can usually be found on the product packaging or the manufacturer's official website.