Product Overview
The SPEENSUN Yarn Winder is designed to simplify the process of winding yarn into compact, center-pull cakes. This manual provides detailed instructions for assembly, operation, and care to ensure optimal performance and longevity of your yarn winder.
- Efficient Yarn Cake Creation: Capable of producing neat and compact yarn cakes up to 3.5 oz (100 g), saving storage space and preventing tangles.
- Easy Installation: Designed for quick and straightforward setup, allowing you to begin your knitting or crocheting projects without delay.
- Durable Construction: Made from robust ABS material, ensuring durability and continuous use with minimal noise.
- Desktop Protection: Features a non-slip silicone base and secure clamping mechanism to protect your work surface.
- Versatile Use: Suitable for various yarn types, such as baby blanket yarn, acrylic yarn, and cotton yarn. Best for worsted weight yarn (size 4 or less).

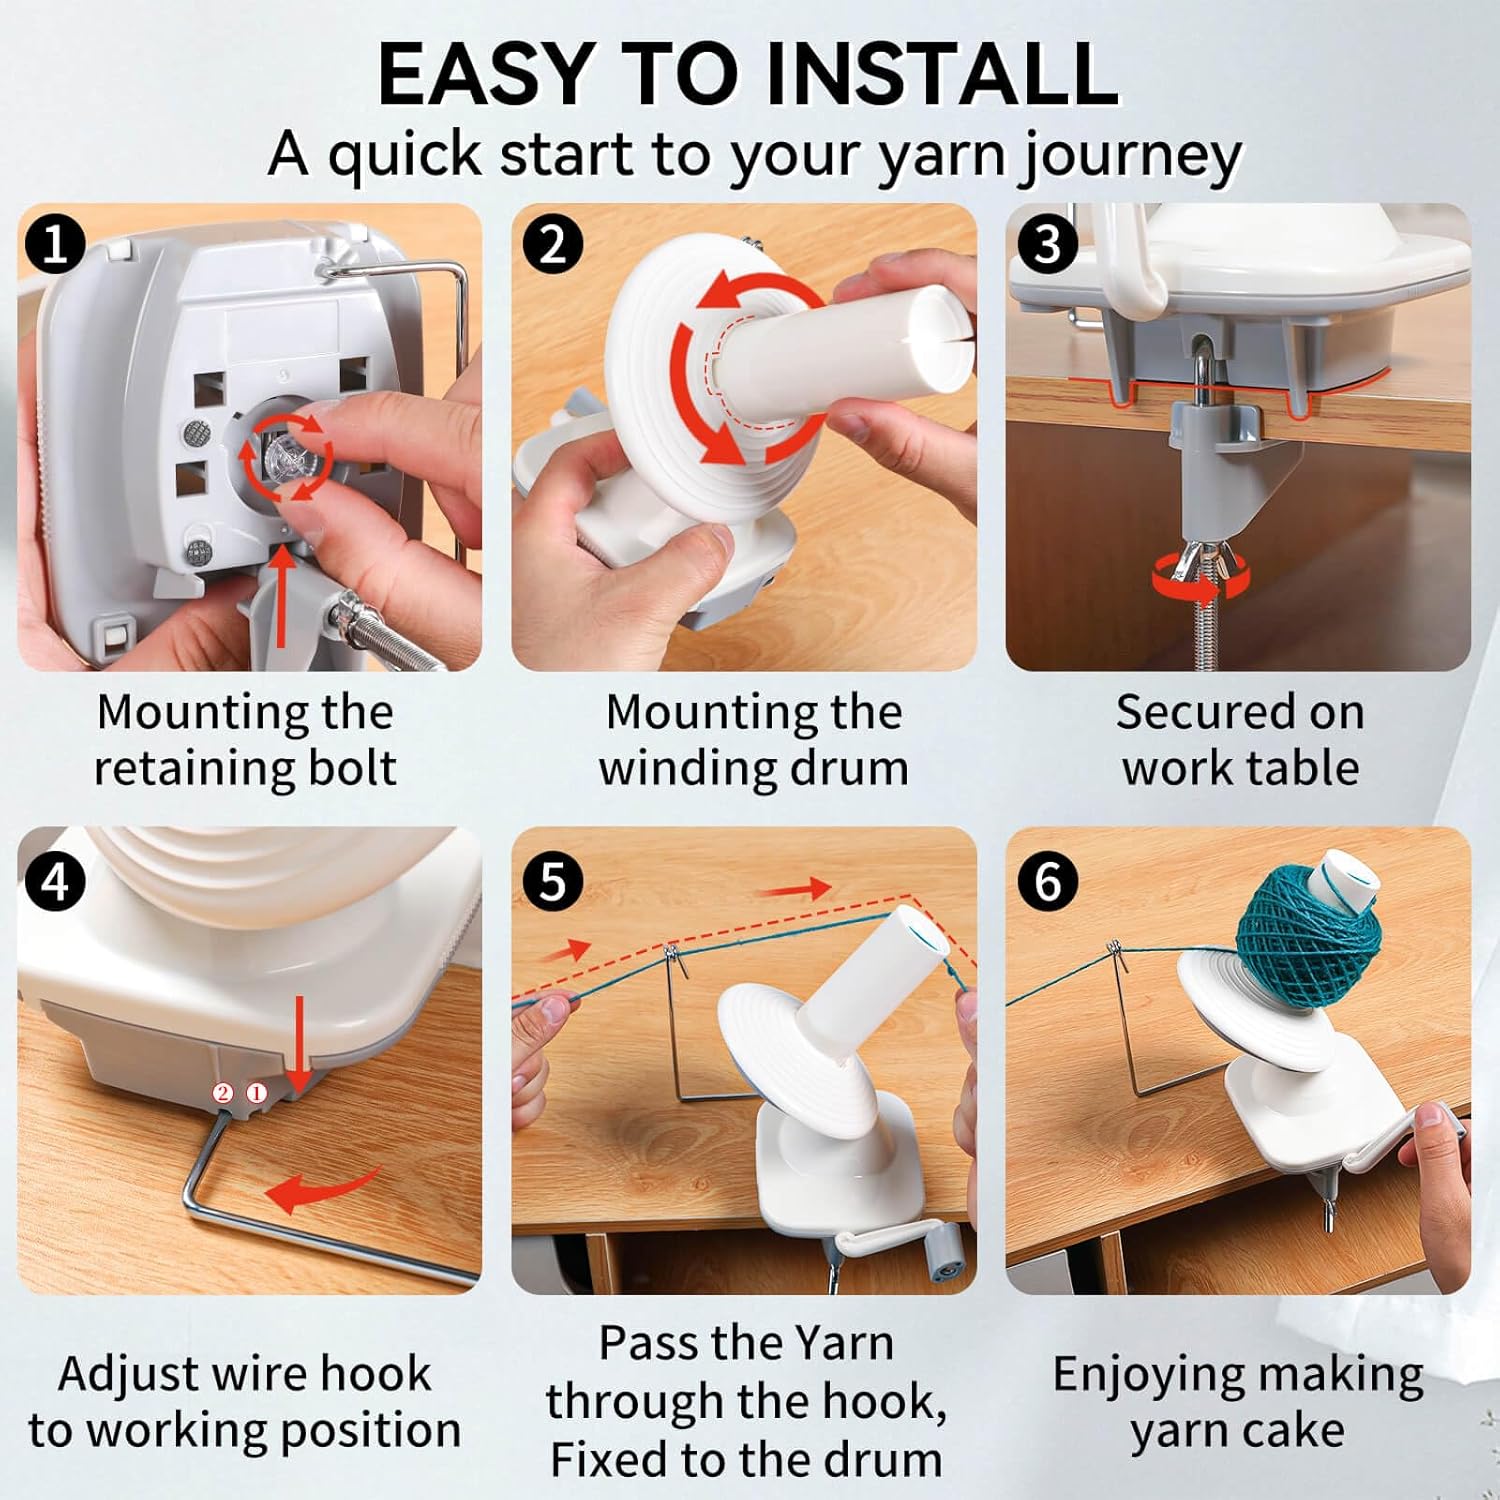
Setup Instructions
Follow these steps to assemble and prepare your SPEENSUN Yarn Winder for use.
- Mount the Retaining Bolt: Insert the retaining bolt into the designated slot on the winder's base.
- Mount the Winding Drum: Securely attach the winding drum to the top of the winder.
- Secure to Work Table: Place the winder on a table with a square edge (maximum thickness 1.77 inches). Tighten the clamp screw until the winder is firmly in place, ensuring the non-slip silicone pads protect your desktop.
- Adjust Wire Hook: Position the wire hook to its working position, ensuring it is stable.
- Pass the Yarn: Thread the yarn through the wire hook, then fix the end of the yarn to the winding drum.
Operating Instructions
Once assembled, follow these guidelines for effective yarn winding.
- Start Winding: Begin turning the crank handle clockwise. Maintain a steady speed to ensure even winding.
- Control Yarn Tension: Gently guide the yarn with your free hand to control its tightness and prevent slippage. A tighter hand control results in a tighter yarn cake; a looser control creates a fluffier cake.
- Prevent Slippage: If the yarn slips, adjust its position in different directions and slowly turn the crank while pulling the yarn slightly tighter until it no longer slips.
- Avoid Over-Winding: Do not exceed the width of the winding drum. Over-winding can make it difficult to remove the finished yarn cake.

Maintenance
To ensure the longevity and smooth operation of your yarn winder, follow these simple maintenance tips:
- Cleaning: Wipe down the winder with a soft, dry cloth after each use to remove any dust or yarn fibers. For stubborn dirt, a slightly damp cloth can be used, followed by immediate drying.
- Lubrication: Periodically check the moving parts for smooth operation. If any squeaking or stiffness occurs, apply a small amount of silicone-based lubricant to the gears and rotating shaft.
- Storage: When not in use, store the yarn winder in a clean, dry place away from direct sunlight and extreme temperatures.
- Inspection: Regularly inspect all components, especially the clamp and winding drum, for any signs of wear or damage. Replace any damaged parts immediately to prevent malfunction.
Troubleshooting
If you encounter any issues with your SPEENSUN Yarn Winder, refer to the following common problems and solutions:
| Problem | Possible Cause | Solution |
|---|---|---|
| Yarn cake is loose or uneven. | Inconsistent tension during winding. | Maintain steady tension on the yarn with your free hand while winding. Adjust speed as needed. |
| Yarn slips off the winding drum. | Insufficient tension or incorrect yarn threading. | Ensure yarn is properly threaded through the wire guide. Increase tension slightly by pulling the yarn tighter. |
| Winder makes excessive noise. | Loose components or dry gears. | Check that all parts are securely fastened. Apply lubricant to the gears if necessary. The wire hook can be taped down to reduce noise. |
| Difficulty removing yarn cake. | Yarn cake is too wide or over-wound. | Ensure the yarn cake does not exceed the width of the winding drum. Gently push the cake up from the base of the drum. |
Specifications
| Feature | Detail |
|---|---|
| Brand | SPEENSUN |
| Model Number | YW01 |
| Product Dimensions | 7.88 x 4.7 x 9.8 inches |
| Item Weight | 7.2 ounces |
| Material | ABS Body |
| Yarn Capacity | Max 3.5 oz (100 g) |
| Recommended Yarn Size | Worsted weight (size 4 or less) |
Warranty and Support
For warranty information or technical support, please refer to the contact details provided with your product packaging or visit the official SPEENSUN website. Keep your purchase receipt for warranty claims.