1. Introduction
The GRAUTOSPOT MIG250 is a versatile 4-in-1 welding machine designed for various welding applications. It supports MMA (Stick), LIFT TIG, MIG/MAG, Pulse MIG, and Double Pulse MIG welding processes. This machine is compatible with a spool gun and is suitable for welding aluminum and iron, as well as other materials like carbon steel, stainless steel, aluminum-magnesium, aluminum-silicon, and flux-cored wire. Its advanced features include a high-precision control board, pure copper transformer, and a user-friendly digital control system, making it suitable for both novice and professional welders.
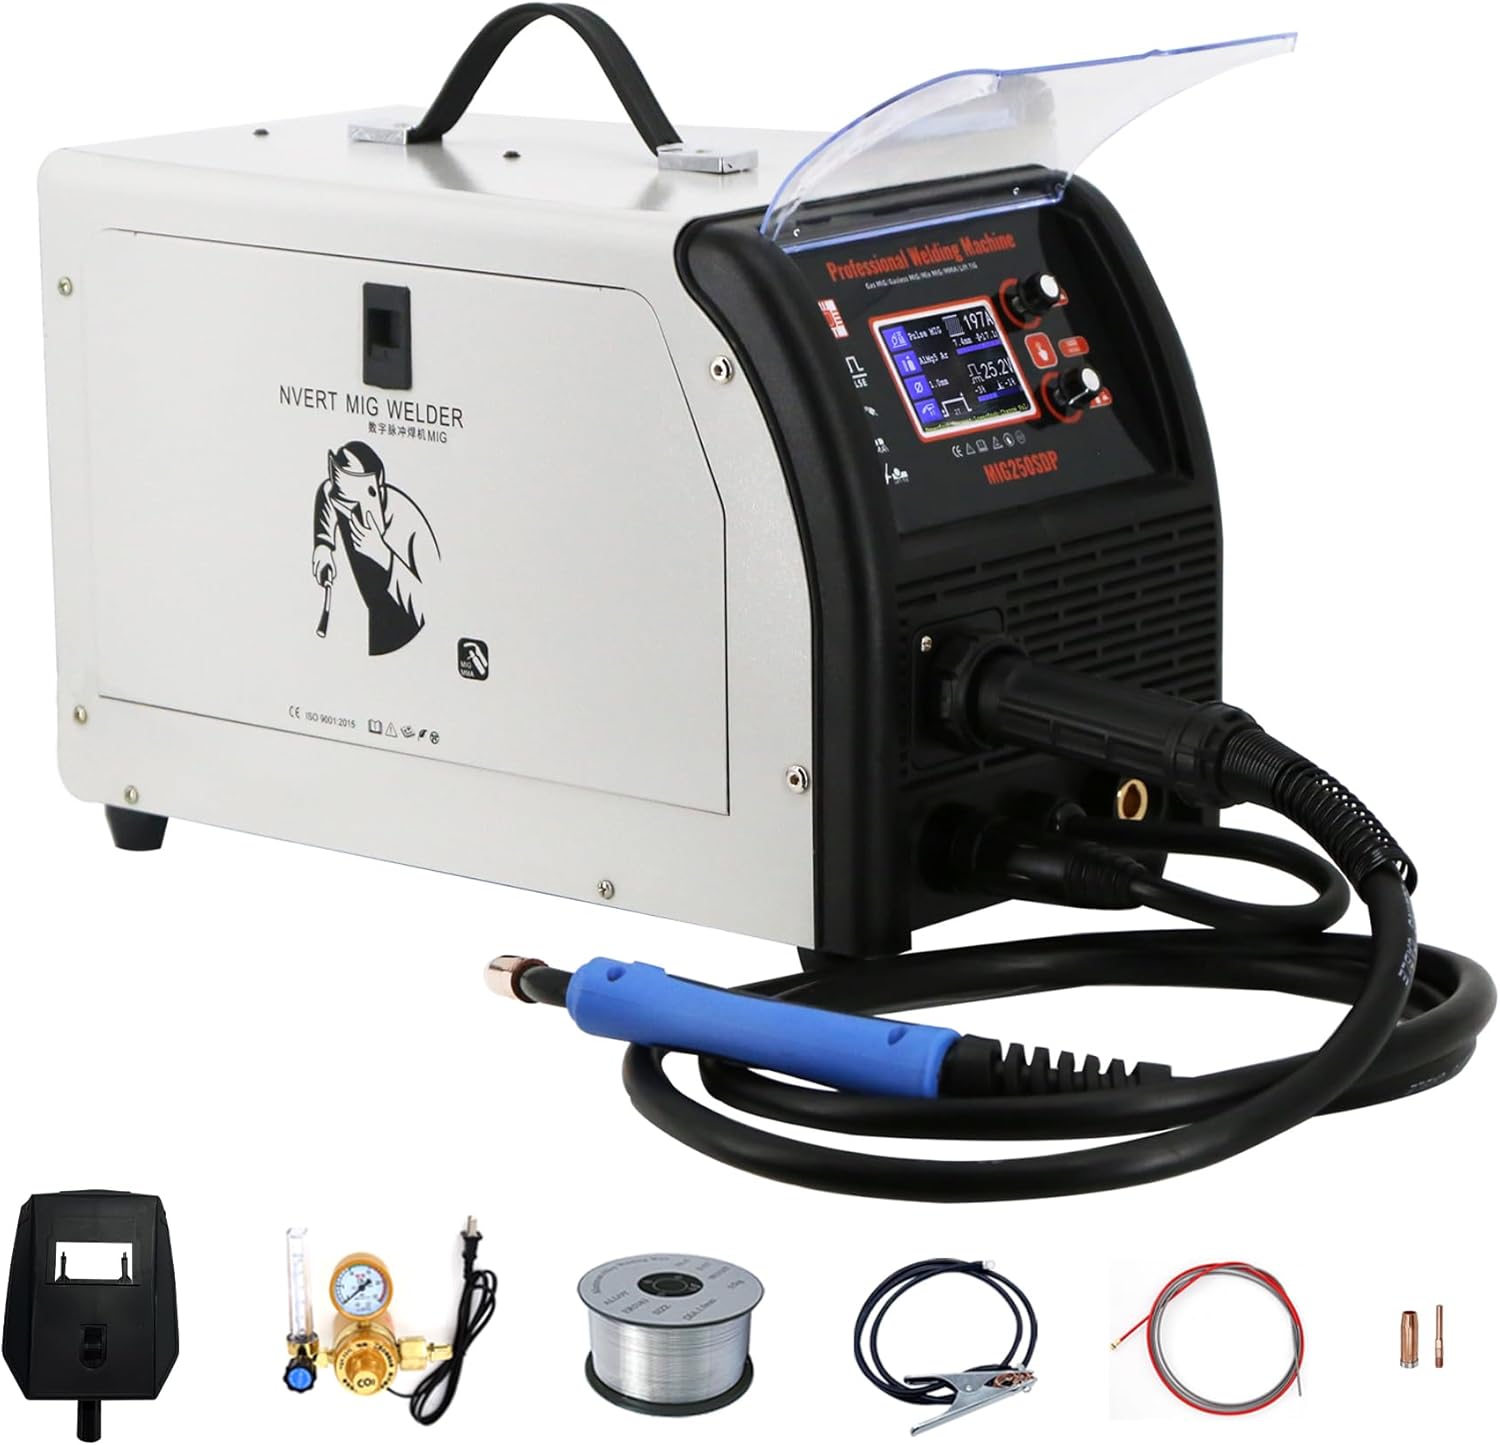
Figure 1: GRAUTOSPOT MIG250 4-in-1 Welding Machine with primary components.
2. Safety Precautions
Always prioritize safety when operating welding equipment. Failure to follow safety guidelines can result in serious injury or death.
- Eye and Face Protection: Always wear a welding helmet with appropriate shade lenses to protect against arc flash and sparks.
- Protective Clothing: Wear flame-resistant clothing, heavy-duty gloves, and safety shoes to protect against burns and electrical shock.
- Ventilation: Ensure adequate ventilation to remove welding fumes, which can be hazardous to health.
- Electrical Safety: Never operate the welder in wet conditions. Ensure proper grounding and inspect cables for damage before each use.
- Fire Prevention: Keep a fire extinguisher nearby. Remove flammable materials from the welding area.
- Work Area: Maintain a clean and organized work area.

Figure 2: Example of a basic welding mask for eye and face protection.
3. Package Contents
Verify that all items listed below are present in the package upon unboxing:
- GRAUTOSPOT MIG250 Welding Machine
- MIG Welding Torch
- Ground Clamp
- Electrode Holder (for MMA welding)
- Gas Regulator (for gas-shielded welding)
- Welding Wire Spool (starter roll)
- Basic Welding Mask
- User Manual

Figure 3: GRAUTOSPOT MIG250 welder and its standard accessories.
4. Product Overview & Features
The MIG250 welding machine incorporates several design elements for enhanced performance and user convenience.
- High Precision Control Board: Ensures accurate and stable welding performance with a uniform weld pool and minimal spatter.
- Pure Copper Transformer: Provides excellent electrical conductivity and strong short-circuit resistance for durability.
- Digital Control System: Offers easy operation with synergistic and manual settings, suitable for various skill levels.
- Two-Roll Dual Drive Wire Feeder: Ensures consistent and reliable wire feeding.
- Universal Wheels: Facilitate easy movement and positioning of the machine.
- User-Friendly Handle: Designed for comfortable and secure transport.
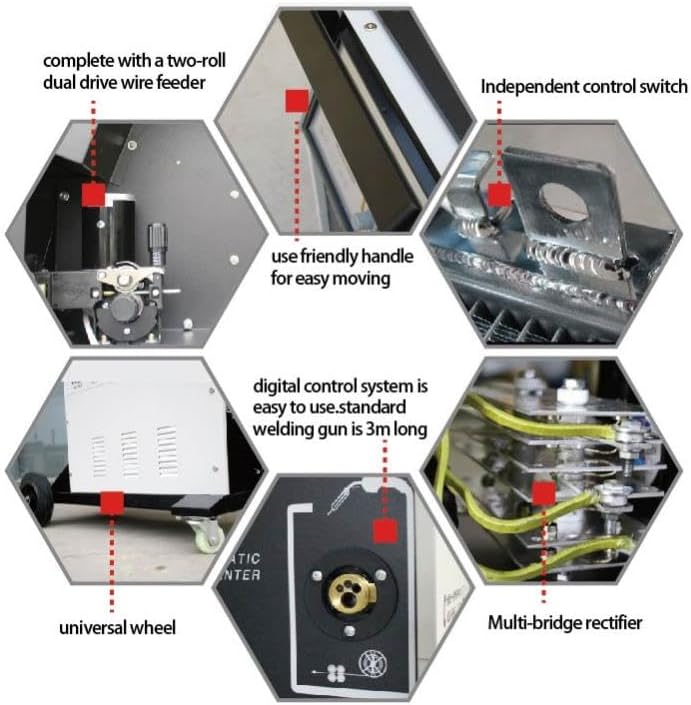
Figure 4: Internal view of the high-precision control board.

Figure 5: Pure copper transformer for efficient power delivery.

Figure 6: Key features including wire feeder, handle, and digital control system.
5. Setup Instructions
Follow these steps to set up your GRAUTOSPOT MIG250 welding machine:
- Placement: Position the welder on a stable, level surface in a well-ventilated area, away from flammable materials.
- Power Connection: Connect the power cord to a suitable 110-volt power outlet. Ensure the outlet can handle the machine's power requirements.
- Ground Clamp: Attach the ground clamp securely to the workpiece or a clean, bare metal portion of the welding table.
- Welding Torch/Electrode Holder:
- For MIG/MAG/Pulse MIG: Connect the MIG torch to the appropriate connector on the front panel.
- For MMA: Connect the electrode holder to the positive (+) terminal and the ground clamp to the negative (-) terminal.
- For LIFT TIG: Connect the TIG torch (not included) to the negative (-) terminal and the ground clamp to the positive (+) terminal.
- Welding Wire Installation (MIG/Pulse MIG):
- Open the wire feeder compartment.
- Place the welding wire spool onto the spindle, ensuring it rotates freely.
- Feed the wire through the guide tube and into the drive rolls.
- Close the drive roll tension arm and adjust tension as needed.
- Press the wire feed button to feed the wire through the MIG torch liner until it exits the contact tip.
- Gas Connection (Gas MIG/MAG/Pulse MIG): If using gas-shielded welding, connect the gas hose from your shielding gas cylinder (e.g., Argon, CO2, or mixed gas) to the gas inlet on the machine via the gas regulator. Ensure all connections are tight to prevent leaks.
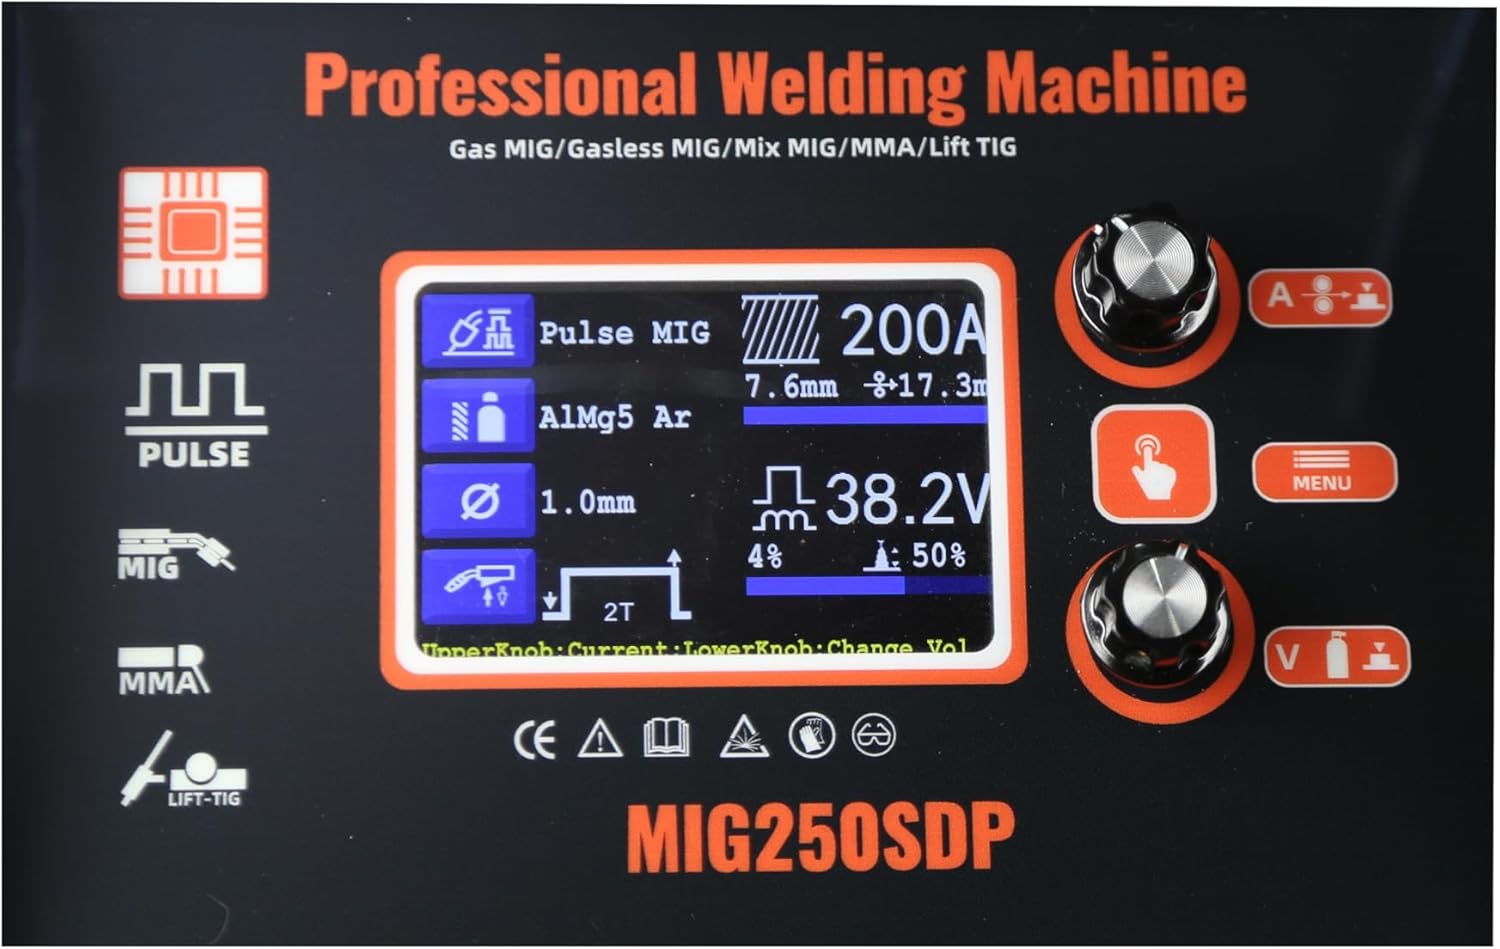
Figure 7: Close-up of the wire feeder mechanism.
6. Operating Modes
The GRAUTOSPOT MIG250 offers multiple welding modes:
- MMA (Manual Metal Arc) Welding: Also known as Stick welding. Uses a consumable electrode coated in flux.
- LIFT TIG Welding: A type of Gas Tungsten Arc Welding (GTAW) where the arc is initiated by gently touching the tungsten electrode to the workpiece and then lifting it. Requires a separate TIG torch and shielding gas (usually Argon).
- MIG/MAG (Gas Metal Arc Welding): Uses a continuously fed wire electrode and a shielding gas (MIG for inert gas like Argon, MAG for active gas like CO2 or mixed gas) to protect the weld pool.
- PULSE MIG Welding: An advanced MIG process that delivers current in pulses, allowing for better control of heat input, reduced spatter, and improved weld quality, especially on thinner materials and aluminum.
- DOUBLE PULSE MIG Welding: Further refines the Pulse MIG process by adding a second, lower frequency pulse, creating a ripple effect on the weld bead similar to TIG welding, enhancing aesthetics and control.
7. Welding Wire & Material Compatibility
The MIG250 is compatible with various welding wires and materials:
- Materials: Carbon steel, stainless steel, aluminum-magnesium alloys, aluminum-silicon alloys, iron.
- Wire Types:
- 0.8mm Iron Welding Wire
- 1.0mm Aluminum Welding Wire
- 1.0mm Flux Cored Wire (for gasless MIG)
- 1.2mm Aluminum Welding Wire
- Spool Gun Compatibility: The machine is compatible with a spool gun for enhanced aluminum welding performance.
8. Operation Guide
The GRAUTOSPOT MIG250 features a user-friendly interface with both synergistic and manual setting options.
8.1. Control Panel Overview
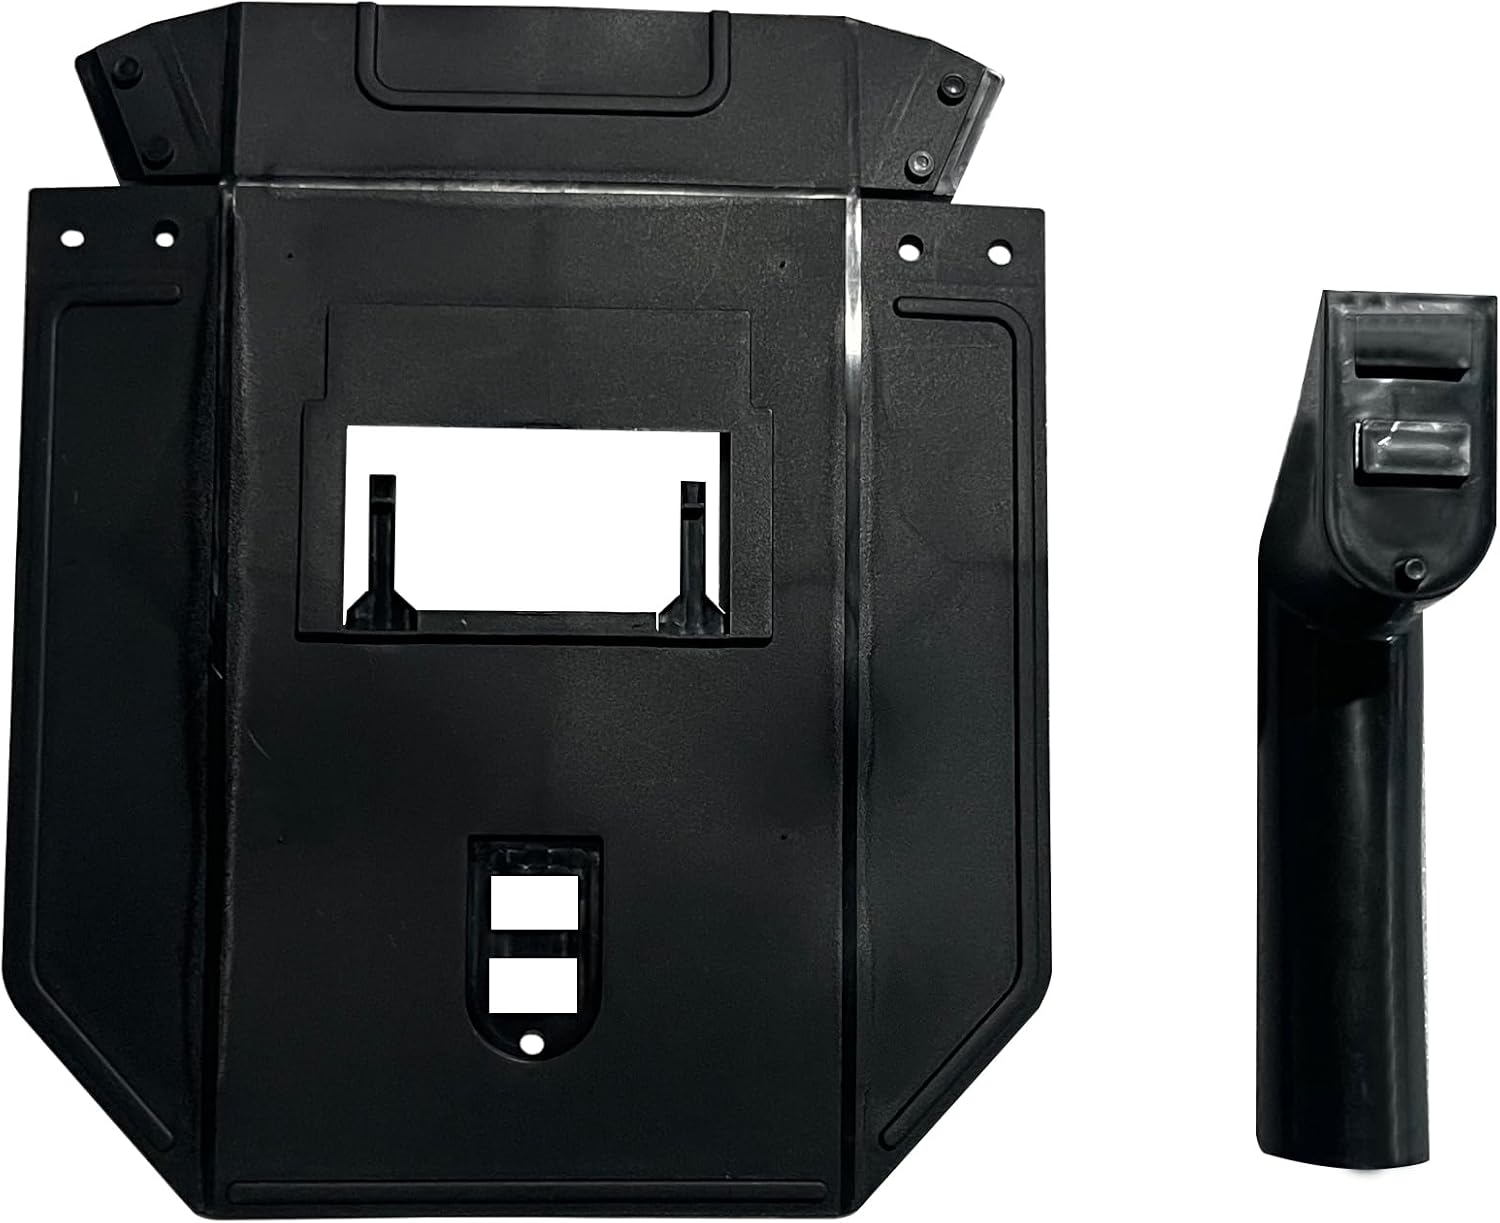
Figure 8: Digital control panel displaying welding parameters.
The digital display shows current welding mode, material type, wire diameter, current, voltage, and other relevant parameters. Rotary knobs allow for precise adjustments.
8.2. Synergistic Setting
For ease of use, the synergistic setting automatically adjusts welding parameters based on the selected material and wire diameter. This is ideal for beginners or for quick setup.
- Select the desired welding mode (e.g., MIG, Pulse MIG).
- Choose the material type (e.g., Aluminum, Carbon Steel).
- Select the wire diameter.
- The machine will automatically suggest optimal current and voltage settings. Fine-tune if necessary using the adjustment knobs.
8.3. Manual Setting
Experienced welders can use the manual setting to independently adjust current, voltage, and other parameters for specific applications or preferences.
- Select the desired welding mode.
- Switch to manual mode (refer to the control panel interface).
- Adjust current, voltage, wire feed speed, and other parameters individually using the control knobs.

Figure 9: Examples of high-quality weld beads.
9. Maintenance
Regular maintenance ensures the longevity and optimal performance of your welding machine.
- Cleaning: Regularly clean the machine's exterior with a dry cloth. Use compressed air to blow out dust and debris from inside the machine, especially around cooling vents.
- Torch and Cable Inspection: Inspect the welding torch, ground clamp, and power cables for any signs of wear, cuts, or damage. Replace damaged components immediately.
- Contact Tip and Nozzle: For MIG welding, regularly clean or replace the contact tip and nozzle to ensure proper wire feeding and gas flow.
- Wire Feeder: Keep the wire feeder mechanism clean and free of debris. Check drive roll tension and alignment.
- Gas Regulator: Periodically check the gas regulator and hoses for leaks.
- Storage: Store the welder in a dry, clean environment when not in use.
10. Troubleshooting
This section addresses common issues you might encounter during operation.
| Problem | Possible Cause | Solution |
|---|---|---|
| No power to machine | Power cord unplugged, circuit breaker tripped, faulty power switch. | Check power connections, reset circuit breaker, contact support if switch is faulty. |
| No arc/Poor arc starting | Poor ground connection, incorrect settings, dirty workpiece, worn contact tip (MIG). | Ensure solid ground, verify settings, clean workpiece, replace contact tip. |
| Wire feeding issues (MIG) | Incorrect drive roll tension, clogged liner, wrong drive roll size, tangled wire. | Adjust tension, clean/replace liner, use correct drive rolls, untangle wire. |
| Excessive spatter | Incorrect voltage/wire feed speed, insufficient shielding gas, dirty workpiece. | Adjust parameters, check gas flow, clean workpiece. |
| Overheating | Exceeding duty cycle, blocked cooling vents. | Allow machine to cool, clear vents, reduce welding time. |
11. Technical Specifications
| Specification | Detail |
|---|---|
| Model | MIG250 |
| Input Voltage | 110 Volts AC |
| Max Output Current | 250 Amp |
| Welding Processes | MMA, LIFT TIG, MIG/MAG, PULSE MIG, DOUBLE PULSE MIG |
| Item Weight | 55 pounds |
| Package Dimensions | 20.87 x 17.91 x 13.98 inches |
| Manufacturer | WANBANG |
| Included Components | Welder Machine and accessories (as listed in Package Contents) |
12. Warranty and Support
For warranty information and customer support, please refer to the documentation provided with your purchase or contact GRAUTOSPOT directly. Typically, products come with a manufacturer's warranty covering defects in materials and workmanship for a specified period from the date of purchase. Keep your proof of purchase for warranty claims.
For technical assistance or service inquiries, please visit the official GRAUTOSPOT store or contact their customer service department.
GRAUTOSPOT Store: Visit GRAUTOSPOT Store on Amazon