Introduction
This manual provides detailed instructions for the setup, operation, maintenance, and troubleshooting of your LINKMICRO LM210S Digital Microscope. The LM210S is a high-performance digital microscope designed for various applications, including soldering, electronics inspection, coin observation, and educational exploration. It features a 10.1-inch 4K 60FPS display, HDMI output, USB connectivity, and audio recording capabilities.
Package Contents
Please verify that all items listed below are included in your package:
- 1x LM210S 10 inch Microscope monitor
- 1x Large Metal Base
- 1x Column with Gears
- 1x Power Adapter
- 1x Power Cable
- 1x HDMI Cable
- 1x USB Data Cable
- 1x 64GB SD Card (pre-installed)
- 1x Lighted Slides Holder
- 5x Prepared Microscope Slides
- 1x Card Reader
- 1x Remote Control
- 1x Cleaning Cloth
- 1x Metal Clips
- 1x User Manual (this document)
Setup Guide
Follow these steps to assemble and prepare your LM210S Digital Microscope for use:
- Assemble the Stand: Attach the column with gears to the large metal base. Ensure it is securely fastened.
- Mount the Microscope Monitor: Carefully slide the microscope monitor onto the column. Use the thumbscrews to secure it at the desired height.
- Insert SD Card: The 64GB SD card is typically pre-installed. If not, gently insert it into the SD card slot on the side of the monitor until it clicks into place.
- Connect Power: Connect the power adapter to the microscope monitor and plug it into a power outlet.
- Position Gooseneck Lights: Adjust the flexible gooseneck lights to illuminate your working area effectively.
- Optional HDMI Connection: If you wish to display the image on an external monitor, connect the provided HDMI cable from the microscope's HDMI port to your monitor's HDMI input.

Image: The LINKMICRO LM210S Digital Microscope fully assembled, showing the monitor, adjustable stand, remote control, and dual gooseneck LED lights.
Operating Instructions
Powering On/Off
Press and hold the power button on the microscope monitor or the remote control to turn the device on or off. The screen will illuminate upon startup.
Focus and Magnification Adjustment
To adjust the focus, rotate the focus wheel located on the barrel of the microscope. For magnification, adjust the height of the microscope monitor on the column. The LM210S offers up to 1760X magnification (when connected to a 32-inch 4K monitor with 8x digital zoom).
Display and Recording Modes
The LM210S supports simultaneous 4K 60FPS display on its built-in 10.1-inch screen and an external HDMI monitor. It also records 4K 60FPS video and captures 64MP images.

Image: The microscope's capability for 4K 60FPS real-time display and simultaneous recording on both its integrated screen and an external HDMI monitor.

Image: Visual demonstration highlighting the superior smoothness and clarity of 4K 60FPS video compared to 4K 30FPS, reducing ghosting and motion blur.
Audio Recording
The LM210S features a built-in noise-cancelling microphone. To activate audio recording, refer to the on-screen menu or remote control options. This feature is particularly useful for live broadcasts or tutorial production.

Image: The microscope connected to a laptop, illustrating its USB output capability for live streaming and the integrated noise-cancelling microphone for audio recording.
Image and Video Capture
Use the dedicated buttons on the monitor or remote control to capture 64MP still images or record 4K 60FPS videos. All captured media is saved to the inserted 64GB SD card.
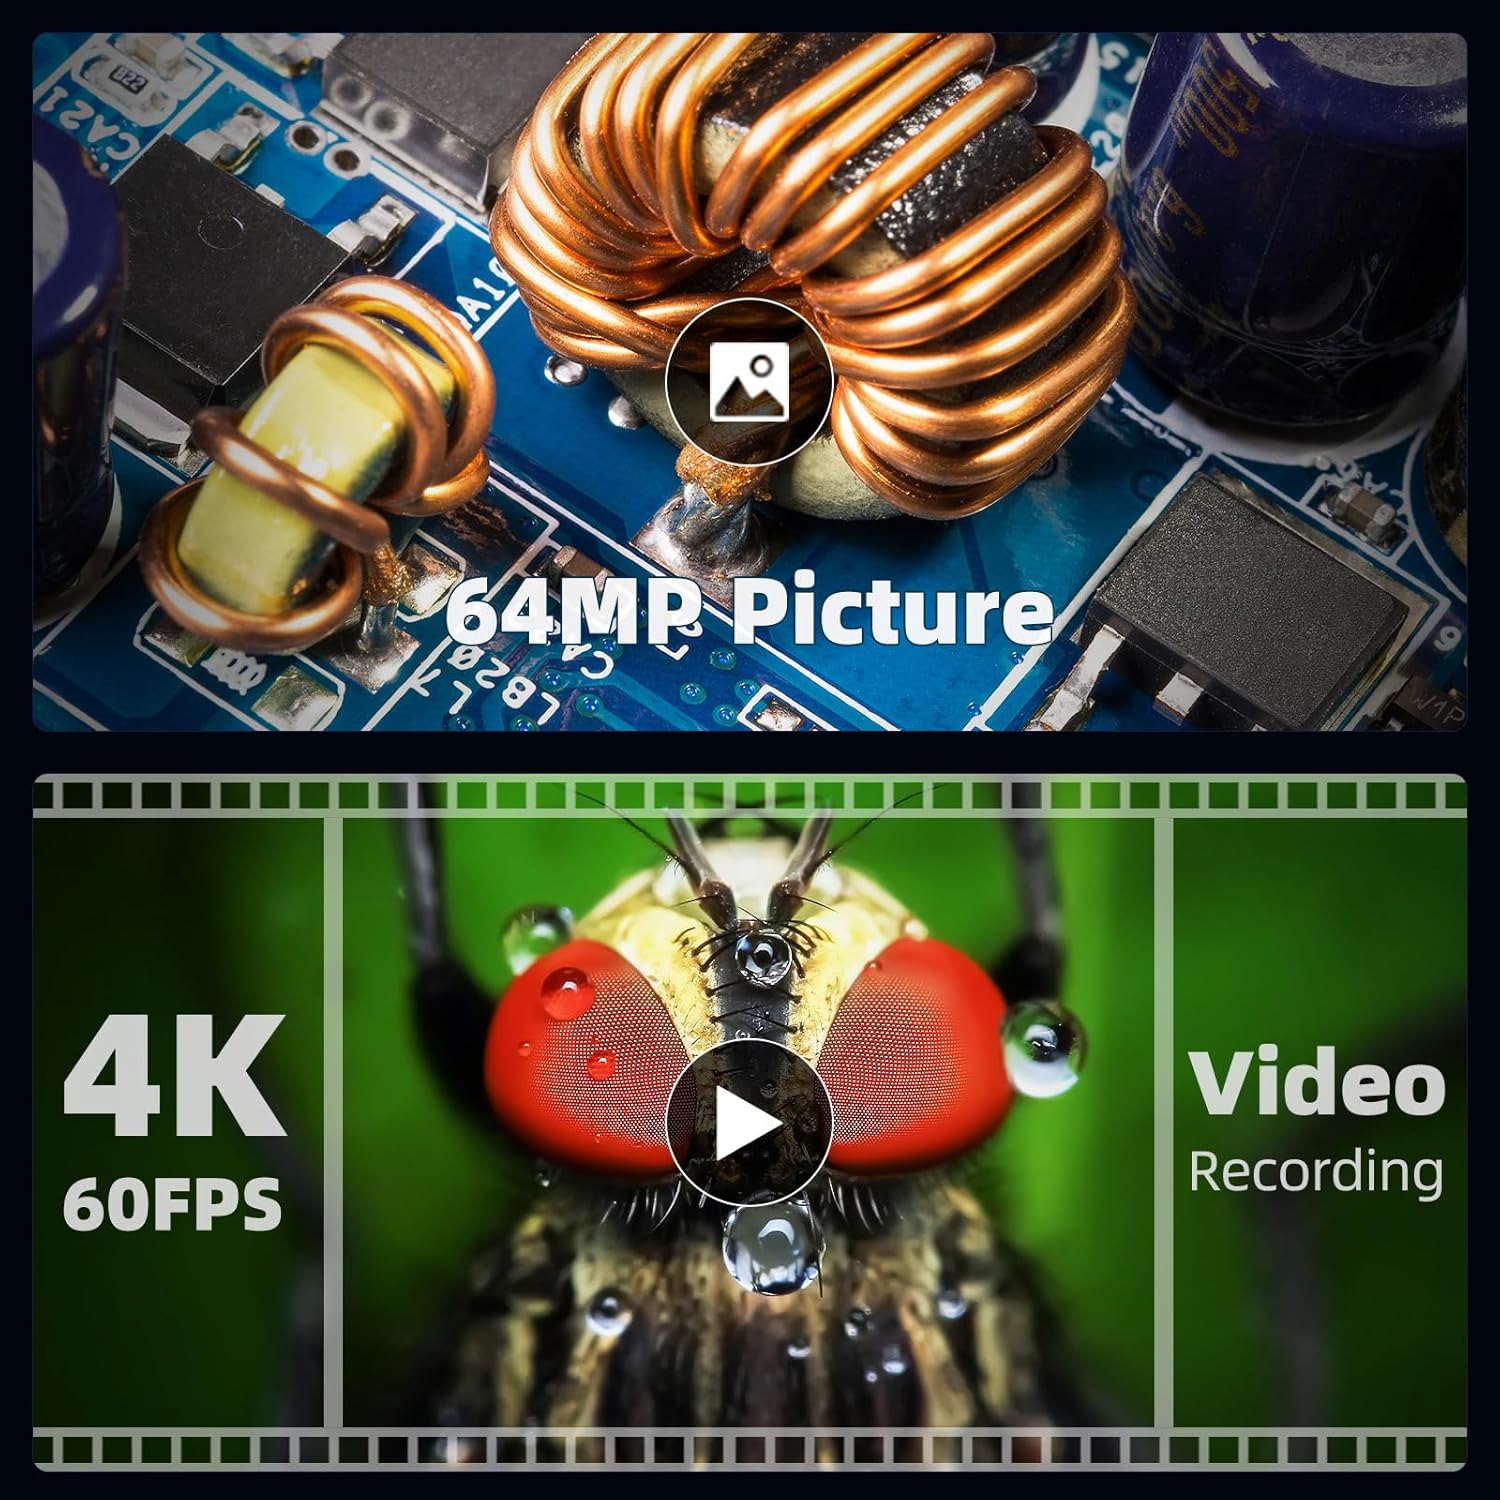
Image: The microscope's display showcasing its ability to capture high-resolution 64MP images and record smooth 4K 60FPS videos.
Lighting Control
The LM210S is equipped with a built-in 8-LED ring light at the top of the lens and two adjustable gooseneck LED lights. Use the controls on the monitor or remote to adjust brightness and direction for optimal illumination of your subject.
Coin Observation
The taller 12.6-inch stand provides ample working distance, allowing for a full view of larger objects like silver dollars (38.1mm) and half dollars (30.61mm). Adjust the height and lighting to achieve clear, detailed views of coins.

Image: The microscope set up to view a silver coin, demonstrating the extended working distance provided by the 12.6-inch stand for full coin views and enhanced 3D illumination.
Microscope Slides Exploration
Utilize the included lighted slides holder and five prepared microscope slides to explore microscopic details. The bottom light source in the holder ensures proper illumination for transparent specimens.
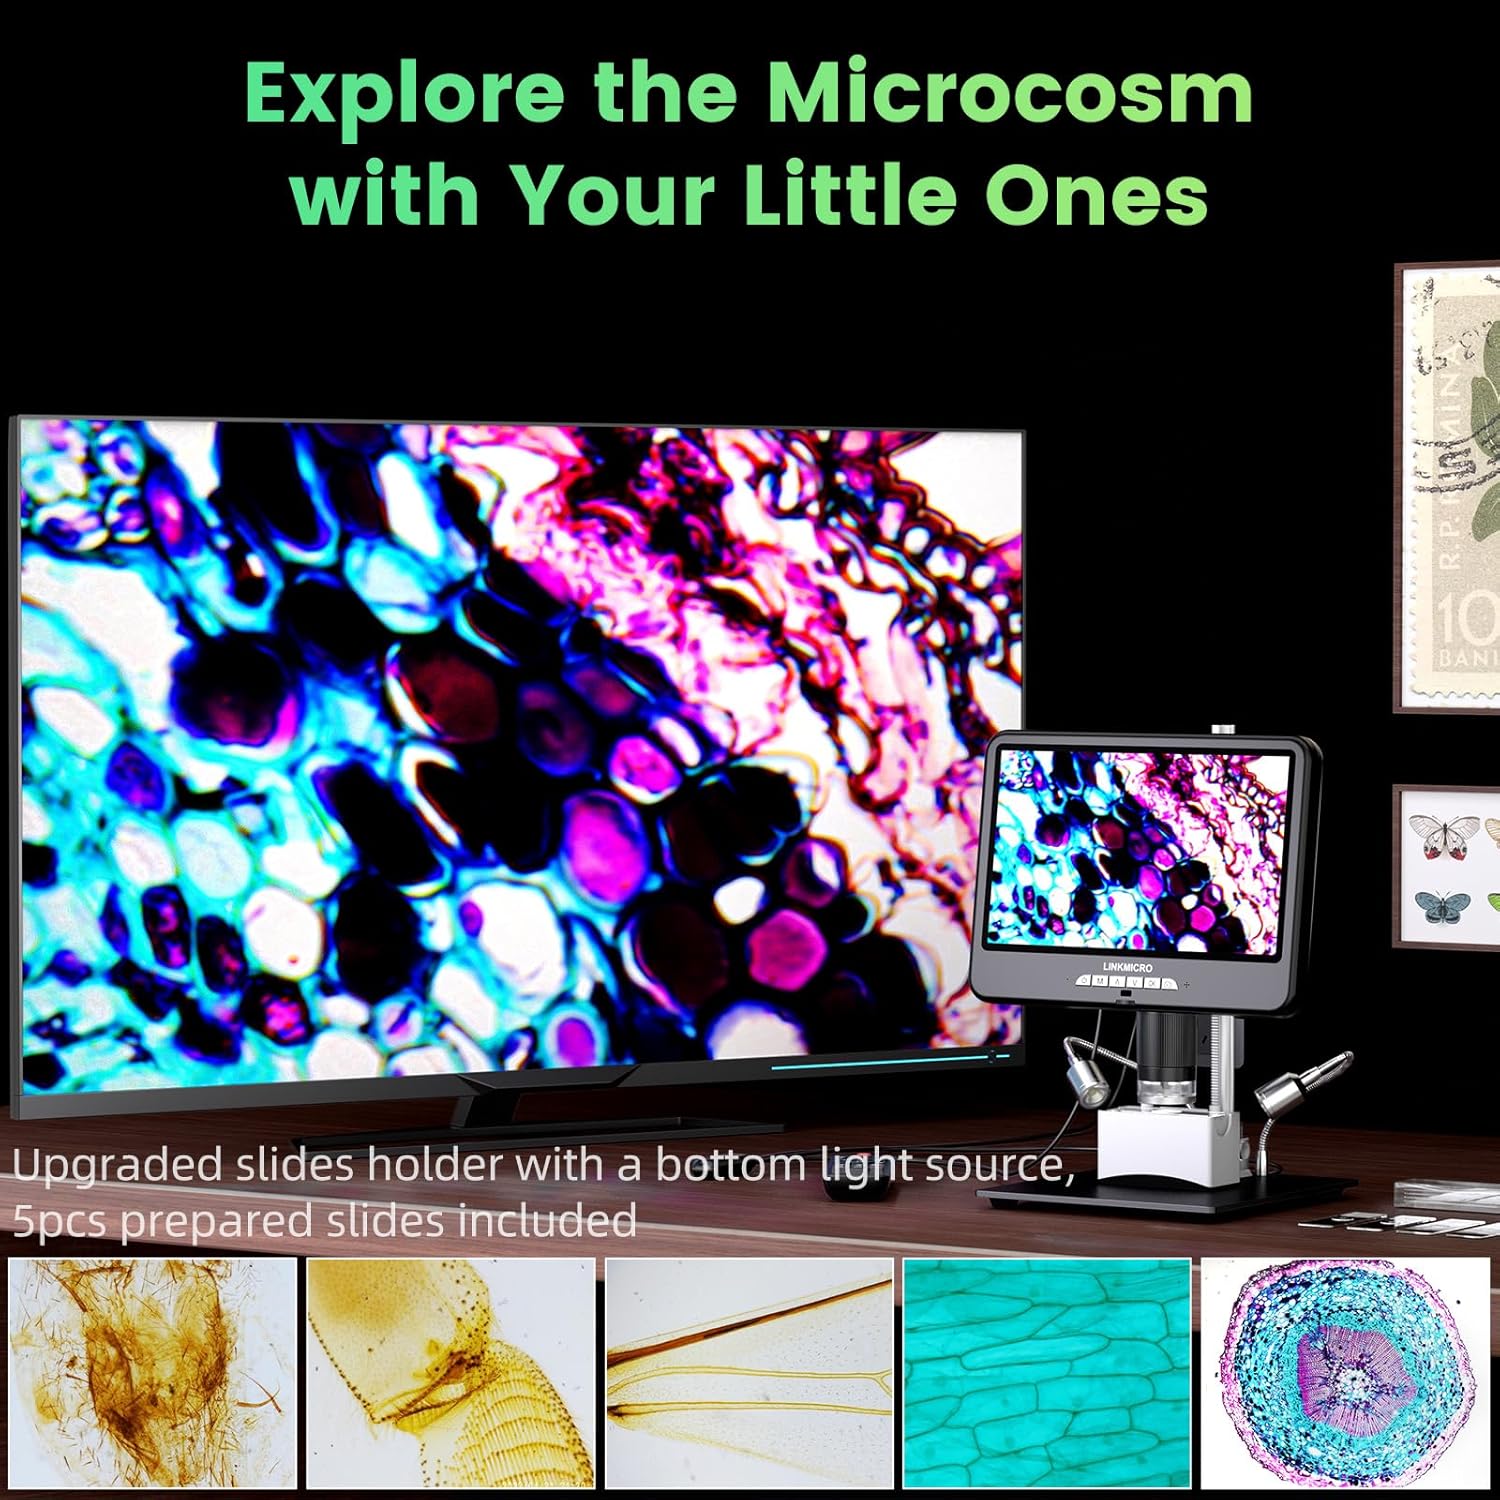
Image: The microscope displaying a magnified view of plant cells, illustrating its use for exploring the microcosm with prepared slides and the included slides holder.
Maintenance
- Cleaning the Lens and Screen: Use the provided cleaning cloth or a soft, lint-free cloth to gently wipe the lens and screen. For stubborn smudges, a small amount of lens cleaning solution can be applied to the cloth (not directly to the lens/screen).
- Cleaning the Body: Wipe the microscope body and stand with a dry or slightly damp cloth. Avoid using harsh chemicals or abrasive cleaners.
- Storage: When not in use, store the microscope in a clean, dry, and dust-free environment. Consider covering it to prevent dust accumulation.
- SD Card Management: Regularly back up important images and videos from the SD card to prevent data loss. Format the SD card periodically to maintain optimal performance.
Troubleshooting
| Problem | Possible Cause | Solution |
|---|---|---|
| No image on screen/HDMI output. | Power not connected, device not turned on, HDMI cable loose/faulty, incorrect input selected on external monitor. | Ensure power adapter is connected and device is on. Check HDMI cable connection. Select correct HDMI input on external monitor. |
| Image is blurry or out of focus. | Focus wheel not adjusted, incorrect working distance, dirty lens. | Rotate the focus wheel until the image is clear. Adjust the height of the microscope. Clean the lens with the provided cloth. |
| Cannot record video or capture images. | SD card full, SD card not inserted correctly, SD card faulty. | Check SD card capacity and delete unnecessary files. Reinsert SD card. Try a different SD card if available. |
| No audio in recorded videos. | Microphone disabled in settings, volume too low. | Check the microphone settings in the microscope's menu and ensure it is enabled. Adjust volume levels. |
| Gooseneck lights not working. | Lights not connected properly, power issue, light control setting. | Ensure the lights are securely plugged in. Check power connection. Adjust brightness settings via monitor or remote. |
Specifications
| Feature | Detail |
|---|---|
| Model Name | LM210S |
| Display Screen | 10.1-inch IPS |
| Video Output | HDMI 2.0 (3840x2160 @ 60FPS) |
| Video Recording Resolution | 4K (3840x2160) @ 60FPS |
| Image Resolution | 64MP (9280x6936) |
| Magnification Maximum | 1760x (with 32-inch 4K monitor, 8x digital zoom) |
| Stand Height | 12.6 inches (32 cm) |
| Light Source Type | LED (Built-in ring light + Gooseneck lights) |
| Storage | 64GB SD Card (included) |
| Audio Recording | Built-in Noise-cancelling Microphone |
| Color | Black |
| Item Weight | 3.96 pounds (1.8 kg) |
| Power Voltage | 5 Volts |
| Compatible Devices | Personal Computer (via USB) |
Warranty and Support
LINKMICRO products are manufactured to high quality standards. For warranty information, technical support, or service inquiries, please refer to the warranty card included in your package or visit the official LINKMICRO website. Please retain your proof of purchase for warranty claims.
For further assistance, you may contact LINKMICRO customer service directly through their official channels.