Introduction
This manual provides essential information for the safe and efficient operation of your PowMr 60A MPPT Solar Charge Controller. This controller features a 4-stage battery charging algorithm for rapid, efficient, and safe charging (Bulk Charge, Boost Charge, Float Charge, and Equalization), with a 60A rated charging current. It supports a wide range of solar input voltage/power, up to 190V, and is compatible with 12V, 24V, 36V, and 48V battery systems, including lead-acid (Sealed, Gel, Flooded, AGM) and lithium batteries with customizable parameters. The negative grounding design enhances safety, and the detailed LCD screen with 4 buttons simplifies operation. Comprehensive protections against short circuit, overcurrent, and reverse polarity are integrated.
1. Setup and Installation
Proper installation is crucial for the performance and longevity of your solar charge controller. Please follow these steps carefully.
1.1 Mounting the Controller
Secure the controller to a stable, vertical surface in a well-ventilated area, away from direct sunlight, high temperatures, and moisture. Ensure there is sufficient space around the unit for heat dissipation.

Figure 1: PowMr 60A MPPT Solar Charge Controller mounted on a wall.

Figure 2: Dimensions of the controller (165mm / 6.5in width, 230mm / 9.1in height, 72mm / 2.81in depth). Weight: 2.9 lbs / 1.33 kg. Mounting holes: 4 x Ø10mm.
For a visual guide on mounting and initial wiring, please refer to the official installation video:
Video 1: PowMr 60A MPPT Controller Quick Installation Wiring Guide. This video demonstrates the physical mounting of the controller and the sequence for connecting the battery, solar panels, and DC load.
1.2 Wiring Connections
Follow the wiring sequence below to prevent damage to the controller or battery. Always ensure all circuit breakers are open before making connections.
- Connect the Battery: Connect the battery to the controller's battery terminals. Ensure correct polarity (positive to positive, negative to negative). It is recommended to install a battery circuit breaker between the battery and the controller.
- Connect Solar Panels: Connect the solar panels to the controller's PV input terminals. Ensure correct polarity. Install a PV circuit breaker between the solar panels and the controller.
- Connect DC Load (Optional): If using a DC load directly from the controller, connect it to the load terminals.
- Close Circuit Breakers: Once all connections are secure, close the battery circuit breaker first, then the PV circuit breaker. The controller display should power on.

Figure 3: Recommended wiring diagram showing connections for solar panels, battery, and DC load. PV input range: 200W-2800W power, 20V-160V VOC.
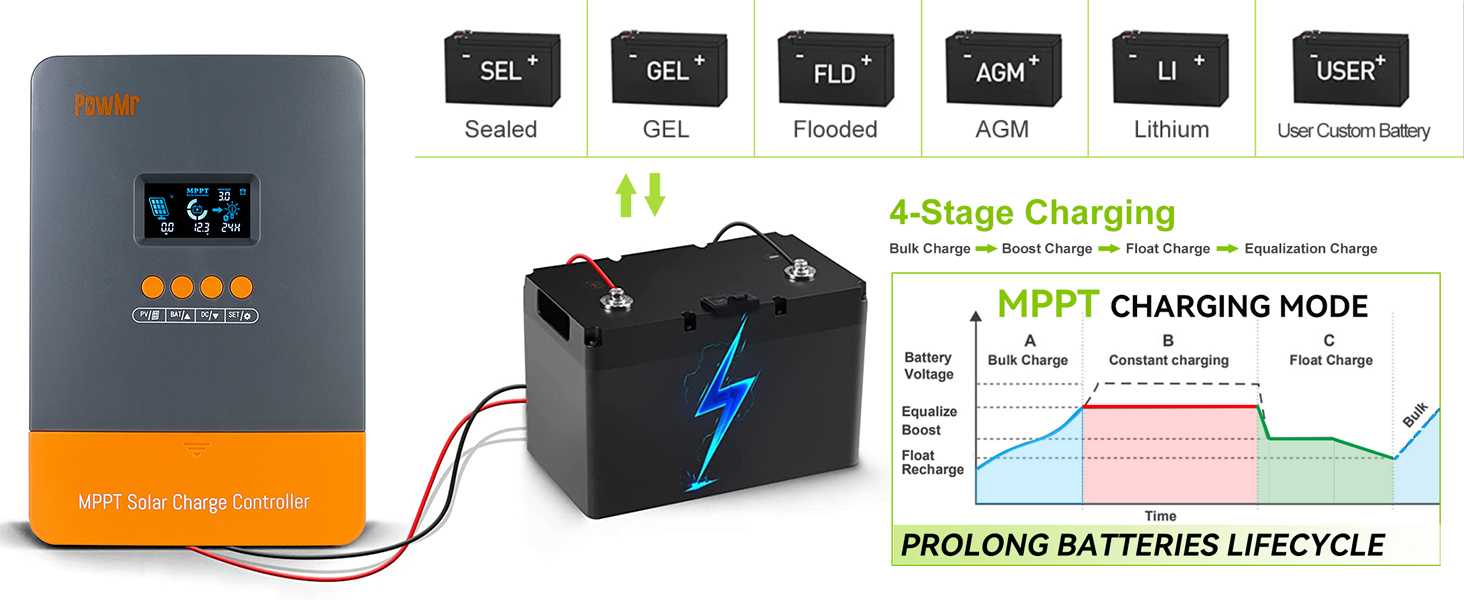
Figure 4: Step-by-step visual guide for wiring: 1) Wire the battery (breaker open), 2) Wire solar panels (breaker open), 3) Connect battery (controller powers on, battery breaker close), 4) Connect solar panels (both PV and battery breakers close, charging begins).
2. Operating Instructions
The controller features an intuitive LCD display and four buttons for easy operation and monitoring.
2.1 LCD Display Overview
The "0 layer display" provides comprehensive information on a single screen, including PV voltage/power/current, battery charging power/current/voltage, and load working mode/power/current/voltage.

Figure 5: Detailed LCD display showing solar panel status, battery status, and load status. It includes icons for day/night, battery SOC, work mode, and state/warning indications, along with numerical values for voltage, current, and power.

Figure 6: Overview of button functions and display modes. The PV button views PV parameters, BAT/up button views battery info and adjusts values, DC/down button sets load mode, and SET button saves/resets parameters.
For a detailed explanation of the display and settings, watch the instruction video:
Video 2: Instruction of PowMr M60's setting and work mode. This video guides you through navigating the display, understanding the different working modes, and adjusting settings.
2.2 Button Functions
- PV Button: Press to browse PV voltage, current, and power. This button is for viewing only and has no setting function.
- BAT/up Button:
- Press to view battery's value.
- When the display shows battery type or C-voltage, press and hold the BAT/up Button until the value flashes. Then press "up" or "down" button to adjust the value. Press "SET" to confirm and save.
- DC/down Button:
- Press to set the load mode.
- Press and hold the DC button until the "load value" flashes. Press UP/DOWN to modify, then press "SET" to save.
- SET Button: Used to save or reset parameters after adjustment.
2.3 Working Modes
The controller supports various working modes for optimal performance:
- 3.0: Night mode, no charging.
- 4.0: MPPT Charge mode.
- 7.0: Absorption Charge mode.
- 8.0: Floating Charge mode.
The load working mode can be selected according to the actual situation:
- 00H: Load OFF.
- 24H: Load always ON.
- 01H-23H: Time control (Set load ON's duration).

Figure 7: Illustration of the three load working modes: Load OFF (00H), Load always ON (24H), and Time control (01H-23H).
The controller also supports various battery types and a 4-stage charging process to prolong battery lifecycle:
- Battery Types: Sealed, GEL, Flooded, AGM, Lithium, and User Custom Battery.
- 4-Stage Charging: Bulk Charge, Boost Charge, Float Charge, Equalization Charge.

Figure 8: Visual representation of supported battery types and the 4-stage charging algorithm (Bulk Charge, Constant Charging/Boost, Float Charge, Equalization Charge) designed to prolong battery lifespan.
3. Maintenance
Regular maintenance ensures optimal performance and extends the lifespan of your solar charge controller.
- Check Connections: Periodically inspect all wiring connections for tightness and corrosion. Loose connections can cause overheating and damage.
- Clean the Controller: Keep the controller clean and free from dust and debris. Use a dry cloth to wipe the exterior. Ensure ventilation openings are not blocked.
- Inspect for Damage: Visually inspect the controller for any signs of physical damage, such as cracks, frayed wires, or discolored components.
- Monitor Performance: Regularly check the LCD display for normal operation and expected charging/discharging values. Note any unusual readings.
4. Troubleshooting
The controller's display may show error codes to indicate specific issues. Refer to the table below for common error codes and their meanings:
| Error Code | Description |
|---|---|
| 18 (ERROR) | Input PV voltage is low, please increase the PV voltage. |
| 60 (ERROR) | Over temperature protection. |
| 63 (ERROR) | Protection-Battery voltage is high, Battery high voltage protection and wait for recovery. |
| 65 (ERROR) | Battery voltage is low, Battery over discharge and wait for recovery. |
| 71 (ERROR) | Input PV voltage is high, please Decrease the PV voltage. |
| 73 (ERROR) | Over charging current, please Decrease the PV power. |
For more detailed troubleshooting, please refer to the official "Troubleshooting Guide (PDF)" available on the product's Amazon page or the PowMr website.

Figure 9: The controller includes multiple protection features: Low Voltage Protection, Over Heat Protection, Short Circuit Protection, Reverse Protection, Overload Protection, and Overcurrent Protection.
5. Specifications
| Feature | Detail |
|---|---|
| Model Number | NEW MPPT 60A Controller |
| Brand | PowMr |
| Display Type | LCD |
| Voltage Compatibility | 12V/24V/36V/48V (Auto-sensing) |
| Rated Charging Current | 60A |
| Max PV Input Voltage | 190V |
| Max PV Input Power | 720W (12V), 1440W (24V), 2100W (36V), 2800W (48V) |
| Battery Types Supported | Sealed, Gel, Flooded, AGM, Lithium, User Customize |
| Charging Port Type | MC4 connectors and battery cables |
| Product Dimensions | 6.5 x 2.8 x 9.1 inches (165 x 72 x 230 mm) |
| Item Weight | 2.93 pounds (1.33 kg) |
| Country of Origin | China |
6. Warranty and Support
For warranty information, please refer to the documentation included with your product at the time of purchase or contact PowMr directly. Warranty terms and conditions may vary.
For technical support, troubleshooting assistance, or any inquiries regarding your PowMr Solar Charge Controller, please contact PowMr customer service. You can typically find contact information on the official PowMr website or through the seller "Spring Mirror" on Amazon.