1. Introduction
Thank you for choosing the Dekaim FLSM-520 Electric Sewing Machine. This compact and versatile sewing machine is designed for household use, making it ideal for beginners and experienced sewers alike. It features 12 built-in stitches, adjustable speed, and a range of accessories to support various sewing projects. Please read this manual thoroughly before operating the machine to ensure safe and efficient use.
2. Safety Instructions
- Always unplug the sewing machine from the power outlet when not in use, before cleaning, or when changing parts.
- Keep fingers away from the needle, handwheel, and other moving parts during operation.
- Do not operate the machine if the power cord is damaged or if the machine is not functioning correctly.
- Use only the power adapter supplied with the machine.
- This appliance is not intended for use by persons (including children) with reduced physical, sensory or mental capabilities, or lack of experience and knowledge, unless they have been given supervision or instruction concerning use of the appliance by a person responsible for their safety.
- Ensure the machine is placed on a stable, flat surface during use.
3. Product Overview
Familiarize yourself with the components of your Dekaim FLSM-520 sewing machine.

Figure 3.1: Main components of the Dekaim FLSM-520 Electric Sewing Machine, including the extension table and various accessories.

Figure 3.2: Close-up details of the sewing machine, highlighting the speed switch, built-in storage, stitch display, suction cup feet, power input, and dual control options.
Key Components:
- Handwheel: Manually raises and lowers the needle.
- Stitch Selector Dial: Used to choose one of the 12 available stitch patterns.
- Speed Switch (OFF/L/H): Controls the machine's operating speed (Off, Low, High).
- Reverse Stitch Button: For reinforcing seams.
- Thread Tension Dial: Adjusts the tension of the upper thread.
- Presser Foot Lifter: Raises and lowers the presser foot.
- LED Sewing Light: Illuminates the sewing area.
- Bobbin Winder Spindle: For winding thread onto bobbins.
- Foot Pedal Jack: Connects the foot pedal for hands-free speed control.
- Power Input Jack: Connects the power adapter.
- Extension Table: Provides a larger working area and includes a built-in accessory drawer.
4. Setup
4.1 Unpacking and Placement
Carefully remove the sewing machine and all accessories from the packaging. Place the machine on a stable, flat surface. Attach the extension table by sliding it into place if a larger work area is desired.
4.2 Power Connection
- Ensure the speed switch is in the 'OFF' position.
- Insert the small end of the power adapter into the power input jack on the back of the machine.
- Plug the other end of the power adapter into a standard electrical outlet.
- If using the foot pedal, plug its connector into the foot pedal jack.
4.3 Winding the Bobbin
- Place an empty bobbin onto the bobbin winder spindle.
- Guide the thread from the spool pin through the bobbin winding tension disc.
- Wrap the thread around the bobbin a few times clockwise.
- Push the bobbin winder spindle to the right.
- Turn on the machine (set speed switch to 'L' or 'H') or press the foot pedal to start winding. Stop when the bobbin is full.
- Cut the thread and push the bobbin winder spindle back to the left. Remove the wound bobbin.
4.4 Inserting the Lower Thread (Bobbin)
- Open the bobbin cover plate located on the needle plate.
- Insert the wound bobbin into the bobbin case, ensuring the thread unwinds in the correct direction (usually counter-clockwise).
- Guide the bobbin thread through the tension spring slot.
- Close the bobbin cover plate.
4.5 Threading the Upper Thread
- Raise the presser foot lifter.
- Place a spool of thread onto the spool pin.
- Guide the thread through the upper thread guide.
- Pass the thread down through the tension discs.
- Bring the thread up and through the take-up lever (from right to left).
- Guide the thread down through the remaining thread guides.
- Thread the needle from front to back. A needle threader (included) can assist with this step.
- Pull about 15 cm (6 inches) of thread through the needle eye.
4.6 Bringing Up the Bobbin Thread
- Hold the upper thread lightly with your left hand.
- Turn the handwheel towards you (counter-clockwise) to lower the needle into the needle plate and then raise it back up.
- The needle will catch the bobbin thread, forming a loop. Pull this loop up through the needle plate with the upper thread.
- Pull both the upper and bobbin threads under the presser foot and towards the back of the machine.
5. Operating Instructions
This section details how to use the various functions of your sewing machine.
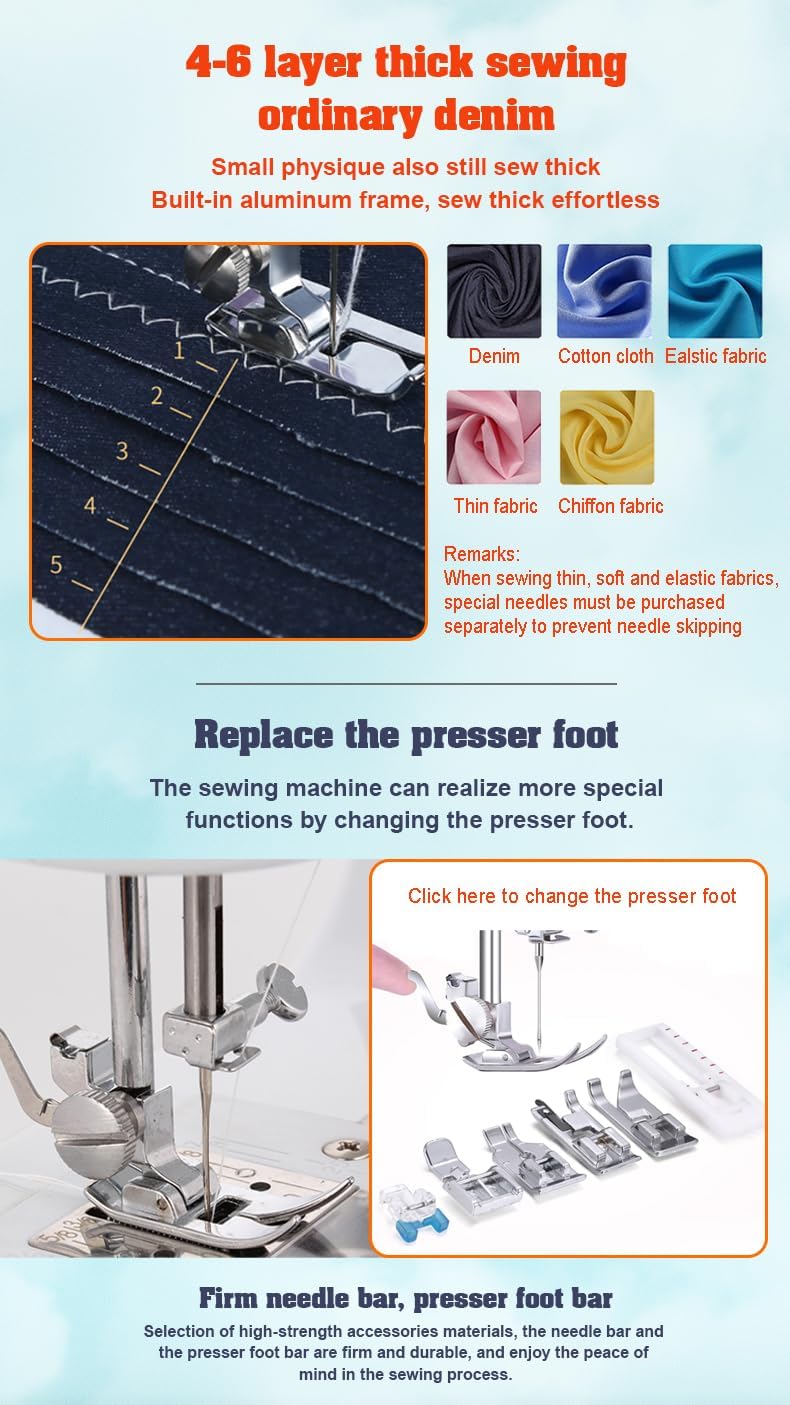
Figure 5.1: Overview of additional features including stitch types, fabric capabilities, and convenience functions.
5.1 Stitch Selection
The FLSM-520 offers 12 different stitch patterns. To select a stitch, turn the stitch selector dial to the desired number. The selected stitch will be displayed on the machine body.

Figure 5.2: The stitch selector dial and the 12 available stitch patterns, along with the reverse feed function button.
5.2 Speed Adjustment
Use the speed switch (OFF/L/H) to control the sewing speed. 'L' is for low speed, suitable for beginners or intricate work. 'H' is for high speed. Alternatively, the foot pedal provides variable speed control; the harder you press, the faster the machine sews.
5.3 Reverse Sewing
To reinforce the beginning or end of a seam, press and hold the reverse stitch button while sewing. The machine will sew backward. Release the button to resume forward sewing.
5.4 Changing Presser Feet
The machine comes with 11 different presser feet for various sewing tasks. To change a presser foot:
- Ensure the machine is off and the needle is in its highest position.
- Raise the presser foot lifter.
- Press the release lever at the back of the presser foot holder to detach the current foot.
- Align the new presser foot with the holder and lower the presser foot lifter until it snaps into place.

Figure 5.3: Illustration of presser foot replacement and the machine's ability to handle multiple layers of fabric.
5.5 Buttonhole Function
The machine supports a 4-step buttonhole function. Refer to the specific buttonhole presser foot instructions for detailed steps on creating buttonholes.
5.6 Hemming Function
Utilize the appropriate presser foot for creating neat hems, preventing fabric edges from fraying.
5.7 LED Sewing Light
The integrated LED light illuminates your sewing area, providing better visibility for detailed work. It turns on automatically when the machine is powered on.

Figure 5.4: The LED light provides clear illumination of the sewing area.
5.8 Sewing Cuffs and Small Items
Remove the extension table to reveal the free arm, which is ideal for sewing cylindrical items like cuffs, sleeves, and pant legs.
6. Maintenance
Regular maintenance ensures the longevity and optimal performance of your sewing machine.
6.1 Cleaning
- Always unplug the machine before cleaning.
- Use a soft brush to remove lint and dust from the bobbin area, feed dogs, and around the needle plate.
- Wipe the exterior of the machine with a soft, damp cloth. Do not use harsh chemicals or abrasive cleaners.
7. Troubleshooting
This section addresses common issues you might encounter.
| Problem | Possible Cause | Solution |
|---|---|---|
| Machine does not start | Not plugged in; Speed switch OFF; Foot pedal not connected/faulty. | Check power connection; Set speed switch to 'L' or 'H'; Ensure foot pedal is connected or try manual switch. |
| Thread breaks frequently | Incorrect threading; Thread tension too high; Needle bent/dull; Poor quality thread. | Re-thread the machine correctly; Adjust tension dial; Replace needle; Use good quality thread. |
| Skipped stitches | Incorrect needle for fabric; Needle bent/dull; Incorrect threading. | Use appropriate needle type/size; Replace needle; Re-thread machine. |
| Fabric not feeding | Presser foot not lowered; Lint in feed dogs. | Lower the presser foot; Clean feed dogs. |
| Uneven stitches | Incorrect thread tension; Inconsistent sewing speed. | Adjust thread tension; Maintain a steady sewing speed. |
8. Specifications
Technical details of the Dekaim FLSM-520 Electric Sewing Machine.
| Feature | Detail |
|---|---|
| Brand | Dekaim |
| Model Number | FLSM-520 |
| Power | 7.2 W |
| Color | White |
| Material | ABS & Metal |
| Dimensions (L x W x H) | 29.5 x 12.5 x 27 cm |
| Weight | 1.98 Kilograms |
| Stitch Patterns | 12 Built-in Stitches |
| Power Source | Electric Cord |
| Special Features | LED Light, Reverse Sewing, Free Arm, Built-in Storage, Extension Table |
9. Included Accessories
Your Dekaim FLSM-520 sewing machine comes with a comprehensive set of accessories to get you started:
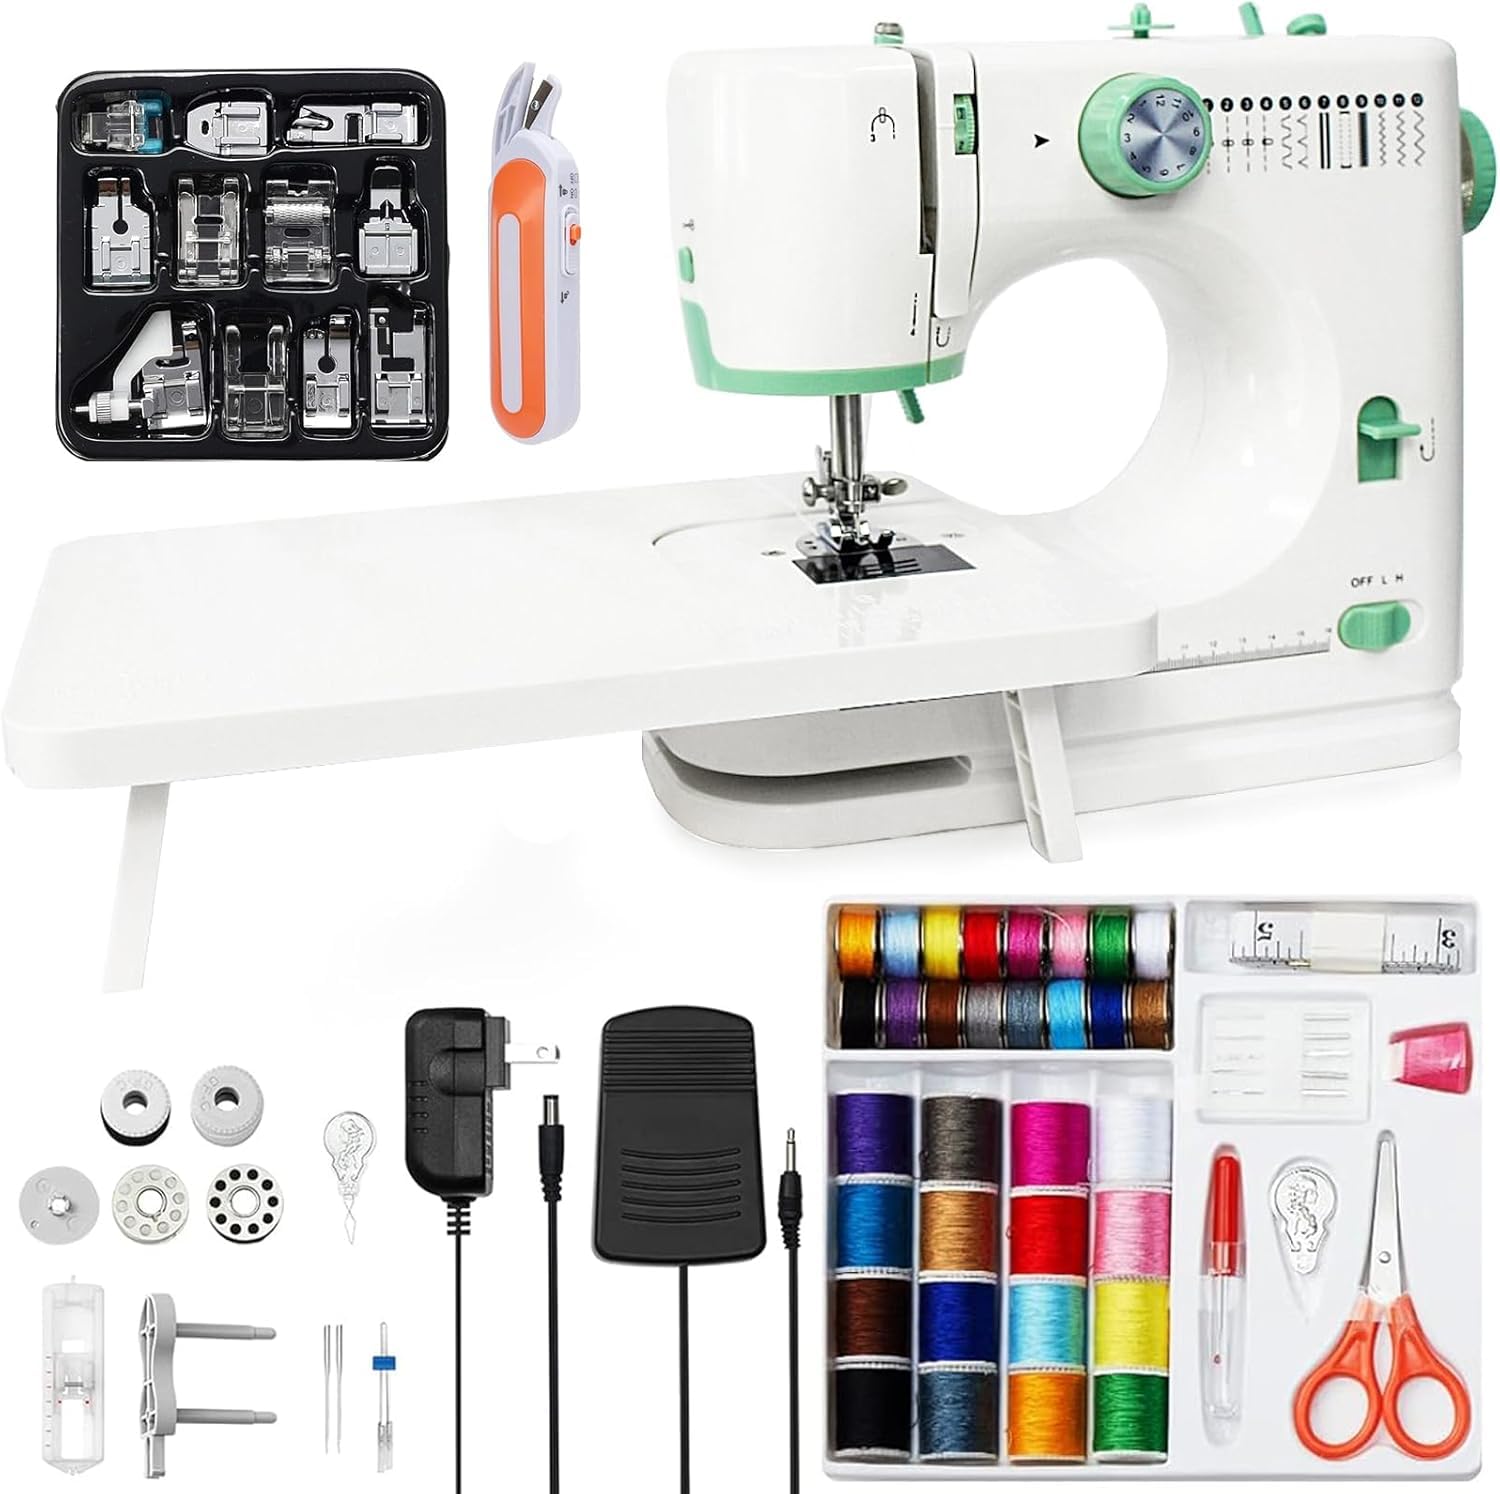
Figure 9.1: A visual representation of the included accessories, such as different presser feet, a starter kit, and electric scissors.
- 11 Different Presser Feet: Including Blind Stitch Foot, Sewing Presser Foot, 3mm Narrow Edge Presser Foot, Straight Stitch Foot, 1/4" Quilting Foot, Zipper Foot, Invisible Zipper Foot, Open Toe Embroidery Foot, Roller Foot, Satin Stitch Foot, Nail Button Pressing Foot, Button Fitting Foot.
- 42-piece Starter Kit: Includes various colored threads, bobbins, and other small sewing essentials.
- Needle Threader: For easy needle threading.
- Bobbins with Spools: Additional bobbins pre-wound with thread.
- Electric Scissors: For convenient fabric cutting.
- Sewing Needles: Assorted needles for different fabrics.
- Power Cord: For connecting the machine to power.
- Foot Pedal: For hands-free speed control.
- Extension Table: Provides a larger work surface.
10. Warranty and Support
For any questions, concerns, or issues regarding your Dekaim FLSM-520 Electric Sewing Machine, please contact the seller or manufacturer directly. Please refer to your purchase documentation for specific warranty information and contact details. Keep your proof of purchase for warranty claims.