1. Overview
The RALAN Wireless Controller is designed for an enhanced gaming experience across multiple platforms. It features a 2.4G wireless adapter for stable connectivity, Hall Effect sensing triggers for precision, ALPS joysticks for durability, and customizable paddles for personalized control. This controller is compatible with Xbox One S/X, Xbox Series S/X, and Windows PC.

2. Setup
2.1 Connecting to Xbox/PC
- Insert the 2.4G Wireless Adapter: Plug the included 2.4G wireless adapter into an available USB port on your Xbox console (Xbox One S/X, Xbox Series S/X) or Windows PC.
- Power On the Controller: Press and hold the HOME button on the controller until the indicator light begins to flash.
- Pairing: The controller will automatically attempt to pair with the wireless adapter. Once successfully connected, the indicator light on the controller will become solid.
2.2 Charging the Controller
The controller features a rechargeable battery. To charge:
- Connect the provided USB charging cable to the USB charging port on the controller.
- Plug the other end of the USB cable into a power source (e.g., console USB port, PC USB port, or a USB wall adapter).
- The indicator light will show charging status and turn off or change color when fully charged.
3. Operation
3.1 Button Layout
Familiarize yourself with the controller's button layout:

- HOME Button: Powers on/off the controller, accesses system menus.
- BACK/START Buttons: Standard navigation buttons for in-game menus and system functions.
- ABXY Buttons: Standard action buttons.
- D-Pad: Directional input.
- L3/R3 (Left/Right Joysticks): Analog input for movement and camera control. Pressing them down activates L3/R3 buttons.
- LB/RB (Left/Right Bumpers): Shoulder buttons.
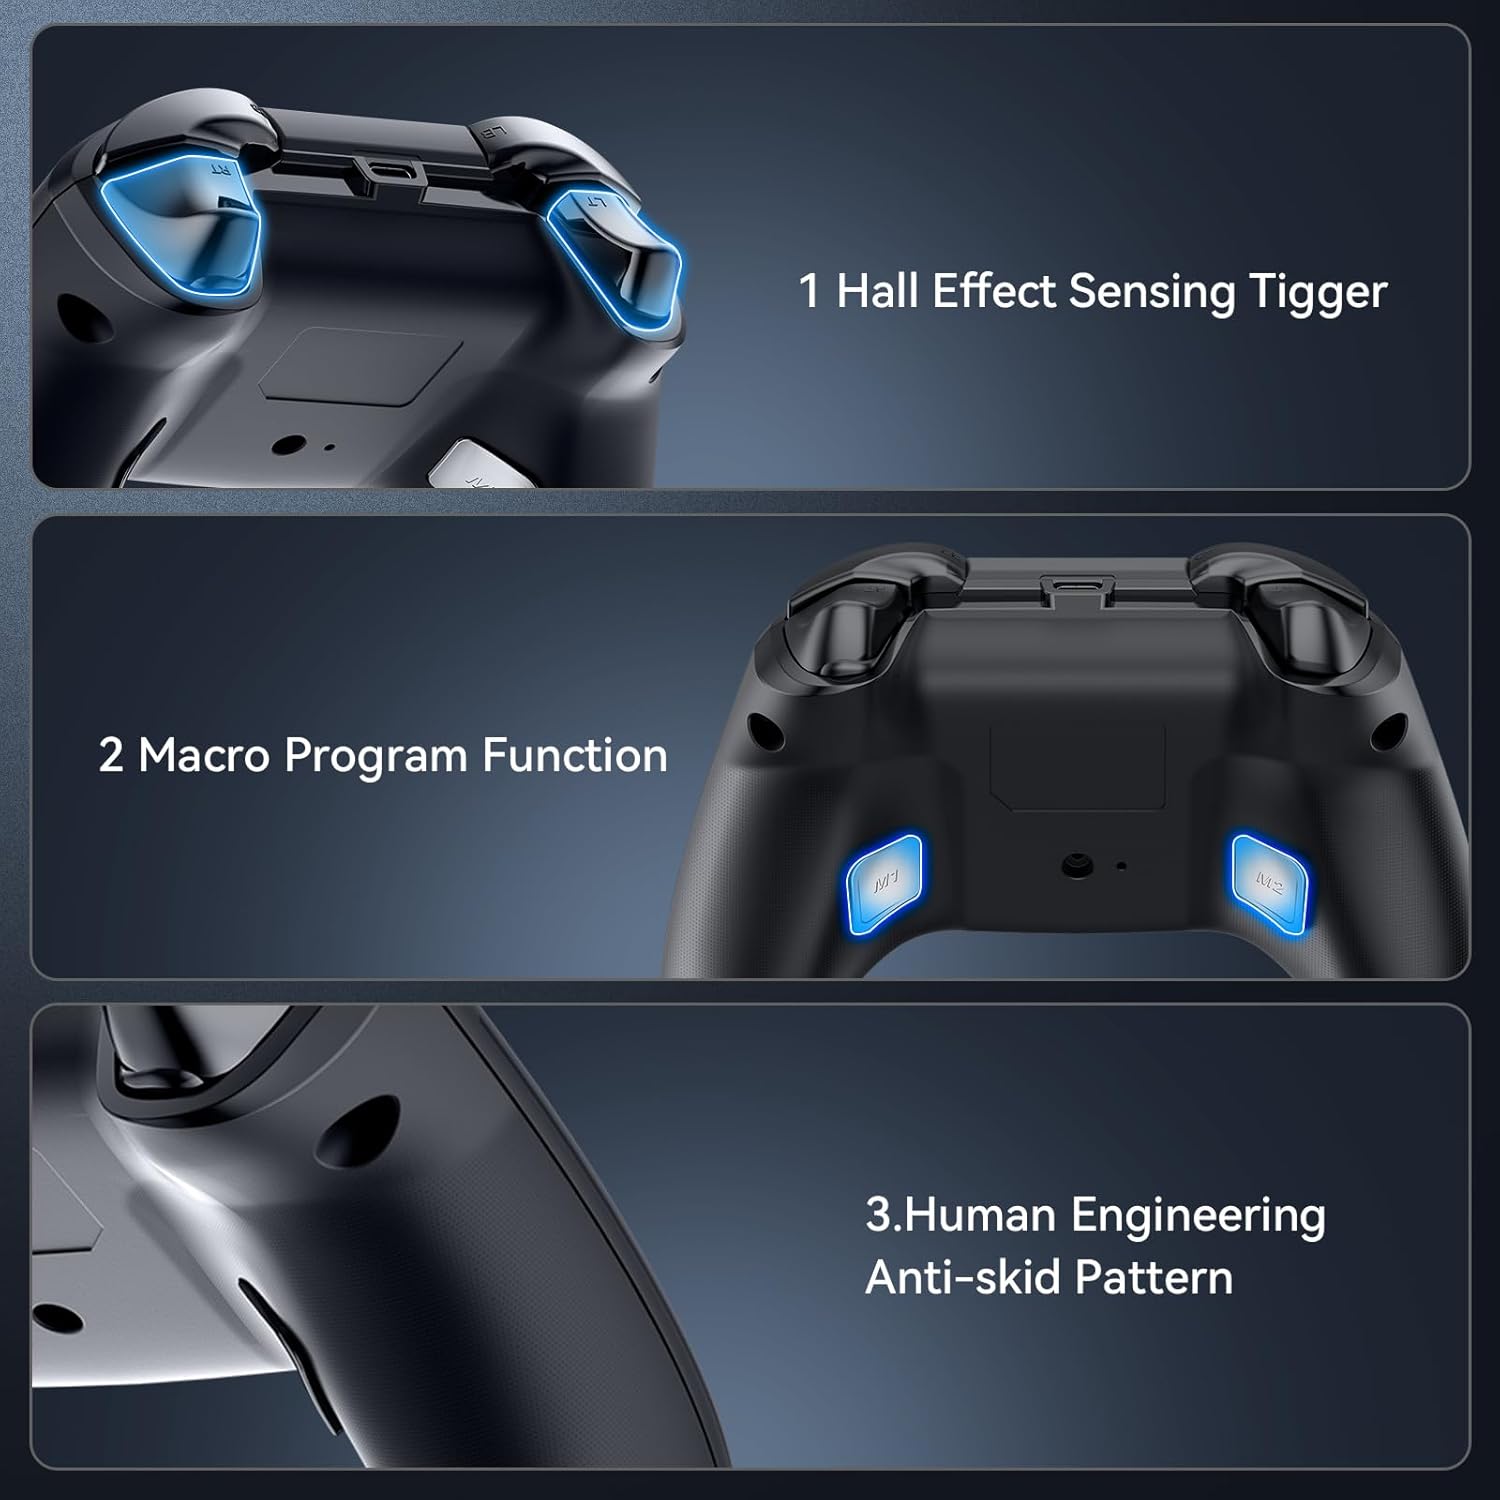
- LT/RT (Left/Right Triggers): Analog triggers with Hall Effect sensing.
- M1/M2 Paddles: Customizable rear paddles.
- TURBO Button: Activates/deactivates turbo function for other buttons.
3.2 Customizing Paddles (M1/M2)
The M1 and M2 paddles on the back of the controller can be programmed to replicate any other button on the controller, allowing for quick access to frequently used actions without repositioning your fingers.
- Enter Programming Mode: Press and hold the TURBO button for approximately 5 seconds. The indicator light (RALAN logo) on the controller will start blinking, indicating it is in programming mode.
- Select Button to Map: While the indicator light is blinking, press the button on the front of the controller that you wish to assign to a paddle (e.g., A, B, X, Y, LB, RB, LT, RT, L3, R3, D-Pad directions).
- Assign to Paddle: Immediately after selecting the button, press either the M1 or M2 paddle on the back of the controller to assign the selected button's function to that paddle.
- Exit Programming Mode: The indicator light will stop blinking and become solid, confirming the successful assignment and exit from programming mode.
3.3 Turbo Function
The Turbo function allows a button to be repeatedly pressed rapidly by holding it down, which can be useful in certain games.
- Activate Turbo: Press and hold the TURBO button, then press the desired action button (e.g., A, B, X, Y, LB, RB, LT, RT). The button will now have turbo functionality.
- Deactivate Turbo: To remove turbo from a button, repeat the activation steps: press and hold the TURBO button, then press the button with active turbo.
3.4 3.5mm Headphone Jack
The controller includes a 3.5mm audio jack for connecting your gaming headset, enabling in-game audio and voice chat.

Simply plug your headset into the port located at the bottom of the controller.
4. Key Features
4.1 Hall Effect Sensing Triggers and ALPS Joysticks
The controller is equipped with Hall Effect sensing triggers and ALPS joysticks. Hall Effect technology uses magnetic fields instead of physical contacts, reducing wear and tear, which contributes to a longer lifespan and prevents stick drift. ALPS joysticks are known for their precision and durability, offering a responsive and accurate gaming experience with a 100% no dead zone and up to 50 million clicks of service life.

4.2 Interchangeable Thumbsticks
Customize your control with a variety of interchangeable thumbsticks. The controller comes with different sizes and grip textures, allowing you to select the best fit for your playstyle and comfort.

To change a thumbstick, gently pull the existing cap off the joystick and firmly press the desired new cap onto the joystick until it is securely in place.
4.3 Dual-Motor Vibration
Experience immersive feedback with dual-motor vibration. The intensity of the vibration can be adjusted to suit your preference, providing a realistic gaming experience.
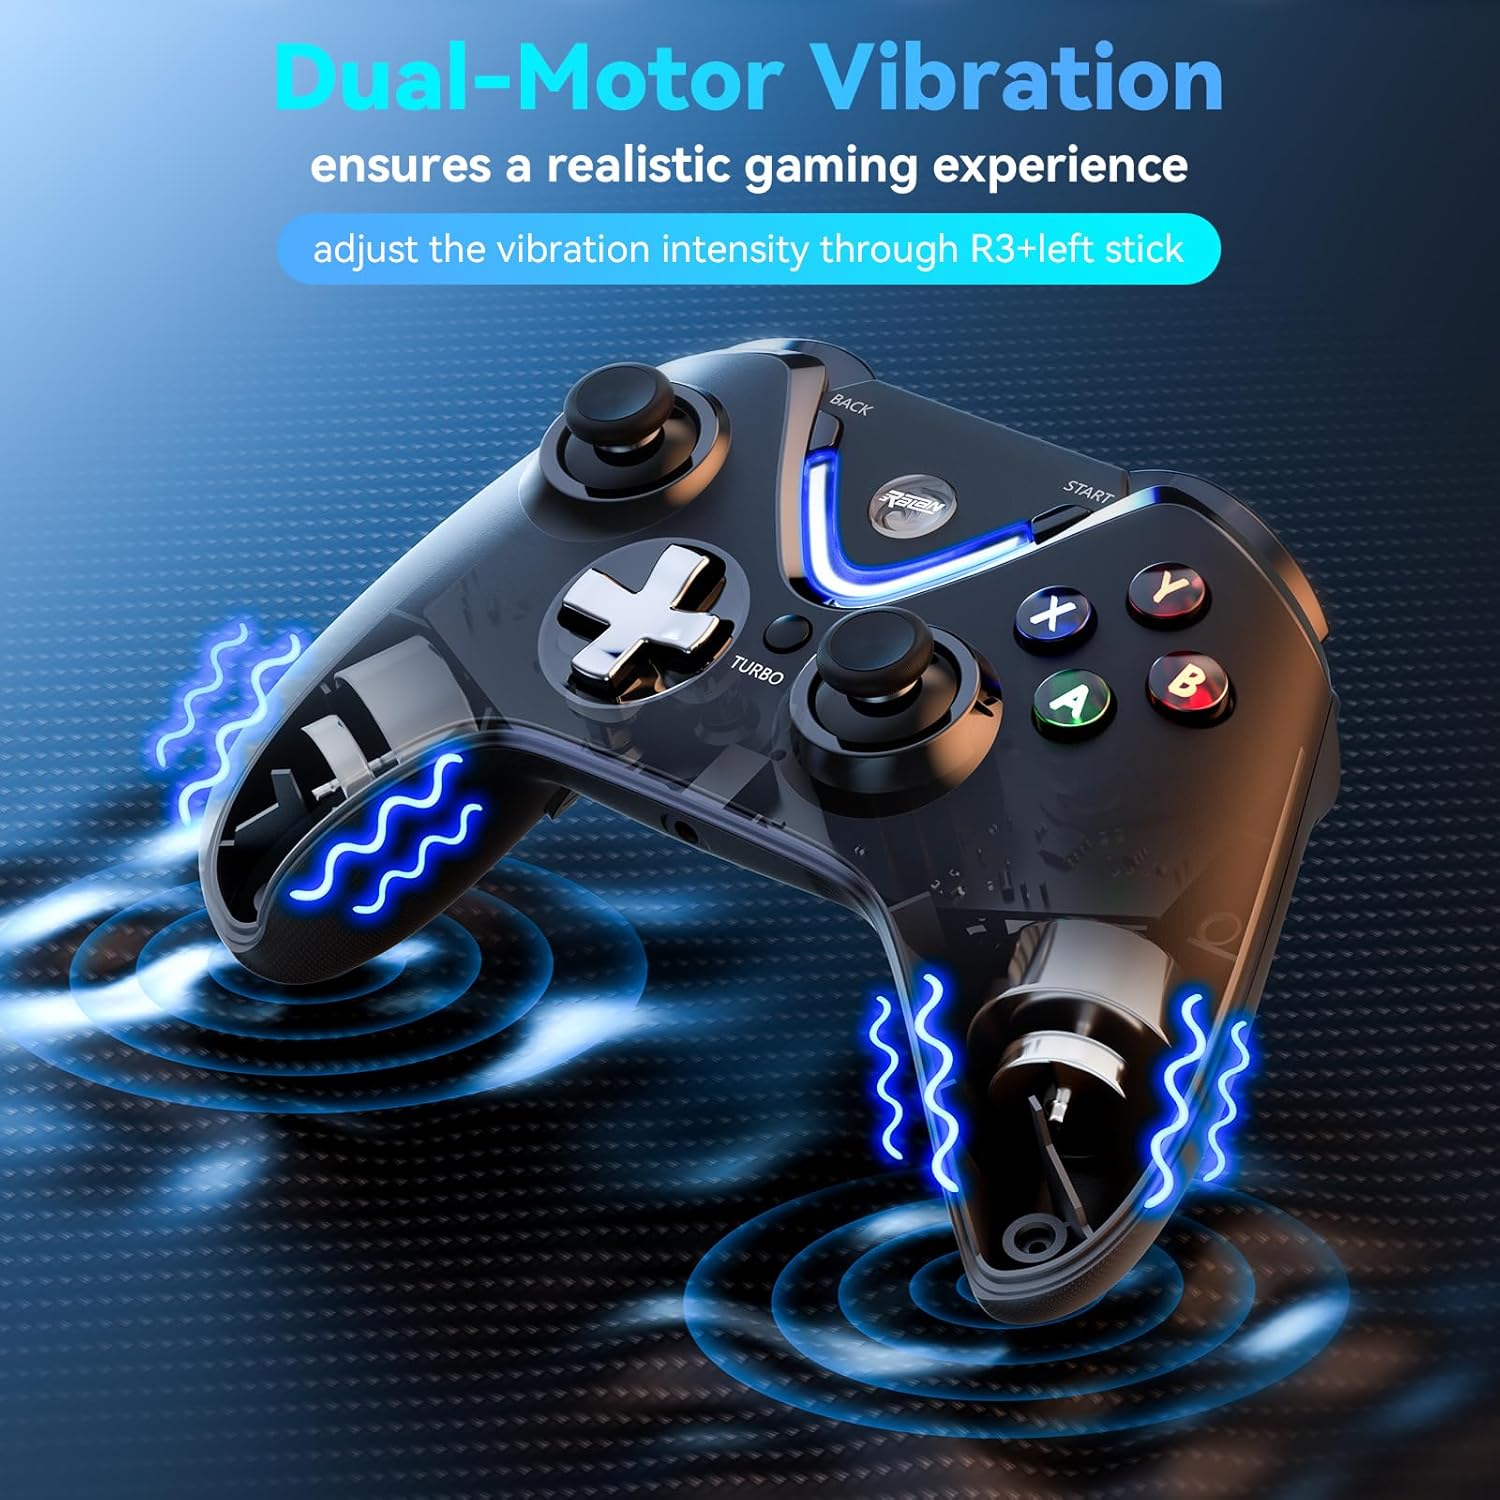
Refer to the troubleshooting section or controller settings for details on adjusting vibration intensity, typically through a combination of R3 (right stick press) and the left stick.
4.4 Macro Program Function & Anti-skid Pattern
Beyond paddle customization, the controller supports macro programming for complex command sequences. Its human engineering anti-skid pattern on the grips ensures a secure and comfortable hold during extended gaming sessions.
5. Maintenance
- Cleaning: Use a soft, dry cloth to wipe the controller. For stubborn dirt, slightly dampen the cloth with water or a mild cleaning solution. Avoid harsh chemicals or abrasive materials.
- Storage: Store the controller in a cool, dry place away from direct sunlight and extreme temperatures.
- Battery Care: To prolong battery life, avoid fully discharging the controller frequently. Charge it regularly, even if not in constant use. Do not expose the battery to high temperatures.
6. Troubleshooting
| Issue | Possible Solution |
|---|---|
| Controller does not connect to console/PC. | Ensure the 2.4G wireless adapter is securely plugged in. Verify the controller is powered on and in pairing mode (blinking indicator light). Try restarting the console/PC and re-pairing. Ensure the controller is charged. |
| Poor battery life or controller randomly shuts off. | Ensure the controller is fully charged before use. Avoid using the controller while charging if possible. If battery life significantly degrades, contact customer support. |
| No obvious battery indicator. | The controller's indicator light typically changes behavior (e.g., blinking during low battery, solid when charged) to indicate battery status. Consult the full product manual or contact support for specific light patterns. |
| Vibration feature is weak or non-existent. | Check in-game settings for vibration intensity. Some games allow adjustment. Ensure the controller firmware is up to date (if applicable). |
| Paddles (M1/M2) are not responding or incorrectly mapped. | Re-enter programming mode (hold TURBO for 5 seconds) and re-assign the desired button to the paddle. Ensure you press the correct paddle after selecting the button. |
| Thumbsticks feel loose or fall off. | Ensure the interchangeable thumbstick caps are firmly pressed onto the joystick. If the issue persists, the internal mechanism might be damaged; contact customer support. |
7. Specifications
- Brand: RALAN
- Model: Wireless Controller
- Compatible Devices: PC, Windows, Xbox One, Xbox Series S/X
- Controller Type: Joystick
- Connectivity: 2.4G Wireless Adapter
- Audio: 3.5mm Headphone Jack
- Joystick Technology: ALPS Joystick, Hall Effect Sensing Trigger
- Power Source: Rechargeable Battery
- Additional Features: Customizable Paddles (M1/M2), Turbo Function, Dual-Motor Vibration, Interchangeable Thumbsticks, Anti-skid Pattern
8. Warranty & Support
For warranty information, technical support, or any product-related inquiries, please refer to the contact information provided with your product packaging or visit the official RALAN website. Keep your purchase receipt for warranty claims.


