1. Introduction
The VIHELM PM6811A is a portable, stable, reliable, and safe resistance-type wood moisture tester. It utilizes a high-performance microcontroller for precise measurement control, offering fast response, high accuracy, and low power consumption. This instrument is designed to measure moisture content in various materials, including wood (four tree species types), paper, and walls. It features a three-color backlight display to visually indicate humidity levels (low, medium, high), a battery undervoltage prompt, and an automatic power-off function to conserve battery life.
2. Safety Information
Please read and understand all safety instructions before operating the device. Failure to follow these instructions may result in injury or damage to the meter.
- Keep the device away from water and high humidity environments to prevent damage.
- Do not attempt to disassemble or modify the meter. Repairs should only be performed by qualified personnel.
- The measurement pins are sharp. Handle with care to avoid injury. Keep out of reach of children.
- Remove batteries if the device will not be used for an extended period to prevent battery leakage.
- Do not use the meter in environments with flammable gases or vapors.
3. Product Overview
The PM6811A moisture meter is designed for ease of use and accurate readings across various materials.

Figure 3.1: Overview of the PM6811A meter and its primary functions.
3.1 Meter Components
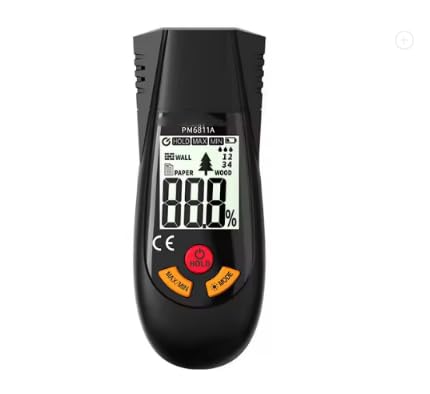
Figure 3.2: Front view of the PM6811A meter, highlighting the LCD display and control buttons.
The meter features a clear LCD display, three control buttons (HOLD, MAX/MIN, MODE), and two sharp measurement pins at the top for material penetration.
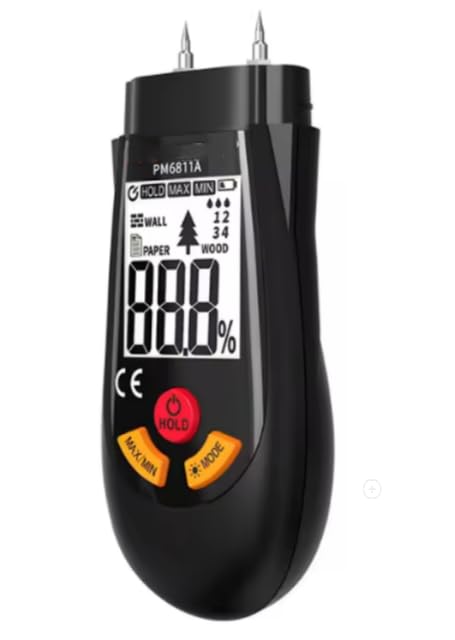
Figure 3.3: Angled view of the PM6811A, showing the measurement pins ready for use.
The measurement pins are designed to penetrate the material surface to obtain accurate moisture readings. Always ensure the protective cap is in place when not in use.
4. Setup
4.1 Battery Installation
The PM6811A requires two 1.5V AAA batteries for operation.
- Locate the battery compartment cover on the back of the meter.
- Slide or unclip the cover to open the compartment.
- Insert two AAA batteries, ensuring correct polarity (+ and -) as indicated inside the compartment.
- Replace the battery compartment cover securely.
If the battery undervoltage prompt appears on the display, replace the batteries promptly.
5. Operating Instructions
5.1 Power On/Off
- To power on the meter, press the HOLD button.
- The meter will automatically power off after approximately 10 minutes of inactivity to conserve battery life.
5.2 Mode Selection
The meter supports three measurement modes: Wood, Paper, and Wall.
- Press the MODE button to cycle through the available measurement modes. The selected mode will be indicated on the LCD display.
5.3 Tree Species Selection (Wood Mode Only)
When in Wood mode, the meter allows selection of four different tree species types (1, 2, 3, 4) to improve measurement accuracy based on wood density.
- While in Wood mode, press the MODE button repeatedly to cycle through the tree species types (1-4). Select the type that best matches the wood being tested.
5.4 Taking a Measurement
- Remove the protective cap from the measurement pins.
- Select the appropriate measurement mode (Wood, Paper, or Wall) and tree species type (if in Wood mode).
- Carefully push the measurement pins into the material being tested. Ensure both pins fully penetrate the surface for an accurate reading.
- Read the moisture content percentage displayed on the LCD screen.
- Observe the backlight color: Green for low humidity, Yellow for medium humidity, and Red for high humidity.
- After measurement, carefully withdraw the pins and replace the protective cap.
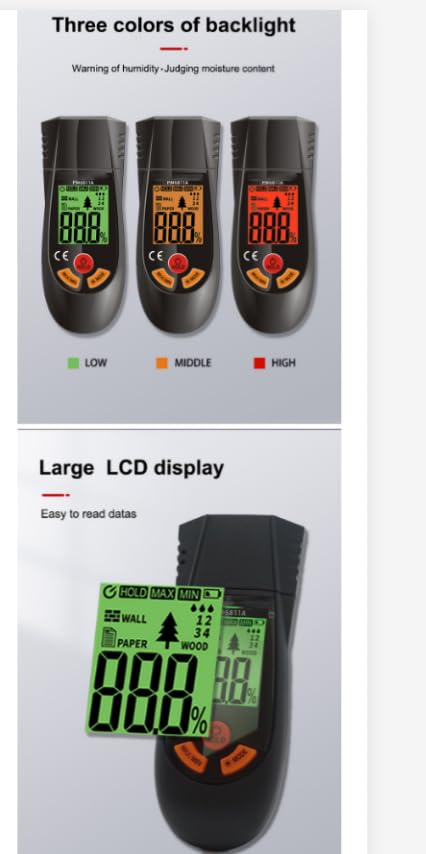
Figure 5.1: The meter's display indicating humidity levels with three backlight colors and a large, easy-to-read LCD.
5.5 Data Hold Function
- During measurement, press the HOLD button to freeze the current reading on the display. The "HOLD" icon will appear.
- Press the HOLD button again to release the data hold and resume live measurement.
5.6 MAX/MIN Value Measurement
- Press the MAX/MIN button to display the maximum moisture reading recorded during the current measurement session. The "MAX" icon will appear.
- Press the MAX/MIN button again to display the minimum moisture reading. The "MIN" icon will appear.
- Press the MAX/MIN button a third time to exit MAX/MIN mode and return to live measurement.
5.7 Backlight Control
- The backlight automatically illuminates when the meter is powered on or a button is pressed.
- The backlight can be manually turned off by pressing and holding the MODE button for approximately 2 seconds. Press and hold again to turn it back on.
6. Applications
The PM6811A Digital Wood Moisture Meter is suitable for a wide range of applications where moisture content measurement is critical.
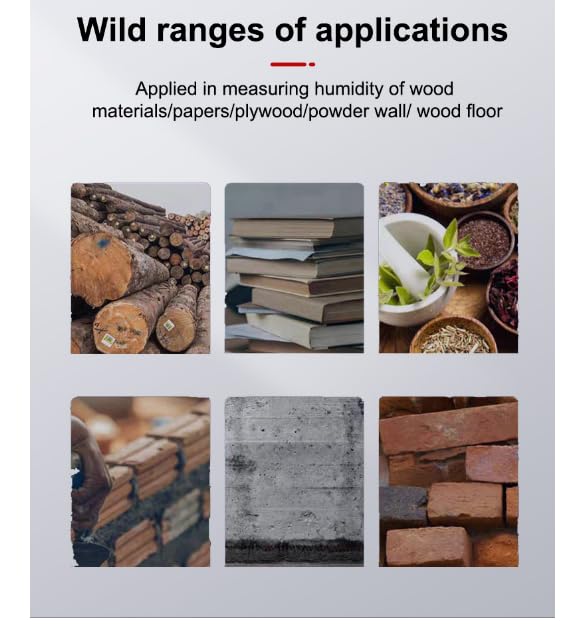
Figure 6.1: Examples of materials and environments where the PM6811A can be used, including wood, paper products, and building materials.
Common applications include:
- Woodworking: Ensuring proper moisture levels in lumber, timber, and finished wood products to prevent warping, cracking, and poor adhesion.
- Construction: Checking moisture in drywall, plaster, concrete, and other building materials to prevent mold growth and ensure structural integrity.
- Paper and Pulp Industry: Measuring moisture in paper, cardboard, and other cellulose-based materials.
- Home Inspection: Identifying potential moisture problems in walls, floors, and ceilings.
7. Specifications
Detailed technical specifications for the VIHELM PM6811A Digital Wood Moisture Meter.
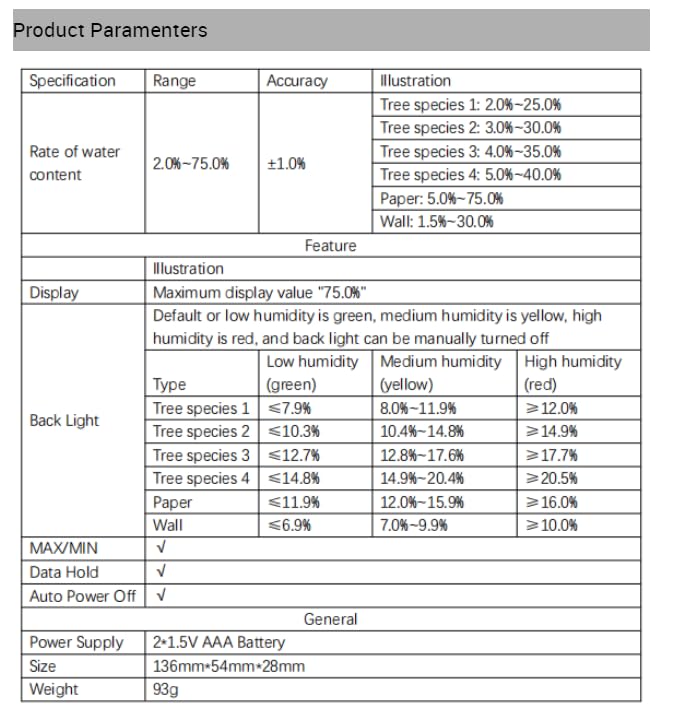
Figure 7.1: Comprehensive table of product parameters and features.
| Specification | Range / Value | Accuracy / Details |
|---|---|---|
| Rate of Water Content | 2.0% – 75.0% | ±1.0% |
| Tree Species 1 | 2.0% – 25.0% | Low: ≤7.9%, Medium: 8.0%-11.9%, High: ≥12.0% |
| Tree Species 2 | 2.0% – 30.0% | Low: ≤10.3%, Medium: 10.4%-14.8%, High: ≥14.9% |
| Tree Species 3 | 4.0% – 35.0% | Low: ≤12.7%, Medium: 12.8%-17.6%, High: ≥17.7% |
| Tree Species 4 | 5.0% – 40.0% | Low: ≤14.8%, Medium: 14.9%-20.4%, High: ≥20.5% |
| Paper | 5.0% – 75.0% | Low: ≤11.9%, Medium: 12.0%-15.9%, High: ≥16.0% |
| Wall | 1.5% – 30.0% | Low: ≤6.9%, Medium: 7.0%-9.9%, High: ≥10.0% |
| Display | Maximum display value "75.0%" | |
| Backlight | Default or low humidity is green, medium humidity is yellow, high humidity is red, and backlight can be manually turned off. | |
| MAX/MIN | Supported | |
| Data Hold | Supported | |
| Auto Power Off | Supported | |
| Power Supply | 2 × 1.5V AAA Battery | |
| Size | 136mm × 54mm × 28mm | |
| Weight | 136g | |
8. Maintenance
Proper maintenance ensures the longevity and accuracy of your moisture meter.
- Cleaning: Wipe the meter's exterior with a soft, dry cloth. Do not use abrasive cleaners or solvents. Ensure the measurement pins are clean and free of debris after each use.
- Storage: Store the meter in a cool, dry place, away from direct sunlight and extreme temperatures. Always replace the protective cap over the measurement pins when storing.
- Battery Replacement: Replace batteries when the low battery indicator appears. Remove batteries if the meter will not be used for an extended period (e.g., several months) to prevent leakage.
9. Troubleshooting
If you encounter issues with your PM6811A meter, refer to the following table for common problems and solutions.
| Problem | Possible Cause | Solution |
|---|---|---|
| Meter does not power on. | Dead or incorrectly installed batteries. | Check battery polarity. Replace with fresh AAA batteries. |
| Inaccurate readings. | Incorrect mode selected; pins not fully inserted; dirty pins; material outside measurement range. | Ensure correct mode (Wood, Paper, Wall) and tree species. Push pins fully into the material. Clean pins. Verify material is within the meter's specified range. |
| Display is dim or flickering. | Low battery power. | Replace batteries. |
| "HOLD" icon is stuck. | Data hold function is active. | Press the HOLD button again to release. |
| Meter automatically shuts off too quickly. | Automatic power-off feature is active. | This is a normal function to save battery. Ensure you are actively using the device or press a button to reset the timer. |
10. Warranty and Support
For warranty information and technical support, please refer to the documentation provided at the time of purchase or contact your retailer. Keep your purchase receipt as proof of purchase for any warranty claims.