1. Introduction
Thank you for choosing the QUSKLISU Hand Held Leaf Blower, Model EB-260. This manual provides essential information for the safe and efficient operation, maintenance, and troubleshooting of your new gas-powered leaf blower. Please read this manual thoroughly before operating the device and keep it for future reference. This powerful 2-stroke engine blower is designed for effective lawn care, yard cleaning, snow blowing, and debris removal.
2. Safety Instructions
Always prioritize safety when operating power tools. Failure to follow these instructions may result in serious injury or property damage.
- Personal Protective Equipment (PPE): Always wear appropriate safety glasses or goggles, hearing protection (due to the 90 dB noise level), long pants, and sturdy, non-slip footwear.
- Fuel Handling: Gasoline is highly flammable. Refuel in a well-ventilated outdoor area, away from sparks, open flames, or heat sources. Do not smoke while refueling. Allow the engine to cool before refueling.
- Operation Area: Keep children, bystanders, and pets at a safe distance (at least 50 feet) from the operating area. Clear the area of any objects that could be thrown by the air stream.
- Engine Exhaust: The engine produces carbon monoxide, an odorless and deadly gas. Never operate the blower in an enclosed area.
- Inspection: Before each use, inspect the blower for loose parts, damaged components, or fuel leaks. Do not operate if damaged.
- Secure Grip: Maintain a firm grip on the handle during operation.
- Storage: Store the blower and fuel in a cool, dry, well-ventilated area, away from heat sources and out of reach of children.
3. Package Contents
Verify that all items are present in the package:
- 1x Handheld Gas Blower
- 2x Blast Pipes
- 1x Mixing Pot
- 1x Funnel
- 1x English Manual
4. Product Overview
Familiarize yourself with the components of your QUSKLISU Hand Held Leaf Blower.

Figure 4.1: Key Components of the Handheld Gas Blower.
- Handle for Grip: Ergonomically designed for comfortable and secure handling.
- Throttle Handle: Controls the engine speed and blowing force.
- Damper Switch: Used during the starting procedure to control air intake.
- Air Tube: Directs the airflow. The product includes two blast pipes for varied applications.
- Oil Inlet: Point for adding the fuel mixture.
- Starting Handle: Used to manually start the engine.
- Sparking Plug: Essential component for engine ignition.
- Protective Cover: A 360° anti-suction protective mesh housing prevents impurities from being sucked into the engine and aids in heat dissipation, protecting the engine's lifespan.
- Reinforced Handle: Designed to enhance grip friction and provide flexible operation.
- Stable Feet: Allows the blower to be stored and placed easily when not in use.
- Protrusion Design: Ensures the blast tubes are tightly connected.
5. Setup
5.1 Assembly
Attach the desired blast pipe(s) to the air outlet of the blower. Ensure they are securely connected using the protrusion design.
5.2 Fuel Preparation
This leaf blower operates on a 2-stroke engine and requires a specific fuel mixture. Use unleaded gasoline with an octane rating of 92# or higher, mixed with 2-stroke engine oil at a ratio of 25:1 (Gasoline:Oil). Use the provided mixing pot and funnel for accurate measurement.

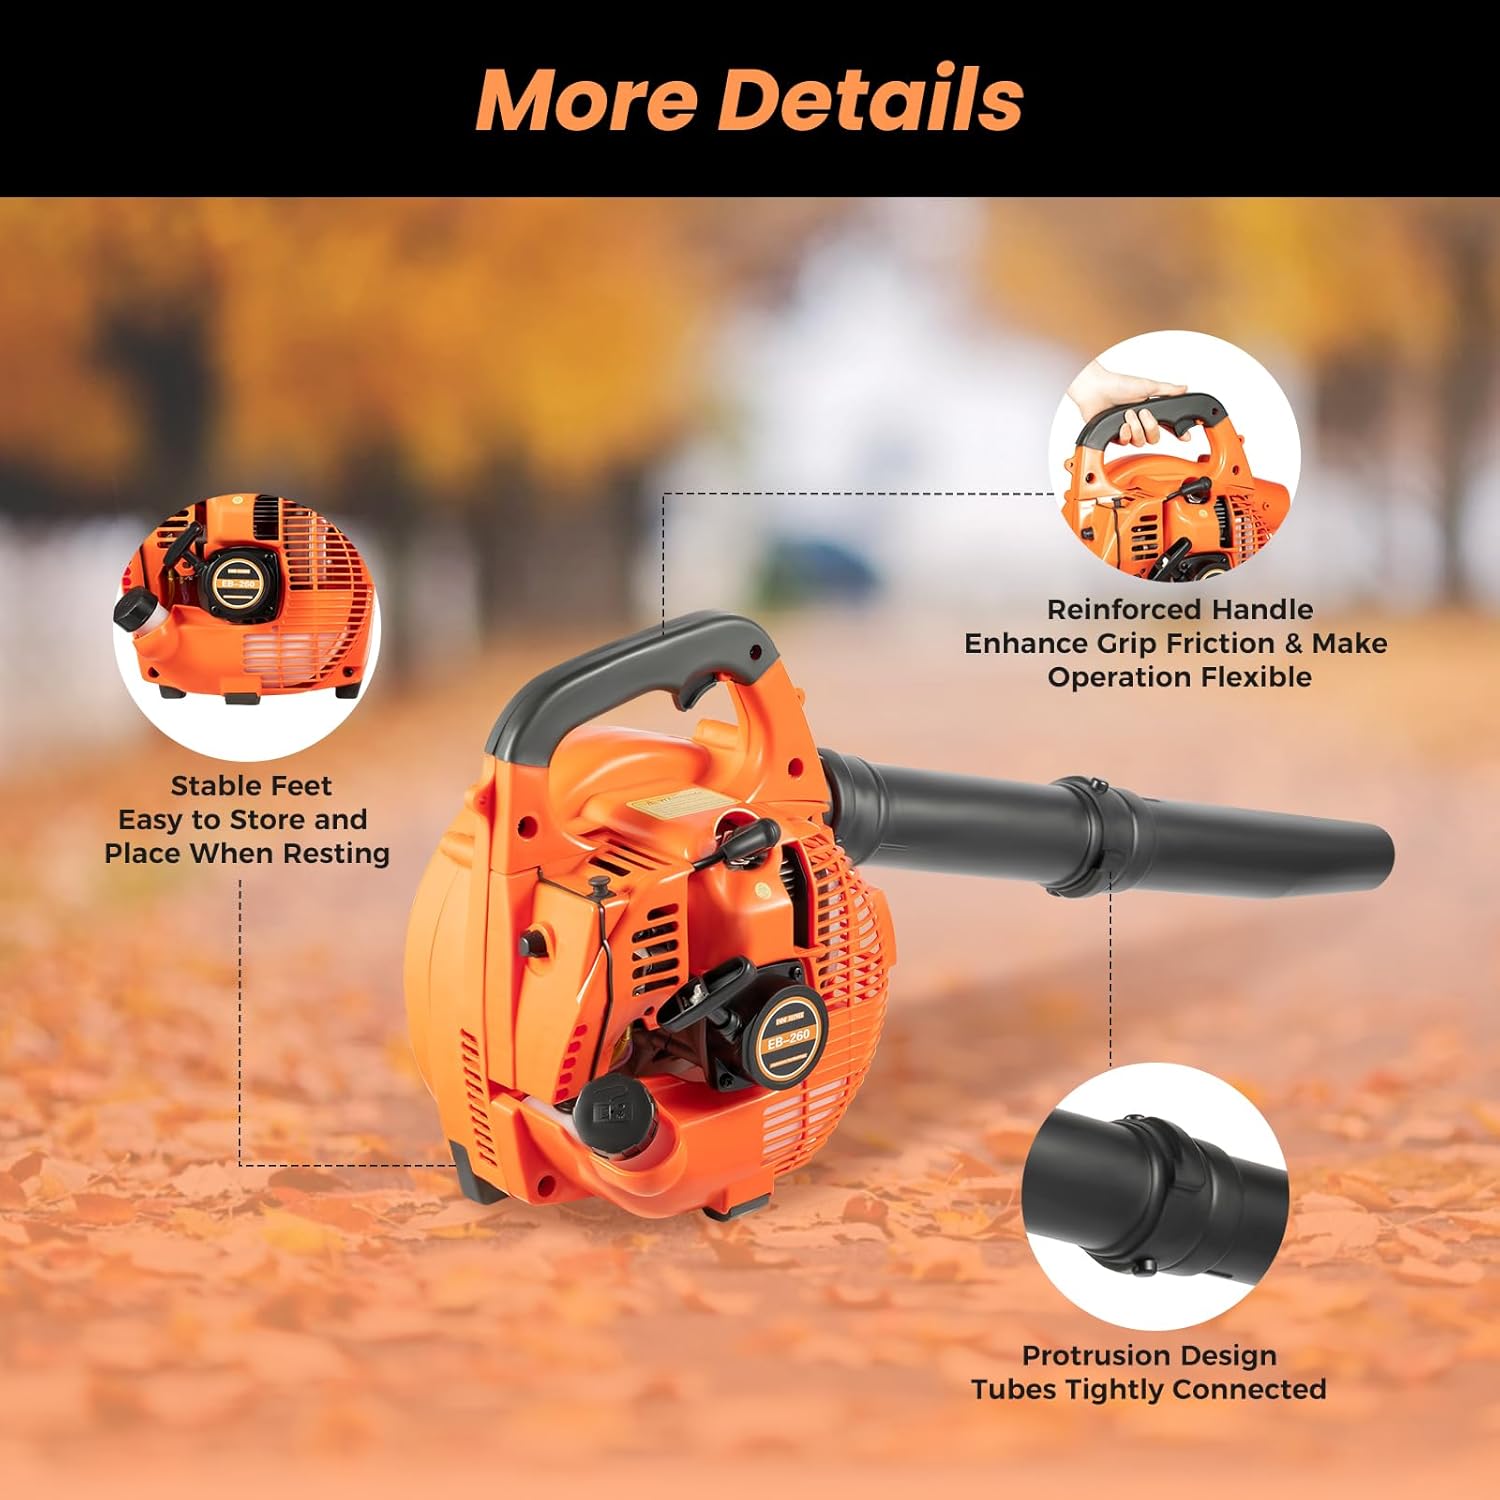
Figure 5.1: Fuel tank port and fuel tank capacity (0.2 Gallons) indicating the 25:1 gasoline to oil mixture.
Important: Always use fresh, clean gasoline. Avoid using ethanol-blended fuels if possible, as they can cause issues with small engines over time. Store mixed fuel in a proper, sealed container away from direct sunlight and heat.
6. Operating Instructions
Follow these steps to start and operate your leaf blower.

Figure 6.1: Visual guide for starting and stopping the blower.
6.1 Starting the Engine
- Step 1: Fuel Priming. Pour the mixed fuel into the fuel tank. Locate the oil bubble (primer bulb) and press it several times until fuel is visible and returns in the pipe, indicating the carburetor is primed.
- Step 2: Cold Start (First Start or After Long Storage).
- Pull the damper switch upwards (choke ON).
- Pull the starting handle firmly and steadily until you feel resistance, then pull quickly to start the engine.

- Once the engine briefly fires or starts, push the damper switch downwards (choke OFF).
- Pull the starting handle again until the engine fully starts.
- Step 2: Hot Start (Engine is Warm).
- Ensure the damper switch is downwards (choke OFF).
- Pull the starting handle until the engine starts.
6.2 Stopping the Engine
- Step 3: Engine Stop. Press the red button located on the handle to immediately shut off the engine.

6.3 General Operation Tips
- The blower features adjustable speed via the throttle handle, allowing you to control the airflow for different tasks.
- Its lightweight and compact design makes it easy to carry and maneuver for extended periods.
- The blower is suitable for various applications including clearing leaves, snow, crushed stones, and dust.

Figure 6.2: Wide application of the QUSKLISU Hand Held Leaf Blower.
7. Maintenance
Regular maintenance ensures optimal performance and extends the lifespan of your leaf blower.
- Cleaning: Due to its smooth surface and simple structure, the blower is easy to clean. Wipe dirt from the machine with a soft cloth after each use. Ensure the air intake and exhaust vents are free of debris.
- Air Filter: Periodically inspect and clean the air filter. A clogged air filter can reduce engine performance and increase fuel consumption. The 360° protective mesh housing helps keep larger debris out.
- Spark Plug: Check the spark plug periodically for wear or carbon buildup. Replace if necessary. A clean, properly gapped spark plug is crucial for easy starting and efficient engine operation.
- Fuel System: For long-term storage, it is recommended to drain the fuel tank and run the engine until it stops from lack of fuel. This prevents fuel degradation and carburetor issues.
- General Inspection: Regularly check all screws and fasteners for tightness. Inspect the blast pipes for cracks or damage.
8. Troubleshooting
If you encounter issues with your leaf blower, refer to the following common problems and solutions:
| Problem | Possible Cause | Solution |
|---|---|---|
| Engine does not start | No fuel or incorrect fuel mixture Damper switch in wrong position Clogged fuel filter Faulty spark plug | Ensure fuel tank has correct 25:1 mixture Check damper switch position (up for cold start, down for hot start) Clean or replace fuel filter Inspect and replace spark plug |
| Loss of power during operation | Clogged air filter Incorrect fuel mixture Dirty spark plug | Clean or replace air filter Verify correct 25:1 fuel mixture Clean or replace spark plug |
| Excessive smoke from exhaust | Too much oil in fuel mixture Incorrect type of oil | Ensure correct 25:1 fuel mixture Use proper 2-stroke engine oil |
| Blower vibrates excessively | Loose components Damaged impeller | Check and tighten all screws and fasteners Inspect impeller for damage; contact service if damaged |
If the problem persists after attempting these solutions, please contact customer support.
9. Specifications
Technical specifications for the QUSKLISU Hand Held Leaf Blower, Model EB-260:
| Brand | QUSKLISU |
| Model Name | Handheld Gas Blower |
| Item Model Number | EB-260 |
| Power Source | Gas Powered |
| Engine Type | 2-Stroke, 25.4CC |
| Rated Power | 0.75kW / 7500rpm |
| Impeller Speed | 7000rpm |
| Airflow Capacity | 4.59ft³/h (0.13m³/s) |
| Fuel Consumption Rate | 1.56 lbs/kW.h (or < 710g/kw.h) |
| Fuel Mix Ratio | 25:1 (Gasoline:2-Stroke Oil) |
| Noise Level | 90 dB |
| Item Weight | 3.46 Kilograms (7.61 pounds) |
| Product Dimensions (L x W x H) | 15"L x 9.45"W x 14.17"H |
| Color | Red, Black |

Figure 9.1: Performance specifications of the blower.
10. Warranty and Support
Warranty information for your QUSKLISU Hand Held Leaf Blower is typically provided with your purchase documentation or can be found on the manufacturer's official website. Please retain your proof of purchase for warranty claims.
For technical support, replacement parts, or further assistance, please refer to the contact information provided on the product packaging or visit the QUSKLISU official website.