RESKIU online inkjet coding machine
Industrial Inkjet Printer User Manual
Model: online inkjet coding machine | Brand: RESKIU
1. Introduction
This manual provides comprehensive instructions for the setup, operation, maintenance, and troubleshooting of your RESKIU Industrial Inkjet Printer. This automatic coding machine is designed for efficient and precise printing of various data types on a wide range of materials in industrial settings.
The RESKIU Industrial Inkjet Printer is suitable for all types of production lines, packaging machinery, and assembly lines. Its compact design allows for installation in small spaces and integration with robotic arm control for spray terminals. It ensures accurate coding regardless of product size through positioning and tracking printing.
2. Important Safety Information
Please read and understand all safety warnings before operating the device.
- Power Connection: Do not unplug or plug in cables and ink cartridges while the machine is powered on to prevent damage to the equipment.
- Ink Cartridge Handling: Due to the nature of the ink, always remove the ink cartridge within 30 minutes of shutting down the machine. Cover it with a protective cap and store it in a sealed container to prevent nozzle damage.
- Unauthorized Disassembly: Do not disassemble the machine without authorization. Disassembly may lead to equipment failure and void the warranty.
3. What's in the Box
Upon unpacking, please verify that all the following components are included:
- Industrial Inkjet Printer Unit
- Inkjet Cartridge(s)
- USB Cable
- Power Cable
- User Manual (this document)
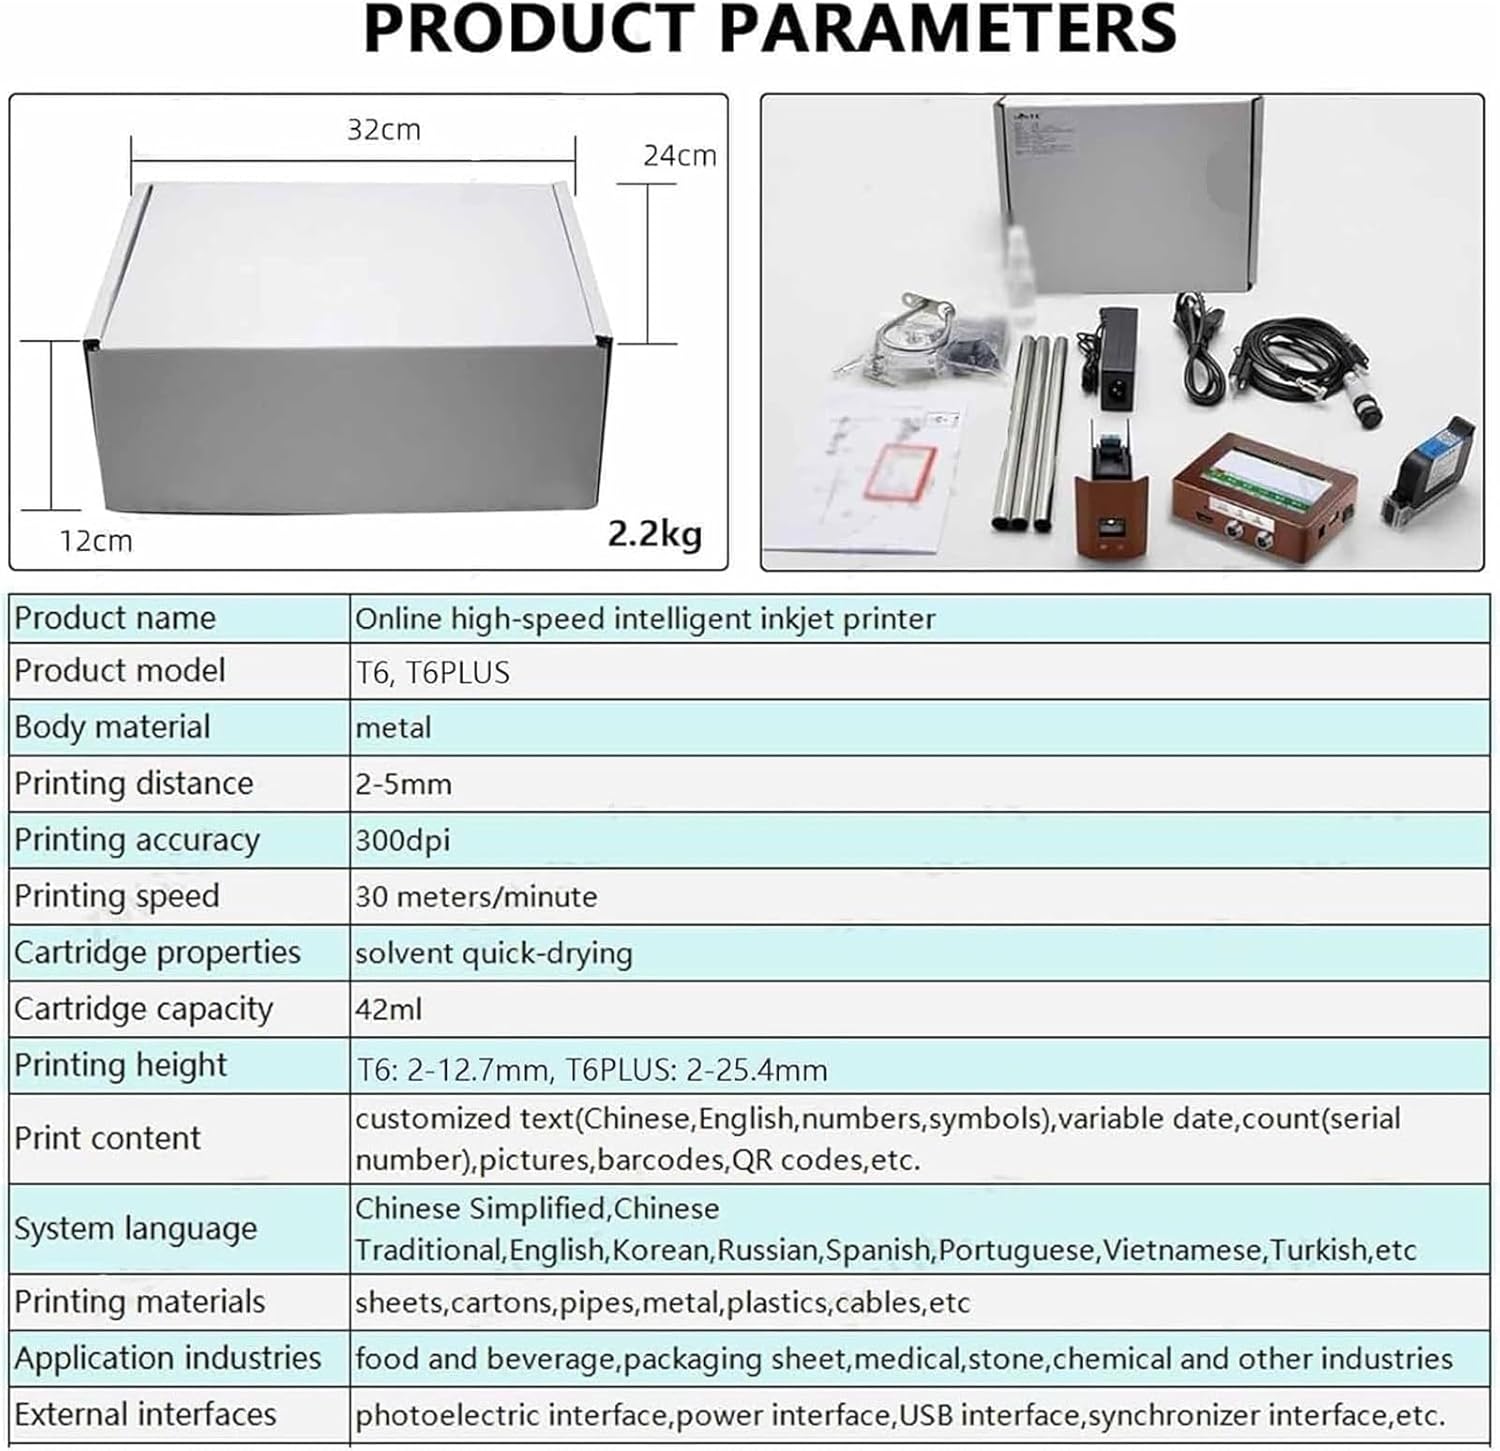
Figure 3.1: Overview of the product packaging and included components.
4. Product Features
The RESKIU Industrial Inkjet Printer offers a range of advanced features designed for industrial coding applications:
- Online Inkjet Coding: Automatically prints QR codes, barcodes, language characters, graphics, serial numbers, text, symbols, dates, and logos. Ideal for food and beverage, packaging, medical, stone, and chemical industries.
- High-Definition Printing: Achieves over 300DPI clarity with stable motherboard performance. Recommended printing distance is 2-5mm for optimal results.
- Intelligent Operating System: Features a full graphical user interface for easy content addition, zooming, and editing. Supports connection to conveyor tables, paging machines, and labeling machines for automated printing.
- Multiple Installation Angles: Nozzle direction is 360-degree adjustable, allowing for horizontal or downward printing. Provides flexibility for various product orientations.
- Wide Printing Scope: Compatible with diverse materials including cartons, plastics, metals, sheets, industrial chemical packaging, pharmaceutical, and food packaging.
- Multi-language Support: System supports Chinese, English, Korean, Russian, Spanish, Portuguese, Vietnamese, Turkish, and more.
- External Data Import: Equipped with USB interface for importing user pictures, graphics, logos, TXT documents, and Excel forms.

Figure 4.1: Illustration of the intelligent online high-definition printing capability, showing the recommended printing distance for clarity.

Figure 4.2: Display of the diverse editing functions and rich printing content options available, including custom text, counting, time variables, multi-line printing, graphic logos, QR codes, barcodes, dot matrix fonts, and everyday graphics.
5. Setup Guide
- Unpacking: Carefully remove all components from the packaging. Retain packaging for future storage or transport.
- Mounting the Printer: The printer can be installed in various configurations. Securely mount the printer unit and the print head assembly to your production line, conveyor belt, or robotic arm. Ensure the print head is positioned at the desired printing distance (2-5mm) from the target surface.
- Ink Cartridge Installation:
- Ensure the printer is powered off.
- Carefully insert the ink cartridge into its designated slot until it clicks into place.
- Do not force the cartridge.
- Connecting Cables:
- Connect the power cable to the printer and then to a suitable power outlet.
- If integrating with other machinery (e.g., conveyor, paging machine, labeling machine), connect the appropriate optical, electrical, or synchronizer interfaces.
- For data transfer or software updates, connect the USB cable to a computer or insert a USB drive into the USB port.
- Initial Power On: Once all connections are secure, power on the printer. The system will boot up and display the main operating interface.

Figure 5.1: Example setup of the Industrial Inkjet Printer integrated into a production line, showing the main unit and print head assembly.
6. Operating Instructions
The printer features an intelligent operating system with a user-friendly graphical interface.
6.1. Interface Navigation and Language Selection
- The HD display touch screen allows for intuitive navigation.
- To change the system language, navigate to the settings menu. Supported languages include Chinese, English, Korean, Russian, Spanish, Portuguese, Vietnamese, Turkish, and more.

Figure 6.1: The HD display touch screen showing various language options for the operating system.
6.2. Creating and Editing Print Content
The system supports a wide variety of content types:
- Text: Enter custom text directly via the on-screen keyboard.
- QR Codes & Barcodes: Generate and customize QR codes and various barcode formats.
- Variable Data: Set up automatic printing for dates (production, expiry), serial numbers, and counts.
- Graphics & Logos: Import images, graphics, and logos via USB. The system supports various file formats.
- Multi-line Printing: Configure multiple lines of text or data for complex labels.
- Font Selection: Choose from various fonts including Song Dynasty, dot matrix fonts, and boldface.
Use the "add content" and "zoom in/out" functions on the touch screen for easy editing.
6.3. Printing Operation
- Prepare Content: Create or load the desired print content.
- Adjust Settings: Verify printing height (T6: 2-12.7mm, T6Plus: 2-25.4mm) and printing speed (up to 30 meters/minute). Ensure the nozzle direction is correctly set (360-degree adjustable).
- Start Printing: Initiate the printing process. The machine will automatically print as products pass the print head.
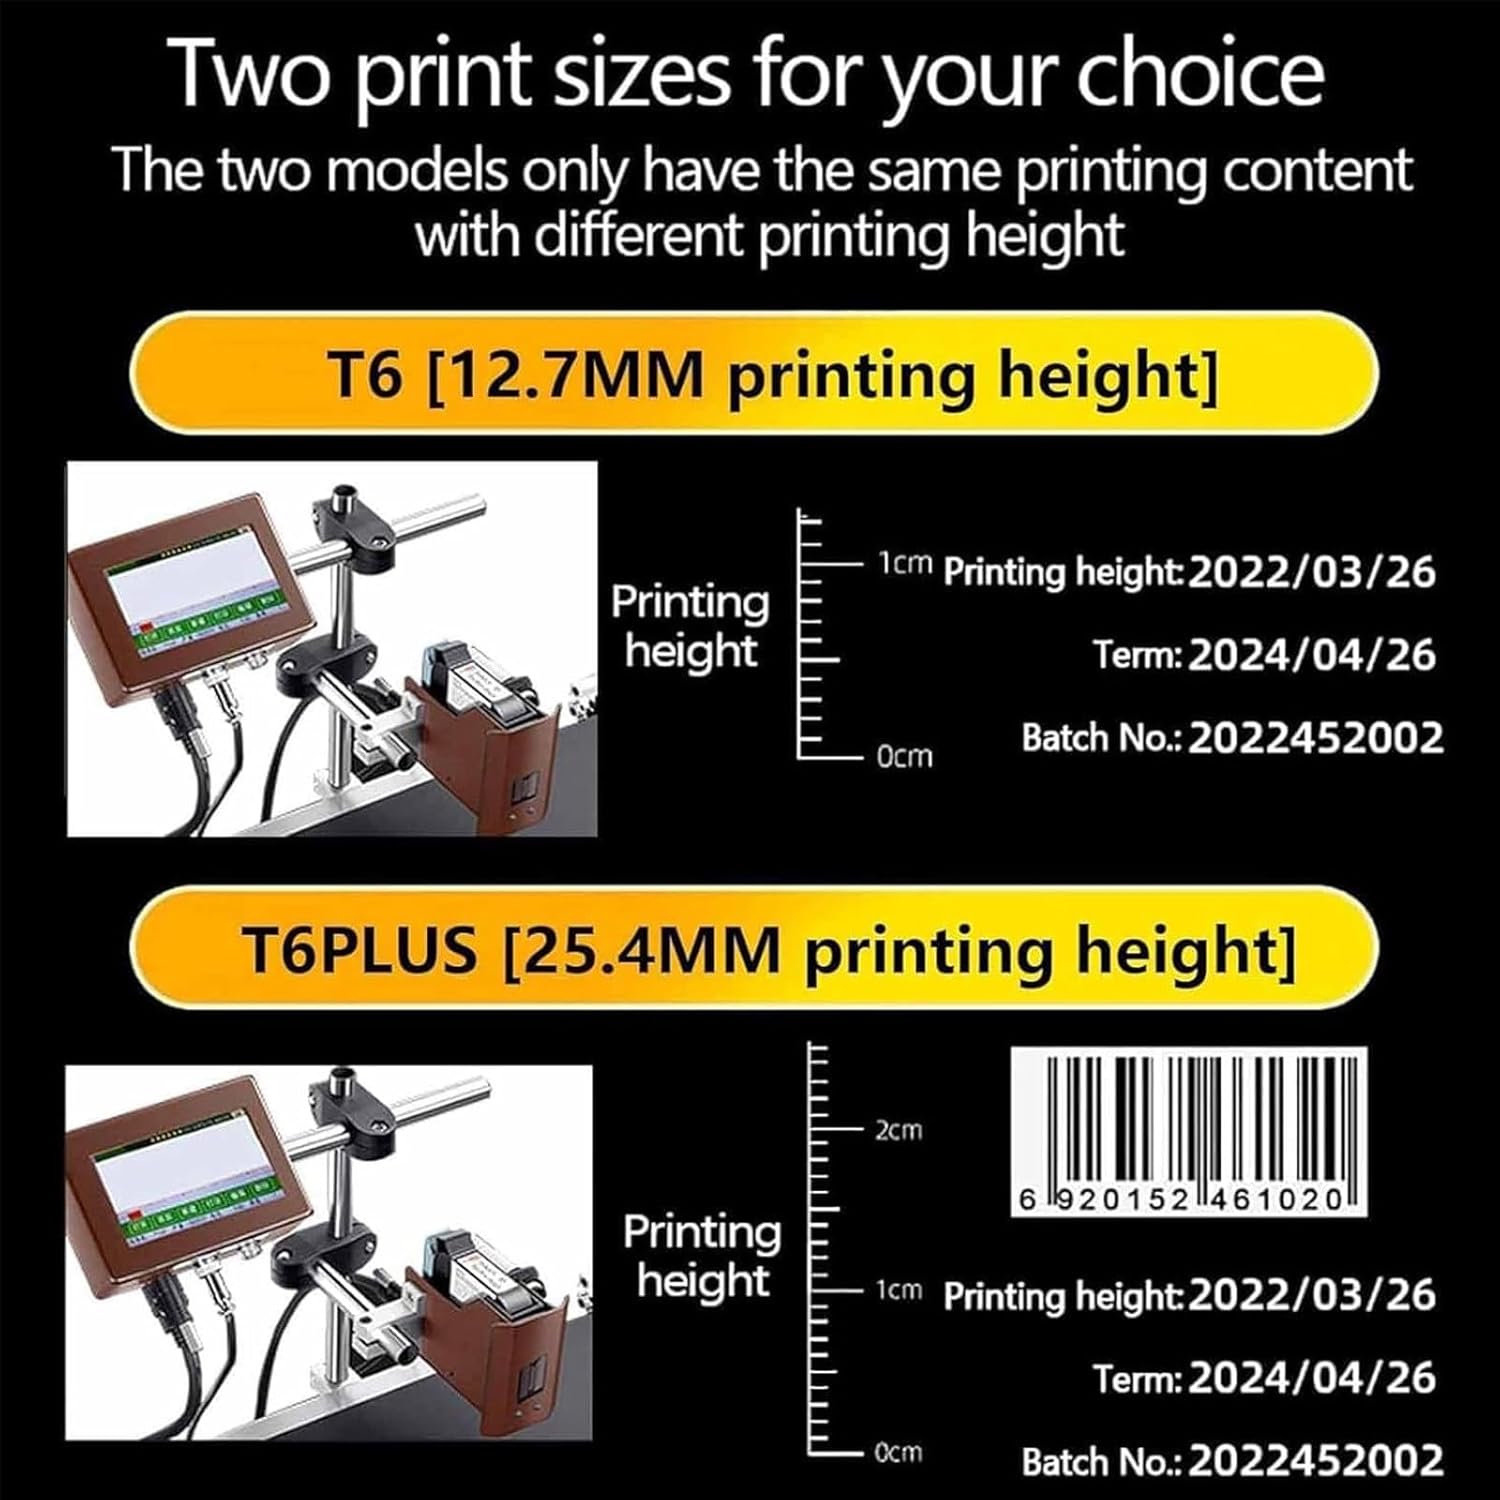
Figure 6.2: Comparison illustrating the two available print sizes: T6 (12.7mm printing height) and T6Plus (25.4mm printing height), showing examples of printed content.
7. Application Areas
The RESKIU Industrial Inkjet Printer is versatile and can be used across various industries and on numerous materials, including but not limited to:
- Packaging: Cartons, food packaging, industrial chemical packaging.
- Plastics: PET bottles, plastic bottles, PVC pipes.
- Metals: Various metal surfaces.
- Other Materials: Sheets, wood, medicine containers, cement bags, eggs, ceramics.

Figure 7.1: Visual examples of diverse materials and products suitable for printing with the Industrial Inkjet Printer, including packing cartons, medicine bottles, wood, food packaging, PET bottles, cement bags, PVC pipes, eggs, ceramic, and plastic bottles.
8. Maintenance
Proper maintenance ensures the longevity and optimal performance of your inkjet printer.
- Ink Cartridge Care: Always remove the ink cartridge within 30 minutes of shutting down the machine. Immediately cover the nozzle with its protective cap and store the cartridge in a sealed container to prevent the solvent-based ink from drying out and damaging the nozzle.
- Cleaning: Regularly clean the exterior of the printer and the print head area with a soft, lint-free cloth. Avoid using harsh chemicals that could damage the surfaces.
- Storage: When not in use for extended periods, ensure the ink cartridge is properly stored and the printer is kept in a clean, dry environment.
9. Troubleshooting
This section addresses common issues you might encounter. For problems not listed here, or if solutions do not resolve the issue, please contact customer support.
- Printer Not Powering On:
- Check if the power cable is securely connected to both the printer and the power outlet.
- Ensure the power outlet is functional.
- Poor Print Quality / Clogged Nozzle:
- Ensure the ink cartridge is properly installed and has sufficient ink.
- Verify that the ink cartridge was stored correctly with its protective cap when not in use.
- Perform a nozzle cleaning cycle through the printer's operating system, if available.
- Ensure the printing distance (2-5mm) is maintained for optimal clarity.
- Machine Failure After Disassembly:
- As stated in the safety information, unauthorized disassembly may cause equipment failure. Contact customer support for assistance.
If you have any questions or encounter issues during use, please feel free to contact us for support.
10. Technical Specifications
| Feature | Specification |
|---|---|
| Product Name | Online high-speed intelligent inkjet printer |
| Product Model | T6, T6PLUS (online inkjet coding machine) |
| Machine Material | Metal |
| Printing Distance | 2-5mm |
| Printing Accuracy | 300dpi |
| Printing Speed | 30 meters/minute |
| Cartridge Features | Solvent quick-drying |
| Cartridge Capacity | 42ml |
| Printing Height | T6: 2-12.7mm, T6Plus: 2-25.4mm |
| Print Content | Language characters, QR codes, barcodes, variable dates, serial numbers, counts, pictures, etc. |
| System Language | Chinese, English, Korean, Russian, Spanish, Portuguese, Vietnamese, Turkish, etc. |
| Printing Materials | Sheets, cartons, pipes, metals, plastics, industrial chemical packaging, pharmaceutical and food packaging, etc. |
| Application Industries | Food and beverage, packaging sheet, medical, stone, chemical and other industries |
| External Interfaces | Photoelectric interface, power interface, USB interface, synchronizer interface, etc. |
| Hardware Interface | USB |
| Control Method | Remote |
| Item Weight | 4.4 pounds |
| Package Dimensions | 3.94 x 3.94 x 3.94 inches |
11. Warranty and Support
11.1. Warranty Information
This product comes with a limited warranty. Please refer to the warranty card included in your package for specific terms and conditions. Unauthorized disassembly of the machine may void the warranty.
The return policy allows for refund/replacement within 30 days of purchase.
11.2. Customer Support
For any questions, technical assistance, or troubleshooting not covered in this manual, please contact RESKIU customer support. Refer to your purchase documentation for contact details.