
1. Introduction
This manual provides instructions for the safe and efficient operation of your conecto Digital Thermostat Plug. This device is designed for precise temperature control in various environments, including terrariums, greenhouses, and for general heating or cooling applications. Please read this manual thoroughly before use and retain it for future reference.
2. Safety Instructions
- Ensure the device is connected to a properly grounded power outlet.
- Do not exceed the maximum load capacity of 3600 Watts (230V, 16A).
- Do not immerse the device in water or expose it to excessive moisture.
- Keep out of reach of children.
- Do not disassemble or attempt to repair the device yourself. Contact qualified personnel for service.
- Unplug the device from the power outlet before cleaning or when not in use for extended periods.
- Ensure proper ventilation around the device and connected appliances.
3. Product Overview
The conecto Digital Thermostat Plug features an integrated internal sensor for accurate temperature measurement and control. It includes a clear LCD display and intuitive buttons for setting various parameters.
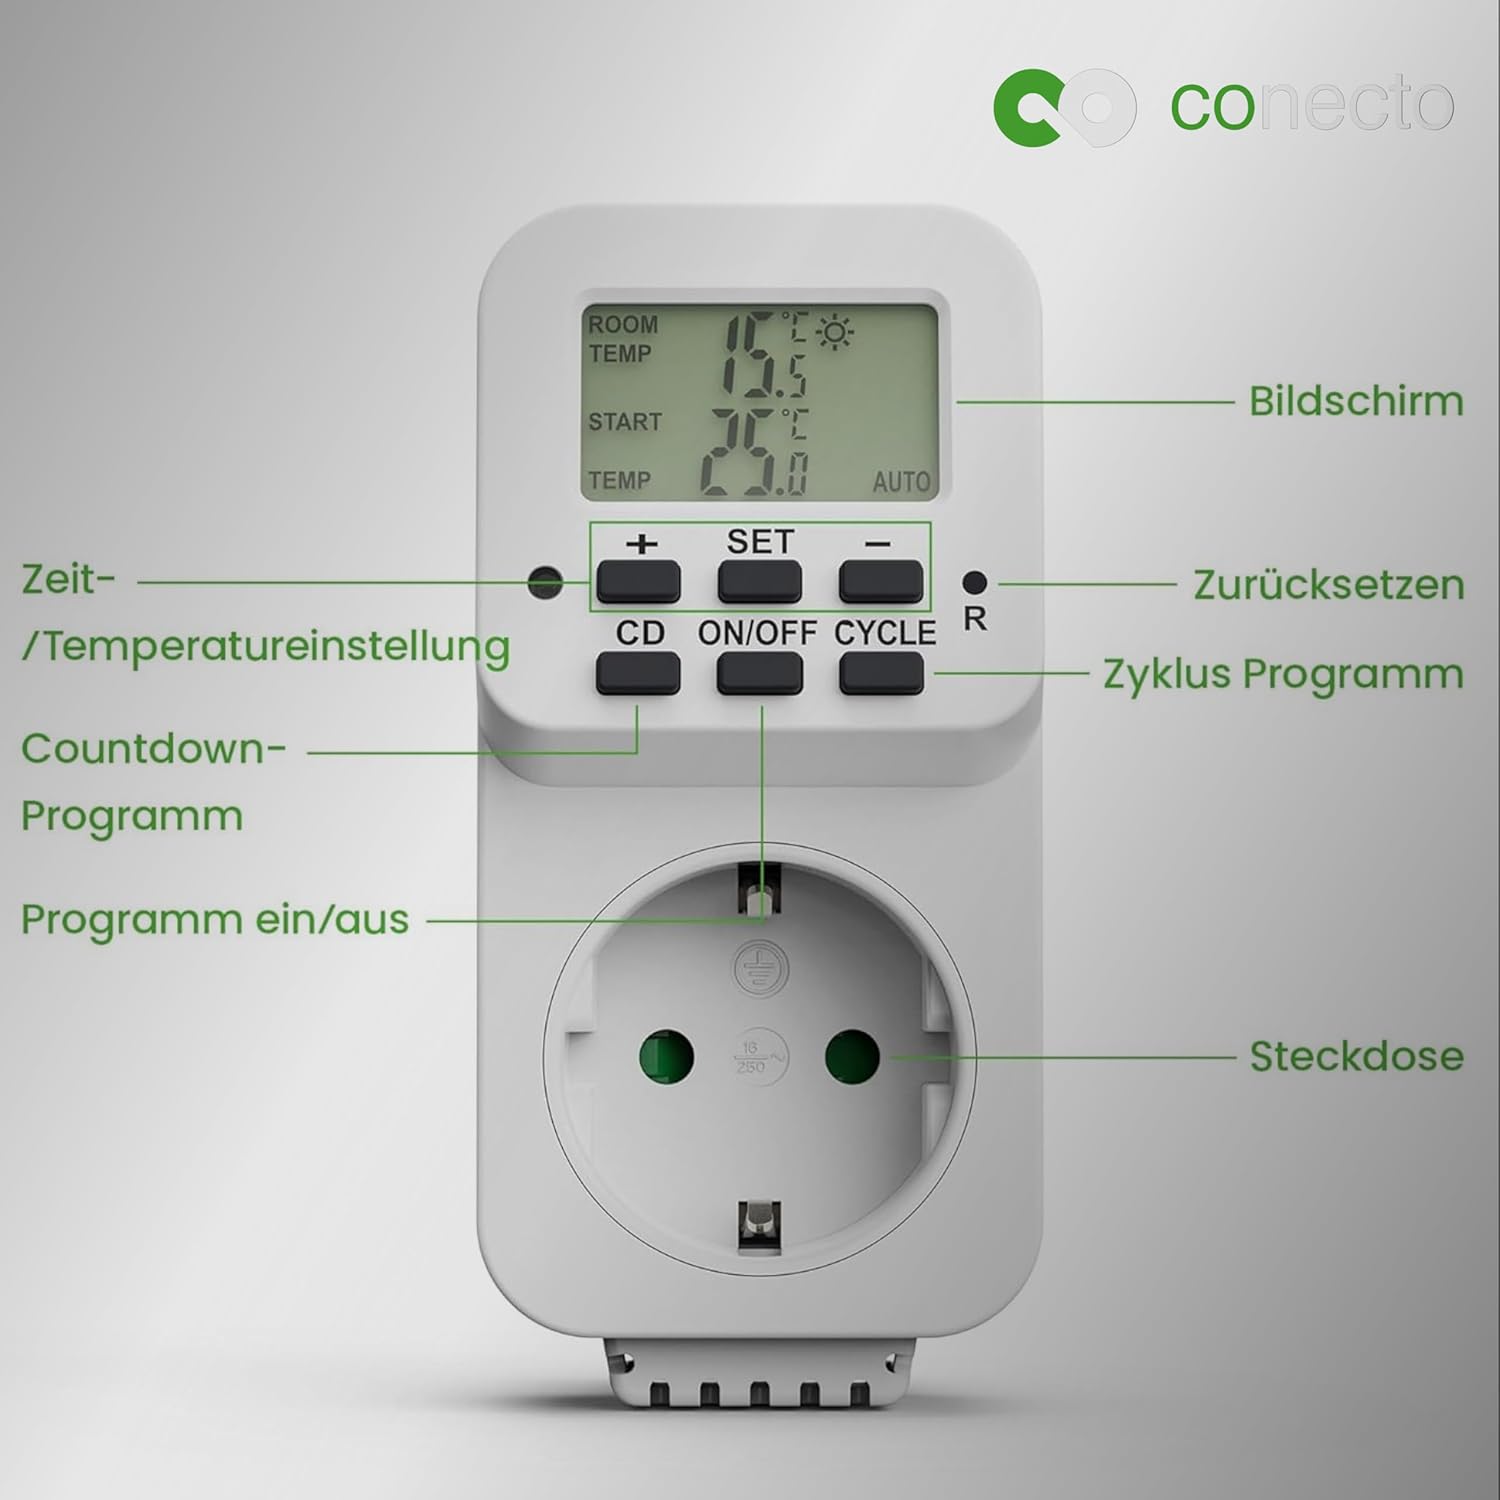
Figure 1: Front view of the conecto Digital Thermostat Plug with its display, control buttons, and power outlet clearly labeled. The display shows current room temperature, start temperature, and auto mode indicator. Buttons include '+', '-', 'SET', 'CD', 'ON/OFF', 'CYCLE', and 'R' (Reset).
Components:
- LCD Display: Shows current temperature, set temperatures, and operating modes.
- '+' / '-' Buttons: Adjust temperature settings and timer values.
- SET Button: Enters programming mode and confirms settings.
- CD (Countdown) Button: Activates and sets the countdown timer.
- ON/OFF Button: Manually turns the connected appliance on or off.
- CYCLE Button: Configures cycle timing programs.
- R (Reset) Button: Resets the device to factory defaults.
- Power Outlet: For connecting the appliance to be controlled.
- Internal Temperature Sensor: Measures ambient temperature.
4. Setup
- Unpacking: Carefully remove the thermostat plug from its packaging.
- Placement: Plug the thermostat directly into a standard 230V wall outlet. Ensure the internal sensor is not obstructed and is exposed to the ambient temperature you wish to measure.
- Connect Appliance: Plug your heating or cooling appliance (e.g., heater, fan, grow light) into the power outlet on the front of the thermostat plug. Ensure the appliance's power consumption does not exceed 3600W.
- Initial Power On: The LCD display will illuminate, showing the current room temperature.
5. Operating Instructions
5.1. Setting Temperature (Heating/Cooling Mode)
- Press the SET button once. The "START TEMP" value will flash.
- Use the '+' and '-' buttons to adjust the desired starting temperature. This is the temperature at which the connected appliance will turn on (for heating) or off (for cooling).
- Press SET again. The "STOP TEMP" value will flash.
- Use the '+' and '-' buttons to adjust the desired stopping temperature. This is the temperature at which the connected appliance will turn off (for heating) or on (for cooling).
- Press SET a third time to confirm and exit the temperature setting mode. The device will now operate based on these set points.
The thermostat automatically detects whether to operate in heating or cooling mode based on the relationship between the START and STOP temperatures. If START TEMP is lower than STOP TEMP, it operates in heating mode. If START TEMP is higher than STOP TEMP, it operates in cooling mode.
5.2. Timer Functions
The thermostat offers intelligent timing functions, including cycle timing and countdown timer, allowing for automated control of your appliances.
5.2.1. Cycle Timing (Day/Night Cycles)
- Press the CYCLE button. The display will show options for setting ON/OFF periods.
- Use '+' and '-' to set the desired ON duration (e.g., for a grow light).
- Press SET to confirm.
- Use '+' and '-' to set the desired OFF duration.
- Press SET to confirm and activate the cycle timer. The appliance will now switch on and off according to the set cycle.
5.2.2. Countdown Timer
- Press the CD button. The display will show a countdown time.
- Use '+' and '-' to set the desired countdown duration (from 0 to 24 hours).
- Press SET to start the countdown. The appliance will turn off once the countdown reaches zero.
5.3. Manual ON/OFF
Press the ON/OFF button to manually switch the connected appliance on or off, overriding any active temperature or timer programs temporarily.
5.4. Frost Protection
The device includes a frost protection feature. If the ambient temperature drops below a certain threshold (typically 0-5°C, consult the display for the exact default), the connected heating appliance will automatically activate to prevent freezing, even if not explicitly programmed for heating.
6. Maintenance
- Cleaning: Disconnect the thermostat from the power outlet before cleaning. Wipe the device with a soft, dry cloth. Do not use abrasive cleaners or solvents.
- Storage: When not in use, store the device in a cool, dry place, away from direct sunlight and extreme temperatures.
- Inspection: Periodically check the power cord and plug for any signs of damage. Do not use if damaged.
7. Troubleshooting
| Problem | Possible Cause | Solution |
|---|---|---|
| Device does not power on. | No power from outlet; device malfunction. | Check the wall outlet with another appliance. Ensure the device is fully plugged in. If problem persists, contact support. |
| Connected appliance does not turn on/off. | Incorrect temperature settings; appliance not working; thermostat in manual OFF mode. | Verify START/STOP temperature settings. Check if the appliance is functional by plugging it directly into a wall outlet. Ensure the thermostat is not in manual OFF mode (press ON/OFF button). |
| Temperature reading seems inaccurate. | Sensor obstructed; device placed in an area with drafts or direct heat/cold. | Ensure the internal sensor is clear of obstructions. Relocate the thermostat to an area that accurately represents the desired ambient temperature. |
| Timer function not working. | Timer not activated or incorrectly set. | Review the steps for setting cycle timing or countdown timer. Ensure the timer is activated after setting. |
8. Specifications
- Model: SA-TCS-001
- Voltage: 230 Volts
- Power: 3600 Watts (Max)
- Temperature Control Range: -10 °C to 40 °C
- Dimensions (L x W x H): 12 x 5.5 x 9 cm
- Weight: 150 grams
- Material: Plastic, Metal
- Special Features: Temperature Display, Programmable, Frost Protection
- Connectivity Technology: Wired
9. Warranty and Support
For warranty information or technical support, please contact conecto customer service. Details may be available on the product packaging or the official conecto website.
Manufacturer: SatChef GmbH
Country of Origin: China


