1. Introduction
This manual provides detailed instructions for the installation, operation, and maintenance of your SIXWIN Android Car Stereo for Honda Civic (2016-2020). Please read this manual thoroughly before installation and use to ensure proper functionality and to prevent damage. Keep this manual for future reference.
2. Product Overview
The SIXWIN Android Car Stereo is designed to integrate seamlessly into your Honda Civic (2016-2020), offering advanced features and enhanced connectivity. It features a 9-inch HD touchscreen, Android 13 operating system, and supports wireless Apple CarPlay and Android Auto.
2.1 Key Features
- Android 13 Operating System
- 9-inch 1080P HD Touch Screen
- 2GB RAM + 32GB ROM Memory
- Wireless Apple CarPlay & Android Auto
- Mirror Link Functionality
- Built-in GPS Navigation (online & offline)
- WiFi Connectivity
- Bluetooth Hands-free Calling & Music Streaming
- FM Radio with 18 preset stations
- EQ Function for Audio Customization
- Support for Factory Backup Camera & Steering Wheel Controls (with CANBUS)
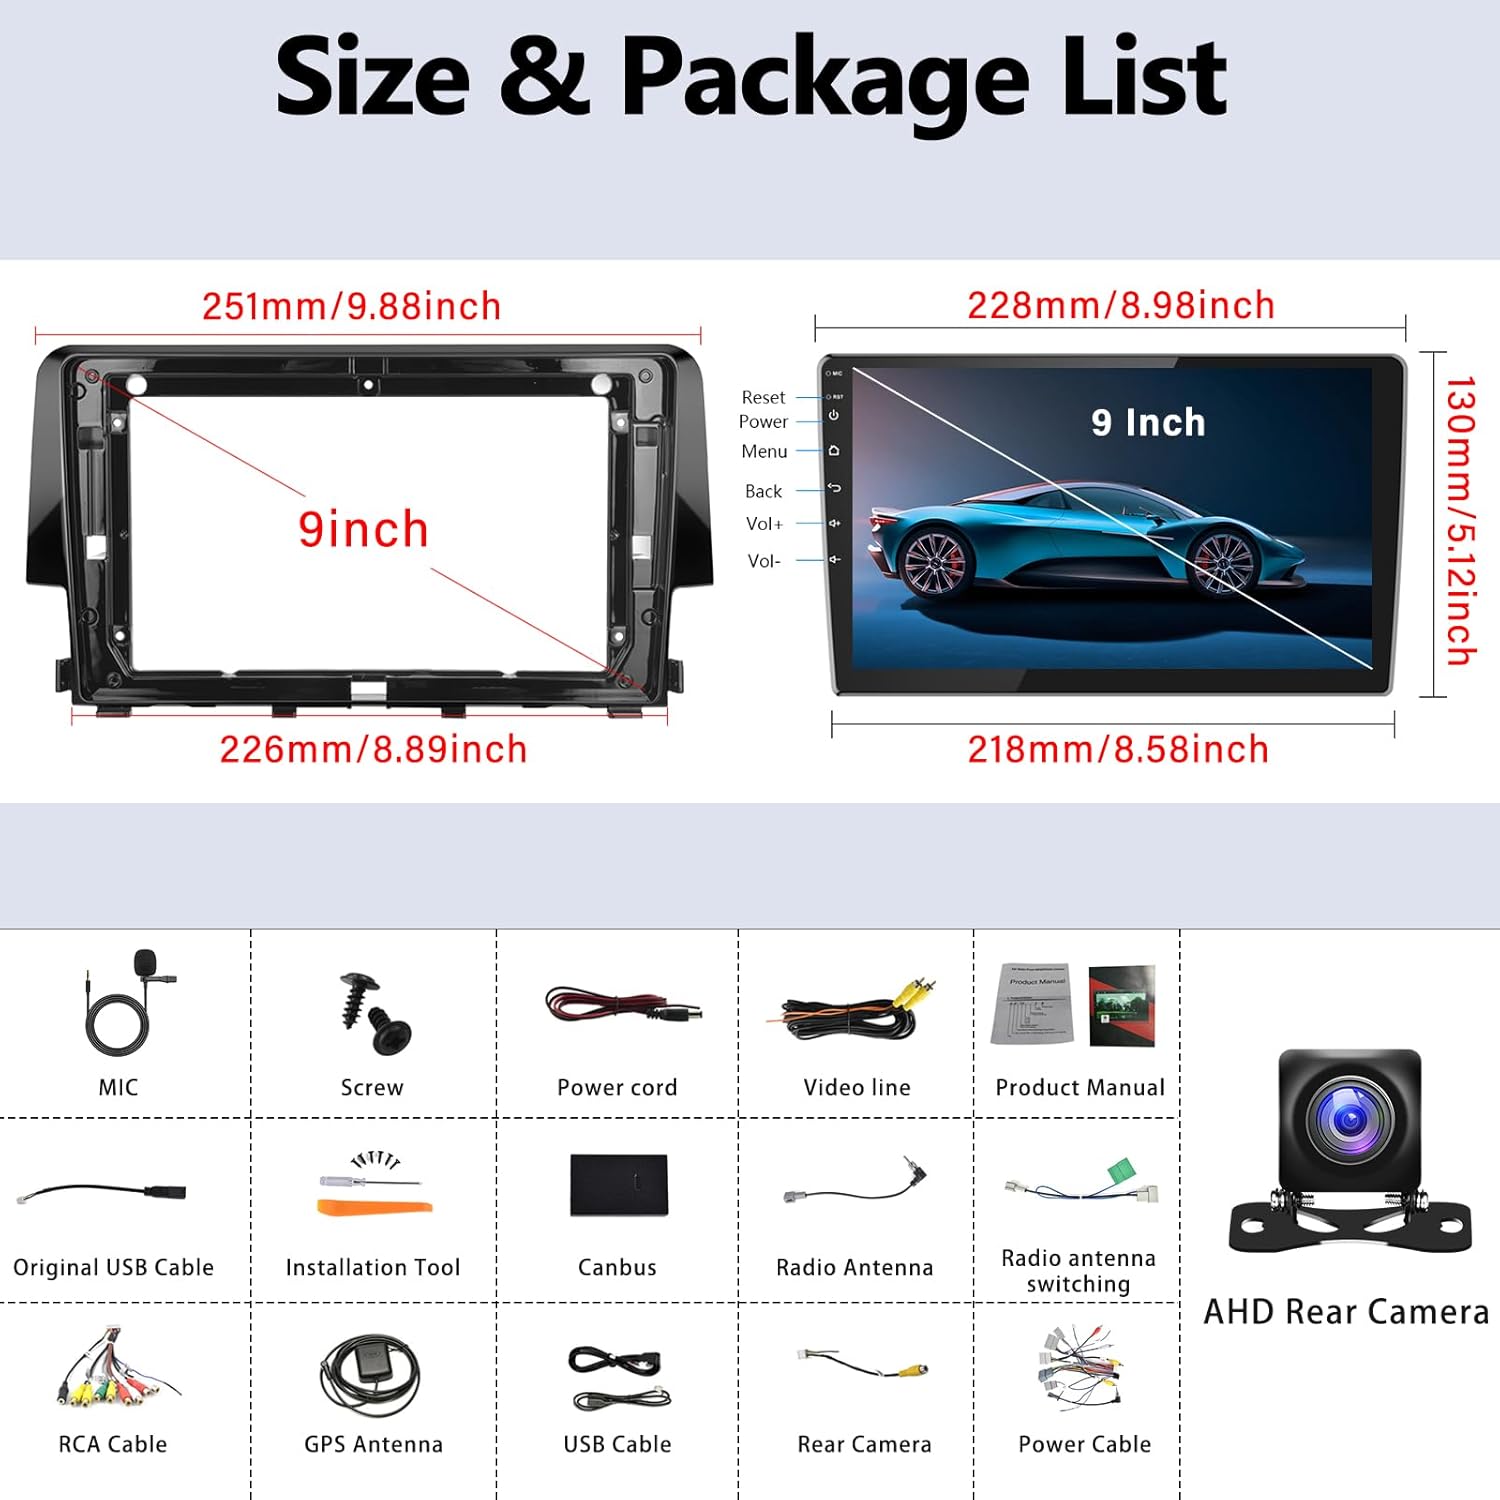
2.2 Package Contents
Verify that all items are present in the package:
- SIXWIN Android Car Stereo Unit
- Power Cord
- RCA Cable
- Original USB Cable
- GPS Antenna
- USB Cable (additional)
- Rear Camera (AHD)
- Microphone (MIC)
- Screws for installation
- Installation Tool
- Radio Antenna
- Radio Antenna Switching Cable
- Product Manual (this document)
- Dash Kit
3. Setup and Installation
Professional installation is recommended. Ensure the vehicle's battery is disconnected before beginning installation. Refer to the wiring diagram carefully.
3.1 Wiring Diagram
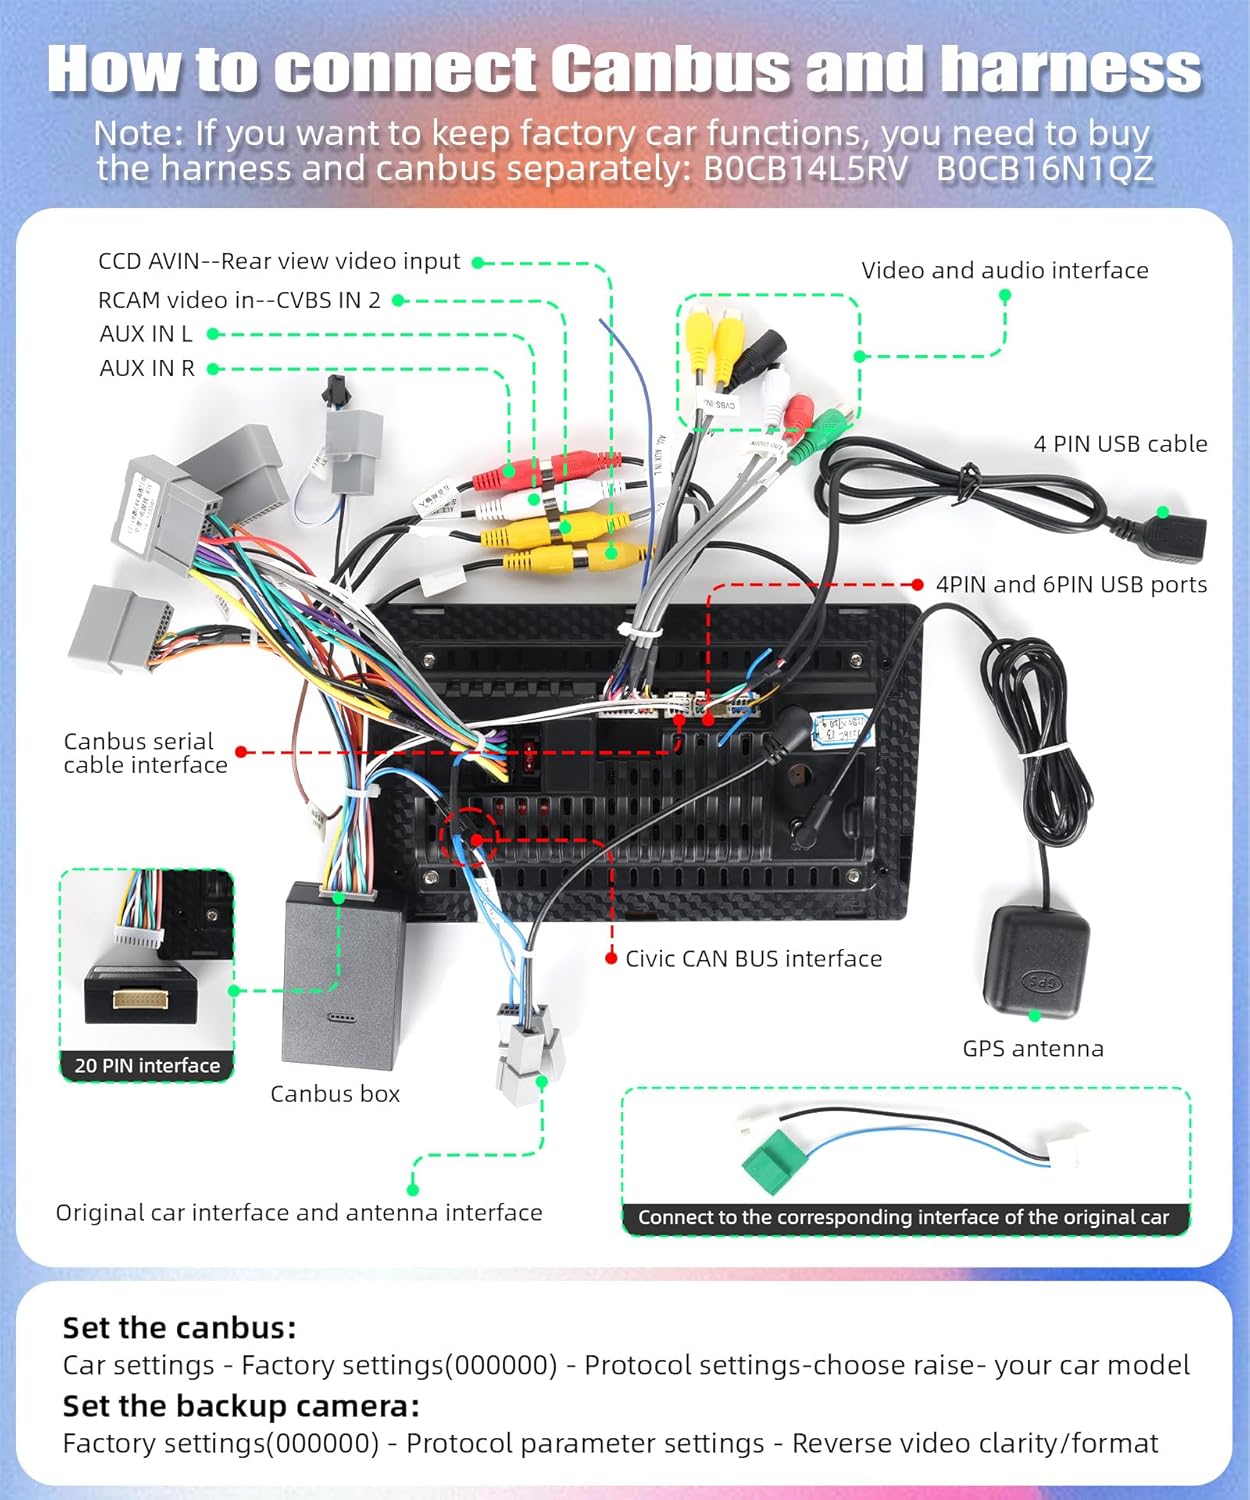
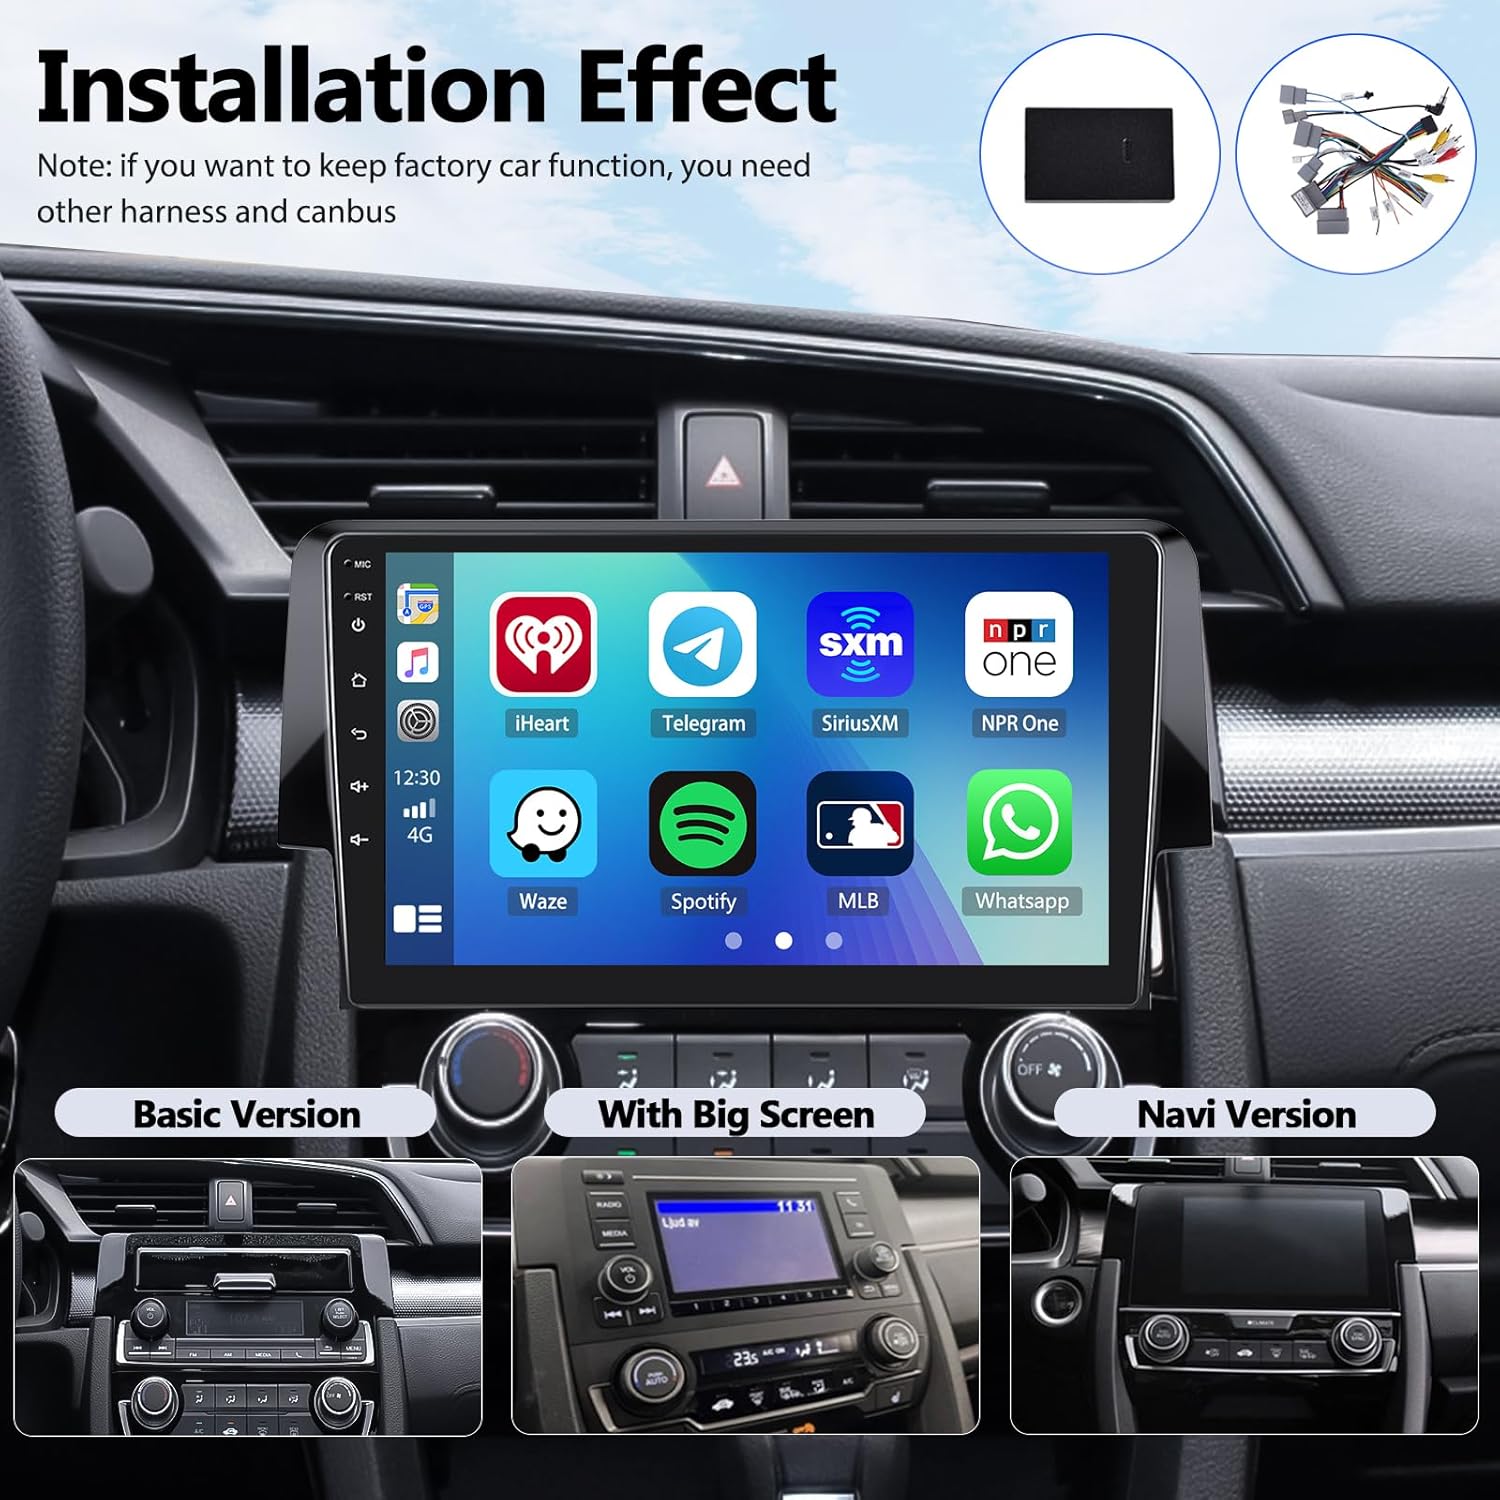
Important: If you intend to retain factory car functions (e.g., original backup camera, steering wheel controls, AC display), you may need to purchase additional harness and CANBUS modules (e.g., B0CB14L5RV, B0CB16N1QZ). Do not connect the power cord interface directly to the CANBUS interface, as this may cause a short circuit.
3.2 Installation Steps
- Remove Factory Unit: Carefully remove the existing car stereo and dashboard trim from your Honda Civic (2016-2020).
- Connect Wiring: Connect the provided power cord, RCA cables, USB cables, GPS antenna, and rear camera to the corresponding ports on the SIXWIN stereo unit. Refer to the wiring diagram for precise connections.
- CANBUS Connection (if applicable): If using a CANBUS box, connect it to the stereo and the vehicle's wiring harness. Ensure both 20-pin and 8-pin CANBUS interfaces are connected.
- Test Connections: Before fully securing the unit, temporarily connect the battery and power on the stereo to verify basic functionality (power, audio, display).
- Mount the Unit: Secure the SIXWIN stereo into the dashboard using the provided dash kit and screws.
- Reassemble Dashboard: Reinstall any removed dashboard trim pieces.
3.3 CANBUS and Factory Function Settings
After connecting the CANBUS, you must configure the settings in the stereo's system:
- Go to Car settings > Factory settings (Password: 000000) > Protocol settings.
- Choose 'raise' and then select your specific car model.
- This enables functions like Steering Wheel Controls (SWC), AC information display, and door opening status.
3.4 Backup Camera Setup
To set up the backup camera (either the included AHD camera or your factory camera via CANBUS):
- Go to Factory settings (Password: 000000) > Protocol parameter settings.
- Adjust 'Reverse video clarity/format' as needed for optimal display.
4. Operating Instructions
This section covers the primary functions and how to use them.
4.1 Wireless Apple CarPlay & Android Auto
Enjoy seamless integration with your smartphone for navigation, music, calls, and more.

4.1.1 Apple CarPlay (Wireless & Wired)
- Establish a Bluetooth connection between the car stereo and your iPhone.
- Open the 'Zlink' application on the car stereo.
- Your iPhone should automatically connect to Apple CarPlay.
4.1.2 Android Auto (Wireless & Wired)
- Download the Android Auto app on your Android phone.
- Establish a Bluetooth connection between the car stereo and your Android phone.
- Open the 'Zlink' application on the car stereo.
- Your Android phone should automatically connect to Android Auto. (Note: Samsung phones may not be supported for wireless Android Auto.)
4.2 Bluetooth Connectivity
Connect your smartphone via Bluetooth for hands-free calling and audio streaming.
- Go to the Bluetooth menu on the stereo.
- Enable Bluetooth on your phone and search for available devices.
- Select the stereo's Bluetooth name (e.g., 'SIXWIN_CAR') and pair.
- Once connected, you can make/receive calls and play music through the car speakers.

4.3 FM Radio
Access local radio stations with clear reception.
- Select the 'FM Radio' application from the main menu.
- Use the scan function to find available stations or manually tune to a frequency.
- Save your favorite stations to the 18 available presets.

4.4 GPS Navigation
Utilize built-in GPS for accurate navigation, supporting both online and offline maps.
- Open the 'Navigation' application.
- For offline maps, download the desired map data via WiFi beforehand.
- Enter your destination to receive turn-by-turn directions.

4.5 WiFi Connectivity
Connect to a WiFi hotspot to access online content, download apps, and update maps.
- Go to Settings > WiFi.
- Select an available network and enter the password if required.
- Once connected, you can browse the internet, stream videos, and use online applications.

4.6 Mirror Link
Display your smartphone screen directly on the car stereo.
- Open the 'Mirror Link' application.
- For iOS devices, connect via WiFi. For Android devices, connect via USB or WiFi.
- Follow the on-screen prompts to establish the connection.

4.7 Steering Wheel Control (SWC)
If CANBUS is correctly configured, your factory steering wheel controls will function with the new stereo.
- Volume Up/Down
- Track Skip (Next/Previous)
- Mode/Source Selection
- Answer/End Call

4.8 Split Screen Function
Use two applications simultaneously on the 9-inch screen.
- Long-press the recent apps button or drag an app to one side of the screen.
- Select a second app to occupy the other half of the screen.

4.9 EQ Function
Customize your audio experience with the built-in Equalizer.
- Access the 'EQ' application from the main menu.
- Adjust frequency bands, select preset sound modes (e.g., Pop, Rock, Classic), and fine-tune balance and fader settings.

4.10 Backup Camera Display
The included AHD backup camera provides a clear view when reversing. The display automatically switches when the vehicle is put into reverse gear.

5. Maintenance
Proper maintenance ensures the longevity and optimal performance of your car stereo.
- Screen Cleaning: Use a soft, lint-free cloth slightly dampened with water or a screen cleaner specifically designed for electronics. Avoid harsh chemicals or abrasive materials.
- Software Updates: Periodically check for software updates via WiFi to ensure the system has the latest features and bug fixes.
- General Care: Avoid exposing the unit to extreme temperatures, direct sunlight for prolonged periods, or excessive moisture.
6. Troubleshooting
Refer to this section for solutions to common issues. If problems persist, contact customer support.
| Problem | Possible Cause | Solution |
|---|---|---|
| No Power | Incorrect wiring; Blown fuse; Loose connection. | Check power cable connections. Verify vehicle fuses. Ensure battery is connected. |
| No Sound | Speaker wires disconnected; Volume too low; Mute activated; Incorrect audio source. | Check speaker wiring. Increase volume. Disable mute. Select correct audio source. |
| Backup Camera Not Displaying | Camera not connected; Incorrect CANBUS settings; Faulty camera. | Verify camera wiring. Check CANBUS protocol settings (Section 3.4). Test with another camera if possible. |
| Wireless CarPlay/Android Auto Not Connecting | Bluetooth not paired; 'Zlink' app not open; Phone compatibility issue. | Ensure Bluetooth is paired. Open 'Zlink' app. Check phone compatibility (e.g., Samsung for wireless Android Auto). |
| Steering Wheel Controls Not Working | CANBUS not connected; Incorrect CANBUS settings. | Verify CANBUS connection. Configure CANBUS protocol settings (Section 3.3). |
| Touchscreen Unresponsive | System freeze; Screen damage. | Restart the unit (press and hold power button). If unresponsive, use the reset button (if available). |
7. Specifications
| Operating System | Android 13 |
| Display Size | 9 Inches |
| Display Resolution | 1080P HD |
| RAM | 2GB |
| ROM | 32GB |
| Connectivity | Wireless CarPlay, Android Auto, Mirror Link, Bluetooth, WiFi, GPS |
| Radio Tuner | FM (87.50-108.0 MHz) |
| Audio Output Mode | Stereo |
| Mounting Type | Dashboard Mount |
| Vehicle Service Type | Car (Honda Civic 2016-2020) |
| Item Weight | 3.61 pounds |
| Product Dimensions | 1 x 1 x 1 inches (Unit only, without dash kit) |
8. Warranty and Support
8.1 Product Warranty
This SIXWIN car stereo comes with a 1-year warranty from the date of purchase, covering manufacturing defects. Please retain your proof of purchase for warranty claims. The warranty does not cover damage caused by improper installation, misuse, accidents, or unauthorized modifications.
8.2 Customer Support
For technical assistance, installation guidance, or any other inquiries, please contact our customer support team. We offer online help and can provide a PDF user manual and installation videos upon request.
Email: sixwin_vip@163.com


