1. Introduction
This manual provides detailed instructions for the installation, setup, operation, and maintenance of the Generic TH8321R1001 Vision PRO 8000 Programmable Touchscreen Thermostat. This device is designed for residential and light commercial applications, offering 7-day programmability and compatibility with up to 3 Heat/2 Cool (3H/2C) heat pump systems or up to 2 Heat/2 Cool (2H/2C) conventional systems. It features RedLINK connectivity and Integrated Air Quality (IAQ) contacts for enhanced control.
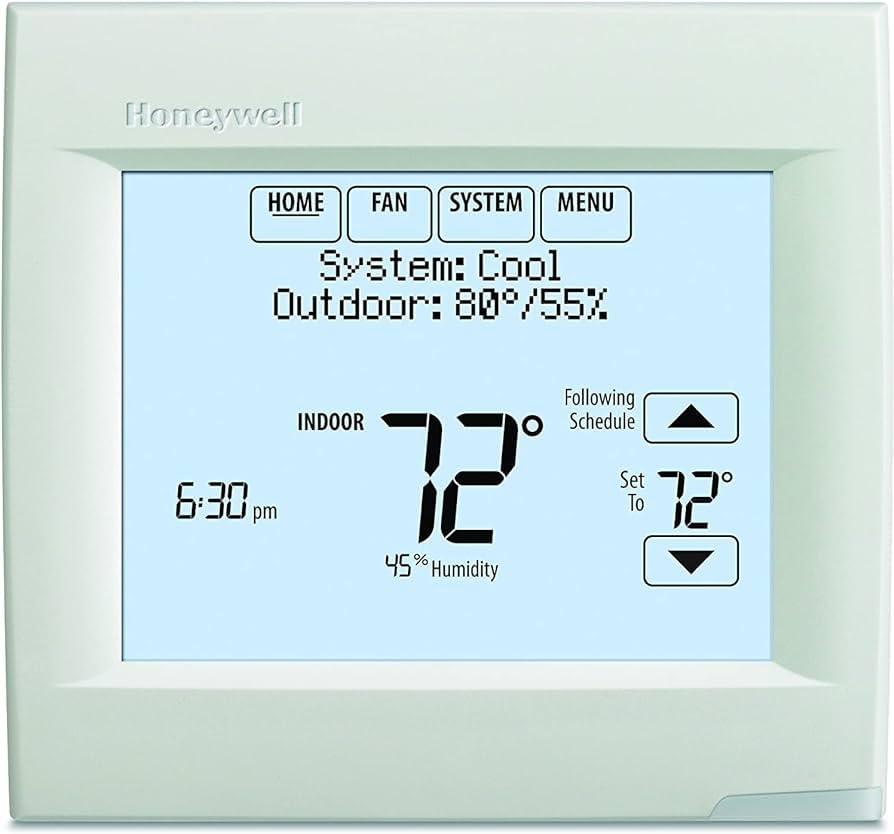
Figure 1: Generic TH8321R1001 Vision PRO 8000 Thermostat. This image shows the front of the thermostat, highlighting its touchscreen display and sleek, white rectangular form factor.
2. Safety Information
WARNING: Electrical Hazard
- Always disconnect power to the heating/cooling system at the main service panel before installing or servicing the thermostat to prevent electrical shock or equipment damage.
- Installation should be performed by a qualified technician.
- Wear appropriate personal protective equipment, such as work gloves, during installation to prevent injury.
- Ensure all wiring complies with local electrical codes and ordinances.
Before proceeding with installation, carefully read and understand all instructions. Confirm compatibility of this thermostat with your existing HVAC system.
3. Installation
3.1. Compatibility and Replacement
The TH8321R1001 is a direct replacement for the YTH9421C1002 model. Note that this product does not include the Equipment Interface Module (EIM) THM5421R1021, which was part of the YTH9421C1002 package. The EIM is required for wireless capabilities and is sold separately.
3.2. Wireless Requirements
- Equipment Interface Module (EIM) THM5421R1021: Required to enable wireless functionality. Sold separately.
- RedLINK Internet Gateway (THM6000R1002): Required for remote access to the unit via Wi-Fi. Sold separately.
3.3. Mounting Options
The thermostat offers flexible installation methods to accommodate various wiring scenarios:
- Wired Directly to Equipment: Standard wiring connection to the HVAC system.
- 2-Wire or Wireless with Equipment Interface Module (EIM): Utilizes the EIM for simplified wiring or wireless communication.
- 2-Wire or Wireless with TrueZONE: Integration with a TrueZONE system for zoned control.
Before mounting, ensure the wall plate is securely fastened and all wiring connections are correct according to the wiring diagrams provided with the EIM or TrueZONE system, if applicable.
4. Initial Setup and Configuration
4.1. On-Screen Setup
The TH8321R1001 features a plain language, on-screen setup process designed to minimize installation errors and reduce the need for a physical manual. Follow the prompts on the touchscreen display to configure your system settings, including:
- System type (heat pump/conventional)
- Number of heating/cooling stages
- Fan operation
- Date and time
- Programming schedule
4.2. Advanced Configuration
- MicroSD Card: Installer settings can be copied from one thermostat to another using a microSD card, streamlining setup for multiple units.
- Dealer Information: The thermostat can display customizable dealer information and alerts, which can be configured during the setup process.
4.3. RedLINK Internet Gateway Setup (Optional)
If using the RedLINK Internet Gateway (THM6000R1002), follow its specific instructions to connect it to your home network. Once connected, you can register your thermostat with Total Connect Comfort Services. This enables remote monitoring and control of your heating and cooling system via free applications available for Apple and Android devices.
5. Operating Instructions
5.1. Touchscreen Interface
The Vision PRO 8000 features an intuitive touchscreen display for all operations. Navigate through menus by touching the desired options. The main screen typically displays current temperature, setpoint, system mode, and fan status.
5.2. System Modes
Common system modes include:
- Heat: Activates the heating system.
- Cool: Activates the cooling system.
- Auto: Automatically switches between heating and cooling as needed to maintain the set temperature.
- Off: Turns off the heating and cooling systems.
- Emergency Heat (Heat Pump Systems): Activates auxiliary heating when the heat pump cannot meet the demand.
5.3. Fan Modes
- Auto: Fan runs only when the heating or cooling system is active.
- On: Fan runs continuously, regardless of heating or cooling demand.
5.4. Programming Schedule
The thermostat supports 7-day programmable scheduling. Access the schedule menu on the touchscreen to set different temperature setpoints for various times of the day and days of the week. This allows for energy savings by adjusting temperatures when the building is unoccupied or during sleep hours.
5.5. IAQ Contacts Control
The universal IAQ contacts allow control over humidification, dehumidification, or ventilation systems. These functions can typically be accessed and configured through the thermostat's advanced settings menu, providing integrated control over indoor air quality.
5.6. Remote Control (with RedLINK Gateway)
If a RedLINK Internet Gateway is installed and configured, you can monitor and adjust your thermostat settings remotely using the Total Connect Comfort app on your smartphone or tablet. This includes changing temperature, system mode, and viewing system status from anywhere with an internet connection.
6. Maintenance
6.1. Cleaning the Thermostat
To clean the touchscreen display, gently wipe it with a soft, damp cloth. Do not use abrasive cleaners, solvents, or chemical sprays, as these can damage the screen or internal components.
6.2. System Filter Replacement
While the thermostat does not directly manage filter replacement, it may display reminders if configured during setup. Regularly check and replace your HVAC system's air filter as recommended by your HVAC system manufacturer to ensure optimal performance and air quality.
6.3. Battery Replacement (if applicable)
This thermostat is typically powered by the HVAC system. If your specific installation includes a battery backup, replace batteries annually or when a low battery indicator appears on the screen.
7. Troubleshooting
If you experience issues with your thermostat, refer to the following common troubleshooting steps:
| Problem | Possible Cause | Solution |
|---|---|---|
| Thermostat screen is blank. | No power to the thermostat; loose wiring; tripped circuit breaker. | Check power supply to HVAC system. Ensure circuit breaker is not tripped. Verify wiring connections are secure. |
| Heating/Cooling system not responding. | Incorrect system mode; wiring issue; system lockout. | Ensure thermostat is in the correct mode (Heat/Cool/Auto). Check wiring. Wait 5 minutes for system lockout to reset. |
| Temperature readings seem inaccurate. | Thermostat located near heat source/draft; calibration needed. | Relocate thermostat if possible. Consult advanced settings for temperature calibration options. |
| Cannot connect to Wi-Fi/Remote access not working. | RedLINK Internet Gateway not installed/configured; network issues. | Ensure RedLINK Internet Gateway (THM6000R1002) is installed and properly connected to your router. Check home Wi-Fi network status. |
For persistent issues, consult a qualified HVAC technician or contact customer support.
8. Specifications
- Model Name: TH8321R1001
- Brand: Generic
- Controller Type: Android (refers to app compatibility)
- Special Feature: Programmable
- Color: White
- Specific Uses: Residential, Light Commercial
- Temperature Control Type: Programmable, Smart/Remote
- Voltage: 24 Volts
- Material: Plastic
- Shape: Rectangular
- Display Type: Touchscreen
- Control Type: Touch
- Control Method: App (via RedLINK Gateway)
- Connectivity Protocol: Wi-Fi (via RedLINK Gateway)
- Mounting Type: Wall Mount, Surface Mount
- Style: Modern
- Backlight: Yes
9. Warranty and Support
For warranty information, please refer to the documentation provided with your purchase or contact the seller directly. Warranty terms and conditions may vary. For technical support, please contact the retailer or a certified HVAC professional.
Note: Please confirm compatibility before purchasing or installing any replacement parts or accessories.