1. Product Overview
The Ebikestar G51 LCD Display Meter is a control panel designed for electric bicycles and scooters, providing real-time data and control over various functions. It is compatible with 12V, 24V, 36V, 48V, and 60V systems and features a waterproof design with an SM plug for easy connectivity.

Figure 1.1: Front view of the G51 LCD Display Meter, illustrating its main screen with various data points such as battery level, power output, assist level, current speed, and total distance (ODO).
Key Features:
- Real-time data display: Battery charge, speed (average, maximum, current), distance (single trip, total ODO), PAS level, error indication, cruise, braking, and headlight indication.
- Waterproof design for enhanced durability.
- LCD backlight for clear visibility in various lighting conditions.
- User-friendly settings interface for customization.
- Compact and lightweight ABS shell with a high-hardness acrylic screen cover.
2. Setup and Installation
This section provides instructions for properly installing your G51 LCD Display Meter on your electric bicycle or scooter.
2.1 Package Contents:
- G51 Electric Bicycle LCD Display Meter (1 unit)
2.2 Mounting the Display:
The G51 display is designed for handlebar mounting. Ensure the mounting location provides clear visibility and does not obstruct steering or other controls.
- Identify a suitable position on your handlebar.
- Securely attach the display's mounting bracket to the handlebar.
- Ensure the display is firmly in place and does not rotate freely.

Figure 2.1: The G51 LCD Display Meter shown mounted on the handlebar of an electric scooter, demonstrating its compact size and typical installation position.
2.3 Connecting the Display:
The G51 display uses an SM plug for connectivity. Ensure your electric vehicle's wiring harness is compatible with this plug type.
- Locate the SM plug on your electric vehicle's wiring harness.
- Align the SM plug from the G51 display with the corresponding connector on your vehicle.
- Gently push the connectors together until they click into place, ensuring a secure connection.
- Route the cable neatly along the handlebar or frame, securing it with cable ties if necessary, to prevent interference with moving parts.

Figure 2.2: Close-up view of the SM plug connector and the wiring harness of the G51 display, highlighting the connection type for installation.
3. Operating Instructions
This section details how to operate your G51 LCD Display Meter and access its various functions and settings.
3.1 Button Functions:
- '+' (Plus) Button: Increases values, navigates up in menus, or increases PAS level.
- '-' (Minus) Button: Decreases values, navigates down in menus, or decreases PAS level.
- 'M' (Mode) Button: Toggles display modes, confirms selections, or enters/exits settings.

Figure 3.1: A detailed view of the G51 display, highlighting the '+', 'M', and '-' buttons on the left side, and the various data fields on the screen.
3.2 Displayed Information:
The G51 display provides comprehensive real-time information about your electric vehicle's status:
- Battery Level: Indicates the remaining battery charge.
- Speed: Displays current, average, and maximum speed.
- Distance: Shows single trip distance and total odometer (ODO).
- PAS Level: Indicates the current Pedal Assist System level.
- Error Indication: Displays codes for system malfunctions.
- Cruise: Indicates if cruise control is active.
- Brake: Shows when the brakes are engaged.
- Headlight Indication: Confirms if the headlights are on.
3.3 Accessing Settings:
To enter the settings interface, press and hold both the '+' and '-' buttons simultaneously. Navigate through the settings using the '+' and '-' buttons, and confirm selections or exit using the 'M' button.
Available Settings:
- Backlight Brightness
- Unit (e.g., Km/h, Mph)
- Voltage Level (e.g., 24V, 36V, 48V, 60V)
- Auto-Off Time
- PAS Level Configuration
- Wheel Size
- Motor Magnet Numbers
- Speed Limit
- Direct Start and Kick-to-Start Mode
- Drive Mode
- PAS Sensitivity
- PAS Start Power
- PAS Sensor Type
- Controller Current Limit
- ODO Clearance (reset total distance)
4. Maintenance
Proper maintenance ensures the longevity and optimal performance of your G51 LCD Display Meter.
4.1 Cleaning:
- Wipe the display screen and body with a soft, damp cloth.
- Avoid using abrasive cleaners, solvents, or harsh chemicals, as these can damage the screen or casing.
- Ensure no water enters the display unit, despite its waterproof design, to prevent internal damage.
4.2 Storage and Environmental Conditions:
- The display is designed to operate within a temperature range of -20°C to 60°C.
- When not in use for extended periods, store the electric vehicle and display in a dry, cool place away from direct sunlight and extreme temperatures.
- Protect the display from physical impacts and excessive vibrations.
5. Troubleshooting
This section provides guidance for common issues you might encounter with your G51 LCD Display Meter.
| Problem | Possible Cause | Solution |
|---|---|---|
| Display does not power on. | Loose connection, no power from battery, faulty display. | Check all cable connections, especially the SM plug. Ensure the vehicle's battery is charged and connected. If issues persist, contact support. |
| Incorrect speed reading. | Incorrect wheel size setting, sensor issue. | Access settings and verify the wheel size is correctly configured. Check the speed sensor for damage or misalignment. |
| Display shows an error code. | System malfunction (e.g., motor, controller, sensor). | Refer to your electric vehicle's main controller manual for specific error code meanings. Often, restarting the system can clear temporary errors. If persistent, consult a technician. |
| Buttons are unresponsive. | Dirt/debris, internal malfunction. | Ensure buttons are clean and free of obstructions. If unresponsive, a hardware issue may be present. |
6. Specifications
Detailed technical specifications for the Ebikestar G51 LCD Display Meter.
| Feature | Detail |
|---|---|
| Brand | Ebikestar |
| Model Name | Electric Bicycle LCD Display Meter (G51) |
| Voltage Compatibility | DC 24V~60V |
| Screen Size | 1.9 Inches (4.8 x 8.2 cm) |
| Display Type | LCD |
| Connectivity Technology | SM Wiring (SM Plug) |
| Shell Material | ABS |
| Screen Cover Material | High Hardness Acrylic |
| Working Temperature | -20°C to 60°C |
| Cable Length | 1.8 meters |
| Protocol | UART #2 |
| Mounting Type | Handlebar Mount |
| Human Interface Input | Buttons |
| Color | Black |
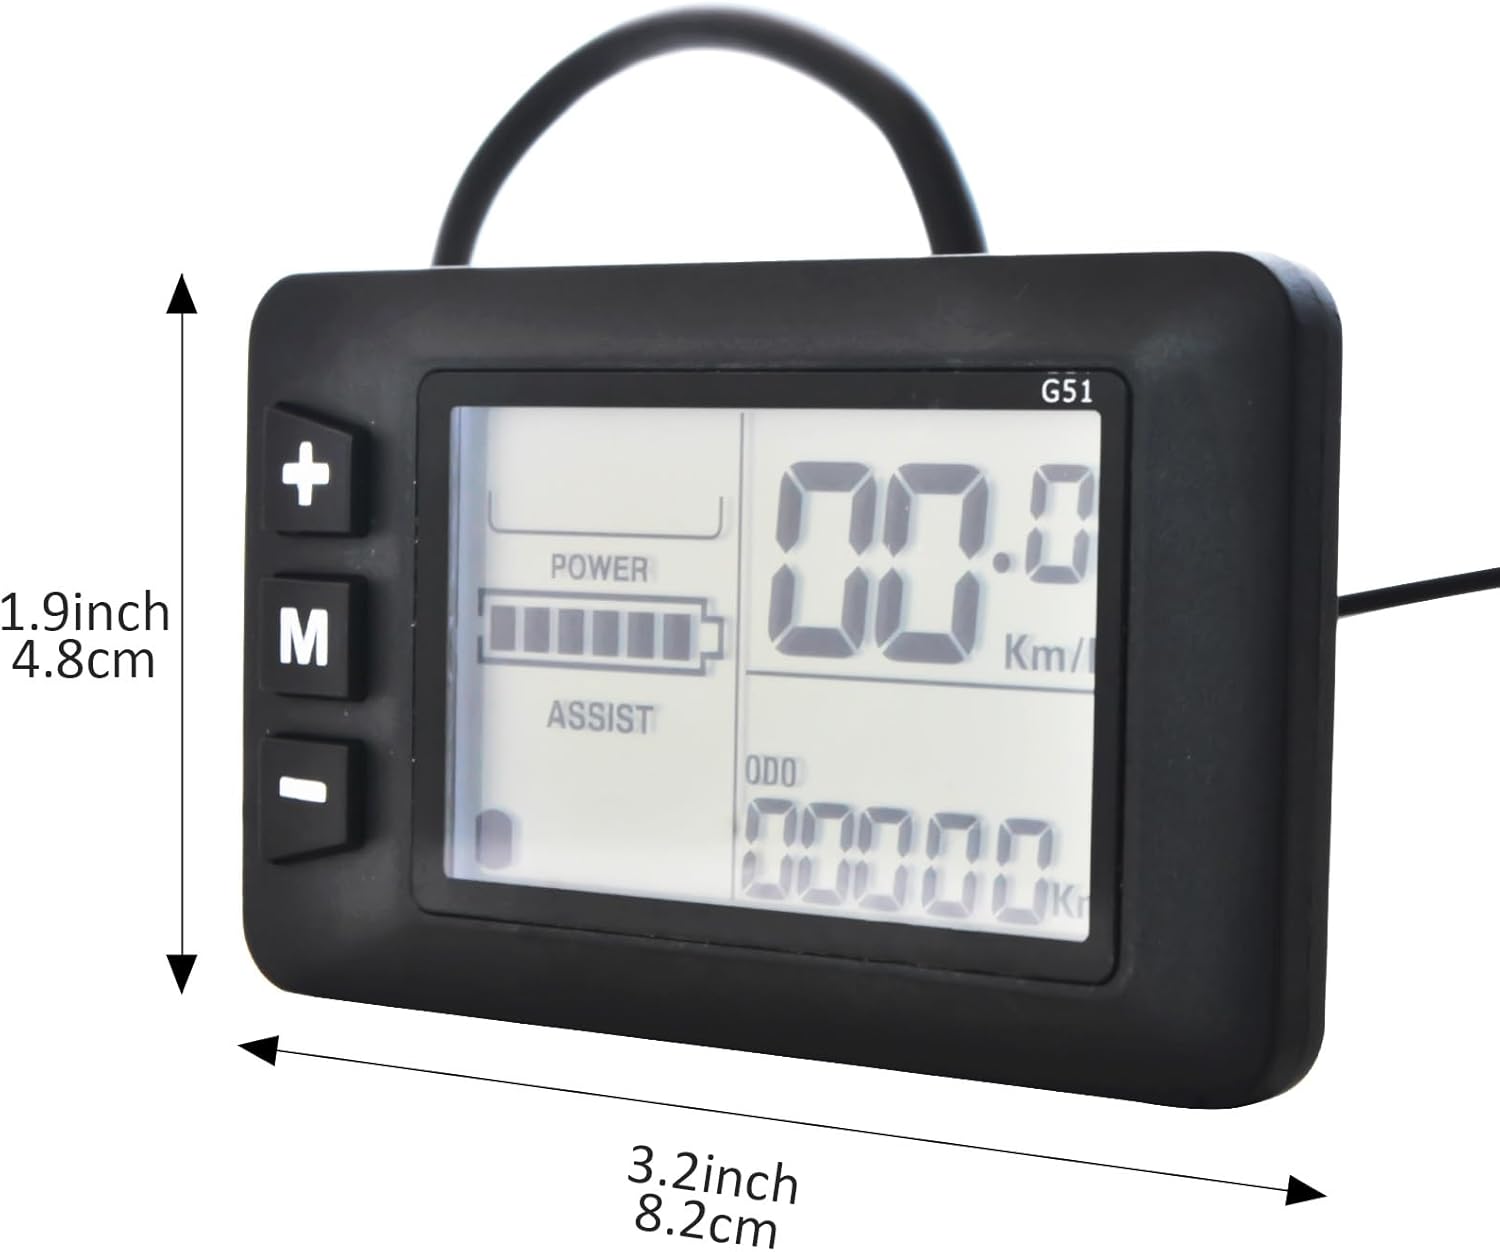
Figure 6.1: The G51 LCD Display Meter with its approximate dimensions (1.9 inches / 4.8 cm height and 3.2 inches / 8.2 cm width) indicated for reference.
7. Warranty and Support
7.1 Warranty Information:
The Ebikestar G51 Electric Bicycle LCD Display Meter comes with a 1 Year Manufacturer Warranty from the date of purchase. This warranty covers defects in materials and workmanship under normal use.
7.2 Customer Support:
If you have any questions regarding the product, its installation, operation, or troubleshooting, please do not hesitate to contact Ebikestar customer support. We aim to answer all inquiries within 24 hours.
Note: To ensure compatibility, please carefully check the product specifications and your electric vehicle's requirements before purchasing.