Introduction
This manual provides detailed instructions for the installation, configuration, and operation of the JUXIESHI X99 PR8 Motherboard. Please read this manual thoroughly before installing or using the product to ensure proper functionality and to prevent damage. This motherboard is designed to support Intel E5 V3 and V4 series processors with an LGA 2011-3 socket.
Product Overview
The JUXIESHI X99 PR8 is a high-performance motherboard designed for desktop personal computers and servers. It features an LGA 2011-3 socket, supporting Intel Xeon E5 V3 and V4 processors. Key features include DDR3 memory support, NVMe/NGFF M.2 storage, Gigabit LAN, and PCIe 3.0 expansion slots.

Image: The JUXIESHI X99 PR8 Motherboard displayed alongside its product packaging, highlighting its design and branding.
Key Features
- Processor Support: Compatible with Intel E5 V3 and V4 series processors using the LGA 2011-3 socket.
- Memory: Four DDR3 memory slots supporting up to 128GB RAM at speeds up to 2133MHz.
- Storage: Features NVMe/NGFF M.2 slot for high-speed storage solutions.
- Expansion Slots: Includes PCIe 3.0 x16 and PCIe 3.0 x1 slots for graphics cards and other expansion cards.
- Networking: Integrated Gigabit LAN for reliable network connectivity.
- USB Connectivity: A total of 10 USB ports for peripheral connections.
LGA 2011-3 Socket
The motherboard is equipped with an LGA 2011-3 socket, designed to accommodate Intel Xeon E5 V3 and V4 series processors. This includes processors such as E5 2629 V3, E5 2649 V3, E5 2669 V3, E5 2666 V3, E5 2673 V3, E5 2676 V3, E5 2678 V3, and E5 2696 V3.
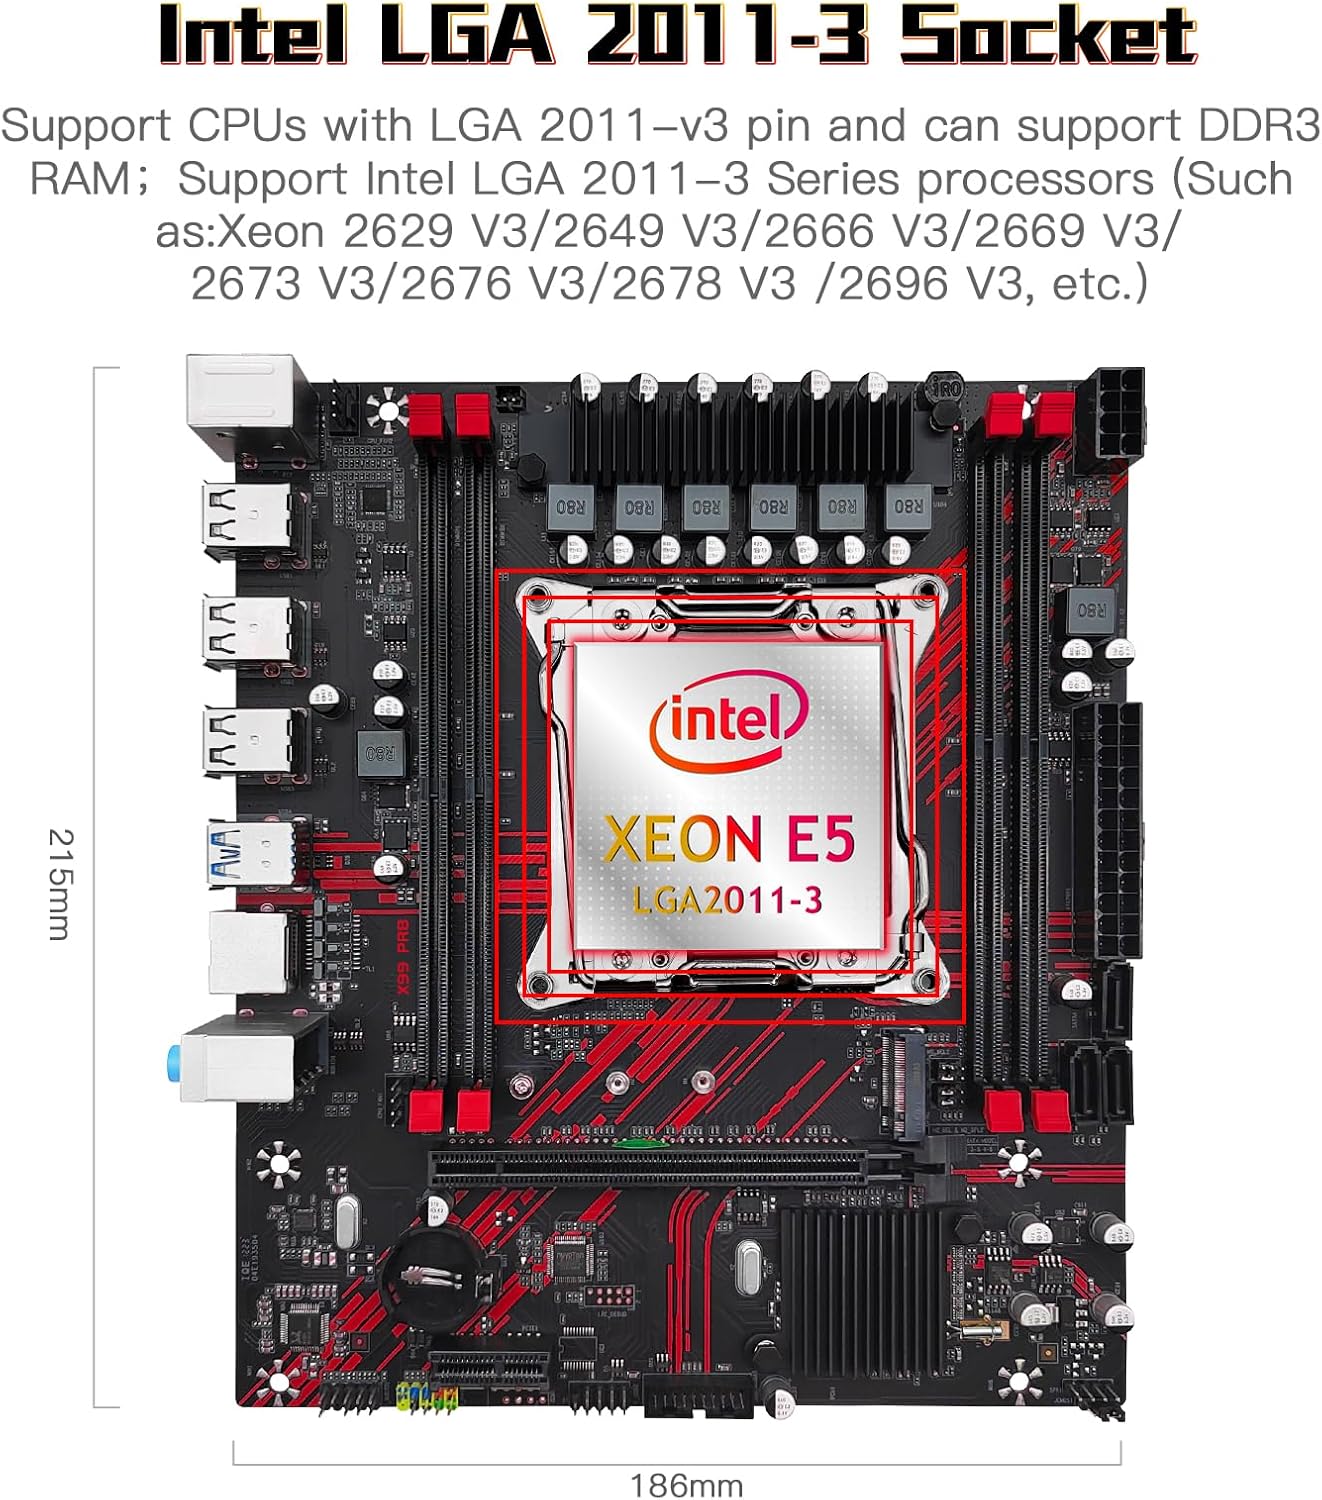
Image: Close-up view of the LGA 2011-3 CPU socket on the motherboard, indicating compatibility with Intel Xeon E5 processors and showing dimensions.
DDR3 Memory Support
The X99 PR8 motherboard features four DDR3 memory slots, supporting a maximum capacity of 128GB. It is compatible with DDR3 RAM modules operating at speeds of 800, 1066, 1200, 1333, 1600, 1866, and 2133MHz.

Image: The four DDR3 memory slots on the motherboard, highlighted to show their location and dual-channel configuration.
PCIe Expansion Interface
The motherboard includes one PCI-E 3.0 x16 slot for high-performance graphics cards and one PCI-E 3.0 x1 slot for other expansion cards. The PCIe Gen3 standard provides 8 Giga transfers per second, ensuring high bandwidth for connected devices.

Image: Close-up of the PCIe 3.0 x16 and PCIe 3.0 x1 expansion slots on the motherboard, indicating their positions.
High Expansion M.2 Interface
The motherboard supports both NVMe and SATA (NGFF) M.2 storage devices. The default mode is NVMe Protocol. When using NVMe (PCIe 3.0 x4) M.2 mode, read/write speeds can reach up to 3600MB/s. Mode switching is performed via M.2 mode switching caps.

Image: The M.2 slot on the motherboard, illustrating the NVMe and NGFF (SATA) protocol options and the location of the mode switching caps.
Setup and Installation
Before beginning installation, ensure your system is powered off and disconnected from the power source. Handle the motherboard by its edges to avoid static discharge.
1. CPU Installation
- Locate the LGA 2011-3 CPU socket on the motherboard.
- Open the CPU socket retention mechanism.
- Carefully align the CPU with the socket, ensuring the triangular mark on the CPU matches the mark on the socket.
- Gently place the CPU into the socket without forcing it.
- Close the socket retention mechanism to secure the CPU.
- Apply thermal paste to the CPU and install the CPU cooler according to its manufacturer's instructions.
2. Memory (RAM) Installation
The motherboard supports DDR3 memory modules. For optimal performance, install memory in a dual-channel configuration.
- Locate the four DDR3 DIMM slots.
- Open the clips at both ends of the DIMM slot.
- Align the notch on the DDR3 memory module with the key in the DIMM slot.
- Press down firmly on both ends of the memory module until the clips snap into place.
- For single RAM installation, use slot 4. For dual RAM installation, use slots 1 and 4.
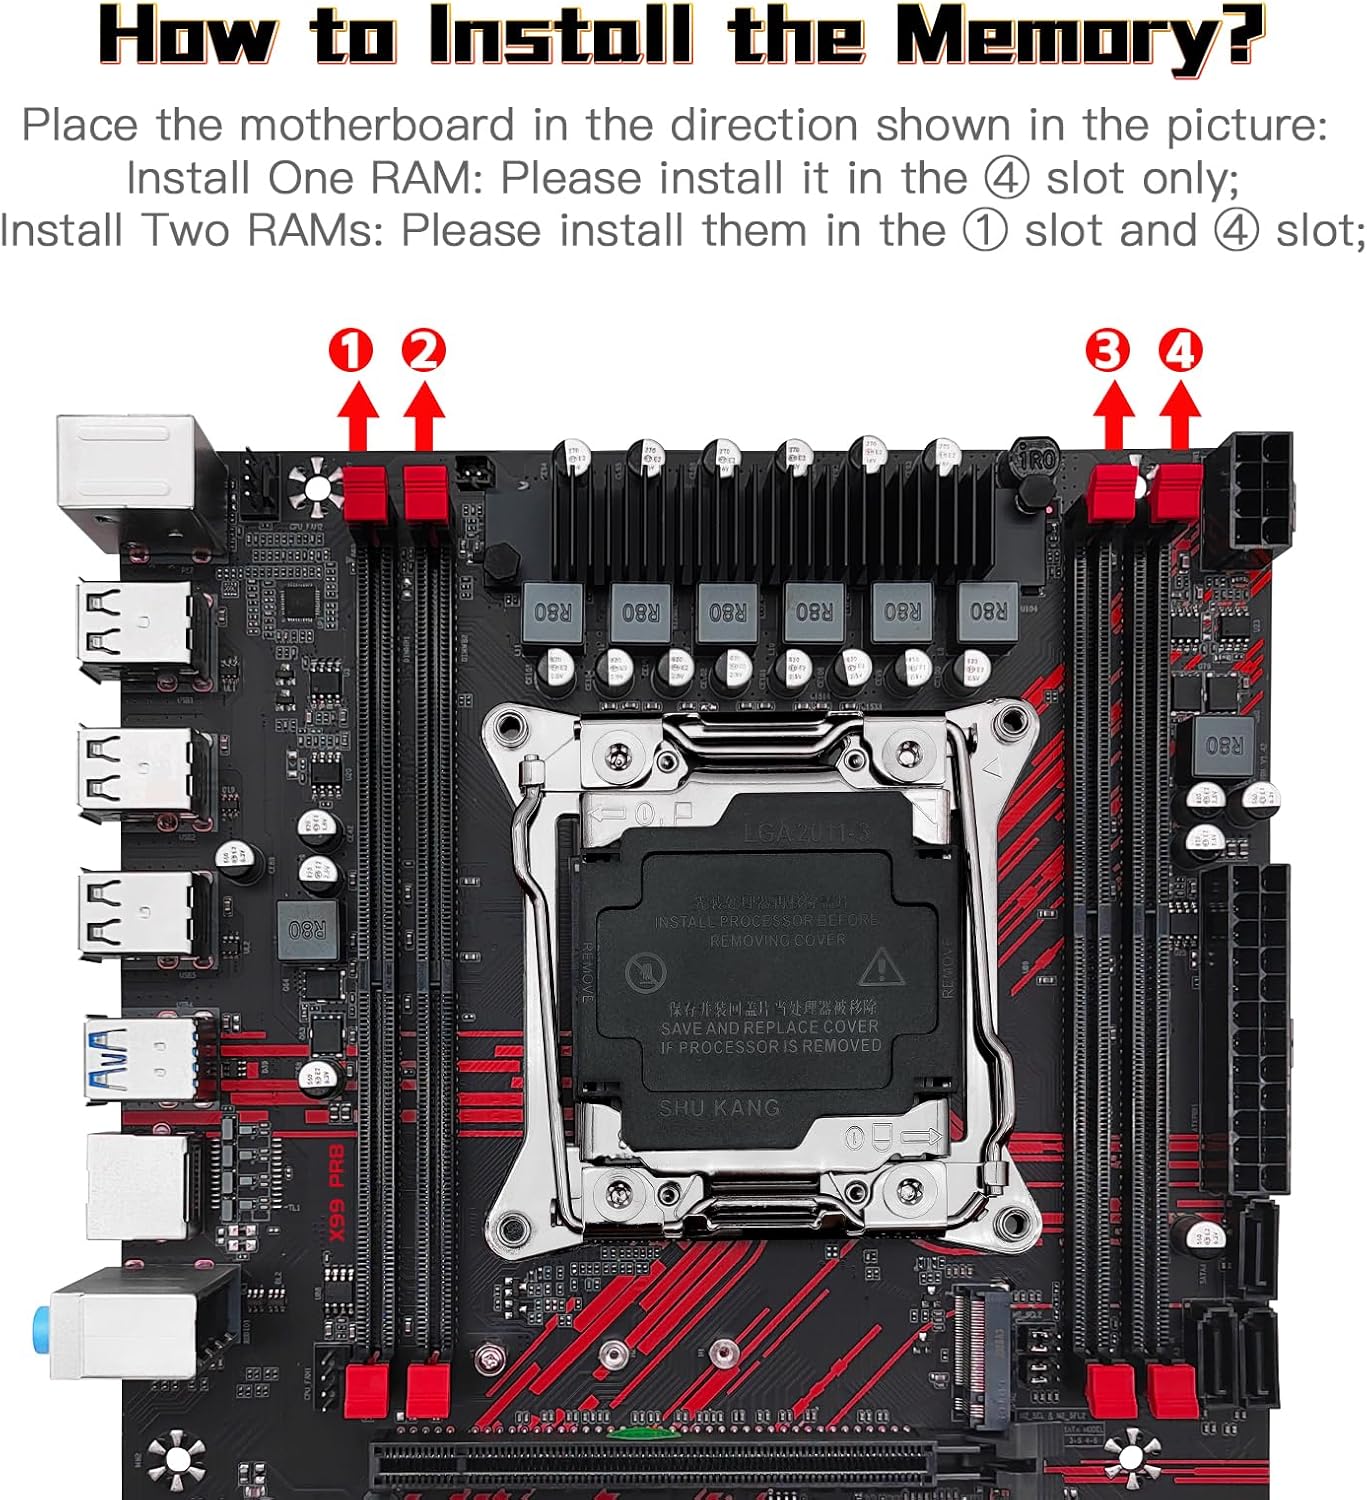
Image: Diagram illustrating the correct placement for single and dual DDR3 RAM module installation in the motherboard's memory slots.
3. Connecting Peripherals and Power
Refer to the diagram below for the location of various connectors on the motherboard.
- 24-pin ATX Power Connector: Connect the main power supply cable.
- 8-pin CPU Power Connector: Connect the CPU auxiliary power cable.
- SATA Ports: Connect SATA storage devices (HDDs/SSDs).
- USB Headers: Connect front panel USB ports.
- Front Panel Headers: Connect power button, reset button, HDD LED, and power LED.
- Fan Headers: Connect CPU fan and case fans.
- Audio Headers: Connect front panel audio.

Image: A detailed diagram of the JUXIESHI X99 PR8 motherboard, labeling all major ports, headers, and components such as CPU socket, RAM slots, PCIe slots, SATA ports, USB ports, and fan headers.
Operating Instructions
Once all components are correctly installed and connected, you can power on your system. The motherboard will initiate the Power-On Self-Test (POST) process. During POST, the system checks for essential hardware components. If successful, the system will proceed to boot from the installed operating system.
- BIOS/UEFI Access: To enter the BIOS/UEFI setup utility, press the designated key (commonly DEL, F2, or F10) during the initial boot sequence. Consult your system's documentation for the exact key.
- Operating System Installation: If installing a new operating system, ensure your boot device (USB drive or DVD) is properly configured in the BIOS/UEFI boot order.
- Driver Installation: After operating system installation, install all necessary drivers for the motherboard chipset, LAN, audio, and any other integrated components. These are typically provided on a driver CD or available for download from the manufacturer's website.
Maintenance
Regular maintenance helps ensure the longevity and stable operation of your motherboard and system.
- Dust Removal: Periodically clean dust from the motherboard and other components using compressed air. Ensure the system is powered off and unplugged before cleaning.
- BIOS/UEFI Updates: Check the manufacturer's website for BIOS/UEFI updates. Updates can improve stability, add support for new hardware, or fix bugs. Follow update instructions carefully to avoid system damage.
- Driver Updates: Keep your system drivers updated to ensure optimal performance and compatibility.
- Environmental Control: Operate the system in a well-ventilated area, away from direct sunlight, excessive heat, and humidity.
Troubleshooting
If you encounter issues with your motherboard, refer to the following common troubleshooting steps:
- No Power:
- Ensure all power cables (24-pin ATX and 8-pin CPU) are securely connected.
- Verify the power supply unit (PSU) is switched on and functioning correctly.
- Check front panel power switch connections to the motherboard.
- No Display:
- Ensure the graphics card is properly seated in the PCIe slot and its power cables are connected.
- Verify the monitor cable is securely connected to the graphics card and the monitor.
- Test with a different monitor or graphics card if possible.
- System Instability/Crashes:
- Check RAM modules for proper seating; try reseating them or testing one module at a time.
- Ensure CPU cooler is properly installed and making good contact with the CPU. Monitor CPU temperatures.
- Update motherboard drivers and BIOS/UEFI to the latest versions.
- Run memory diagnostic tools to check for faulty RAM.
- Boot Device Not Found:
- Verify SATA or M.2 cables are securely connected to the storage device and motherboard.
- Check BIOS/UEFI settings to ensure the correct boot device is selected and detected.
- Ensure the operating system is properly installed on the drive.
If problems persist, consult the JUXIESHI support website or contact technical support.
Specifications
| Feature | Specification |
|---|---|
| Brand | JUXIESHI |
| Model | X99 PR8 |
| CPU Socket | LGA 2011-3 |
| Compatible Processors | Intel E5 V3/V4 series (e.g., E5 2629 V3, E5 2649 V3, E5 2669 V3, E5 2666 V3, E5 2673 V3, E5 2676 V3, E5 2678 V3, E5 2696 V3) |
| Chipset Type | Intel H87 |
| Memory Slots | 4 x DDR3 DIMM |
| Memory Type | DDR3 |
| Max Memory Capacity | 128 GB |
| Memory Clock Speed | 800/1066/1200/1333/1600/1866/2133 MHz |
| PCIe Expansion Slots | 1 x PCIe 3.0 x16, 1 x PCIe 3.0 x1 |
| Storage Interfaces | 1 x NVMe/NGFF M.2 (PCIe 3.0 x4 or SATA), SATA 2.0, SATA 3.0 |
| LAN | Gigabit Ethernet |
| USB Ports (Total) | 10 |
| Compatible Devices | Personal Computer, Server |
| Platform Support | Windows, Linux |
Warranty and Support
For warranty information and technical support, please refer to the official JUXIESHI website or contact your retailer. Keep your proof of purchase for warranty claims.
Online Resources: www.juxieshi.com (Note: This is a placeholder URL as no official support link was provided in the product data.)


