1. Important Safety Information
Read and understand all safety instructions before installing or operating the inverter. Failure to follow these instructions may result in electrical shock, fire, serious injury, or property damage.
- Ventilation: Ensure adequate ventilation around the inverter. Do not install in enclosed compartments.
- Dry Location: Install the inverter in a dry environment. Avoid exposure to rain, moisture, or liquids.
- Proper Grounding: The inverter must be properly grounded. Connect the ground wire to a suitable earth ground.
- Battery Connection: Connect the inverter directly to a 24V DC battery bank. Ensure correct polarity (positive to positive, negative to negative). Reverse polarity will damage the inverter.
- Fuse Protection: Ensure the DC input circuit is protected by an appropriately sized fuse or circuit breaker.
- Avoid Flammable Materials: Do not operate the inverter near flammable fumes or gases.
- Qualified Personnel: Installation and servicing should be performed by qualified personnel.
- Children: Keep the inverter out of reach of children.
2. Package Contents
Verify that all items listed below are included in your package:
- EDECOA 3000W Power Inverter
- Battery Cables (Red and Black, 5AWG, 29.5 inches)
- Remote Controller (Model: ET-RC)
- Remote Controller Cable (157 inches)
- Wrench
- Input Port Nuts (Red and Black)
- Ground Wire

Image: All components included in the EDECOA 3000W Power Inverter package, showing the inverter unit, battery cables, remote controller with its cable, a wrench, input port nuts, and a ground wire.
3. Product Overview
3.1 Front Panel Features

Image: The front panel of the EDECOA 3000W Power Inverter, featuring the LCD display, two US-standard AC outlets, two 5V 2.1A USB ports, an ON/OFF switch, and a remote controller port.
- LCD Display: Shows battery capacity, load level, temperature, fan status, frequency, DC input voltage, AC output voltage, and protection indications.
- AC Outlets (US Sockets): Two standard 110V/120V AC outlets for connecting appliances.
- USB Ports: Two 5V 2.1A USB ports for charging compatible devices.
- ON/OFF Switch: Main power switch for the inverter.
- Remote Controller Port: RJ45 port for connecting the external remote controller.
- AC Terminal Block: Additional terminals for hardwiring AC loads (if applicable to your model).
3.2 Rear Panel Features

Image: The rear panel of the EDECOA 3000W Power Inverter, displaying the positive (red) and negative (black) DC input terminals, dual cooling fans, and a ground wire port.
- DC Input Terminals: Heavy-duty terminals for connecting 24V DC battery cables (Positive + and Negative -).
- Cooling Fans: Dual intelligent cooling fans for optimal heat dissipation.
- Ground Wire Port: Connection point for the safety ground wire.
3.3 Remote Controller
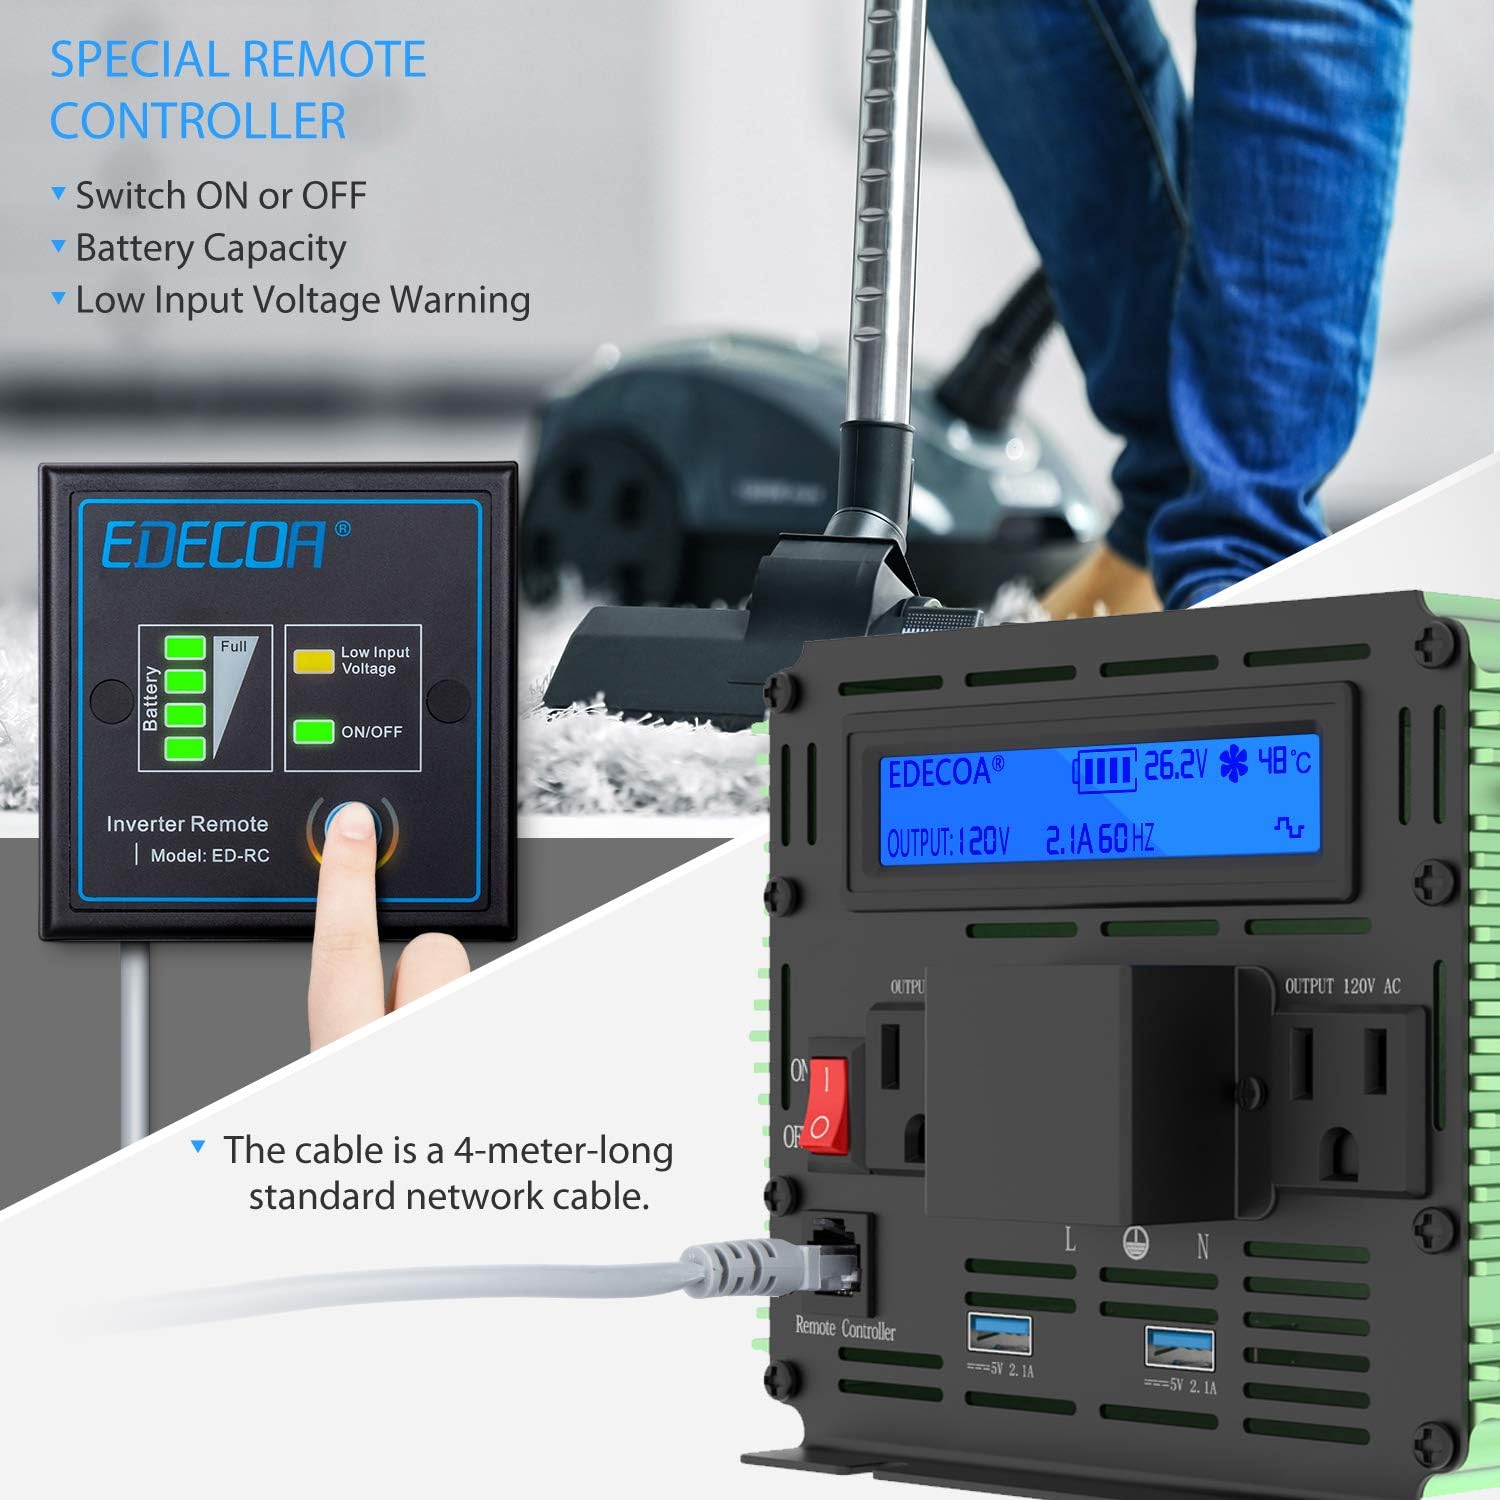
Image: The EDECOA remote controller, which allows for convenient ON/OFF switching, displays battery capacity, and provides a low input voltage warning.
The remote controller provides convenient access to the inverter's ON/OFF function and displays key information such as battery capacity and low input voltage warnings.
4. Installation and Setup
4.1 Choosing a Location
Select a location for the inverter that is:
- Dry and protected from moisture.
- Well-ventilated to allow for proper airflow around the cooling fans.
- Away from direct sunlight or heat sources.
- Securely mounted on a stable surface.
4.2 Connecting the Inverter
Follow these steps to connect the inverter to your 24V DC power source:
- Ensure Power is Off: Before making any connections, ensure the inverter's ON/OFF switch is in the 'OFF' position and disconnect any loads.
- Connect Ground Wire: Connect one end of the ground wire to the ground terminal on the inverter's rear panel. Connect the other end to a reliable earth ground (e.g., vehicle chassis, ground bus bar).
- Connect DC Battery Cables:
- Connect the red battery cable to the positive (+) DC input terminal on the inverter. Secure it firmly with the provided nut.
- Connect the black battery cable to the negative (-) DC input terminal on the inverter. Secure it firmly with the provided nut.
- Connect the other end of the red battery cable to the positive (+) terminal of your 24V battery bank.
- Connect the other end of the black battery cable to the negative (-) terminal of your 24V battery bank.
Warning: Double-check all connections for correct polarity before proceeding. Incorrect polarity will cause severe damage to the inverter and void the warranty.
- Connect Remote Controller (Optional): Plug the remote controller cable into the RJ45 port on the inverter's front panel and the corresponding port on the remote controller.
Image: Close-up of the inverter's rear panel, highlighting the positive and negative DC input terminals where battery cables are connected, and the ground wire port.
Image: Illustration showing the remote controller cable being connected to the remote controller port on the inverter's front panel.
5. Operation
5.1 Powering On/Off
- To Power On: After all connections are secure, switch the ON/OFF button on the inverter's front panel (or the remote controller) to the 'ON' position. The LCD display will illuminate.
- To Power Off: Disconnect all AC loads, then switch the ON/OFF button to the 'OFF' position.
5.2 Using the LCD Display
Image: The inverter's LCD display showing various operational parameters such as output voltage (120V), output current (2.1A), frequency (60Hz), battery voltage (26.2V), and internal temperature (48°C).
The LCD display provides real-time information about the inverter's status:
- Input Voltage (DC): Displays the current voltage of your 24V battery bank.
- Output Voltage (AC): Shows the AC output voltage (e.g., 120V).
- Output Frequency: Indicates the AC output frequency (e.g., 60Hz).
- Load Level: A bar graph or numerical value indicating the percentage of the inverter's capacity being used.
- Battery Capacity: An icon showing the approximate charge level of the connected battery.
- Temperature: Displays the internal temperature of the inverter.
- Protection Indicators: Icons or messages will appear if the inverter enters a protection mode (e.g., overload, low voltage, high temperature).
5.3 Connecting AC Appliances
Plug your 110V/120V AC appliances directly into the AC outlets on the inverter's front panel. Ensure the total wattage of all connected appliances does not exceed the inverter's continuous power rating (3000W).
5.4 Using the USB Ports
Connect your USB-powered devices (e.g., smartphones, tablets) to the 5V 2.1A USB ports for charging.
6. Protection Features
The EDECOA 3000W Power Inverter incorporates multiple protection mechanisms to ensure safe and reliable operation:

Image: A visual representation of the inverter's protection features, including low voltage, over voltage, high efficiency, LCD display, temperature control, short circuit, reverse polarity, overload, dual cooling fans, and ground wire.
- Low Voltage Protection: Automatically shuts down the inverter if the input DC voltage drops too low to prevent battery over-discharge.
- Over Voltage Protection: Shuts down the inverter if the input DC voltage exceeds a safe limit.
- Overload Protection: Shuts down the inverter if the connected AC load exceeds its rated capacity.
- Short Circuit Protection: Protects against damage from short circuits on the AC output.
- Reverse Polarity Protection: Prevents damage if battery connections are accidentally reversed.
- Over Temperature Protection: Activates cooling fans and may shut down the inverter if internal temperature becomes too high.
- Automatic Voltage Regulation (AVR): Helps maintain stable output voltage.
- Intelligent Power Management (IPM): Optimizes power delivery.
- Intelligent Fan Control (IFC): Fans operate only when needed, based on temperature and load, reducing noise and power consumption.
7. Maintenance
Regular maintenance helps ensure the longevity and optimal performance of your inverter:
- Cleaning: Periodically clean the exterior of the inverter with a dry cloth. Ensure cooling vents and fans are free from dust and debris. Do not use liquid cleaners.
- Check Connections: Regularly inspect all DC and AC connections to ensure they are tight and free from corrosion. Loose connections can cause overheating and poor performance.
- Battery Health: Monitor the health of your battery bank. A weak or failing battery can affect inverter performance.
8. Troubleshooting
If you experience issues with your inverter, refer to the following common problems and solutions:
| Problem | Possible Cause | Solution |
|---|---|---|
| No AC Output / Inverter Not Turning On |
|
|
| Low AC Output Voltage |
|
|
| Overload Indication on LCD | Connected load exceeds inverter's capacity | Reduce the total wattage of connected appliances. Disconnect some devices. |
| Over-Temperature Indication |
|
|
| Fans Not Running | Intelligent Fan Control (IFC) means fans only run when needed | This is normal operation. Fans will activate when temperature or load increases. If inverter is hot and fans are not running, check for obstructions. |
If the problem persists after attempting these solutions, contact EDECOA customer support.
9. Specifications
| Feature | Specification |
|---|---|
| Model Name | DPM30 |
| Continuous Output Power | 3000 Watts |
| Peak Output Power (<10ms) | 6000 Watts |
| DC Input Voltage | 24 Volts DC |
| AC Output Voltage | 110V / 120V AC |
| Output Waveform | Modified Sine Wave |
| Product Dimensions | 12.5 x 4.9 x 5.9 inches |
| Item Weight | 8.3 pounds |
| Power Source | Battery Powered |
| Recommended Uses | Home, Office, Vehicle |
10. Warranty and Support
EDECOA products are designed for reliability and performance. For specific warranty details, please refer to the warranty card included with your product or visit the official EDECOA website. If you require technical assistance or have questions not covered in this manual, please contact EDECOA customer support through their official channels.
For further information or to contact support, please visit the EDECOA Store on Amazon.