1. Introduction
This manual provides essential information for the safe and efficient operation, maintenance, and troubleshooting of your Beko Cordless Vacuum Cleaner, Model VRT 84225 VI. Please read these instructions carefully before using the appliance and retain them for future reference.
2. Safety Information
Always observe basic safety precautions when using electrical appliances to reduce the risk of fire, electric shock, or injury. This appliance is intended for household use only.
- Do not use the vacuum cleaner outdoors or on wet surfaces.
- Do not allow children to operate the vacuum cleaner. Close supervision is necessary when used near children.
- Do not pick up flammable or combustible liquids, such as gasoline, or use in areas where they may be present.
- Do not pick up anything that is burning or smoking, such as cigarettes, matches, or hot ashes.
- Ensure the filter is correctly installed before use.
- Use only as described in this manual. Use only manufacturer’s recommended attachments.
- Do not use with a damaged cord or plug. If the appliance is not working as it should, has been dropped, damaged, left outdoors, or dropped into water, return it to a service center.
3. Package Contents
Carefully unpack your Beko Cordless Vacuum Cleaner and check that all items are present and in good condition. The package should contain the following components:
- Main Vacuum Unit
- Extension Wand
- Motorized Floor Nozzle (Carpet / Hard Floor Nozzle)
- Crevice Tool
- Dusting Brush
- Pet (Mini Turbo) Brush
- Wall Mount / Charging Dock
- Power Adapter

Image: All included components of the Beko Cordless Vacuum Cleaner, including the main unit, extension wand, floor nozzle, and various attachments.
4. Setup and Assembly
4.1 Assembling the Vacuum Cleaner
- Attach the Extension Wand: Insert the extension wand into the main vacuum unit until it clicks securely into place.
- Attach the Floor Nozzle: Connect the motorized floor nozzle to the other end of the extension wand, ensuring it locks firmly.
- Attach Accessories: For handheld use or specific cleaning tasks, attach the desired accessory (crevice tool, dusting brush, or pet brush) directly to the main vacuum unit or the extension wand.

Image: Close-up of the crevice tool, dusting brush, and pet (mini turbo) brush attachments.
4.2 Charging the Battery
Before first use, fully charge the vacuum cleaner. The recharging time is approximately 4-6 hours.
- Mount the wall mount/charging dock in a convenient location near a power outlet.
- Connect the power adapter to the charging dock and plug it into a wall outlet.
- Place the vacuum cleaner onto the charging dock. The indicator lights on the main unit will show the charging status.
5. Operating Instructions
5.1 Power On/Off and Suction Adjustment
- Press the power button (usually located on the handle) to turn the vacuum cleaner on.
- Adjust the suction power using the control on the handle. Multiple power settings may be available for different cleaning needs.
- Press the power button again to turn the vacuum cleaner off.
5.2 General Cleaning
Use the motorized floor nozzle for cleaning carpets and hard floors. The flexible design allows for easy maneuverability.

Image: The vacuum cleaner effectively removing debris from a hard floor surface.
5.3 Cleaning Under Furniture
The flexible design of the vacuum cleaner allows it to reach under low furniture and tight spaces.

Image: The vacuum cleaner positioned to clean under a sofa, demonstrating its flexible design.

Image: The vacuum cleaner head extended flat to clean beneath a low piece of furniture.
5.4 Using Attachments
- Crevice Tool: Ideal for narrow gaps, corners, and edges of upholstery.

Image: The crevice tool attached to the vacuum, cleaning a narrow gap in a sofa.
- Dusting Brush: Suitable for delicate surfaces, shelves, and intricate items.

Image: The dusting brush attachment being used to clean debris from a table surface.
- Pet (Mini Turbo) Brush: Designed for effective removal of pet hair from upholstery and carpets.

Image: The pet (mini turbo) brush attachment effectively removing pet hair from upholstered furniture.
6. Maintenance
Regular maintenance ensures optimal performance and extends the lifespan of your vacuum cleaner.
6.1 Emptying the Dust Container
The dust container has a capacity of 0.55 liters. Empty it regularly, especially when the MAX fill line is reached, to maintain suction power.
- Ensure the vacuum cleaner is turned off.
- Locate the dust container release button (refer to your specific model diagram if needed).
- Press the release button and detach the dust container from the main unit.
- Position the dust container over a waste bin.
- Open the bottom flap of the dust container to release the collected debris.
- Close the flap and reattach the dust container to the main unit until it clicks securely.
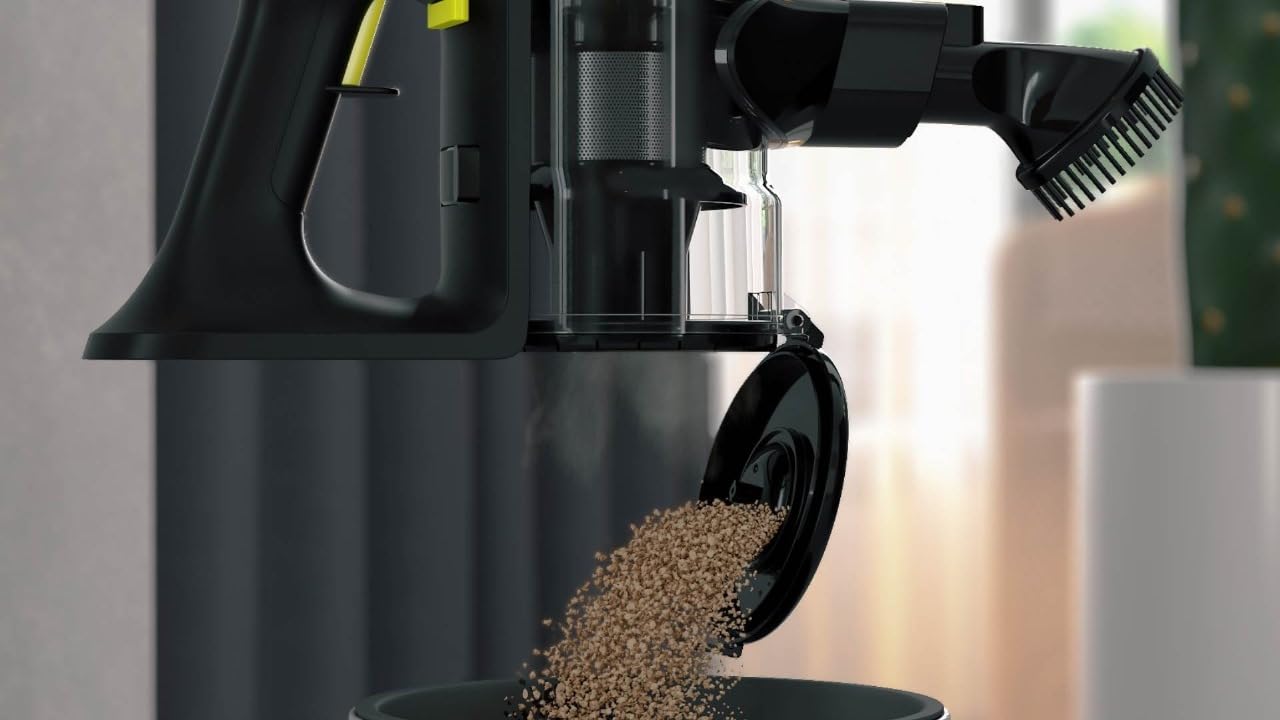
Image: The dust container being emptied into a waste bin, showing the collected debris.
6.2 Cleaning the Filters
The vacuum cleaner is equipped with a HEPA filter. Clean the filter regularly to prevent clogging and maintain suction efficiency.
- Remove the dust container as described above.
- Carefully remove the HEPA filter from the dust container.
- Tap the filter gently over a waste bin to remove loose dust.
- If necessary, rinse the filter under cold running water. Ensure it is completely dry before reinserting. Do not use detergents or hot water.
- Reinsert the dry filter and reattach the dust container.
6.3 Cleaning the Brush Roll
Periodically check the brush roll in the motorized floor nozzle for tangled hair or debris. Use scissors to cut away any tangled hair and remove it.
7. Troubleshooting
If you encounter issues with your vacuum cleaner, refer to the following common problems and solutions:
| Problem | Possible Cause | Solution |
|---|---|---|
| Vacuum cleaner does not turn on | Battery is discharged | Charge the battery fully. |
| Reduced suction power | Dust container is full | Empty the dust container. |
| Reduced suction power | Filter is clogged | Clean or replace the HEPA filter. |
| Reduced suction power | Nozzle or hose is blocked | Check for and remove any blockages. |
| Brush roll not rotating | Hair or debris tangled in brush roll | Clean the brush roll. |
If the problem persists after attempting these solutions, please contact Beko customer support.
8. Specifications
| Feature | Specification |
|---|---|
| Brand | Beko |
| Model Number | VRT 84225 VI |
| Motor Power | 350 W |
| Capacity (Dust-Bin) | 0.55 litres |
| Filter Type | HEPA Filter |
| Cordless | Yes |
| Form Factor | Stick |
| Colour | Grey |
| Noise Level | 81 dBA |
| Recharging Time | 4 - 6 hours |
| Control Method | Touch / Push Button |
| Product Dimensions (L x W x H) | 9L x 9W x 9H Centimeters (approximate, as per product data) |
| Item Weight | 249 g (approximate, as per product data) |
9. Warranty and Support
9.1 Warranty Information
This Beko Cordless Vacuum Cleaner comes with a 1-year warranty from the date of purchase. Please retain your proof of purchase for warranty claims. The warranty covers manufacturing defects under normal household use. It does not cover damage caused by misuse, neglect, accident, alteration, or unauthorized repair.
9.2 Customer Support
For technical assistance, warranty claims, or to purchase replacement parts, please contact Beko customer support. Refer to the official Beko website or your purchase documentation for contact details specific to your region.
Online Support: www.beko.com