1. Introduction
This manual provides detailed instructions for the installation, operation, and maintenance of your DB Drive SPRO2500.4 4-Channel Class AB Amplifier. Please read this manual thoroughly before attempting installation or operation to ensure proper use and to prevent damage to the unit or your vehicle's audio system. Keep this manual for future reference.
2. Safety Information
Always observe the following safety precautions during installation and operation:
- Disconnect the vehicle's negative battery terminal before beginning any electrical work.
- Ensure all wiring is properly routed and secured to prevent pinching, cutting, or short-circuiting.
- Use appropriate gauge wiring for power and ground connections as specified in this manual.
- Install the amplifier in a location that allows for adequate ventilation to prevent overheating.
- Avoid mounting the amplifier in areas exposed to direct sunlight, excessive heat, moisture, or dust.
- Do not attempt to open or modify the amplifier. Refer all servicing to qualified personnel.
- Wear eye protection when working with tools and electrical components.
3. Setup and Installation
3.1 Unpacking
Carefully remove the amplifier from its packaging. Inspect the unit for any signs of damage. If damage is found, contact your dealer immediately.
3.2 Mounting Location
Choose a mounting location that is dry, well-ventilated, and protected from physical damage. Ensure sufficient space around the amplifier for air circulation. Secure the amplifier firmly to a solid surface using appropriate hardware.
3.3 Wiring Connections
Proper wiring is crucial for optimal performance and safety. Refer to the diagram below for terminal identification.

Image: Rear panel of the DB Drive SPRO2500.4 amplifier showing power, ground, remote, fuse, and speaker output terminals.
- Power (BATT+): Connect a 4-gauge power cable directly from the positive (+) terminal of the vehicle's battery. Install an in-line fuse holder (not supplied) within 18 inches (45 cm) of the battery.
- Ground (GND): Connect a 4-gauge ground cable from the amplifier's GND terminal to a clean, unpainted metal surface of the vehicle's chassis. Ensure a solid electrical connection.
- Remote (REM): Connect a 18-gauge remote turn-on wire from your head unit's remote output to the amplifier's REM terminal. This wire turns the amplifier on and off with your head unit.
- Speaker Outputs (CH1-CH4): Connect your speakers to the appropriate output terminals. The SPRO2500.4 supports 4-channel stereo operation or 2-channel bridged operation. Refer to the specifications for minimum impedance requirements.
- Fuses: The amplifier is equipped with internal fuses. Do not attempt to replace them.
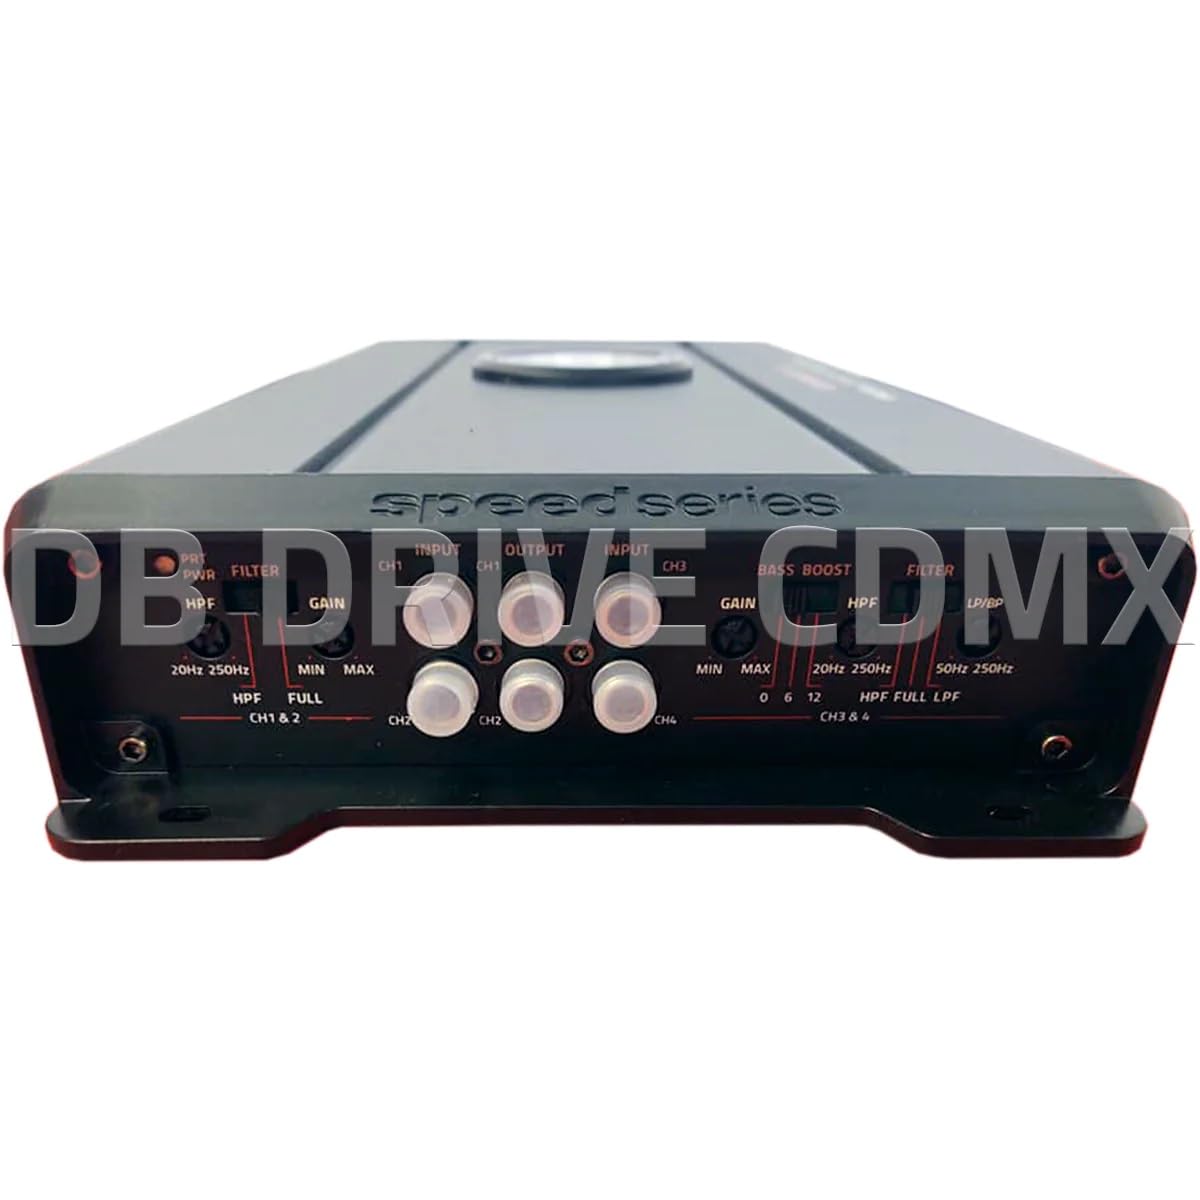
Image: Front panel of the DB Drive SPRO2500.4 amplifier showing input, gain, filter, and bass boost controls.
3.4 Control Panel Settings
The front panel features controls for fine-tuning the amplifier's audio output:
- Input (CH1/CH2, CH3/CH4): Connect RCA cables from your head unit's pre-amp outputs to these inputs.
- Gain (CH1&2, CH3&4): Adjusts the input sensitivity of the amplifier to match the output level of your head unit. Start with the gain at minimum and slowly increase until desired volume is achieved without distortion.
- Filter (HPF/FULL/LPF): Selects the crossover mode for the respective channels.
- HPF (High Pass Filter): Allows frequencies above the set point to pass, blocking lower frequencies. Useful for full-range speakers.
- LPF (Low Pass Filter): Allows frequencies below the set point to pass, blocking higher frequencies. Useful for subwoofers.
- FULL: Allows all frequencies to pass without filtering.
- HPF/LPF Frequency Controls: Adjusts the cutoff frequency for the selected HPF or LPF.
- Bass Boost: Provides an adjustable bass enhancement at a specific frequency. Use sparingly to avoid distortion.
4. Operating Instructions
Once all connections are made and verified, you can power on your audio system. The amplifier will turn on automatically with your head unit via the remote wire.
- Initial Power-Up: Turn on your head unit. The amplifier's power indicator should illuminate.
- Audio Adjustment: Start with the head unit volume low. Gradually increase the volume and adjust the amplifier's gain controls until the desired sound level is reached without audible distortion.
- Crossover Tuning: Adjust the HPF and LPF settings according to your speaker types and desired sound characteristics. For full-range speakers, use HPF to remove low bass. For subwoofers, use LPF.
- Bass Boost: If desired, slowly increase the bass boost control to enhance low frequencies. Overuse can lead to distortion and potential speaker damage.
5. Maintenance
The DB Drive SPRO2500.4 amplifier requires minimal maintenance to ensure long-term performance.
- Cleaning: Periodically wipe the amplifier's exterior with a soft, dry cloth. Do not use harsh chemicals or abrasive cleaners.
- Ventilation: Ensure that the amplifier's cooling fins are free from dust and debris to maintain proper heat dissipation.
- Connection Check: Occasionally check all wiring connections for tightness and corrosion. Loose connections can cause performance issues or damage.
6. Troubleshooting
If you experience problems with your amplifier, refer to the following common issues and solutions:
| Problem | Possible Cause | Solution |
|---|---|---|
| No Power / Amplifier Not Turning On | Blown fuse, loose power/ground/remote wire, faulty remote turn-on signal. | Check in-line fuse near battery. Verify all power, ground, and remote connections are secure. Test remote wire for 12V when head unit is on. |
| No Sound Output | RCA cables disconnected, speaker wires disconnected or shorted, gain set too low, head unit volume too low. | Check RCA input connections. Verify speaker wiring for proper polarity and no shorts. Increase gain and head unit volume. |
| Distorted Sound | Gain set too high, improper crossover settings, damaged speakers, poor ground connection. | Reduce gain. Adjust HPF/LPF settings. Inspect speakers for damage. Ensure ground connection is solid. |
| Amplifier Overheating | Insufficient ventilation, impedance too low, prolonged high output. | Ensure adequate airflow around the amplifier. Verify speaker impedance meets specifications. Reduce volume or allow amplifier to cool. |
If these steps do not resolve the issue, contact DB Drive customer support or a qualified car audio technician.
7. Specifications
The following table details the technical specifications for the DB Drive SPRO2500.4 amplifier:

Image: Detailed specifications sheet for the DB Drive SPRO2500.4 amplifier.
| Feature | Specification |
|---|---|
| Amplifier Class | Class A/B |
| Channels | 4-Channel |
| Output Power (RMS @ 14.4VDC, 2Ω) | 4 x 500W |
| Output Power (RMS @ 14.4VDC, 4Ω) | 4 x 250W |
| Output Power (RMS @ 14.4VDC Bridged) | 2 x 1000W |
| Power Supply Input Voltage | 12.0VDC to 14.8VDC |
| THD (100Hz @ 1Ω) | 0.04% |
| Frequency Response (3dB) | 20Hz - 250Hz |
| Damping Factor (1KHz @ 4Ω) | 100 |
| S/N Ratio (as weighted @ 1 Volt) | 99dB |
| Input Sensitivity | .20mV - 5.0V RMS |
| Minimum Load Impedance | 2Ω |
| Input | Pre in RCA |
| Crossover Filter Slope | 12dB |
| Crossover Filter Range in Mono | 24dB |
| Channel 1-2 HPF Range | 20Hz - 250Hz |
| Channel 3-4 HPF Range | 20Hz - 250Hz |
| Channel 3-4 LPF/BPF Range | 50Hz - 250Hz |
| Selectable Bass Boost CH 1-2 or 3-4 | 0 - 6dB - 12dB |
8. Warranty and Support
DB Drive products are designed and manufactured to the highest quality standards. For specific warranty information, please refer to the warranty card included with your product or contact your authorized DB Drive dealer.
Customer Support:
For technical assistance or support, please contact:
DB Research L.L.P
302 Hanmore Industrial Parkway
Harlingen, TX 78550 USA
Phone: 877-787-0101
Local: 956-421-4513