1. Introduction
This manual provides essential information for the setup, operation, and maintenance of your AITRIP D1 Mini ESP32 ESP-WROOM-32 Development Board. This board is designed for Internet of Things (IoT) applications, offering Wi-Fi and Bluetooth connectivity, and is compatible with various development environments including the Arduino IDE.
2. Product Overview
The AITRIP D1 Mini ESP32 ESP-WROOM-32 is a versatile development board featuring the ESP32 chip, known for its robust performance and ultra-low power consumption. It integrates Wi-Fi and Bluetooth capabilities, making it ideal for a wide range of IoT projects. The board includes a CP2104 USB-to-serial converter and a Type-C USB port for convenient connectivity and power.
Key Features:
- Integrated ESP-WROOM-32 module with Wi-Fi and Bluetooth.
- CP2104 USB-to-serial converter for easy programming.
- Type-C USB port for power and data communication.
- Compatible with Arduino IDE, Lua, and Micropython.
- Ultra-low power technology for efficient operation.
- All I/O pins support interrupt, PWM, I2C, and one-wire functionality (except D0).
- Pin layout similar to ESP8266-12F for compatibility with existing accessories.
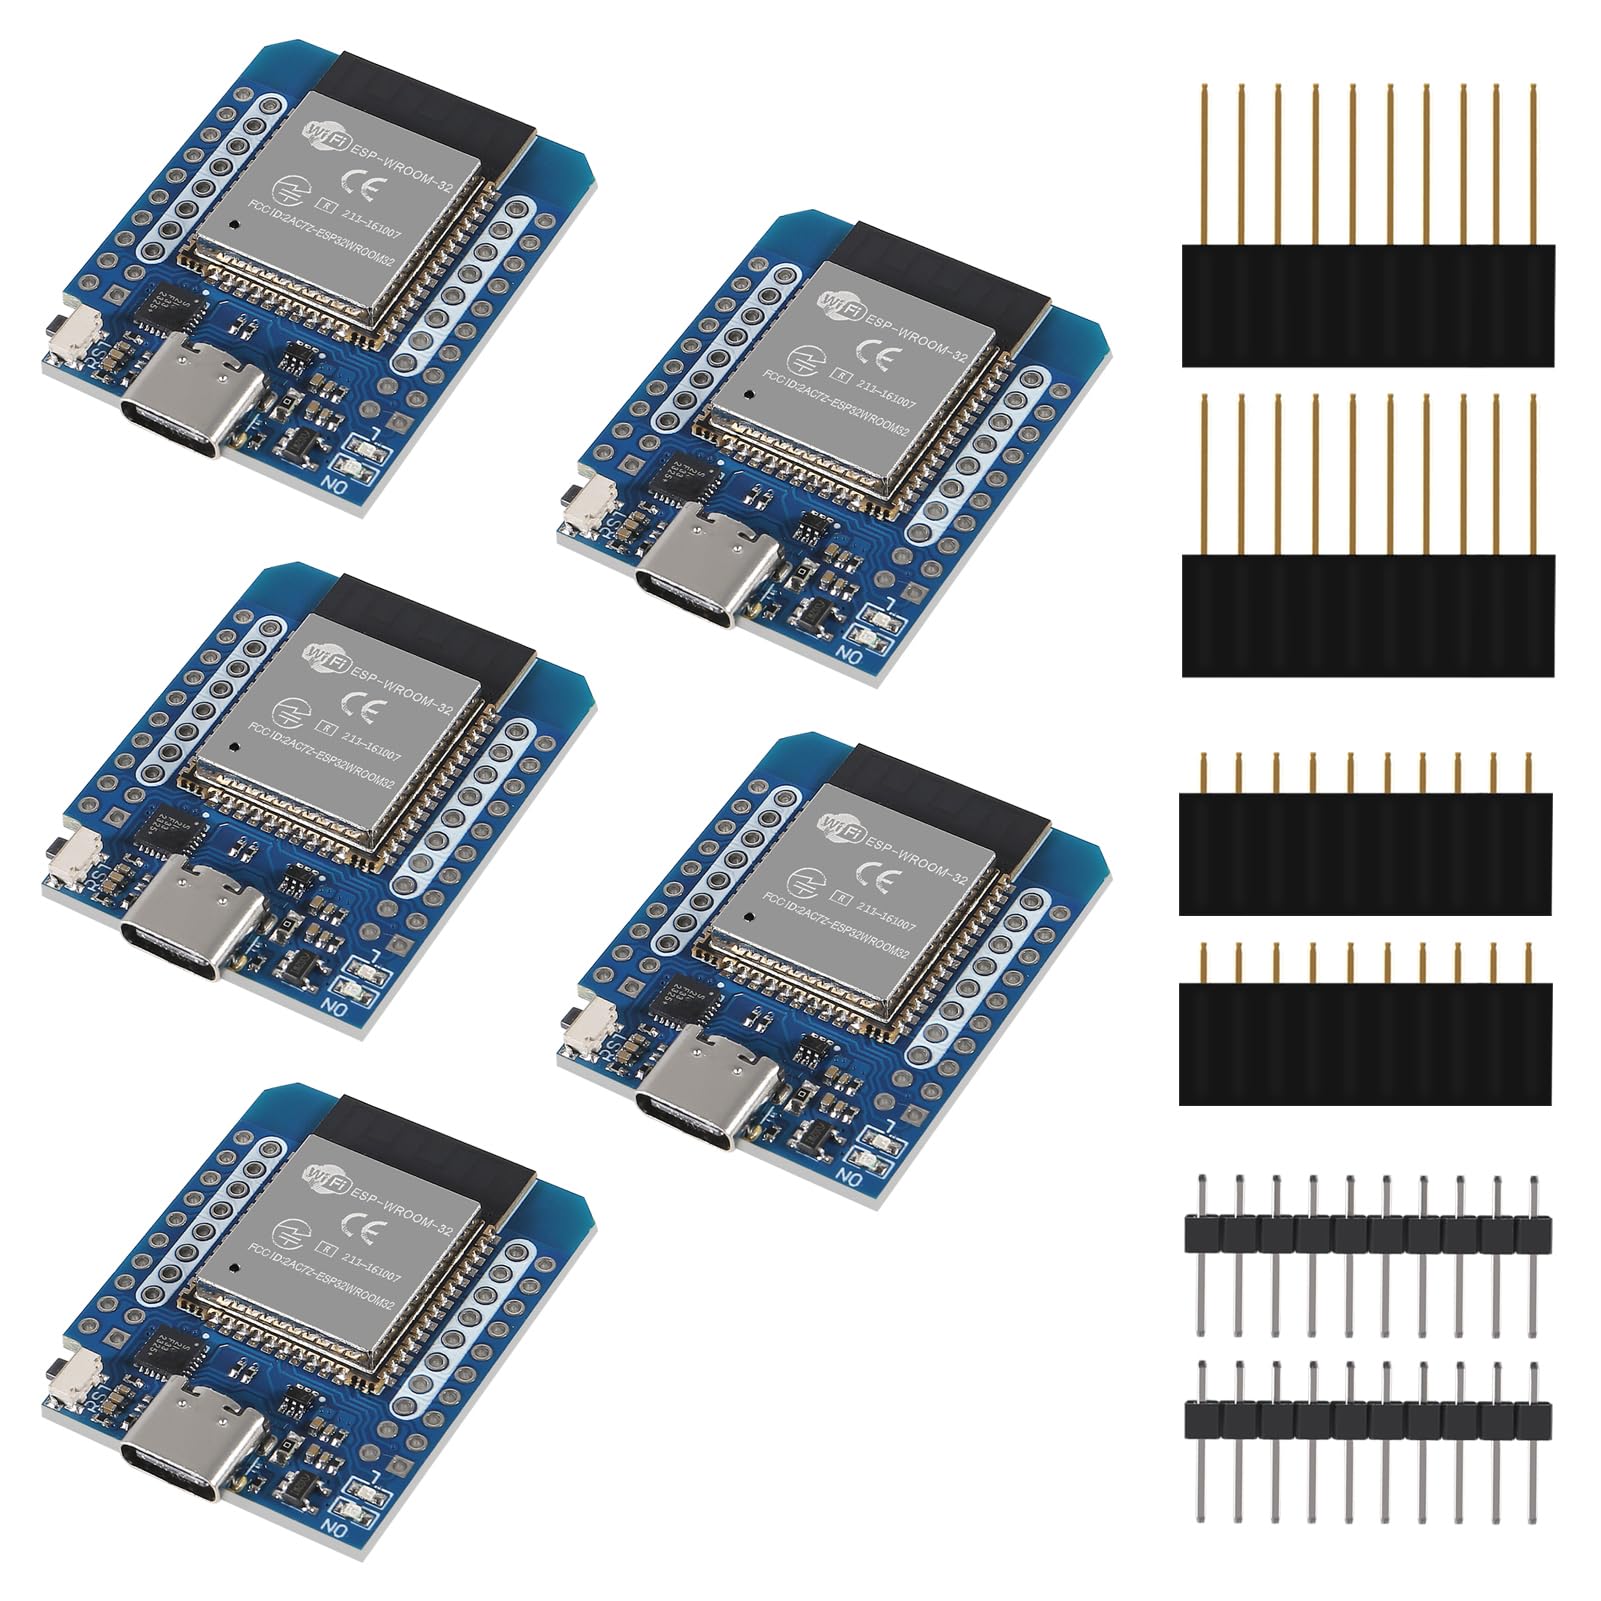
Figure 2.1: AITRIP D1 Mini ESP32 ESP-WROOM-32 Development Board with included pin headers.
3. Package Contents
The package includes the following items:
- 5 x D1 Mini ESP32 ESP-WROOM-32 Type-C Development Boards
4. Specifications
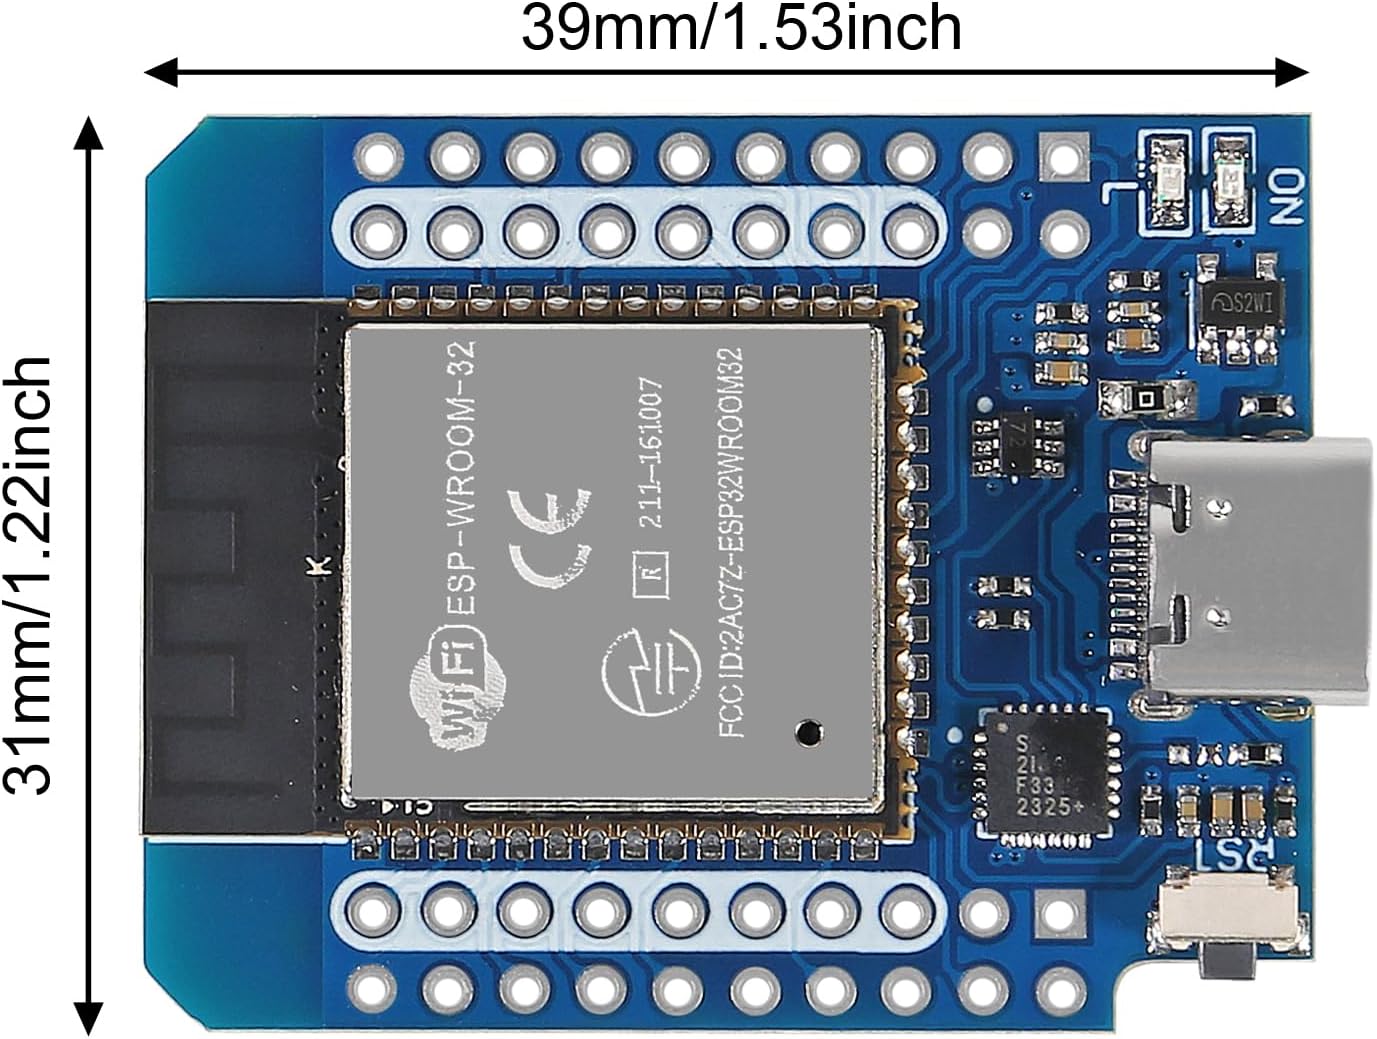
Figure 4.1: Dimensions of the AITRIP D1 Mini ESP32 ESP-WROOM-32 Development Board.
| Parameter | Value |
|---|---|
| Brand | AITRIP |
| Model | D1 Mini ESP32 ESP-WROOM-32 Type-C |
| Memory Storage Capacity | 512 KB |
| Connectivity Technology | Bluetooth, I2C, WLAN, Wi-Fi |
| Wireless Communication Standard | 802.11b, Bluetooth |
| Processor Count | 1 |
| Total USB Ports | 1 (Type-C) |
| Power Supply Voltage (USB) | 5V DC |
| Input/Output Voltage | 3.3V DC |
| Operating Current (min.) | 500mA |
| I/O Pins | 34 |
| ADC Channels | 18 (12-bit resolution) |
| DAC Channels | 2 (8-bit resolution) |
| Max Current per GPIO Pin | 40mA |
| Communications Interfaces | SPI, I2C, CAN, UART |
5. Setup Guide
5.1 Driver Installation
Before connecting the board to your computer, you may need to install the CP2104 USB-to-serial driver. This driver enables your computer to recognize the development board as a serial port for communication and programming.
- Download the appropriate CP2104 driver for your operating system from the official Silicon Labs website or a reliable source.
- Follow the installation instructions provided with the driver package.
5.2 IDE Setup (Arduino IDE Example)
The AITRIP D1 Mini ESP32 is fully compatible with the Arduino IDE. To set up your Arduino IDE for ESP32 development:
- Install Arduino IDE: If you don't have it, download and install the Arduino IDE from the official Arduino website.
- Add ESP32 Board Manager URL:
- Go to File > Preferences in the Arduino IDE.
- In the "Additional Board Manager URLs" field, add:
https://raw.githubusercontent.com/espressif/arduino-esp32/gh-pages/package_esp32_index.json(If there are other URLs, separate them with a comma). - Click OK.
- Install ESP32 Boards:
- Go to Tools > Board > Boards Manager...
- Search for "ESP32" and install the "esp32 by Espressif Systems" package.
- Select Board: After installation, go to Tools > Board > ESP32 Arduino and select a board that closely matches the ESP32 Dev Module or specifically "WEMOS D1 MINI ESP32" if available in your installed package.
- Connect the Board: Connect the AITRIP D1 Mini ESP32 to your computer using a Type-C USB cable.
- Select Port: Go to Tools > Port and select the serial port corresponding to your connected ESP32 board (e.g., COMx on Windows, /dev/cu.usbserial-xxxx on macOS, /dev/ttyUSBx on Linux).

Figure 5.1: Front and back view of the AITRIP D1 Mini ESP32 ESP-WROOM-32 Development Board, highlighting pin assignments.
6. Operating Instructions
6.1 Uploading Code
Once your Arduino IDE is set up and the board is connected, you can upload your code (sketches) to the ESP32 board:
- Write your code in the Arduino IDE.
- Click the "Upload" button (right arrow icon) in the Arduino IDE. The IDE will compile your code and then attempt to upload it to the board.
- During the upload process, you might need to press and hold the "BOOT" button on the ESP32 board if the upload fails, then release it once the upload starts. Some boards automatically enter bootloader mode.
6.2 Using Wi-Fi and Bluetooth
The ESP32 chip provides robust Wi-Fi and Bluetooth functionality. You can integrate these features into your projects using the respective libraries in the Arduino IDE or other development environments.
- Wi-Fi: Use the
WiFi.hlibrary for connecting to networks, creating access points, and implementing web servers. - Bluetooth: Use the
BluetoothSerial.horBLEDevice.hlibraries for classic Bluetooth or Bluetooth Low Energy (BLE) applications, respectively.
6.3 Over-The-Air (OTA) Updates
The ESP32 supports Over-The-Air (OTA) firmware updates, allowing you to update your board's software wirelessly without needing a physical USB connection. Refer to ESP32 OTA documentation for detailed implementation steps. Note that OTA updates can consume a significant portion of the available storage.

Figure 6.1: Detailed view of the ESP-WROOM-32 module and Type-C USB port.
7. Maintenance
Proper care and maintenance will ensure the longevity and reliable operation of your development board.
- Handle with Care: Electronic components are sensitive. Avoid dropping the board or subjecting it to physical shock.
- Static Discharge: Always handle the board in a static-safe environment to prevent damage from electrostatic discharge (ESD).
- Storage: Store the board in a dry, cool place, away from direct sunlight and extreme temperatures. Use anti-static bags if available.
- Cleaning: If necessary, gently clean the board with a soft, dry brush or compressed air to remove dust. Avoid using liquids or harsh chemicals.
- Power Supply: Ensure you use a stable 5V DC power supply via the Type-C USB port or a regulated 3.3V DC supply directly to the 3.3V pin. Incorrect voltage can damage the board.

Figure 7.1: Close-up of the board's components and labeled I/O pins.
8. Troubleshooting
This section addresses common issues you might encounter with your AITRIP D1 Mini ESP32 development board.
8.1 Board Not Recognized by Computer
- Driver Check: Ensure the CP2104 driver is correctly installed. Check your computer's Device Manager (Windows) or System Information (macOS/Linux) for the presence of a serial port.
- USB Cable: Try a different Type-C USB cable. Some cables are for charging only and do not support data transfer.
- USB Port: Try a different USB port on your computer.
8.2 Upload Errors / Failed Flashing
- Correct Board/Port: Verify that the correct board type and serial port are selected in the Arduino IDE (Tools > Board and Tools > Port).
- Boot Mode: If uploads consistently fail, try holding down the "BOOT" button on the board while initiating the upload, then release it once the upload process begins.
- Power Supply: Ensure the board is receiving stable power. Unstable power can lead to flashing issues.
- IDE Version: Ensure your Arduino IDE and ESP32 board definitions are up to date.
8.3 Unstable Operation / Brownouts
- USB Power: If experiencing instability when powered via USB, especially with peripherals connected, consider providing external 3.3V power directly to the 3.3V pin, ensuring it is a regulated supply. The onboard voltage regulator might be insufficient for high current draw scenarios.
- Capacitors: Adding a capacitor (e.g., 100uF) across the 3.3V and GND pins can help stabilize power for demanding applications.
8.4 Module Labeling Discrepancies
Some boards may be labeled simply "ESP-32" instead of "ESP-WROOM-32". While this might be a labeling inconsistency, the boards are generally functionally equivalent for most projects requiring an ESP32. If specific WROOM-32 features are critical, verify functionality through testing.
9. Warranty and Support
For specific warranty details, please refer to the product listing or contact the seller directly. General support for the AITRIP D1 Mini ESP32 ESP-WROOM-32 Development Board can be obtained by contacting the manufacturer or seller through their official channels.